CRM
crm


CRM Leads/Opportunities Pipeline 3


Converting Leads into Opportunities 32

Converting Opportunity into Sales Quotation 37


CRM
Customer Relationship Management (CRM) software is available through the Odoo 17 ERP system for efficiently administrating clients and developing new business connections. You can manage and keep track of all new leads and opportunities in one location, thanks to the CRM module. A corporation will get many advantages from having a suitable platform for managing leads, opportunities, and associated processes. Our company environment is expanding quickly, so if you want to keep up, you need to be proactive with client management. Every year, Odoo releases a new version with a wide range of new features to help businesses perform better across the board.
The CRM module's operational effectiveness has been improved with the addition of cutting-edge features in Odoo 17, the most recent version of the Odoo ERP system.
The sales pipeline, which gathers all the information in one location, will be accessible to the salesperson with ease. The sales pipeline's well-visualized information can be used to manage CRM operations properly. Data from this pipeline will be divided up depending on how well operations are going. According to the progression, appropriate phases can be assigned to leads and opportunities. One of the appealing characteristics of the most recent version of Odoo 17 CRM is improved visualization. There will be a detailed explanation of the CRM module's functionality along with other new features.
The new Odoo 17 CRM module will be fully explained in this chapter. Let's start with the CRM module's main dashboard, which shows as soon as you choose it from the Odoo dashboard.
CRM Leads/Opportunities Pipeline
The CRM module's main dashboard is the window that appears when you access it. The pipeline activities can be thought of as being staged. In Odoo 17, leads and opportunities are organized in accordance with how far along in the sales pipeline they are. Odoo's highly integrated design makes it possible to gather leads from a variety of sources, including the corporate website, social media accounts, live chat, email, SMS, and many other channels. With the use of Odoo17 CRM, leads from all of these channels may be efficiently managed. Depending on the customer's reactions, these leads can later be transformed into opportunities and, finally into sales quotations. A business's ability to increase sales opportunities is significantly impacted by the CRM module.
There are three primary menus, including Sales, Leads, Reporting and Configuration as seen in the screenshot, available in the CRM module. You can find a variety of alternatives to carry out various customer relationship management-related tasks under each of these menus in Odoo 17.
The screenshot depicts the CRM module's primary dashboard for Odoo 17. This platform can be found in the module's Sales menu under the My Pipeline option. The My Pipeline pane will display a list of all leads that have been generated through different routes.
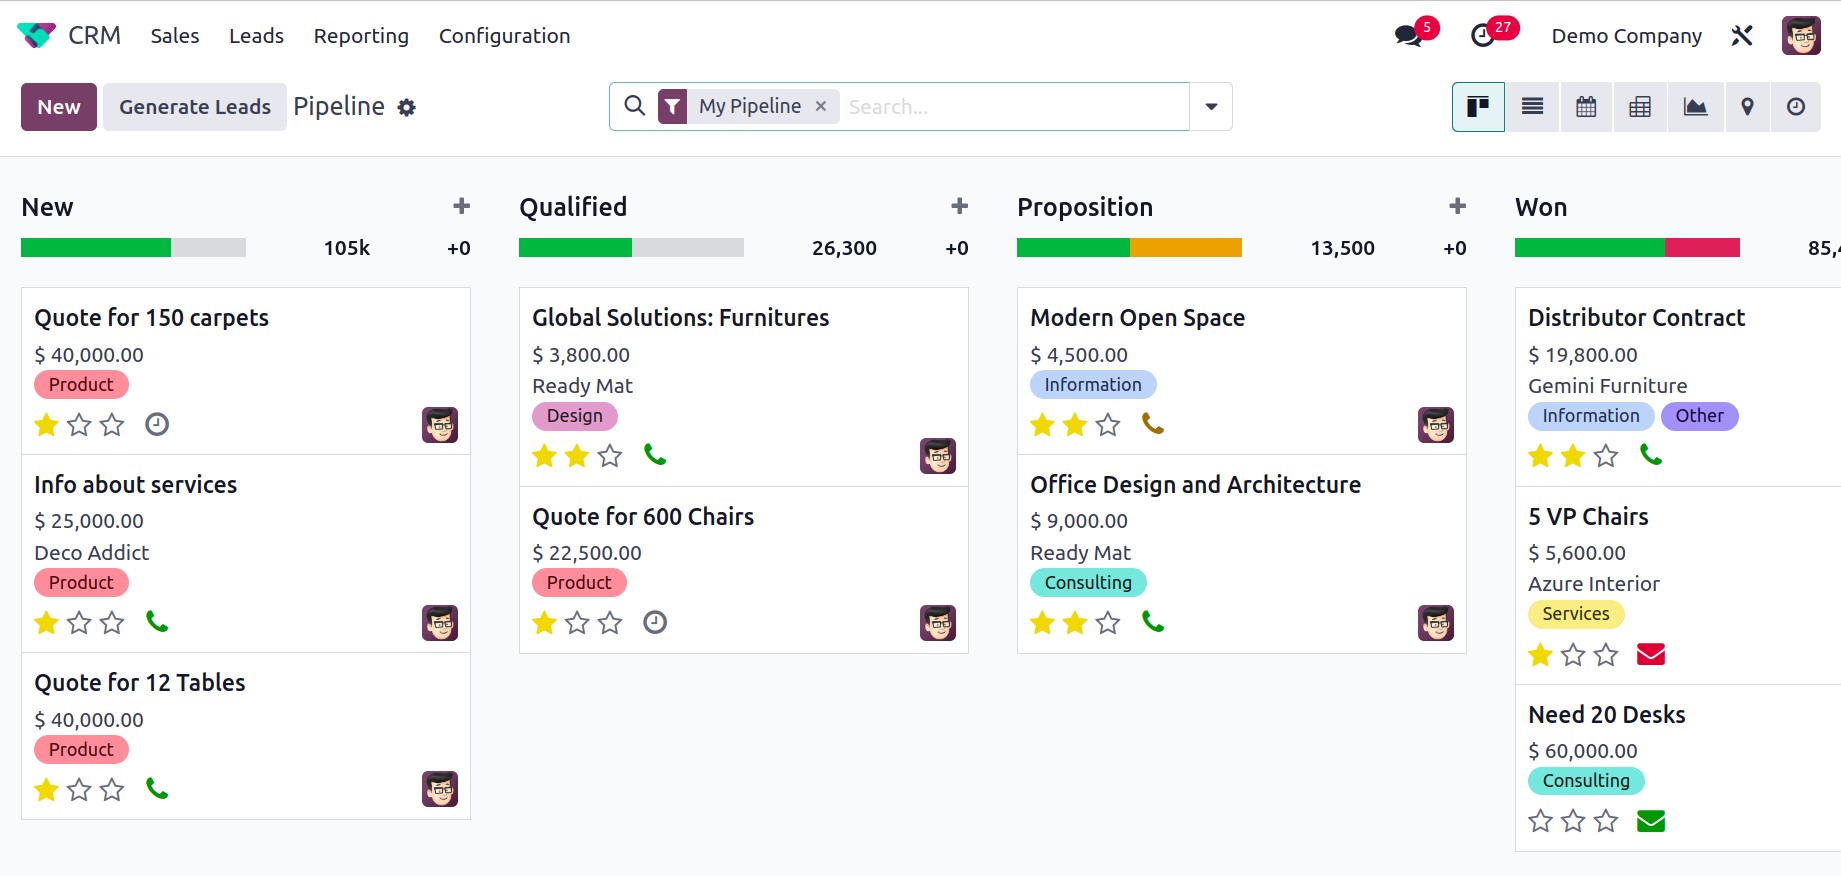
The image above displays the Odoo 17 CRM module dashboard's redesigned colored interface. In Odoo 17, the entire screen appearance is altered. You can change the platform's display into a Kanban, List, Calendar, Pivot, Graph, Map, and Activity much like in earlier versions of Odoo.
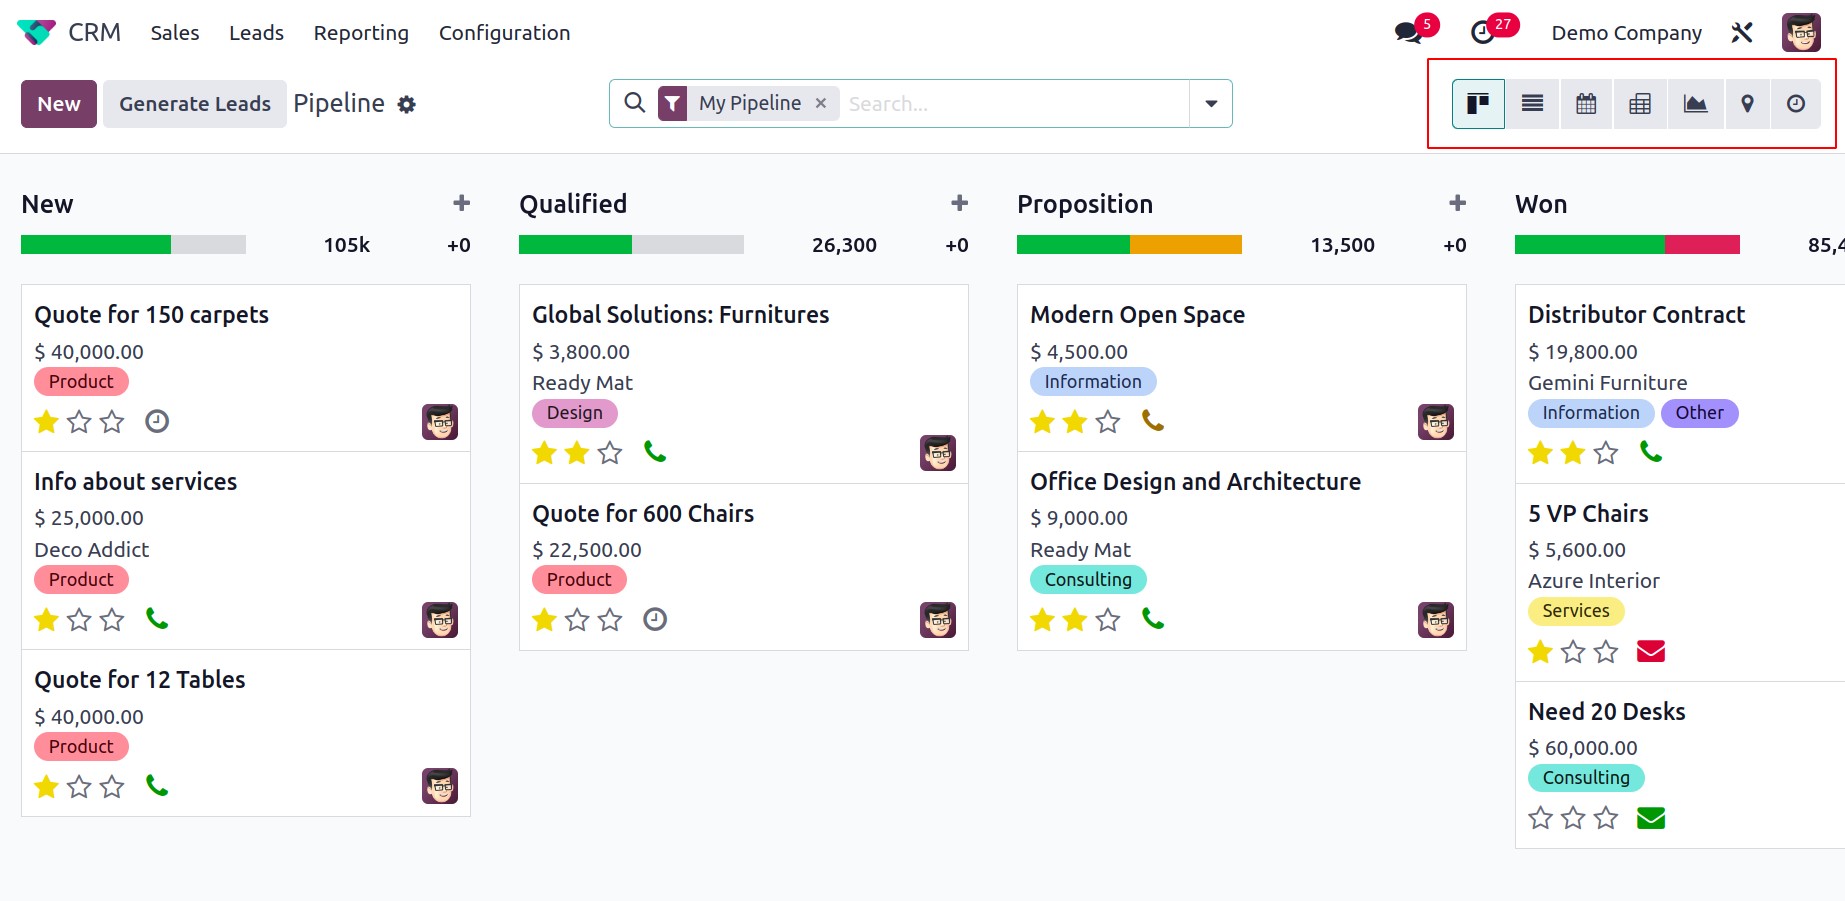
We can see that all records are grouped in the window according to their progress in operations when we look at the Kanban view of the CRM pipeline. Leads are arranged so the user can quickly see how each lead progresses. It's simple to assign multiple stages to leads in the CRM module. You can alter the stages and group leads into the appropriate stages based on your business needs.
The New, Qualified, Proposition, and Won stages are included in the screenshot. All fresh leads will show up under the fresh stage, as indicated by the stage names. Only qualified leads from the new leads will move on to the Qualified stage, which is the following stage. Once the matching customer has confirmed it, the profitable business leads can be advanced to the stage ‘Won’.
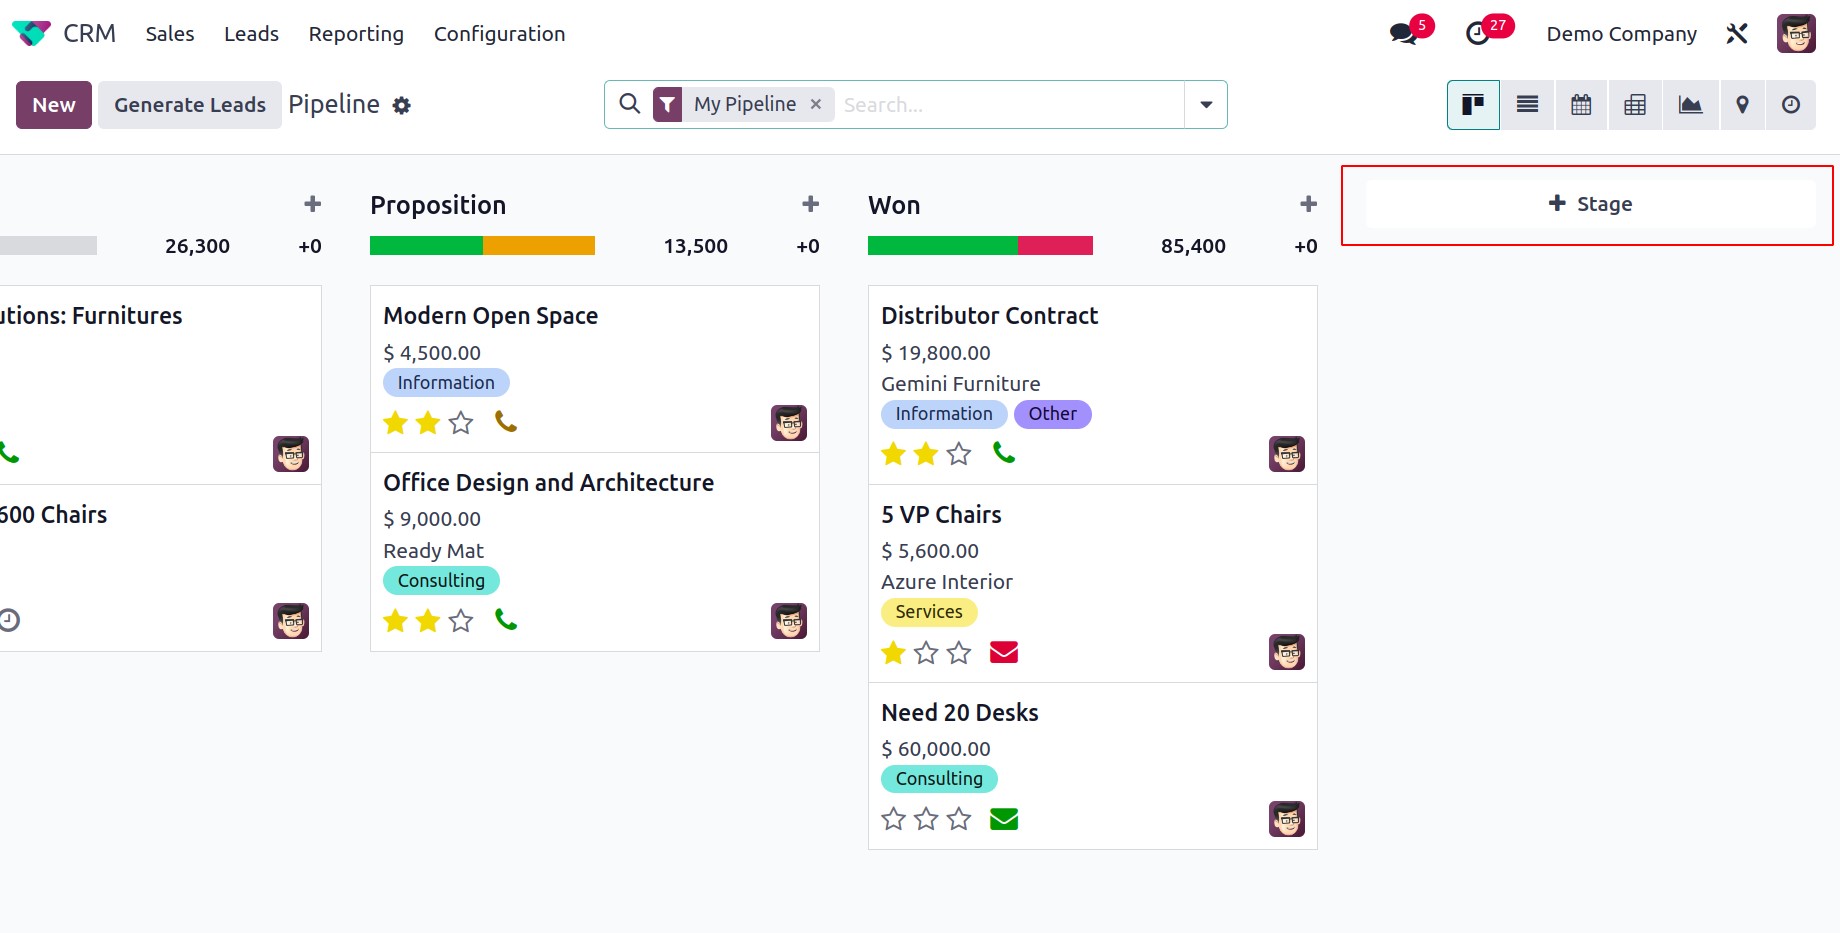
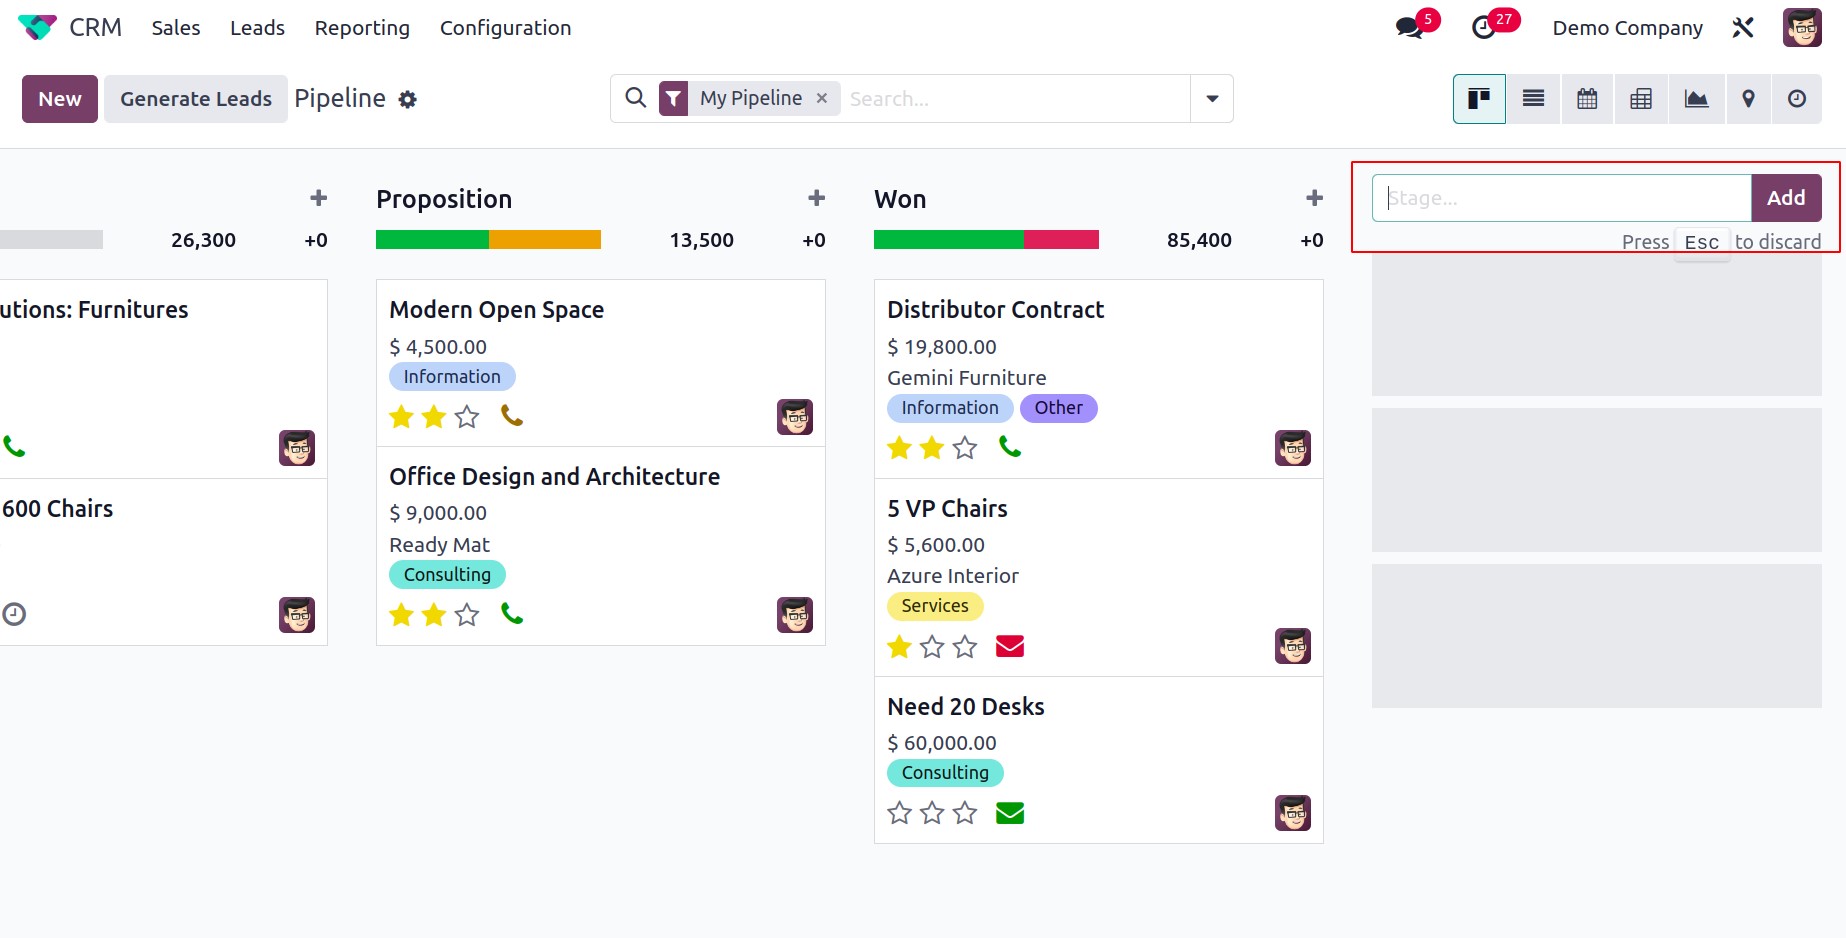
Similarly, by utilizing the +Stage button, you can quickly generate the necessary stages for the leads. A new field will open when you click on this button, as seen in the image, where you may enter the name of the new stage.
Enter the title in the provided field, then press the Add button. By using this technique, you can add as many new levels for leads as you like.
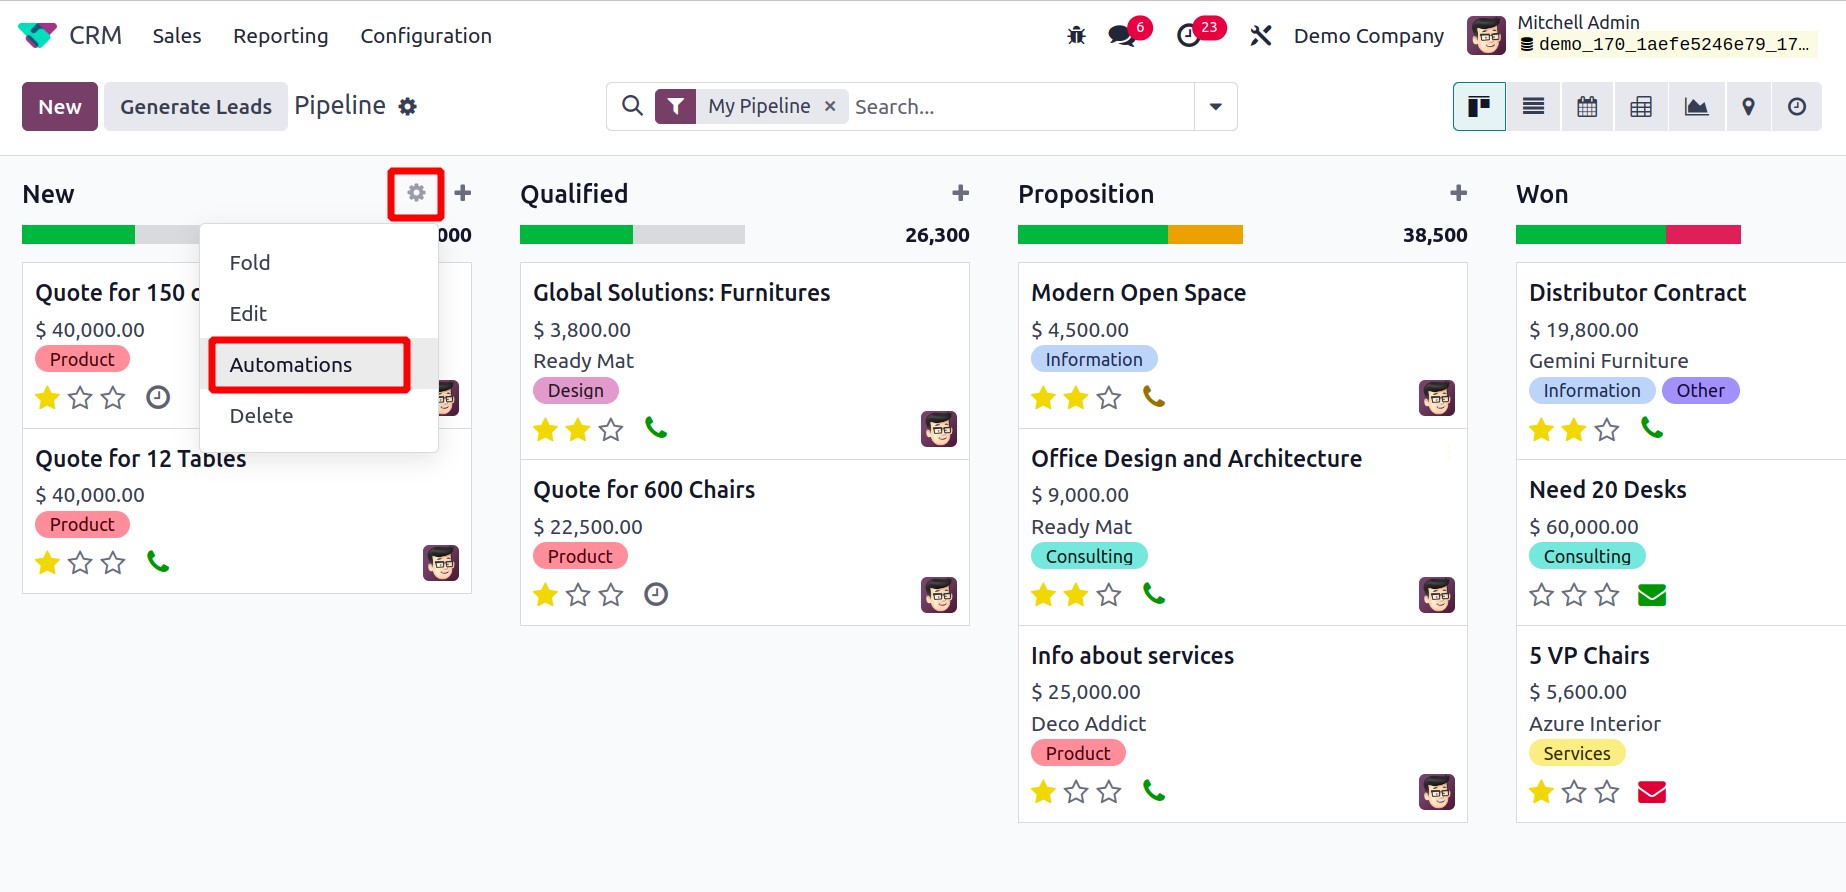
As seen in the screenshot below, after creating a new stage, you may modify its settings by clicking the gear icon that displays next to the stage's title.
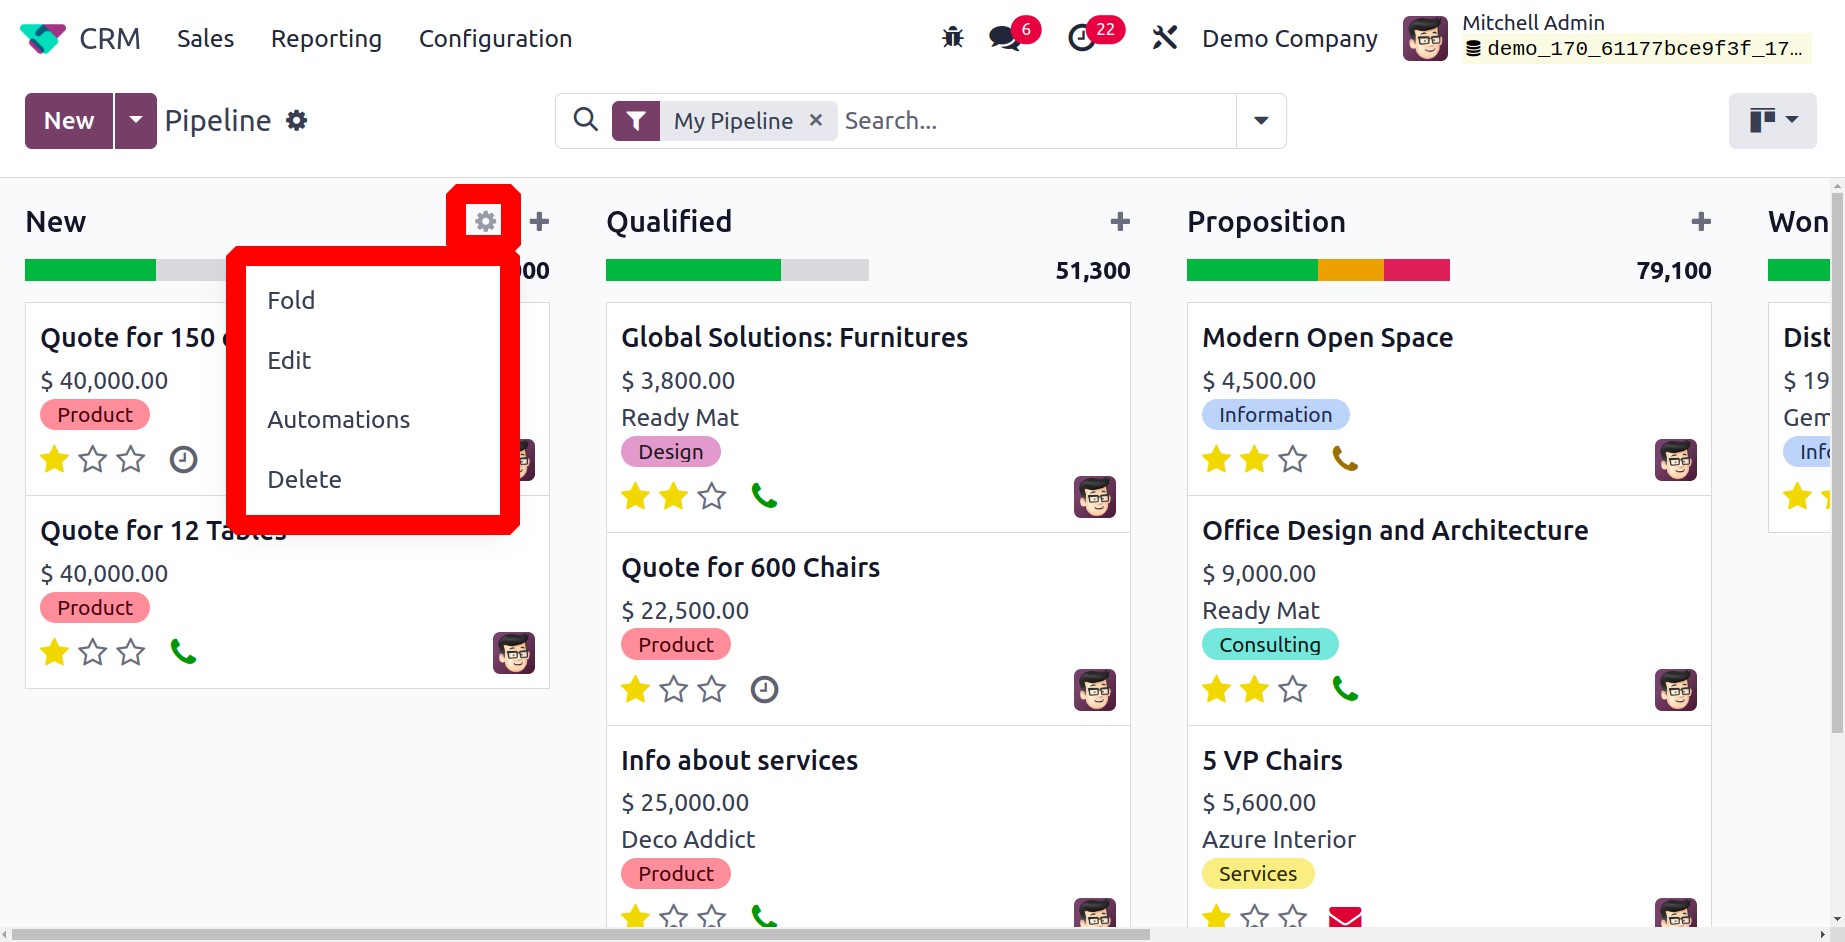
Depending on your needs, you can Fold, Edit, Automation AndDelete the stage with this symbol. You can edit the appropriate stage in the pop-up box that appears when you click the Edit button.
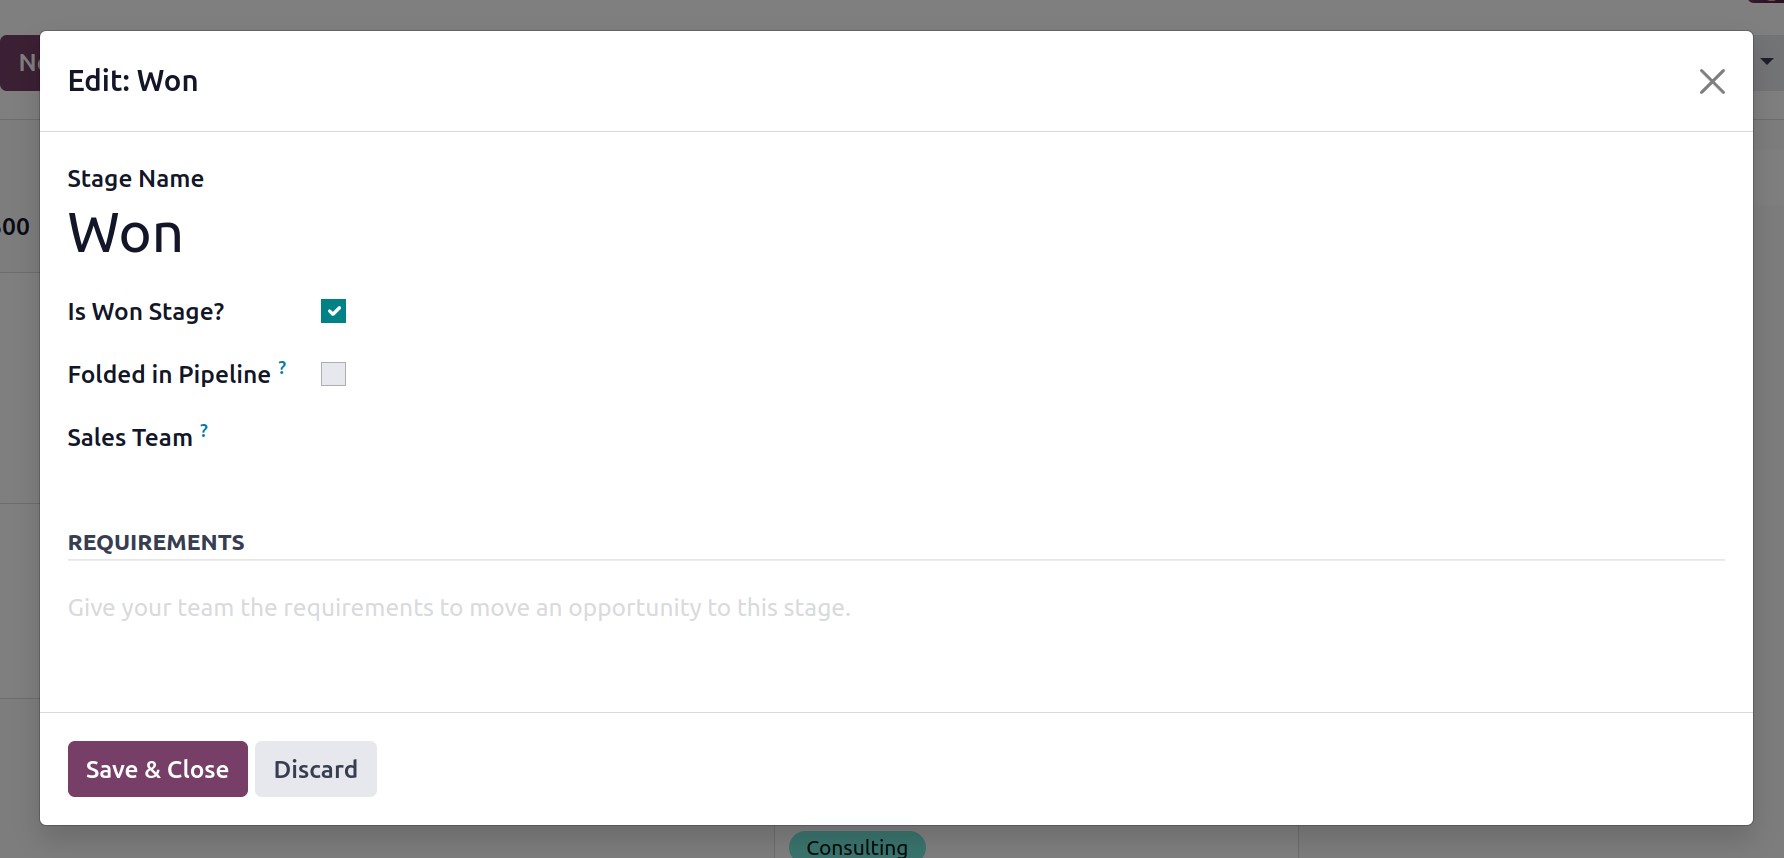
You can turn on the Is Won Stage? field if you wish to treat the chosen stage as the Won Stage for leads. Turning on the Folded in Pipeline field allows the corresponding stage to be folded in the Kanban view. You are permitted to identify a specific sales team that utilizes this stage in the Sales Team section. Other sales teams not specifically indicated in the supplied field will not be able to see or use this stage. In order for the team members to have a clear understanding of the criteria for this specific stage, the requirements to transfer leads to this stage can be given in the criteria section. Don't forget to click the Save button once you've finished modifying the column to save all of your changes.
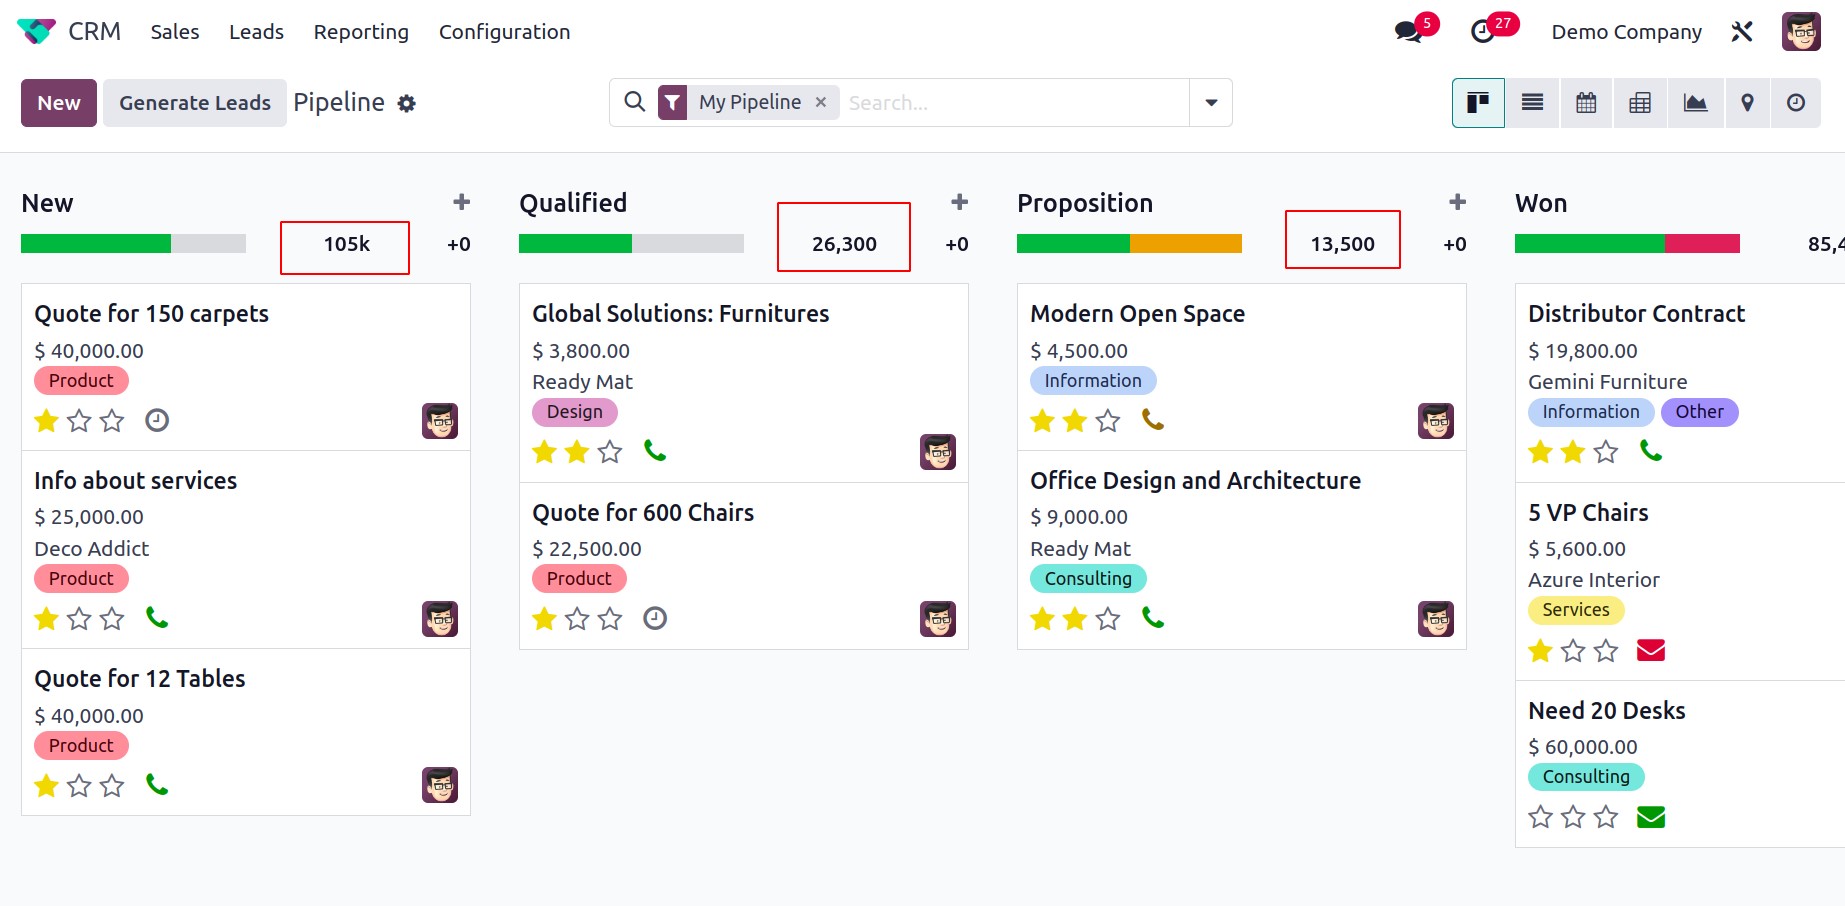
The top right corner of the relevant stages, which is emphasized in the figure below, displays the Expected Revenue from each step. By using the drag and drop functionality, you can adjust the phases of leads. The estimated revenue will be immediately adjusted depending on the new record by altering the stage of one lead.
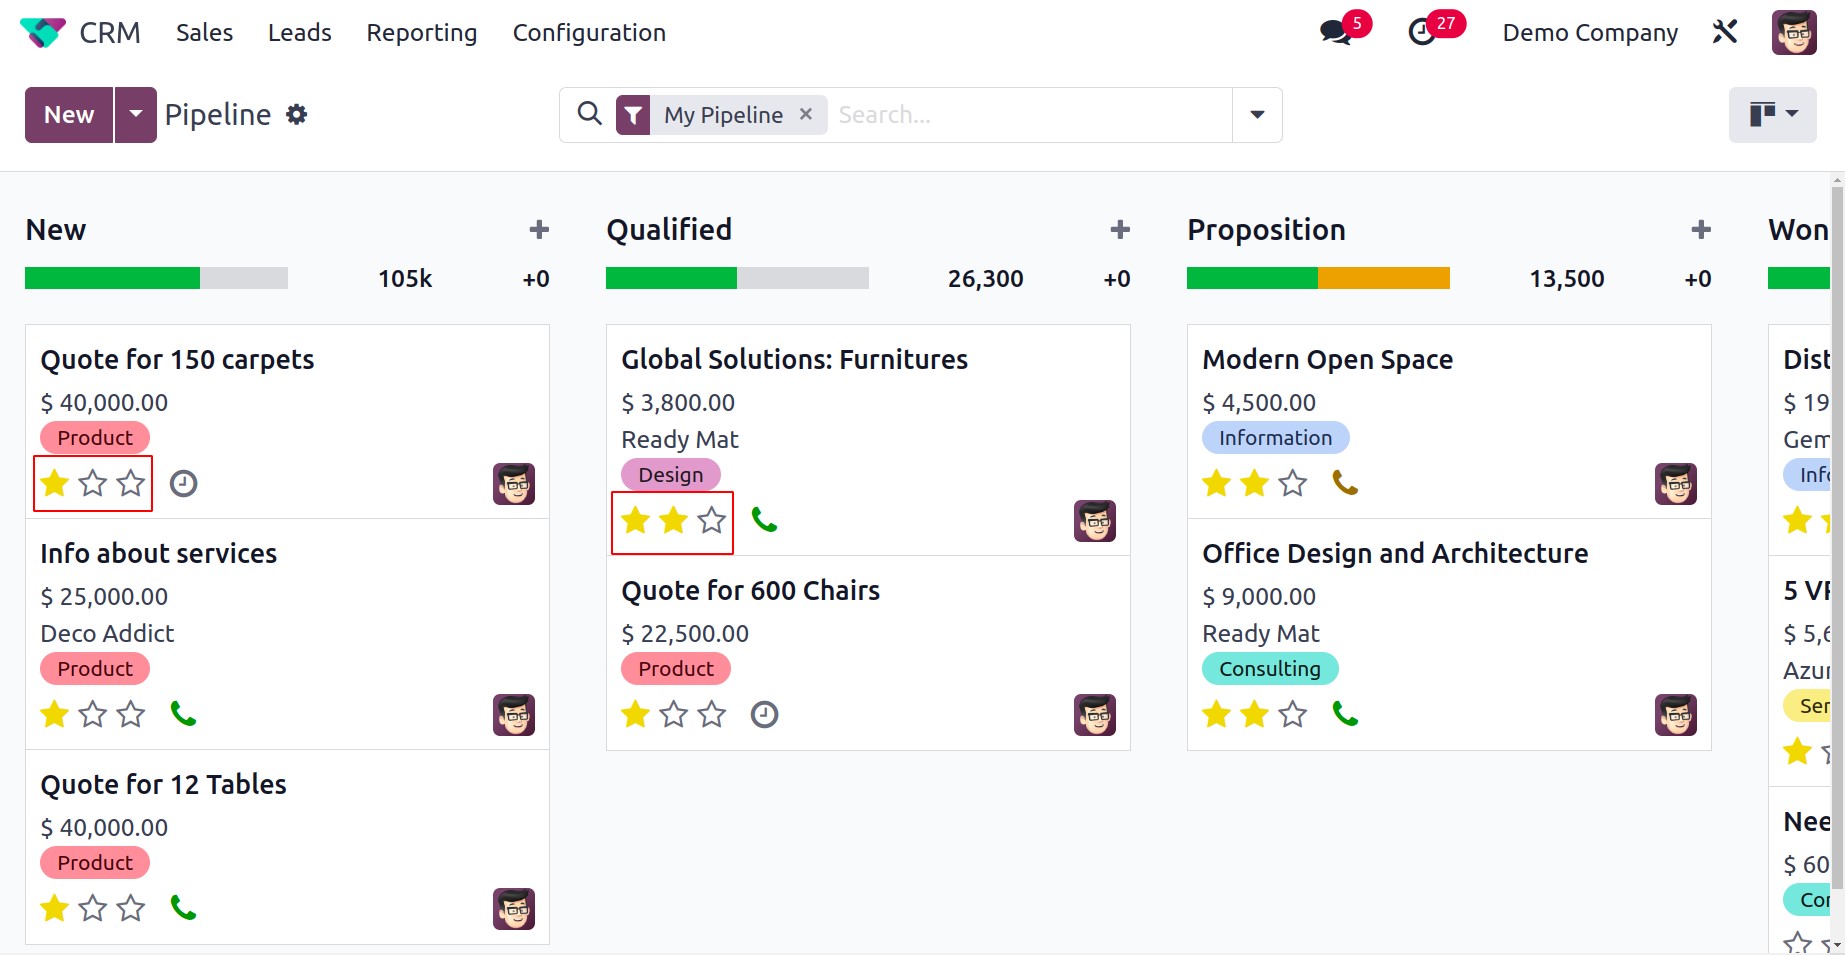
You can find three stars to indicate the lead's Priority on each lead record. You can assign Medium, High, or Very High stars based on the lead's priority. This will make it easier to find high-value leads.
You may arrange several lead activities right from the main dashboard. The tiny clock indicator, which is displayed in the image below, will let you schedule various activities. If there are any scheduled activities, Odoo 17 will display a list of them as soon as you click on this icon.
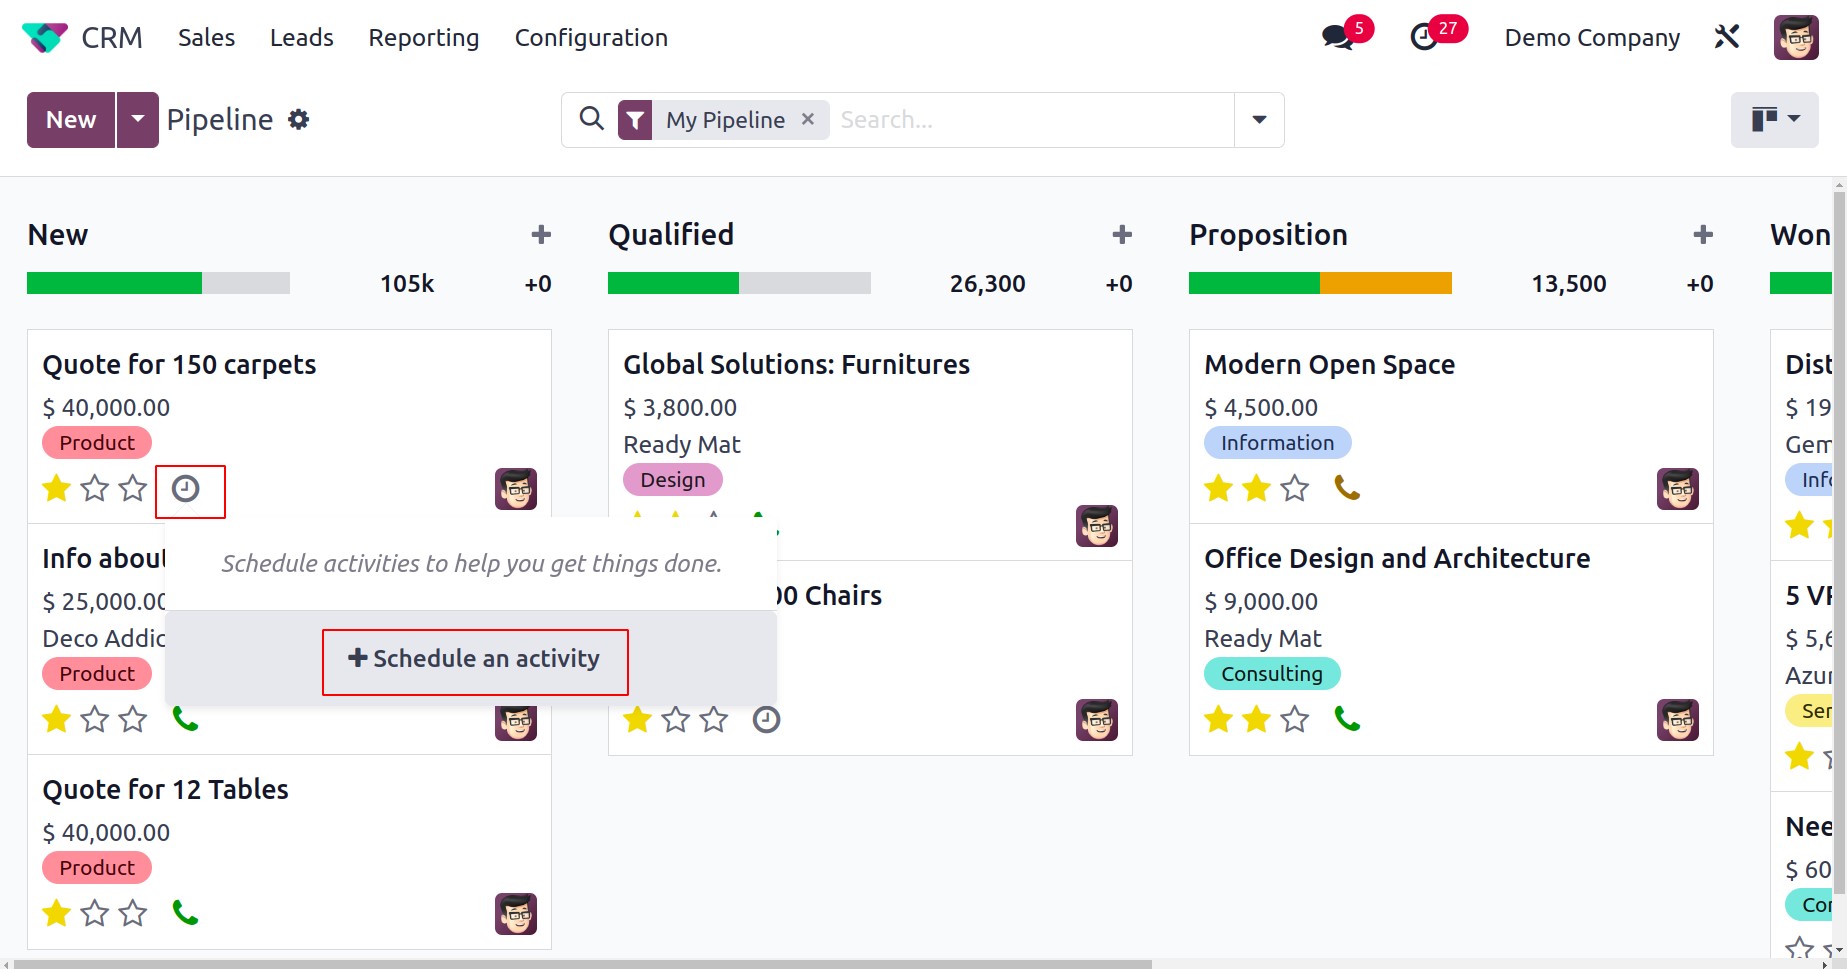
If not, you may create a new one by selecting the Schedule An Activity button. You can create new activities by using a new wizard that Odoo 17 will send you to.
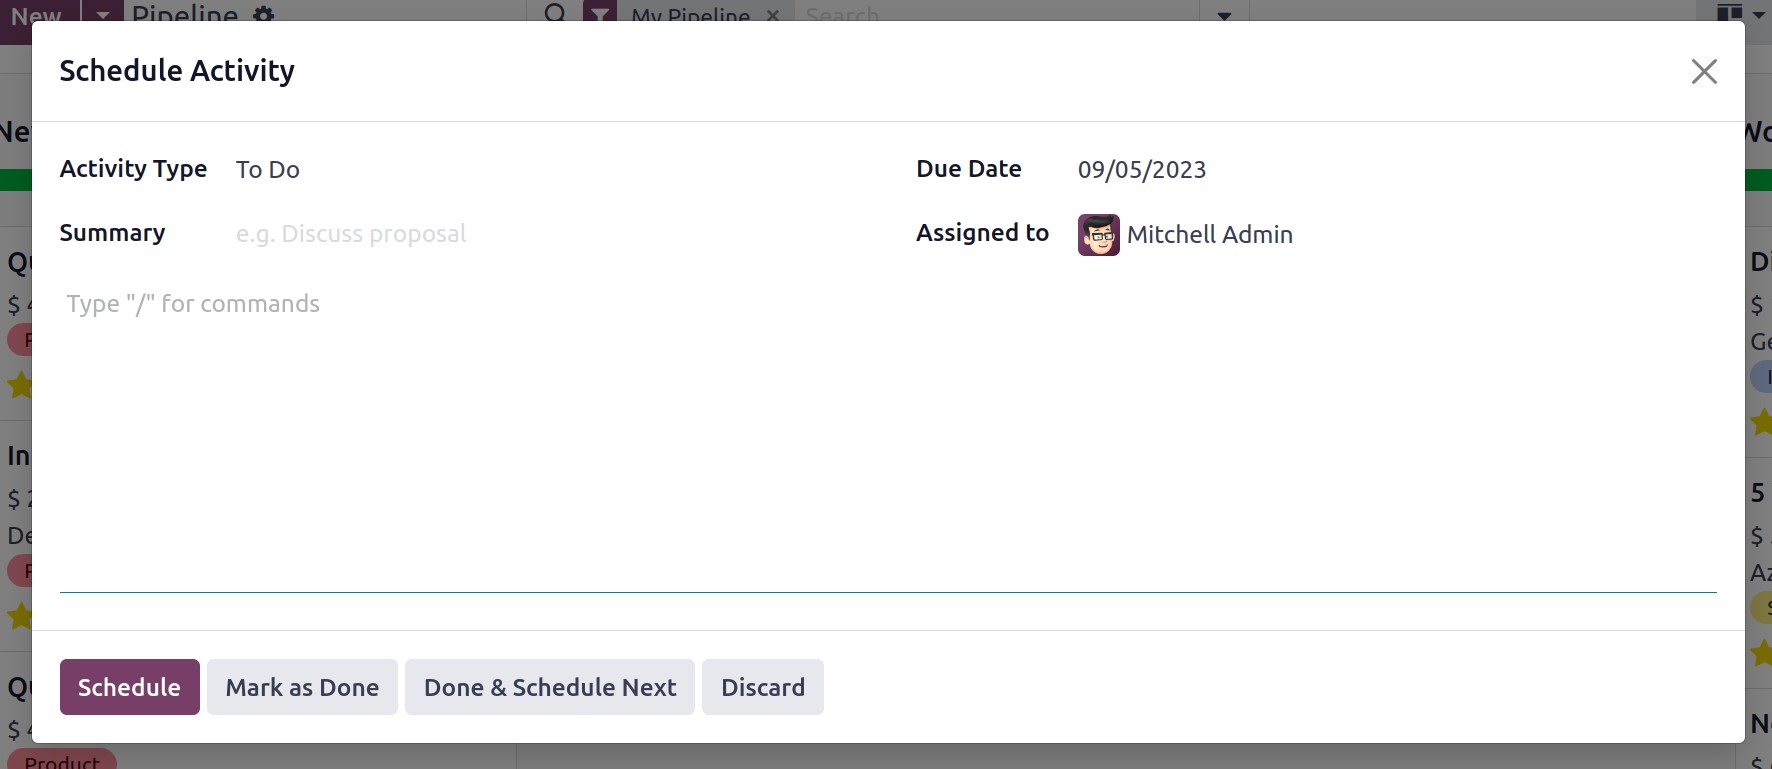
Odoo 17 provides you with a dedicated platform in theConfiguration menu, which we will cover later, to configure various activity types.
You can choose the necessary activity you intend to schedule in the Activity Type box of the new activity schedule dialogue. Along with this, you may use the provided space to briefly describe the activity's Summary. In the Assigned To area, designate a worker who will keep an eye on this action. Last but not least, don't forget to provide the activity's Due Date. Finally, by selecting the Schedule button, you may set the activity into your schedule. The Mark as Done button can be used once the task is finished. The Done & Schedule Next button can be used if you have already finished one scheduled activity and wish to arrange a new one. Use the Discard button to stop the planned activity. The planned activities are highlighted in green. Overdue actions are shown in the red color. Today's scheduled activities will be displayed in brown.
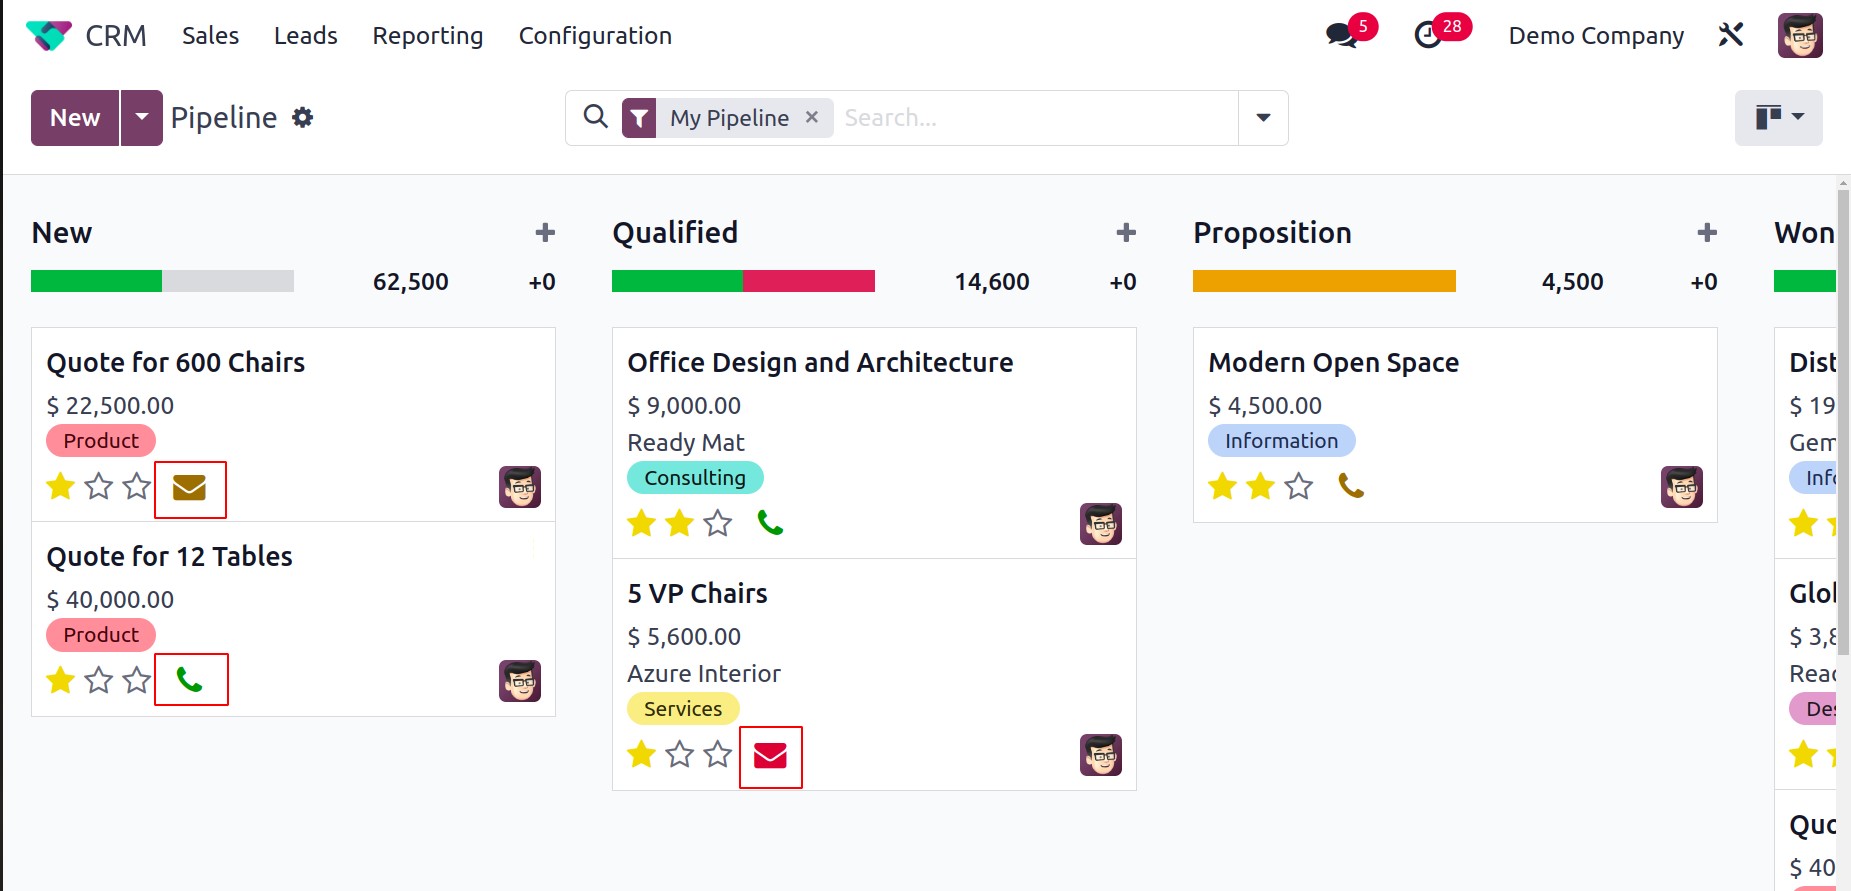
You may now add clients to the call queue, which is a new functionality added to the Odoo 17 CRM module. The clock symbol, which is used to schedule activities, is close to this choice. You can add leads to the call queue with only one click. If you click it again, the icon will be removed from the call queue. Each column will have a Quick Add option that allows you to quickly add leads under particular phases. This choice will be presented as a "+" icon next to each state's title, as illustrated below.
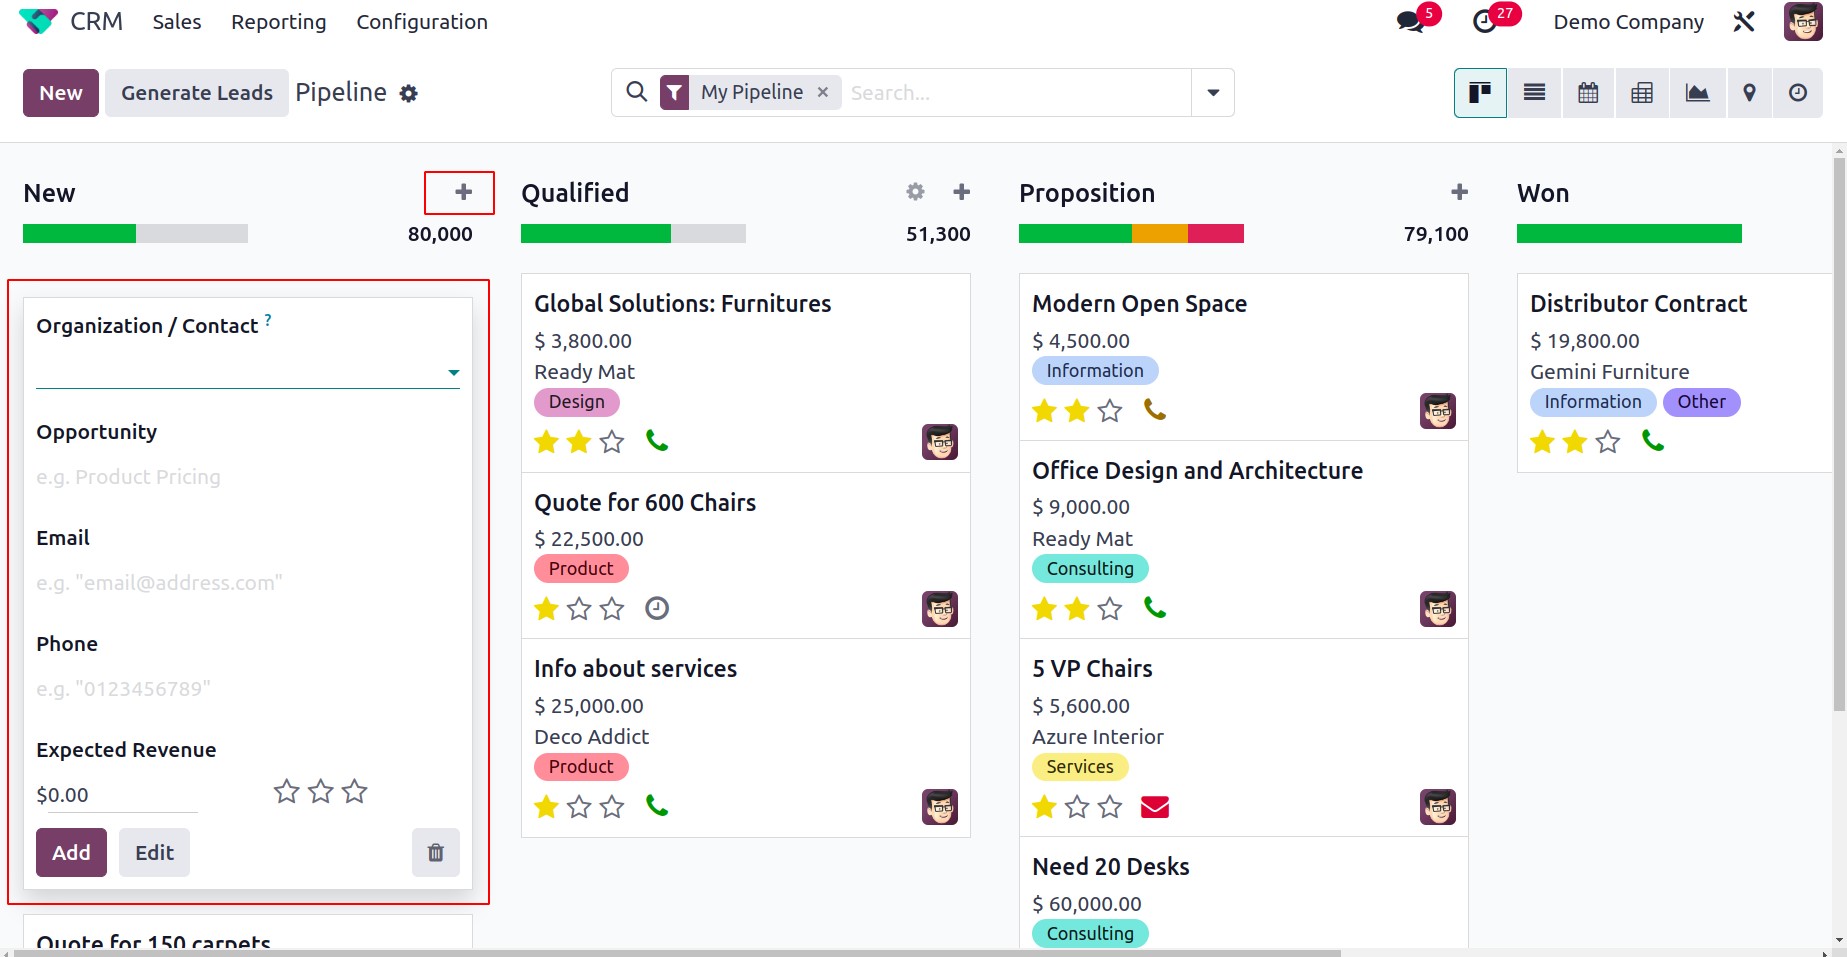
Using this feature, you can easily add new leads under each step. In the space provided, enter the name of the organization or Contact. You can also fill in the appropriate boxes with the opportunity's title, email, phone number, and expected revenue. By selecting the Add button, the new lead will be added to the appropriate stage. Use the Edit button to alter the lead details if you want to.
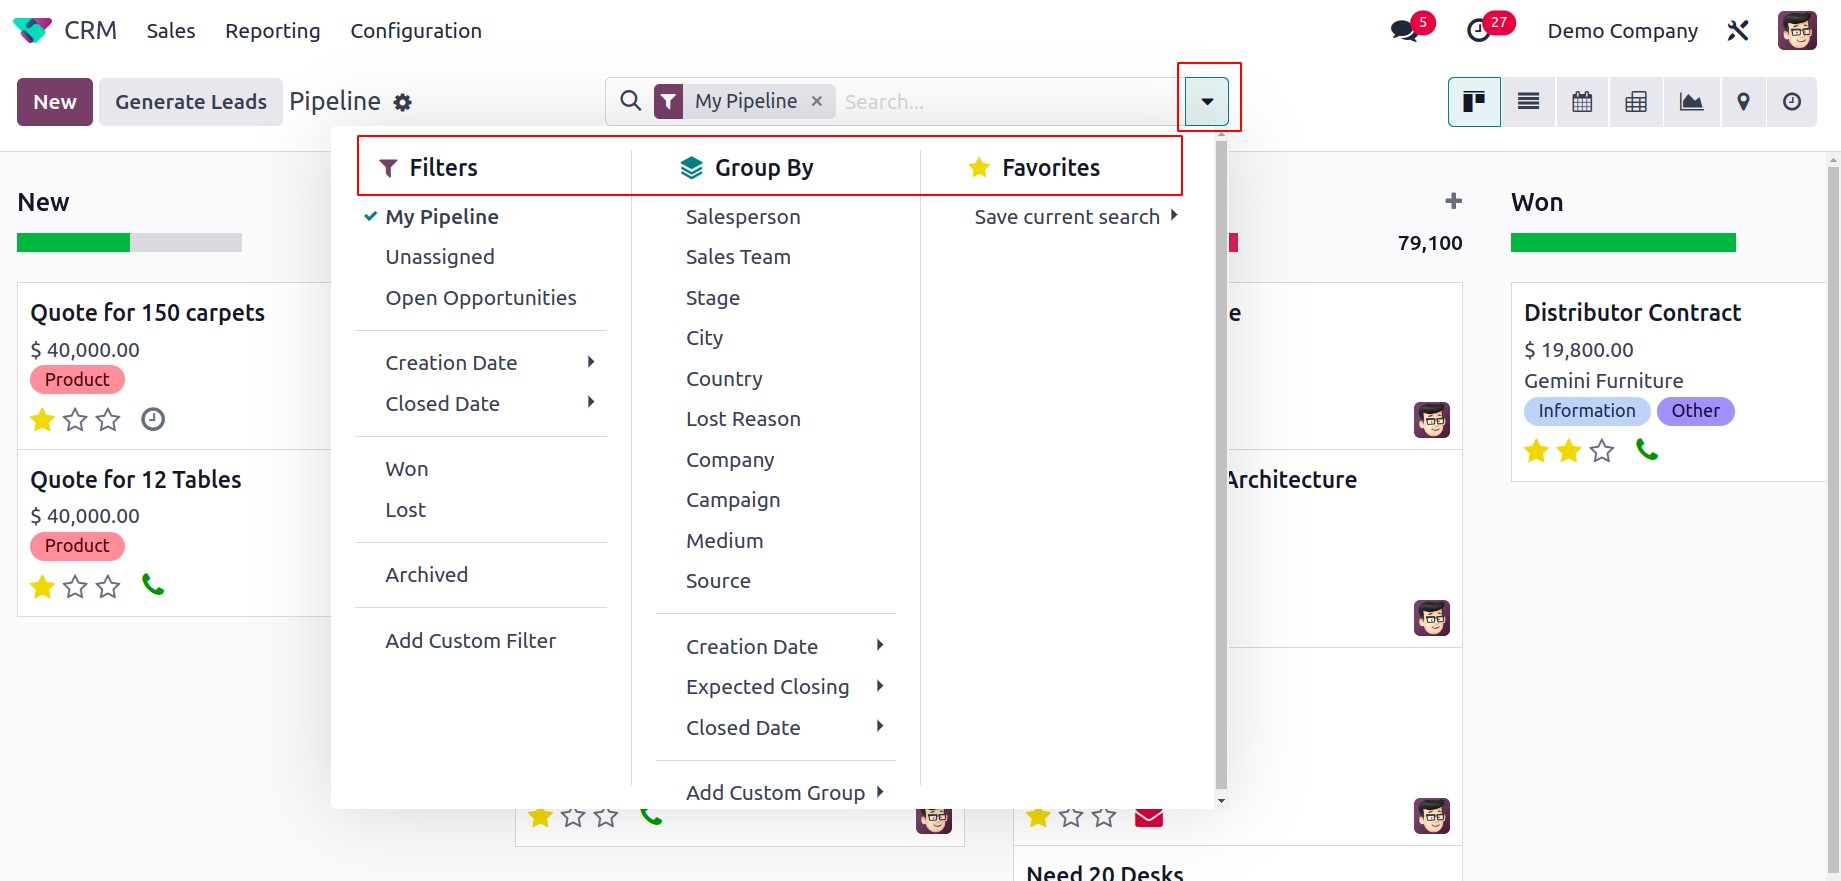
The provision of sophisticated sorting options will help to make Odoo's search process easier. In Odoo 17 CRM, the Filters, Group By, and Favourites options include a number of sorting options to quickly and simply access the needed data.
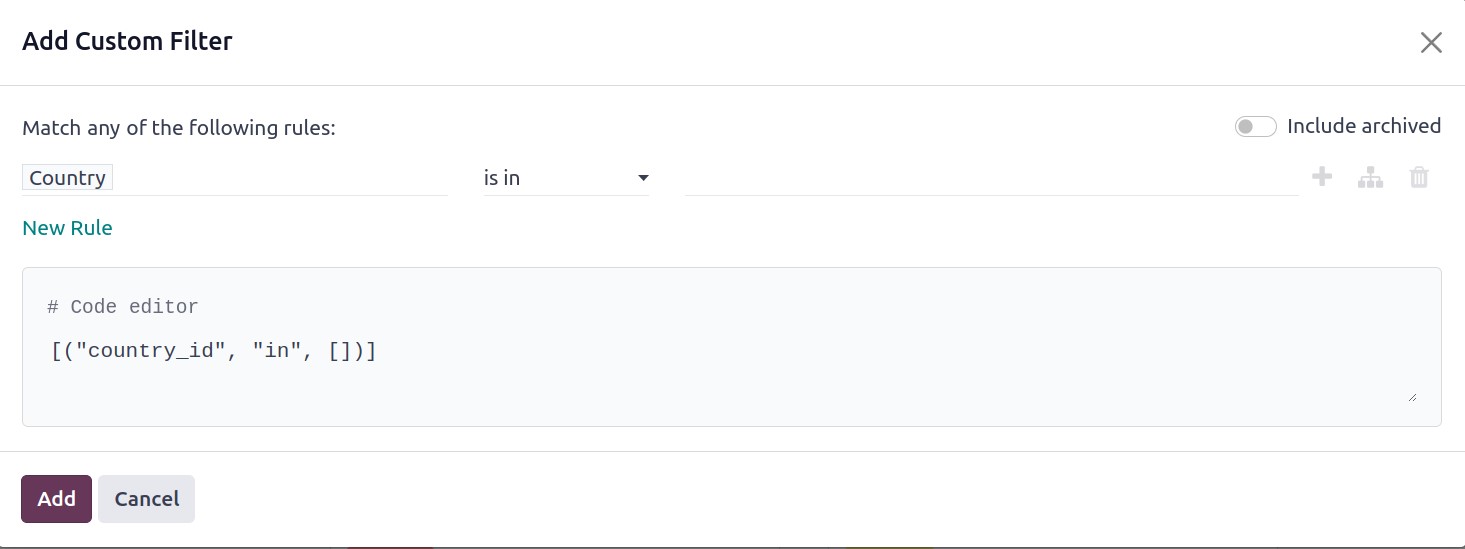
When the Add Custom Filter option is clicked, a new popup window opens where the user can add certain rules for filtering.
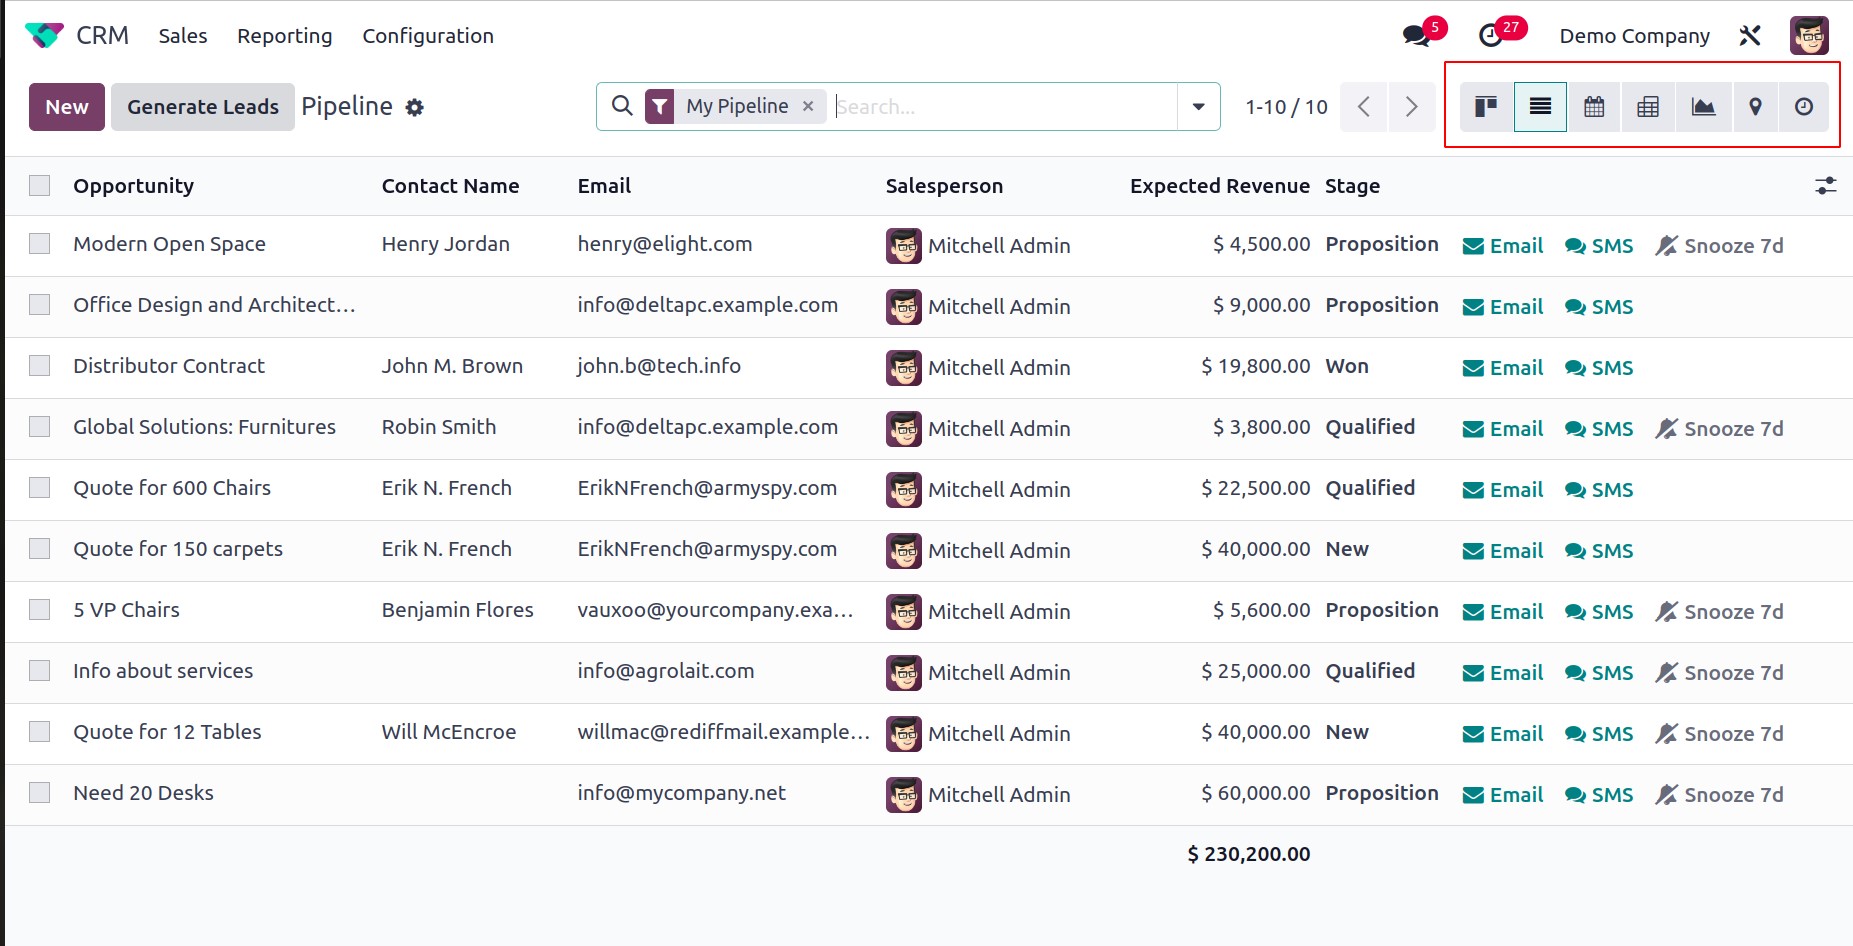
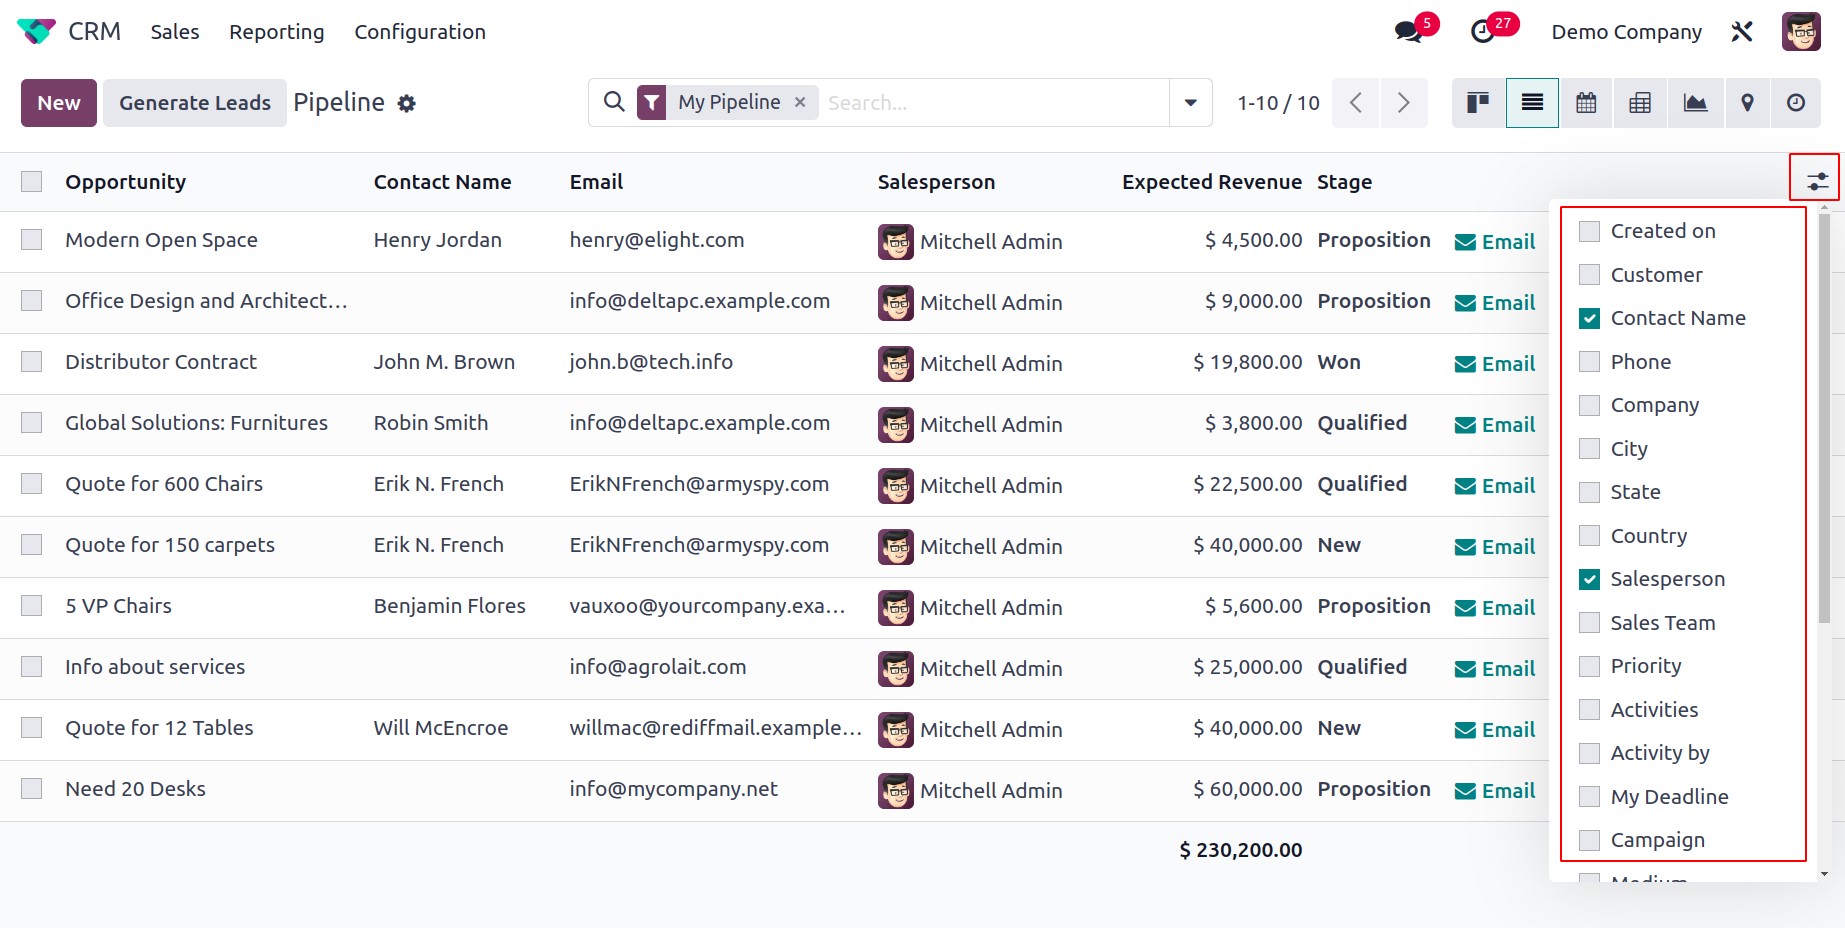
You will see an advanced preview along with information about the Opportunity, Contact Name, Email, Phone, Company, Salesperson, Next Activity, My Deadline, Expected Revenue, and Stage when we look at the List view of the CRM pipeline.
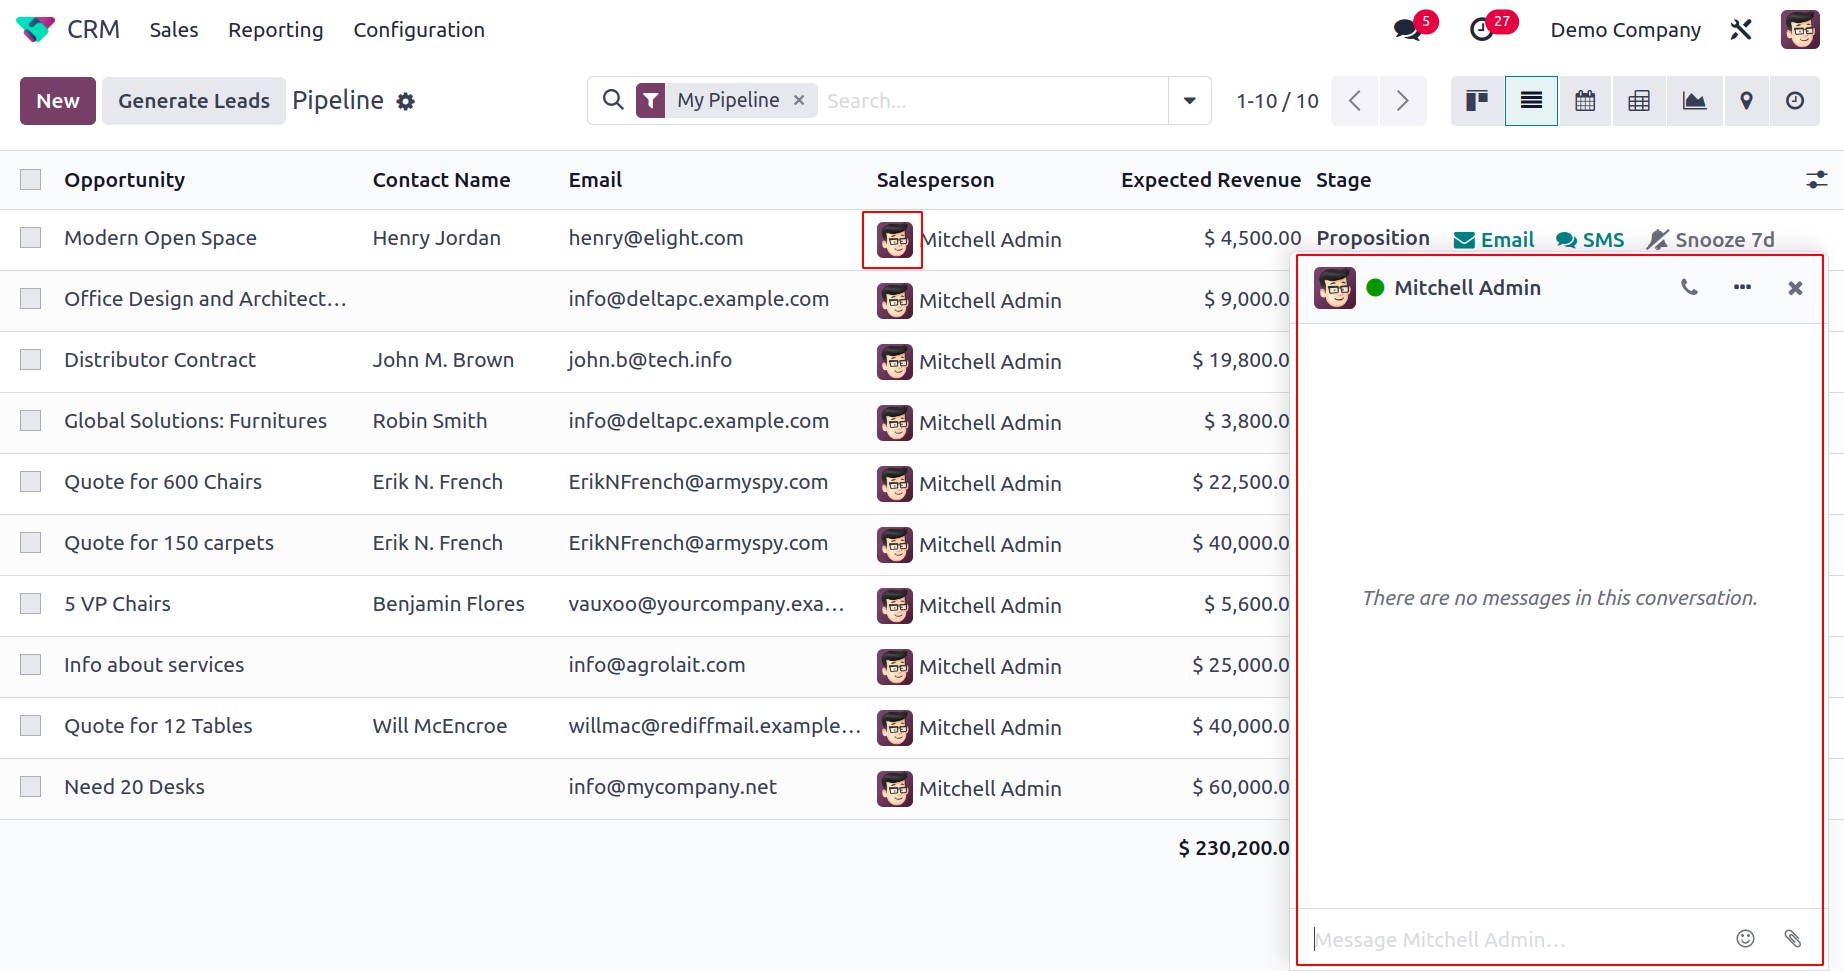
Clicking on a salesperson's name will open a message box that will link you with that salesperson directly if you want to get in touch with them. You will also find Email and SMS options on each lead, which you may use to contact the relevant customer.
By including more information about a lead, such as Created On, Customer, City, State, Country, Sales Team, Priority, Assigned Partner, Activity By, Campaign, Medium, Source, Expected Closing, and Probability, you can improve the list's preview.
As of right now, we have been talking about the CRM module's My Pipeline window. Let's now look at theMy Activities window.
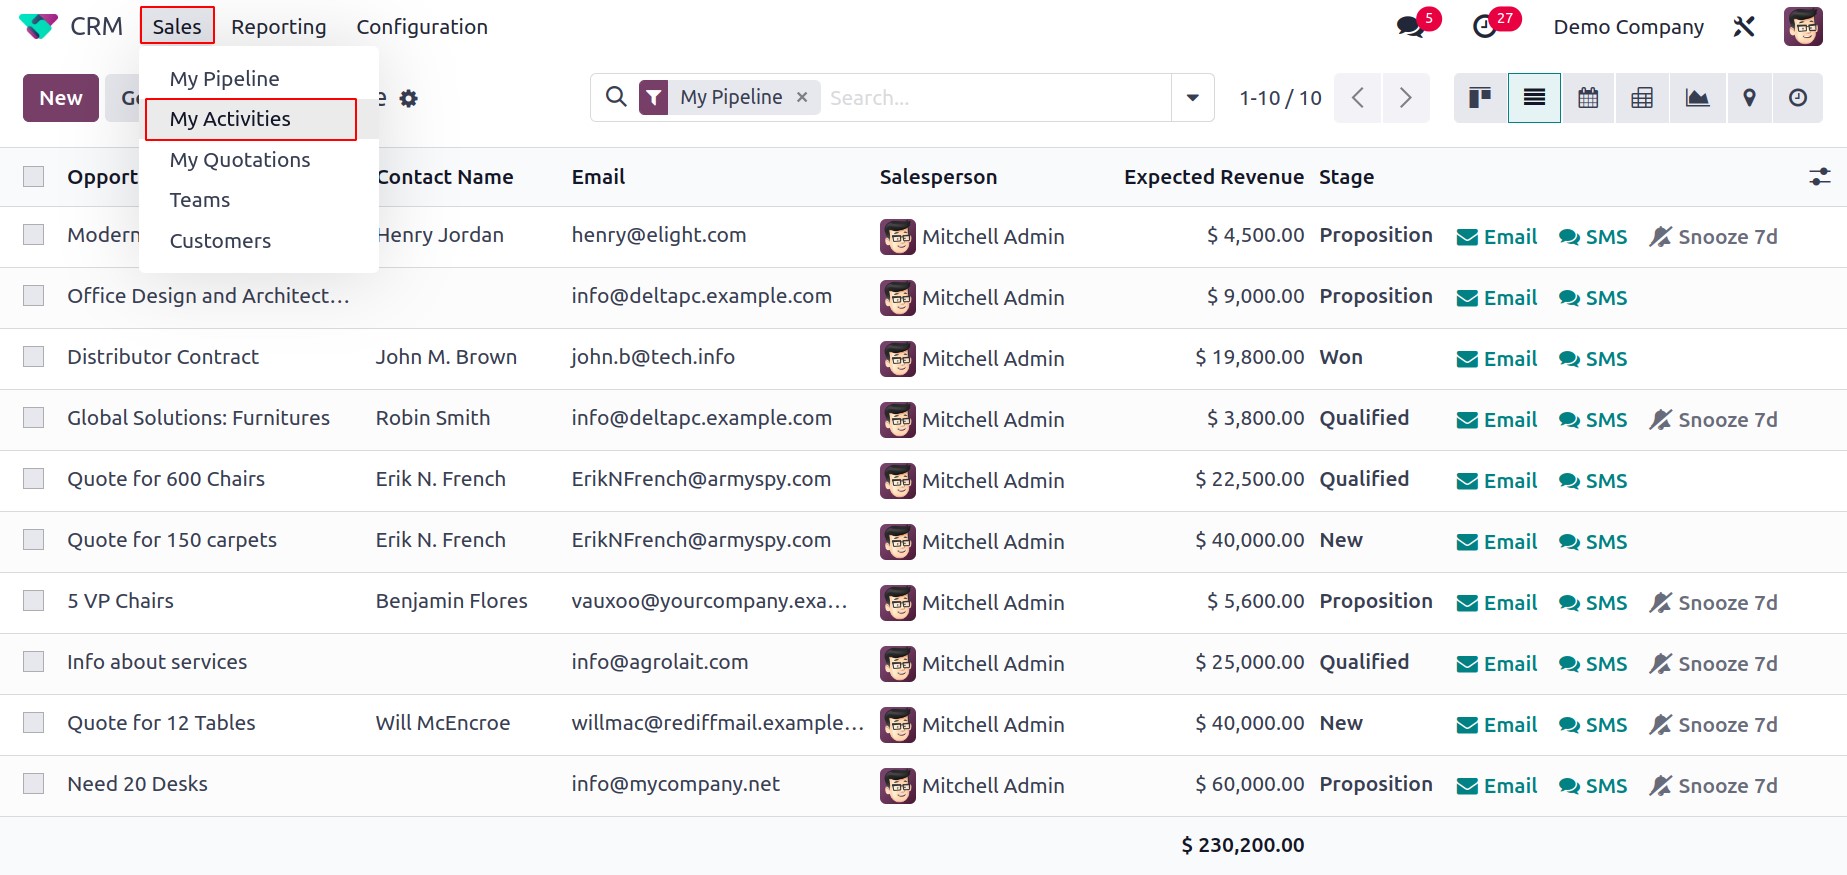
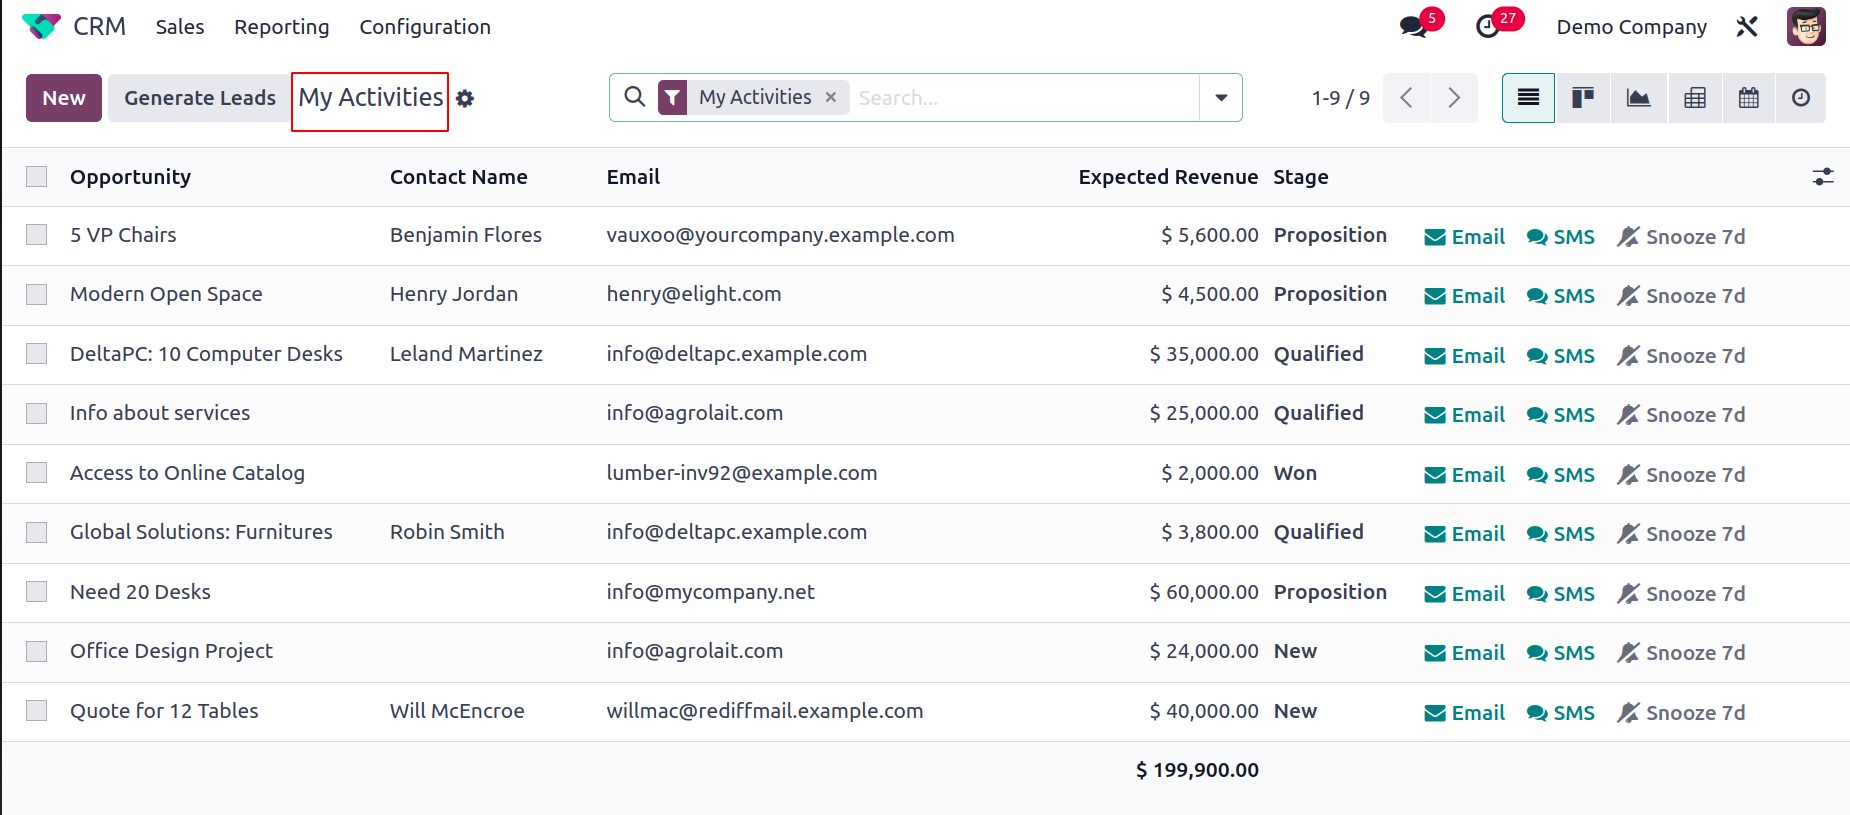
The My Activities window and My Pipeline window are essentially identical. But only the leads and opportunities that are given to you can be found here.
Leads
Leads can be viewed as the first step in beginning a business relationship with a client or organization. If a person or organization expresses interest in your company, you may turn that interest into a lead that can then be turned into a sales opportunity. With the help of the Odoo 17 CRM, leads may be gathered from a variety of sources. Leads can be created in Odoo17 from inquiries made via phone calls, SMS, emails, live chat, help desk tickets, events, contact forms, and many more channels. To increase the likelihood of success, proper management of leads generated through such platforms must be carried out with the highest care and attention. In the CRM module, Odoo 17 provides a dedicated platform for the administration of leads.
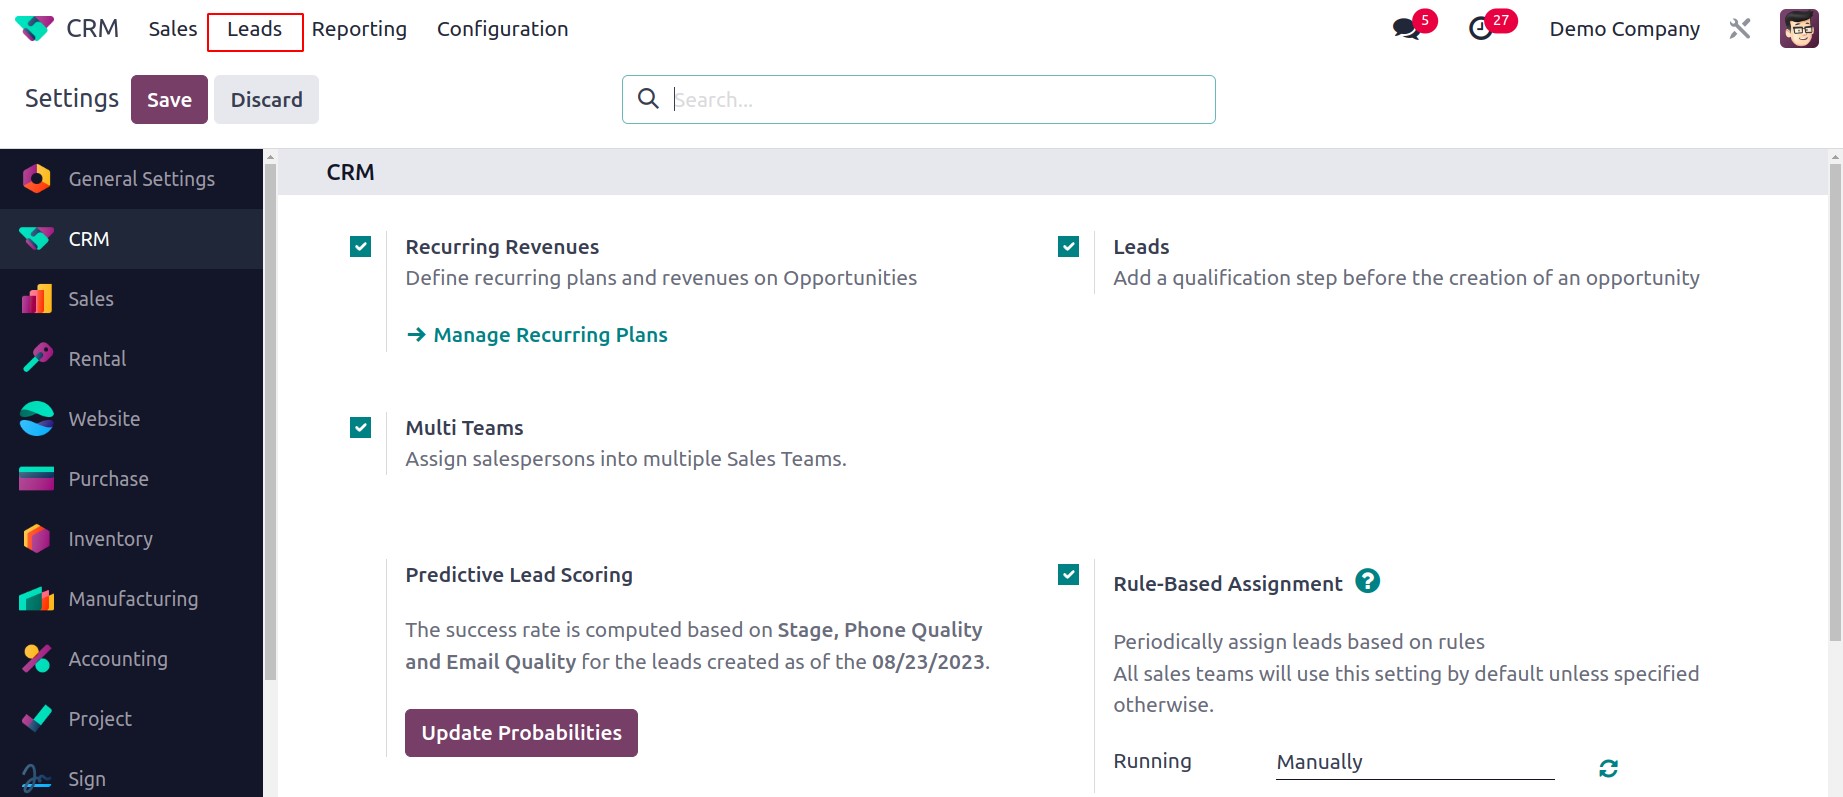
You may access the lead management window by going to the module's Settings menu. You may activate the Lead option under the CRM tab, as seen in the screenshot below.
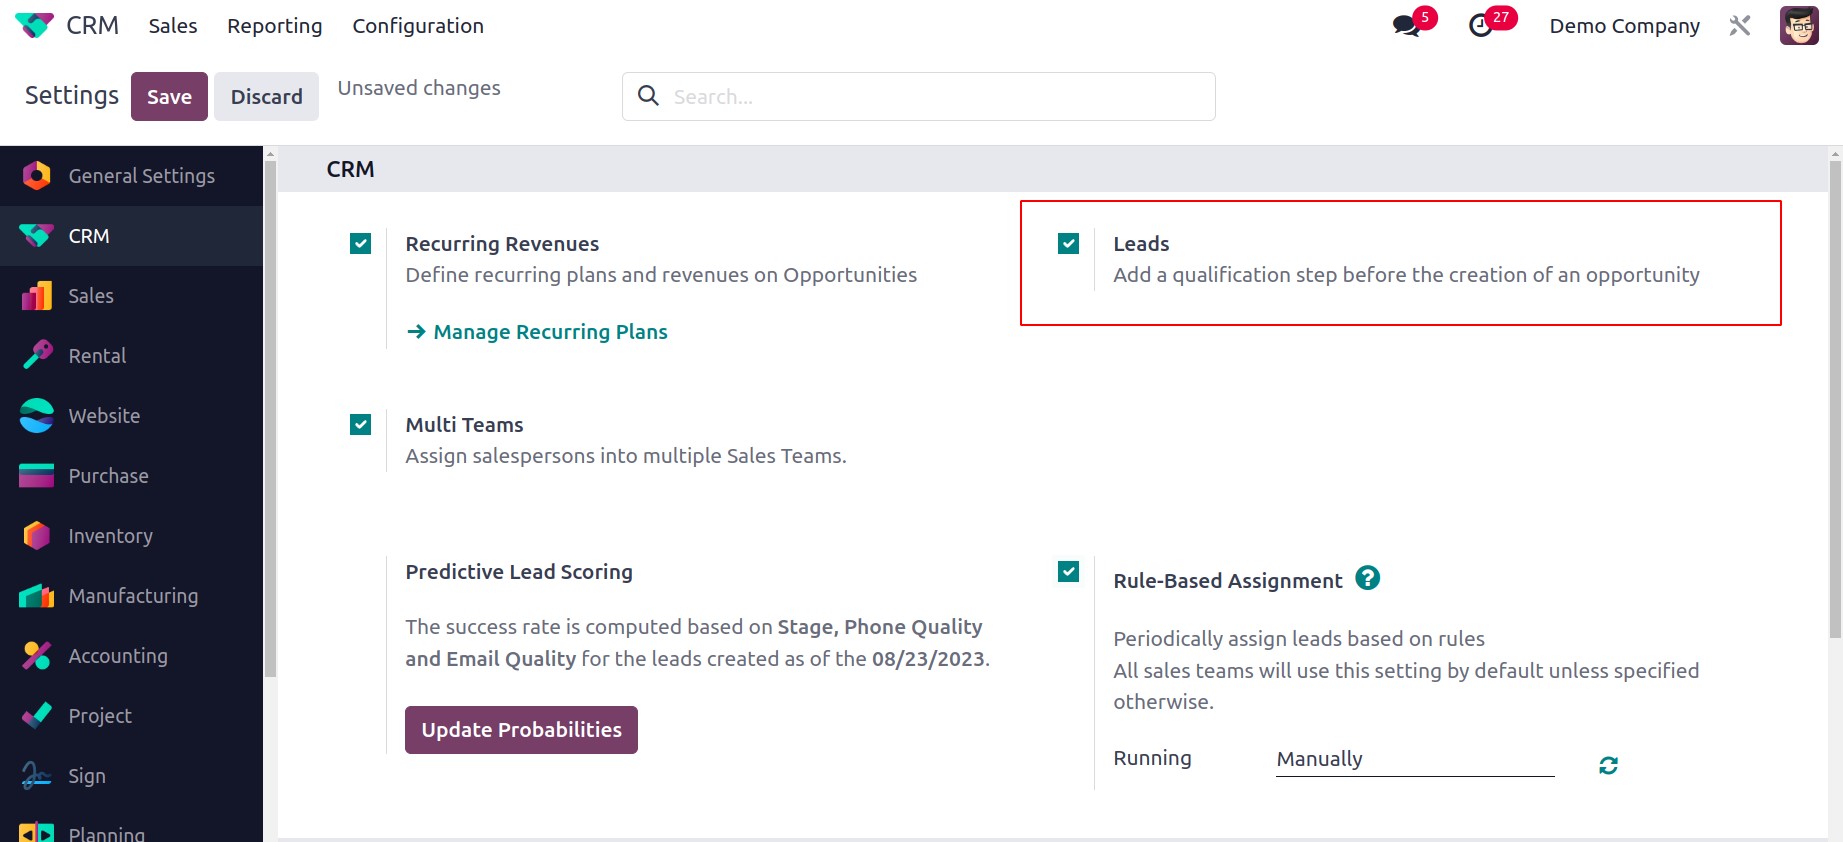
When this option is turned on, a new menu item named Leads will appear in the main menu bar. This platform will display a list of all leads produced by Odoo 17's various platforms.
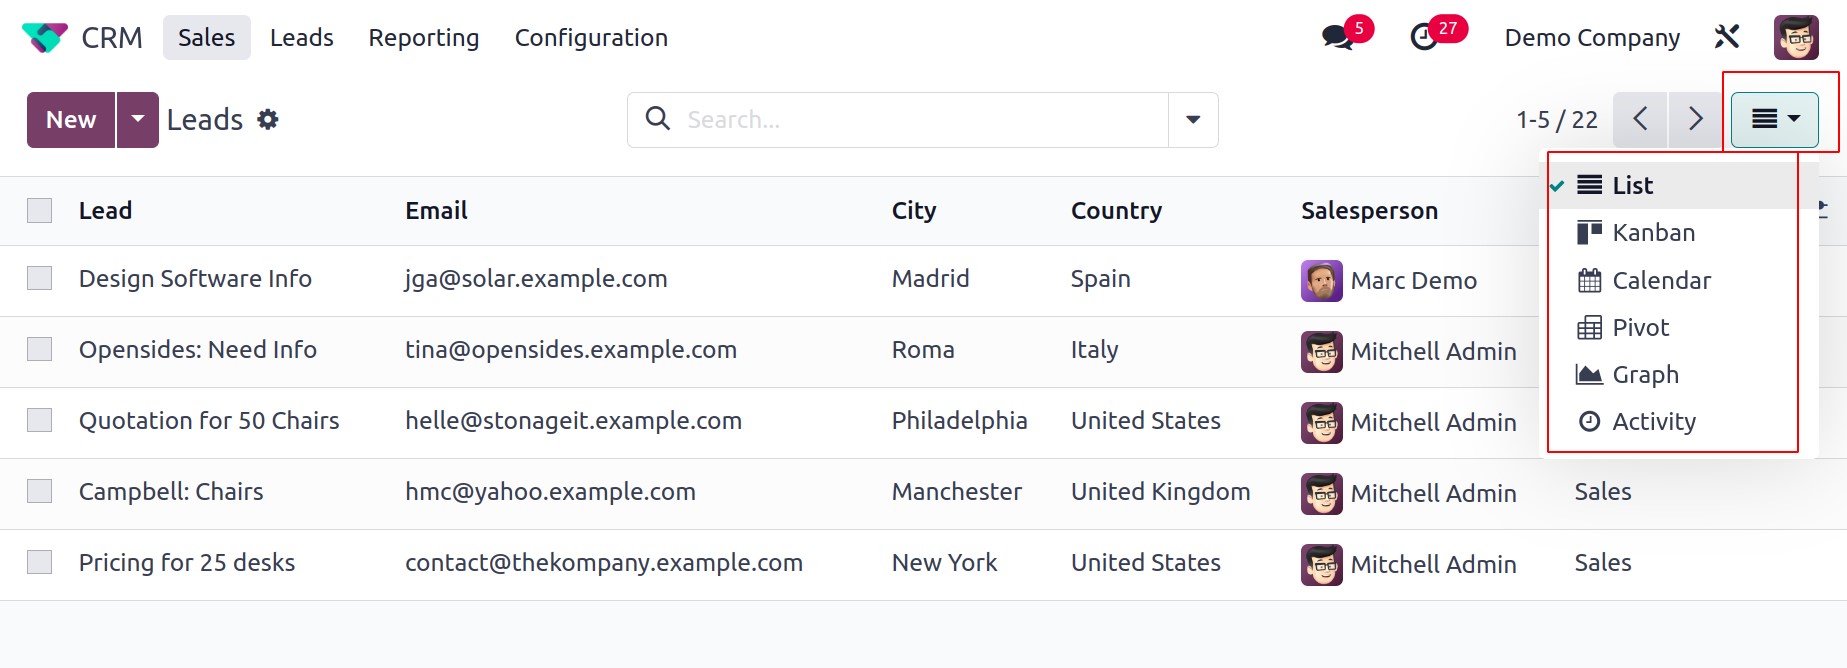
The lead, email, phone, company, city, country, assigned partner, salesperson, and sales team information are all included in the list. Depending on your needs, you can switch between the platform's Kanban, Calendar, Pivot, Graph, and Activity views.
Let's first examine how leads are manually created in the Odoo 17 CRM module. The New button is located in the top left corner of the screen. Click it to begin. When you click on this button, a new window containing the lead's specifics will emerge, as shown in the screenshot below. Let's check out the new features this window has to offer first. The New and Action buttons are now located in the screen's right corner, as you can see.
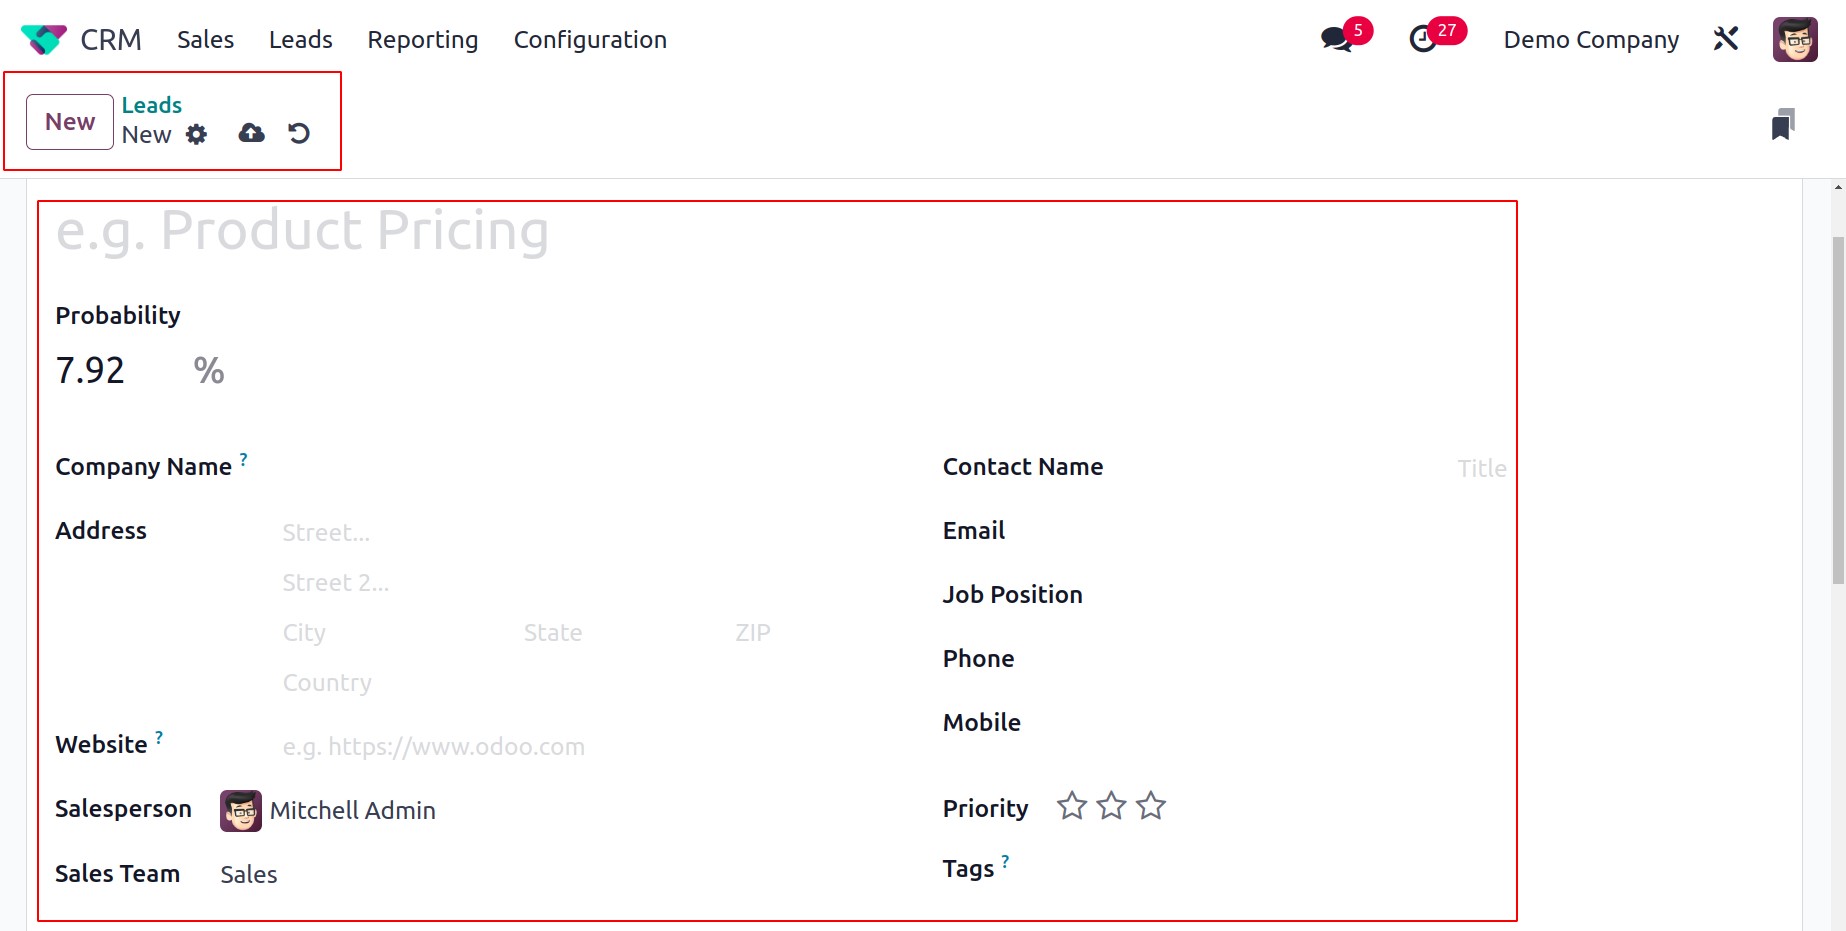
Additionally, without pressing the Save option, Odoo 17 will automatically save the details supplied in this box. You can choose to manually store the information by selecting the Save Manually icon. Changes have also been made to the Discard button. Discard Changes now has a new icon thanks to Odoo 17. The Edit button is not there in the most recent version of Odoo; however, you can click on the field you wish to edit by hovering your mouse over it.
The lead's title can be entered in the designated space. The Company Name section can be used to specify the name of the potential business partner that will be formed when the lead is turned into an opportunity. Enter the company's address in the Address area. You can include the contact's website in the Website section. In the corresponding fields, also provide the Language, Contact Name, Email, Email Cc, Job Position, Phone, and Mobile. In the Salesperson and Sales Team sections, respectively, you can designate an employee and a team for the lead management. You can award the lead stars depending on its priority. In the provided field, provide the appropriate Tags for the leads.
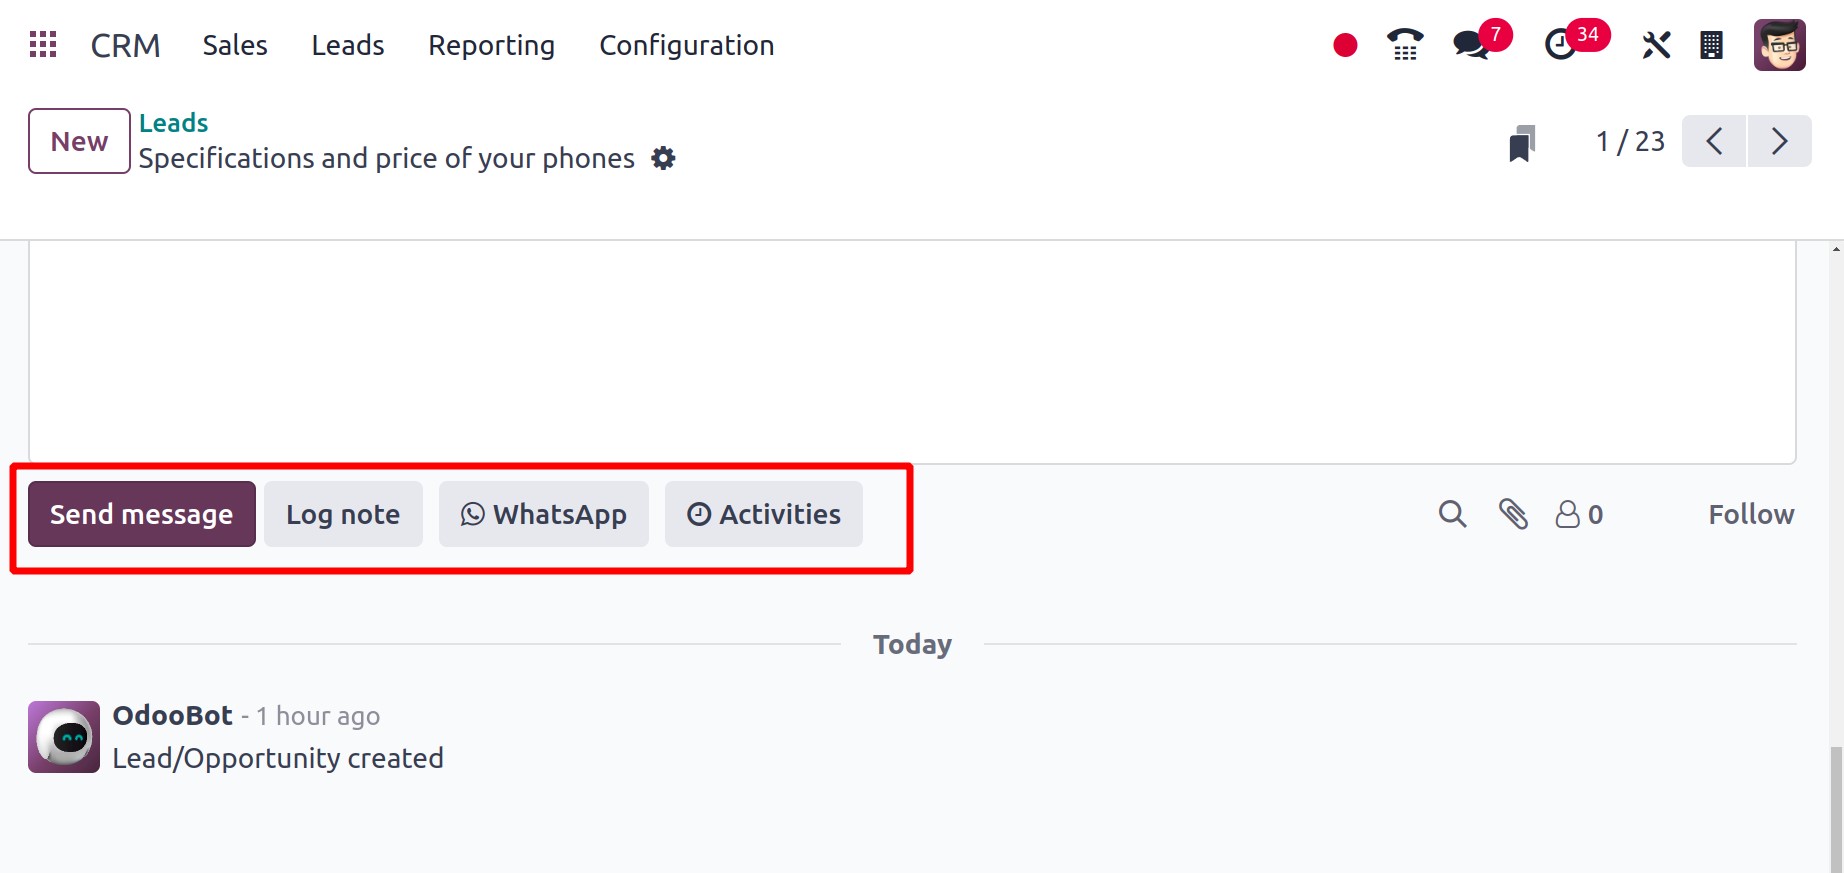
Four alternatives are displayed when you scroll down the window. Which are, Send Message, Log Notes, WhatsApp, Activities as highlighted in the screenshot below.
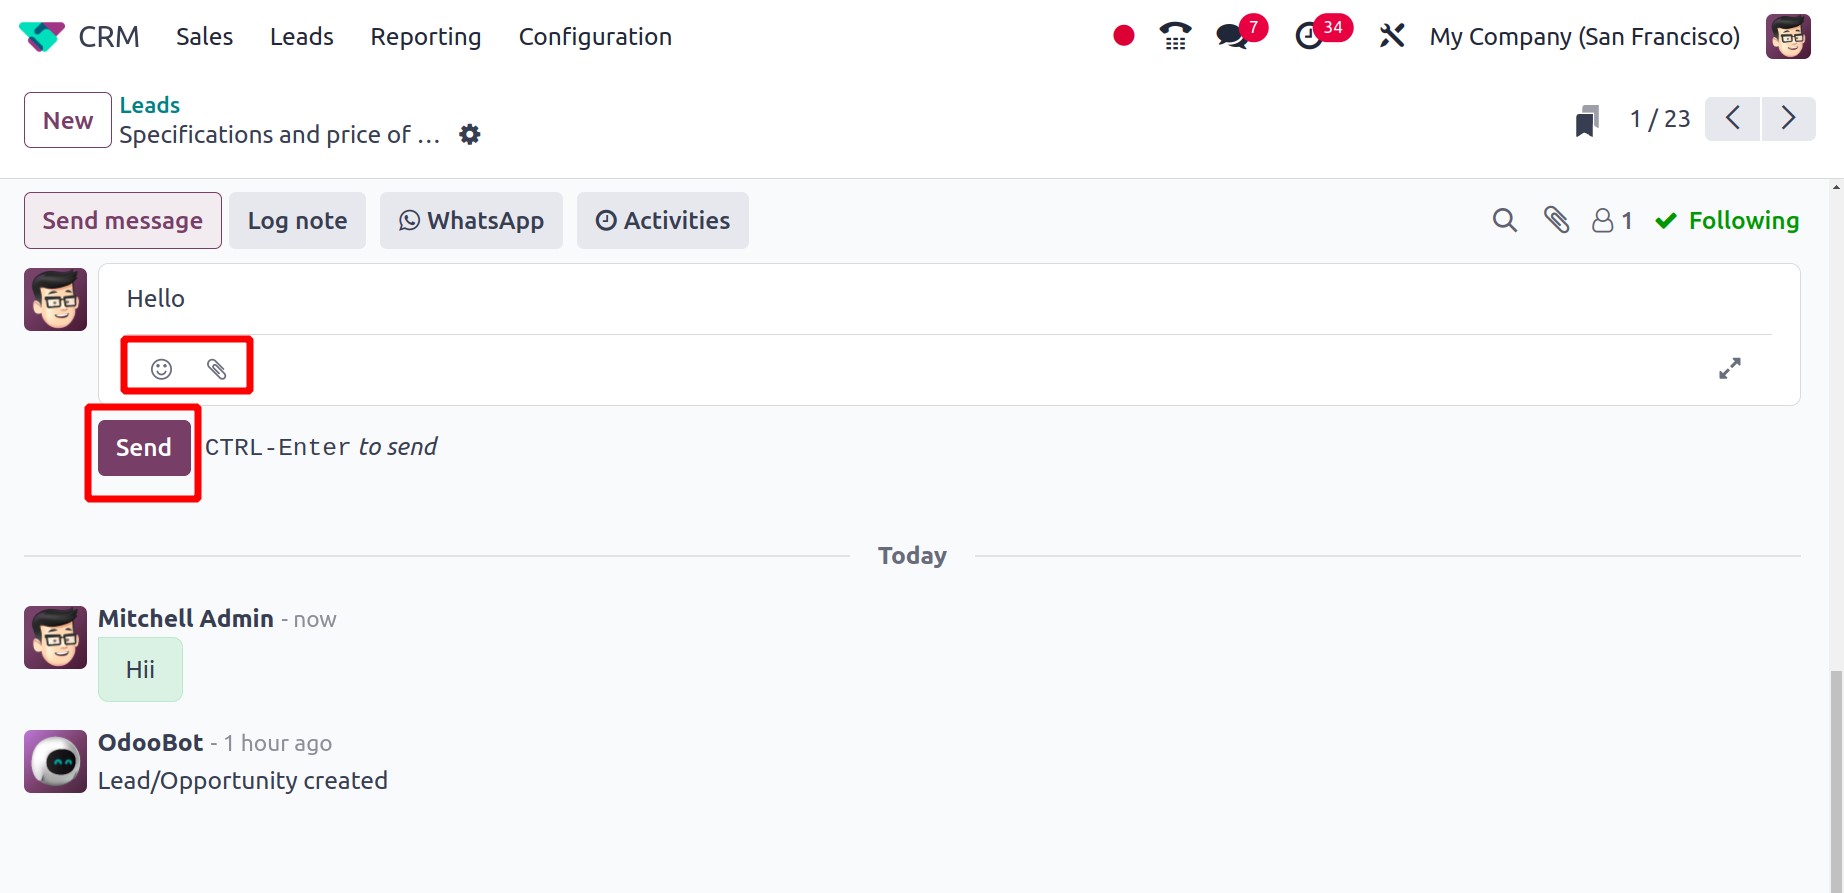
A new section to add messages to the Followers will emerge when we click the Send Message button. You can include attachments and smilies in the message box. After that, use the Send button to deliver the message.
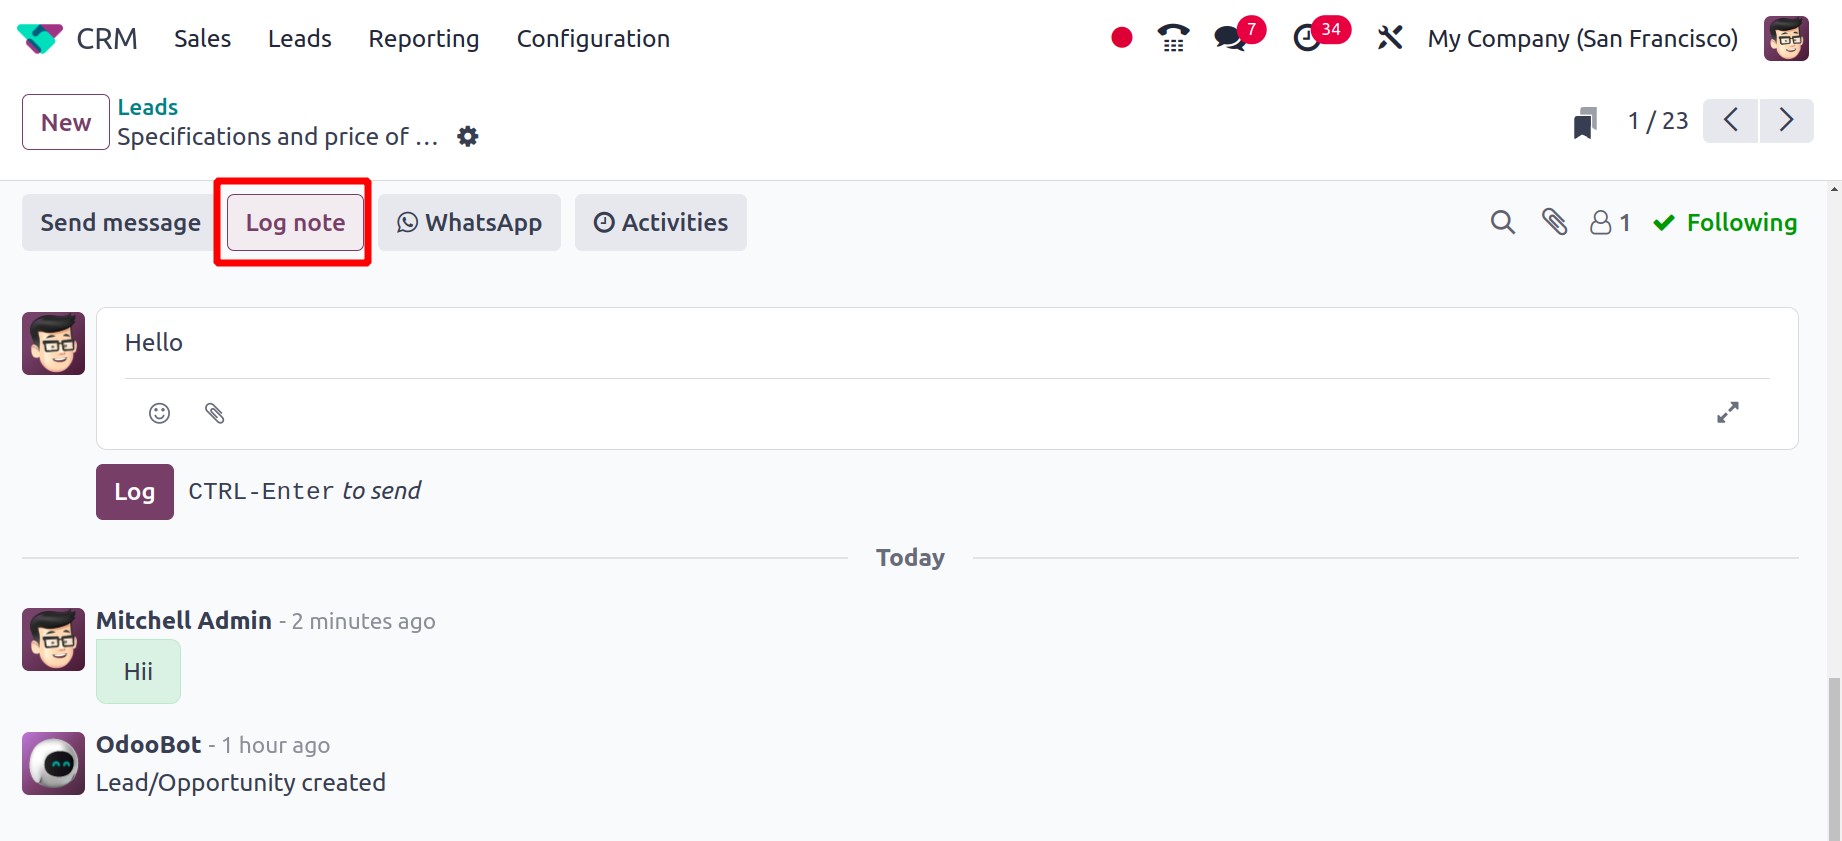
A section identical to this one will show up when you click on the Log note button. Nothing more than a tool for user internal conversation, log notes.
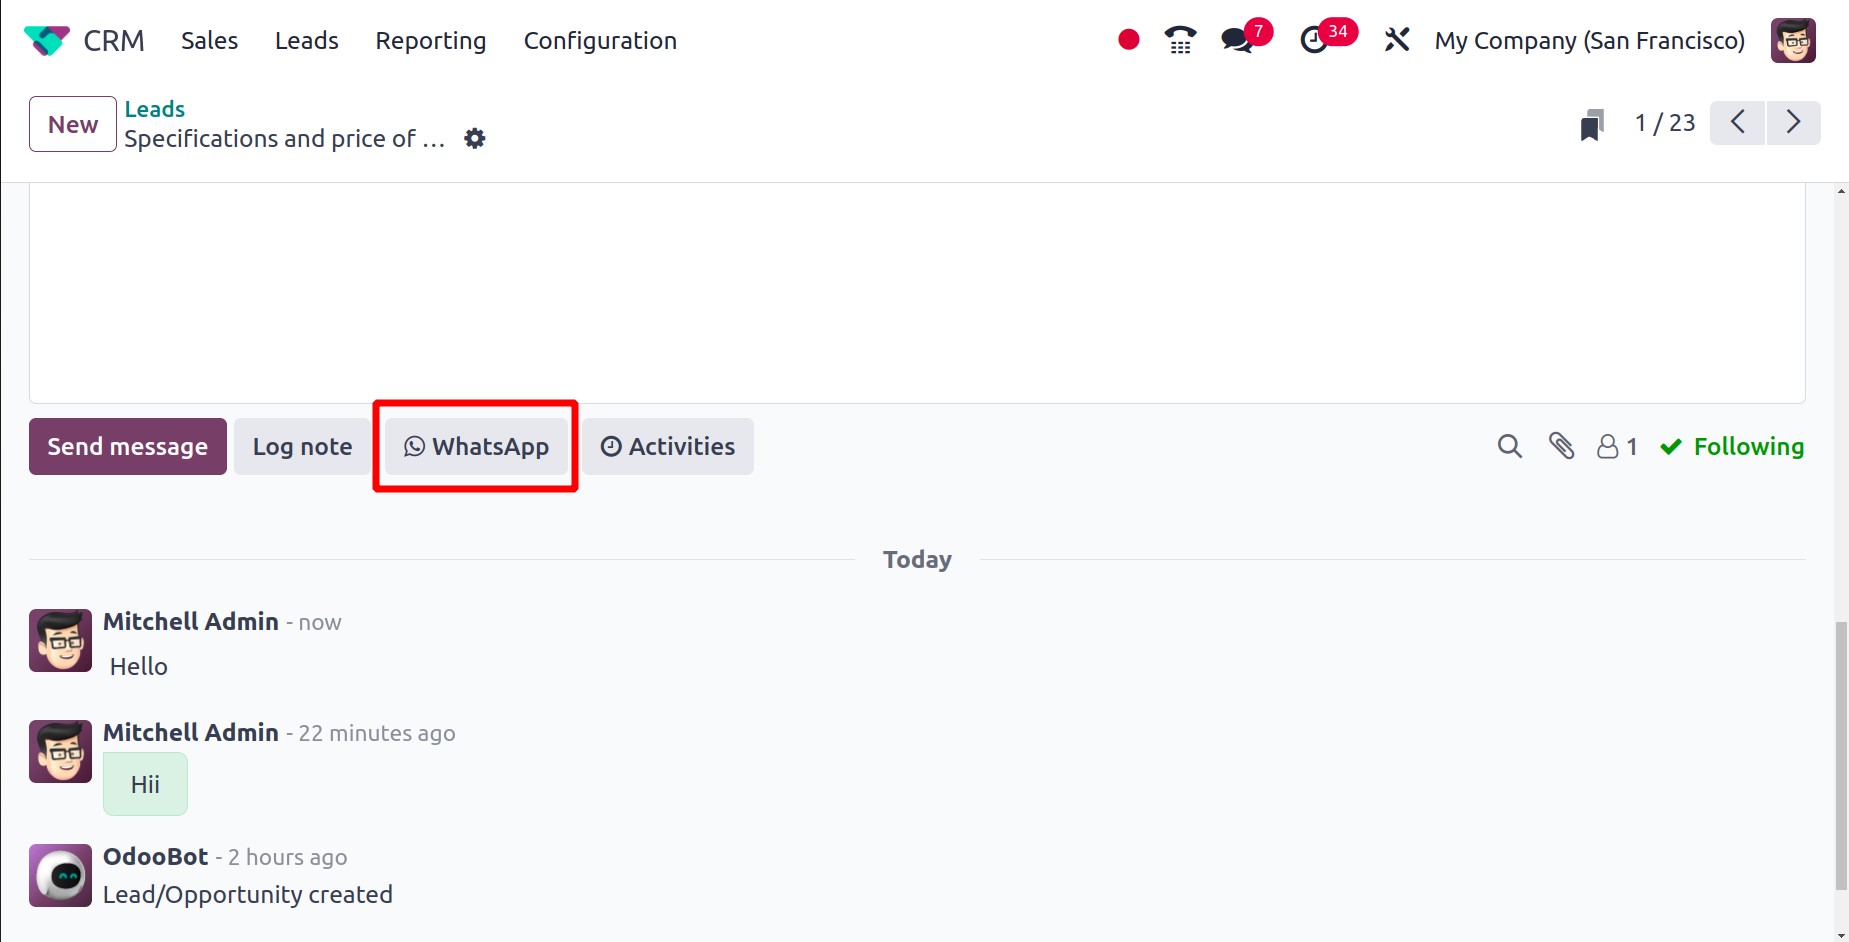
Odoo 17 brought with it a new feature called WhatApp. Odoo can now integrate WhatsApp as of this version as well. Customers can be contacted directly by users using this, and it is possible to get their responses.
Activities are the last choice. Thus, users can schedule Activities using this as well, which is comparable to what we previously mentioned. In the conversation, Odoo 17 added a new Search option in the chatter. It makes it easier to look for specific messages. Click the "searching" symbol, as seen in the screenshot below, to bring up the search option.
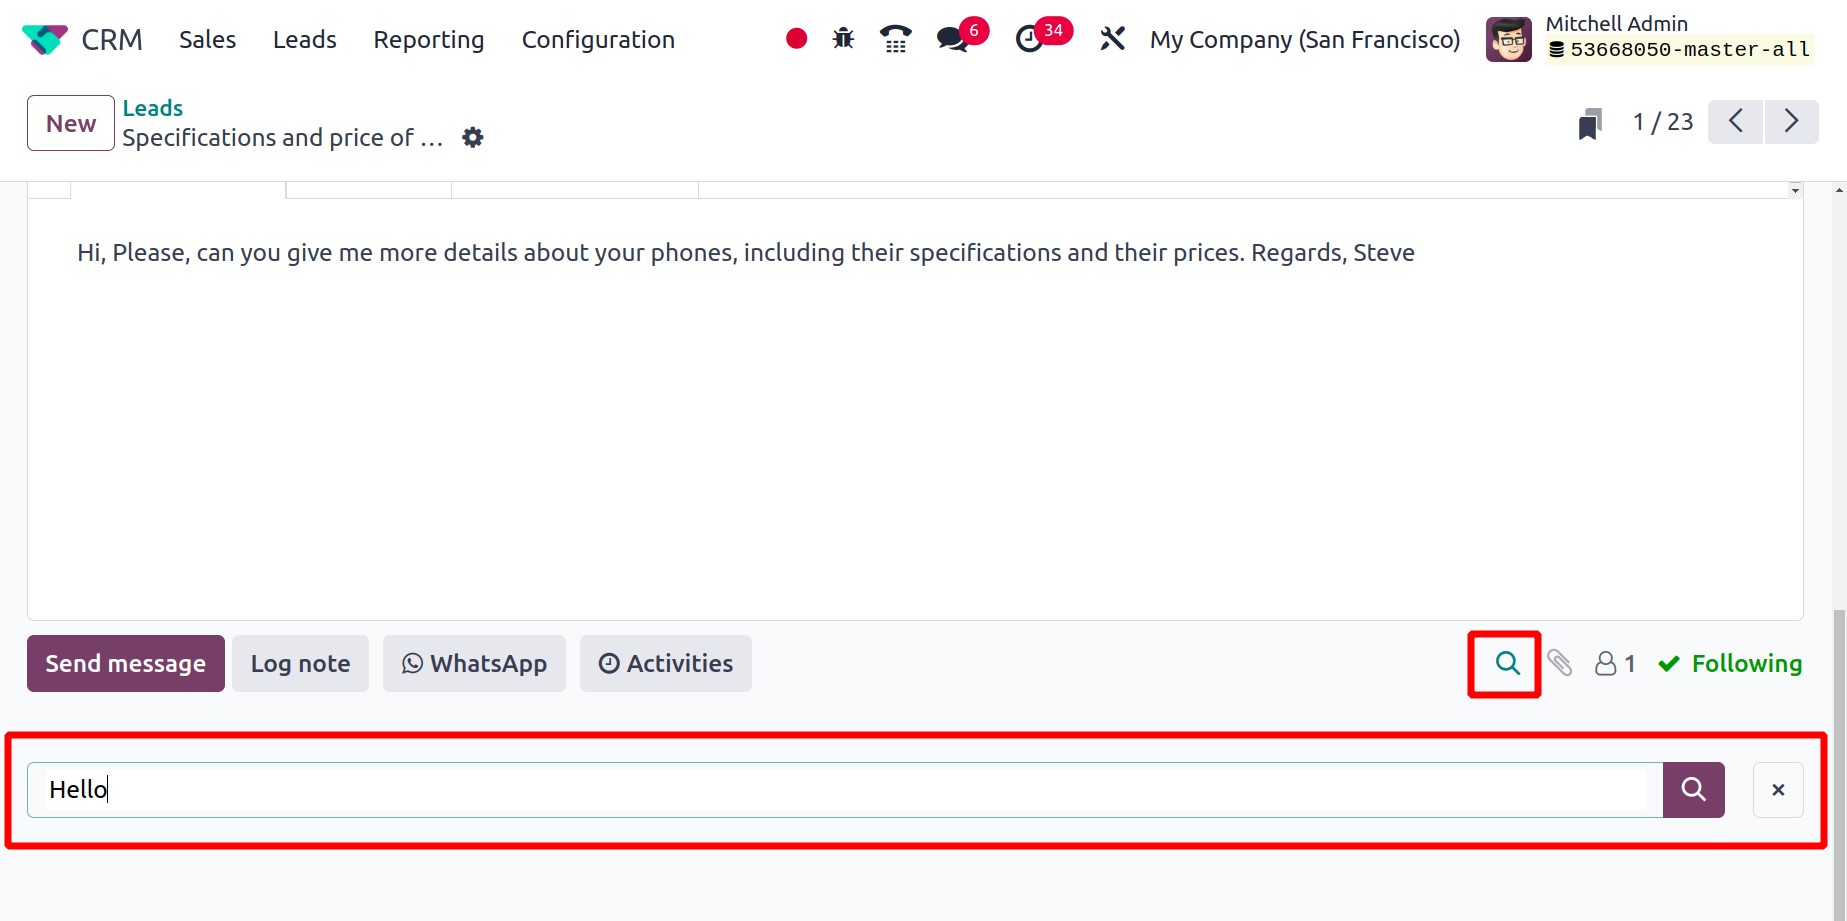
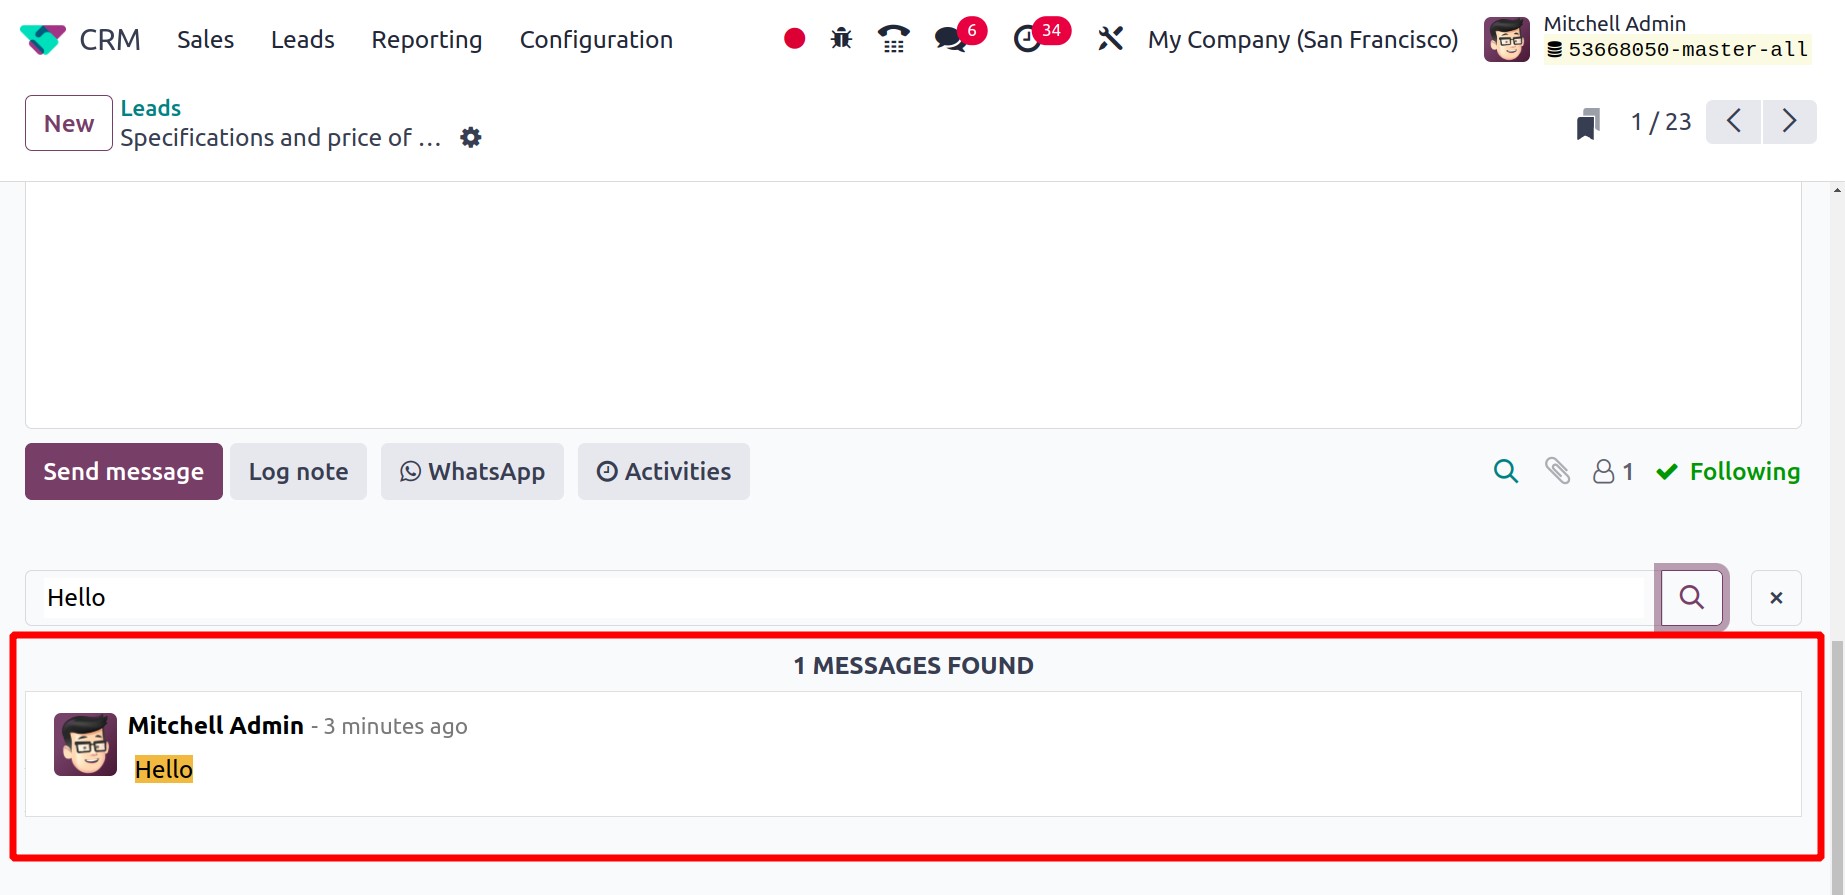
Add a text and search for the added text, which will show the results as shown in the screenshot below.
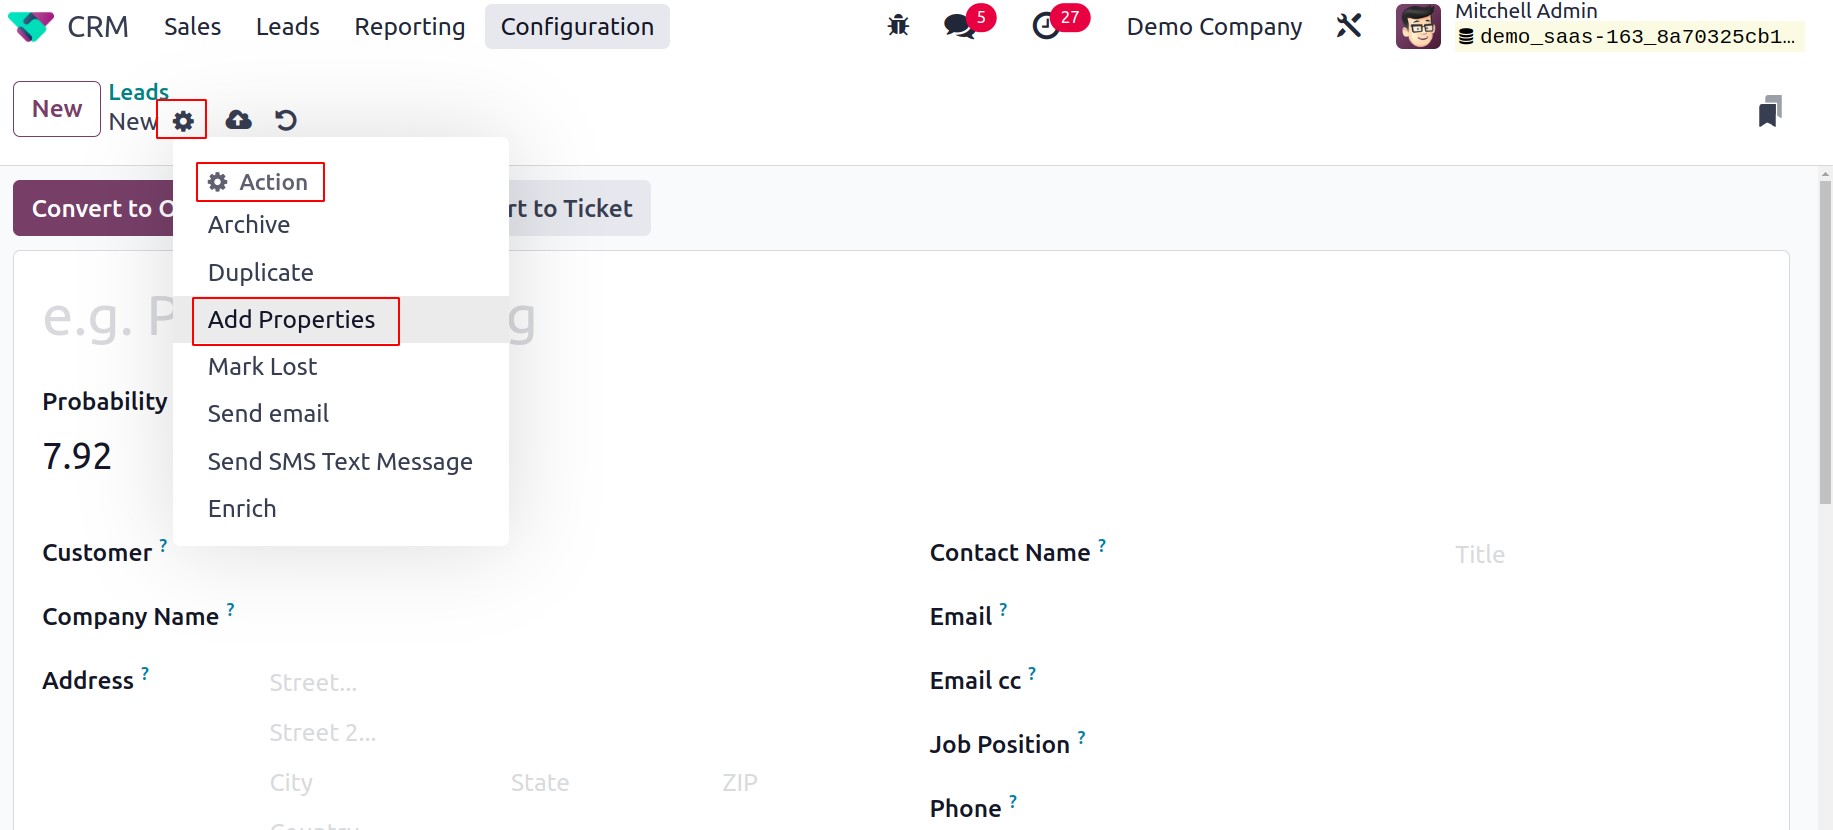
In this window, there is a new functionality called Add a Property that was added to Odoo. This function enables you to add personalized fields to the form view.
A pop-up window similar to the one below will appear when you click the Add a Property button.
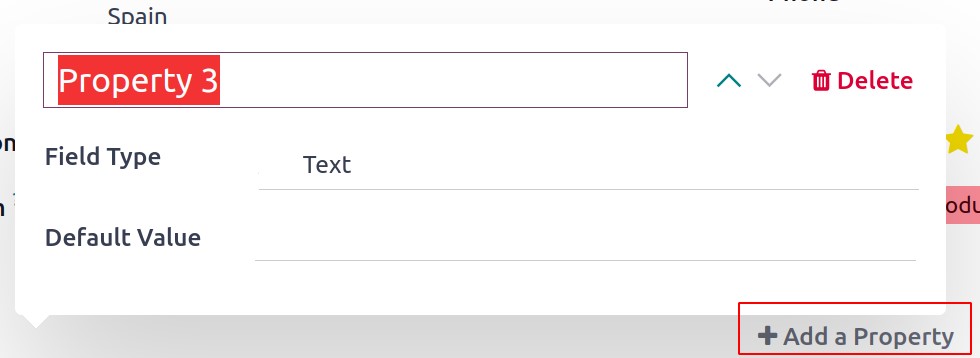
In the space provided, you can mention the name of the new field here. For instance, you can call the field Country if you wish to add the Country field to the form view.
The Field Type will include a drop-down menu from which you can choose the type of the new field. Depending on your preference, the field type can be Text, Checkbox, Integer, Decimal, Date, Date & Time, Selection, Tags, Many2one, or Many2many.
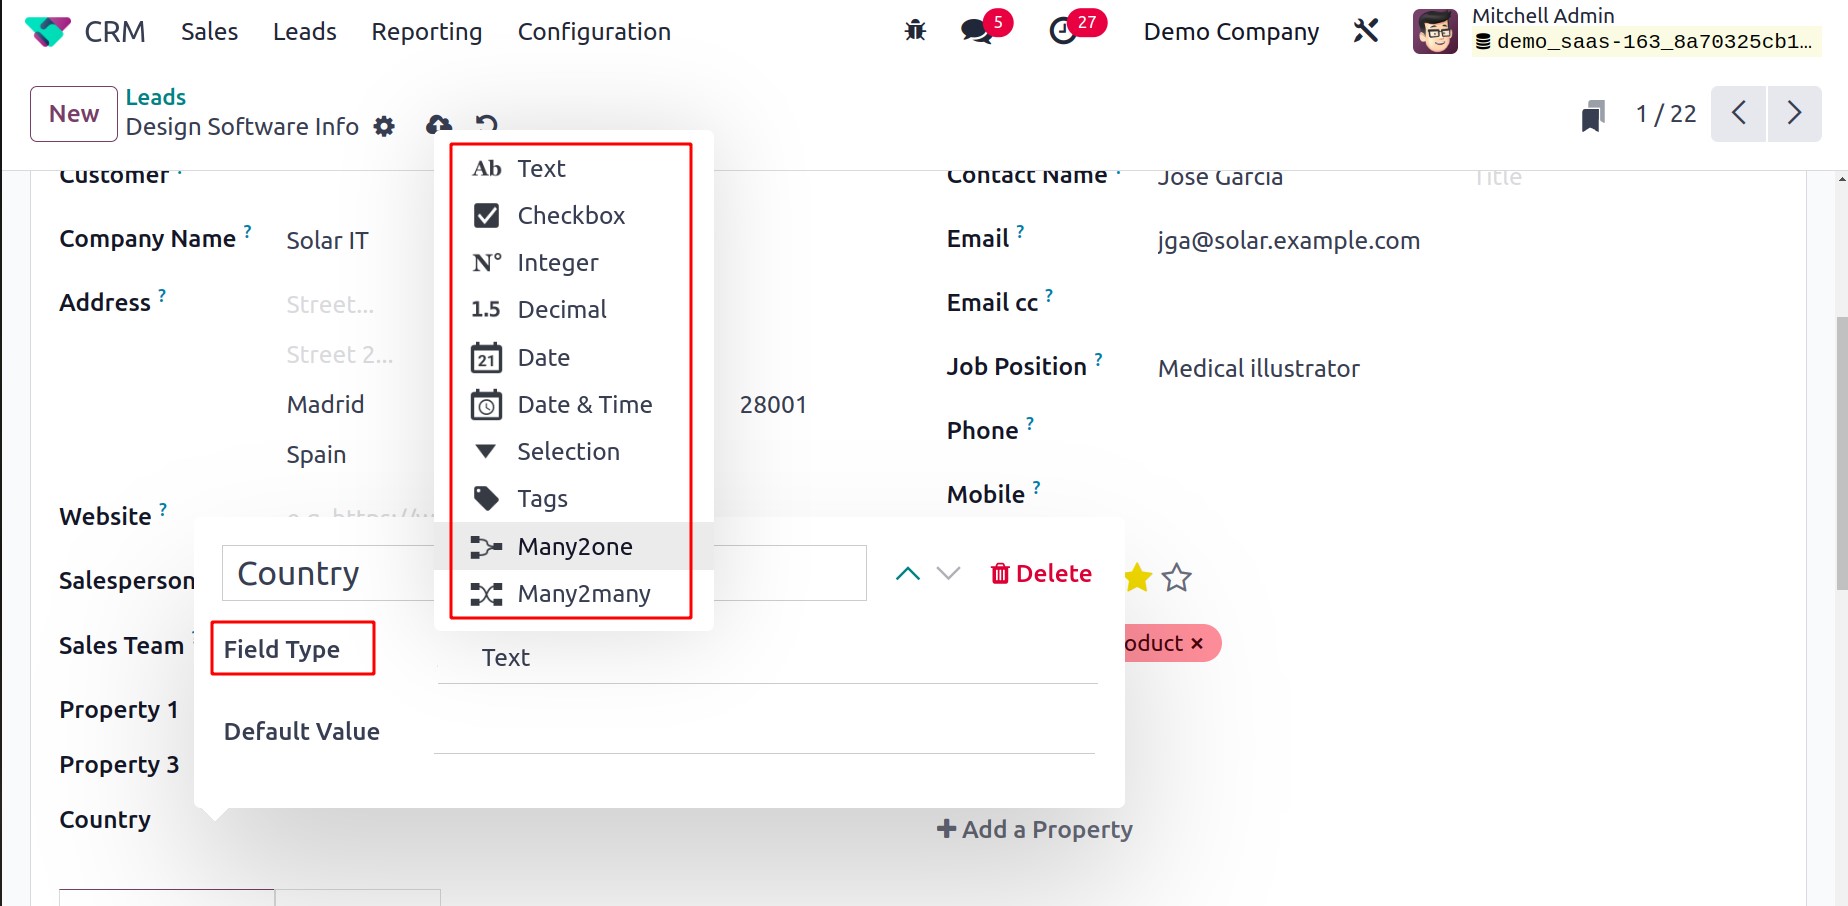
You can specify a Default Value for this new field in the relevant field after establishing the Field Type. By turning on the View in the Kanban field, you may see this field in Kanban.
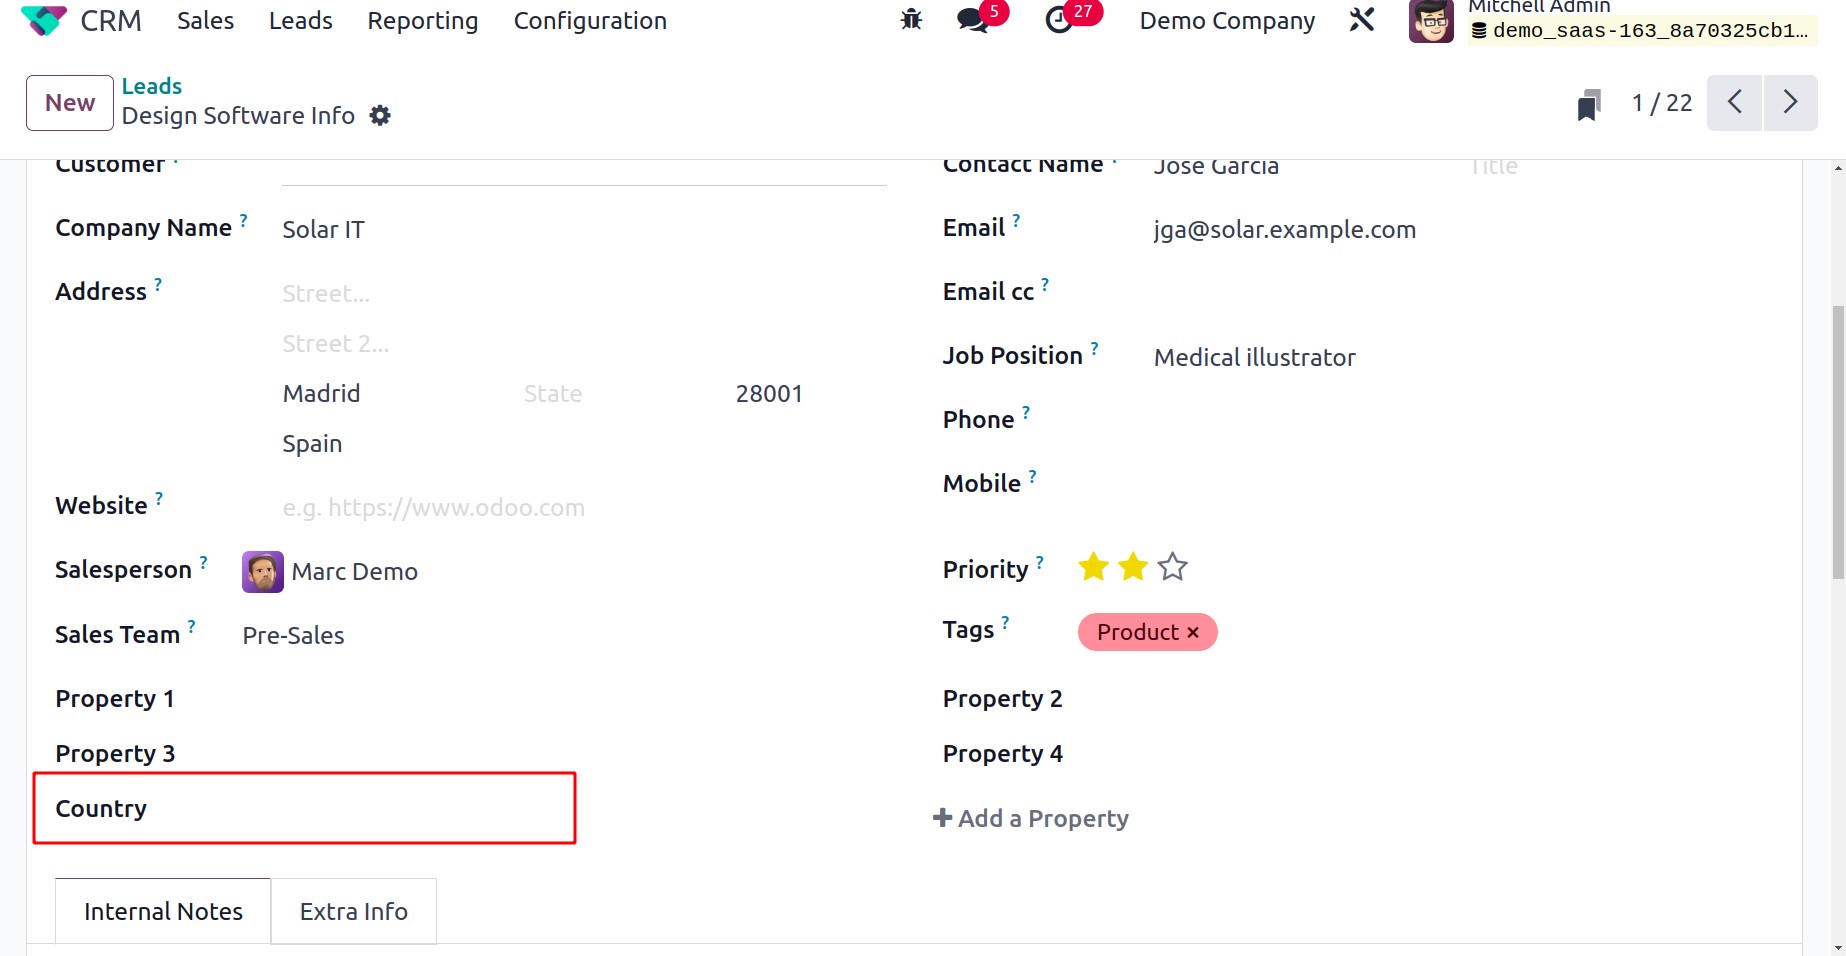
You can see that the lead's form view now includes a new field called Country.
The Add a Property button allows you to add a variety of these fields to the form display.
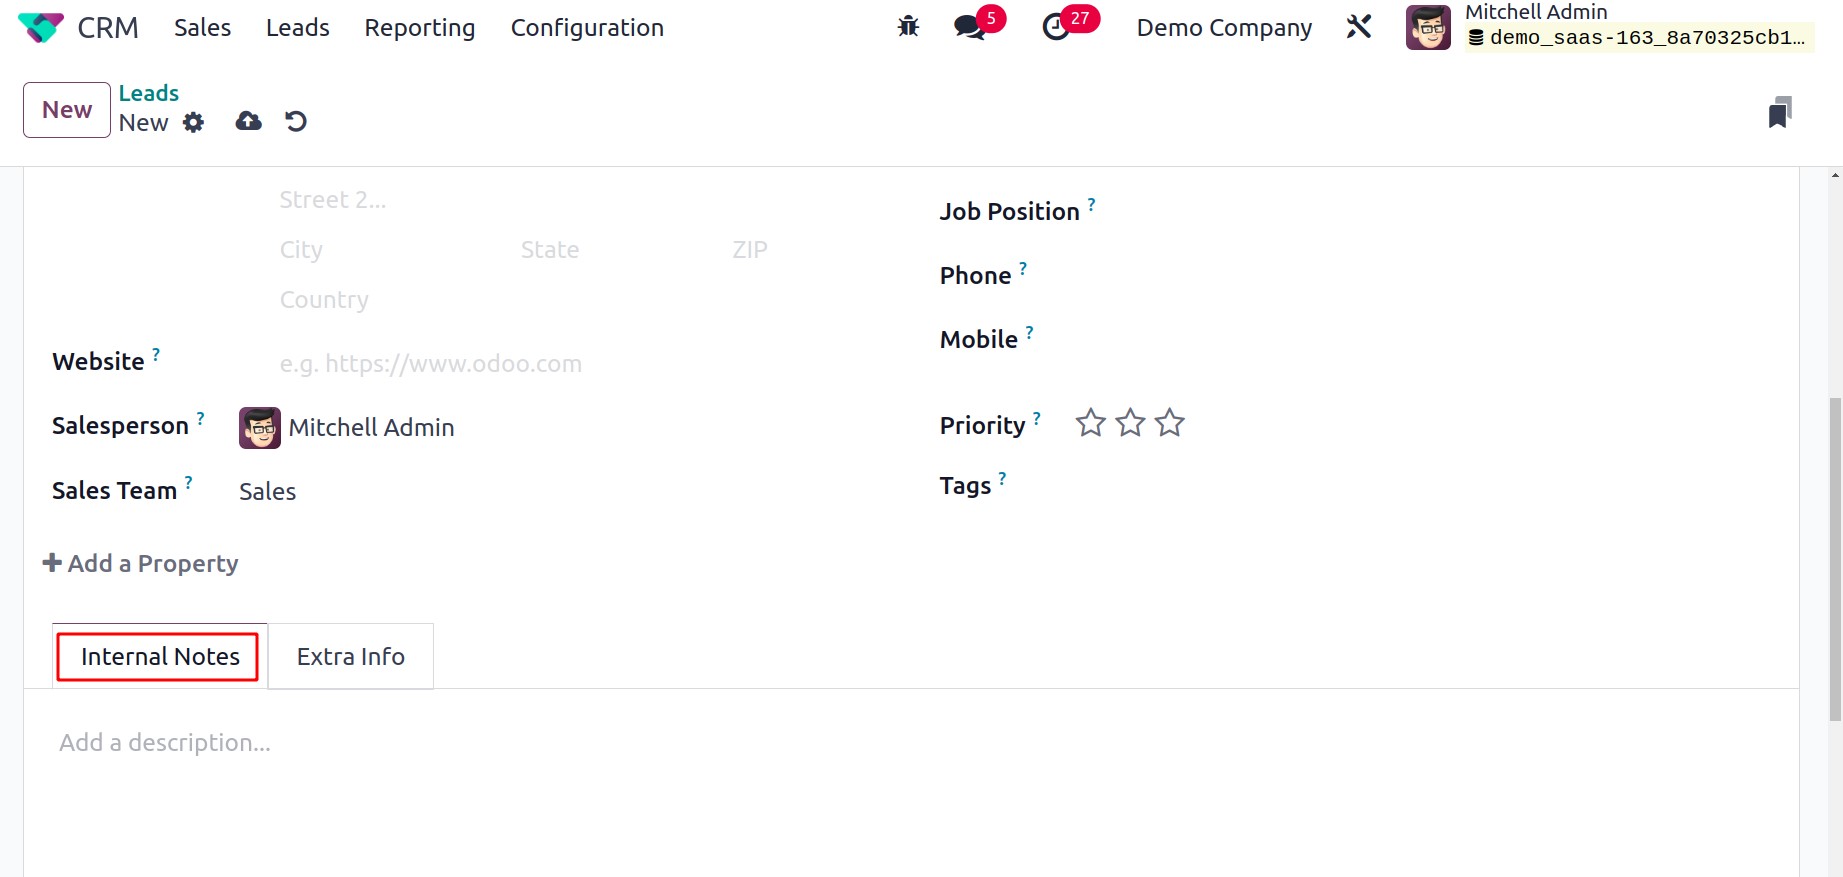
The Internal Notes tab is where you can add any further notes you have about the lead.
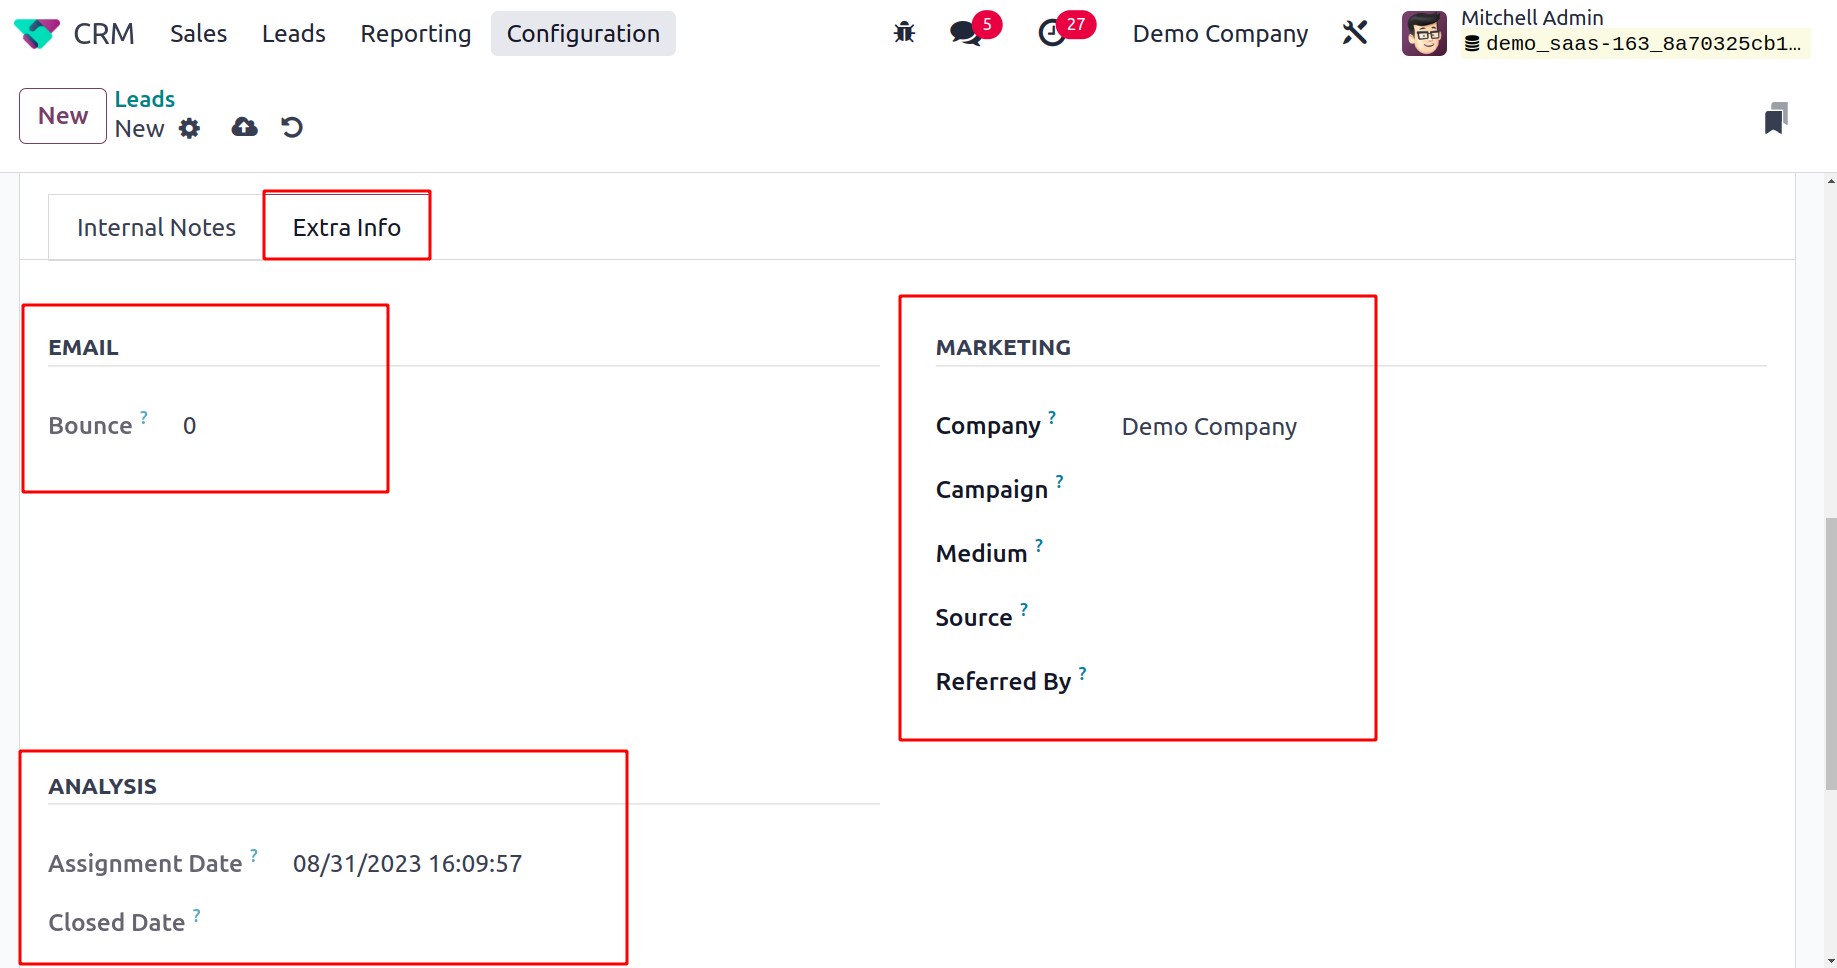
You may add the Marketing and Analysis details under the Extra Info tab. The number of emails that have bounced for this contact may be seen on the Bounce field's counter. Indicate the Company, Campaign, Medium, Source, and Referred By under the Marketing section. You may get information about the Assignment Date and Closed Date under the Analysis field.
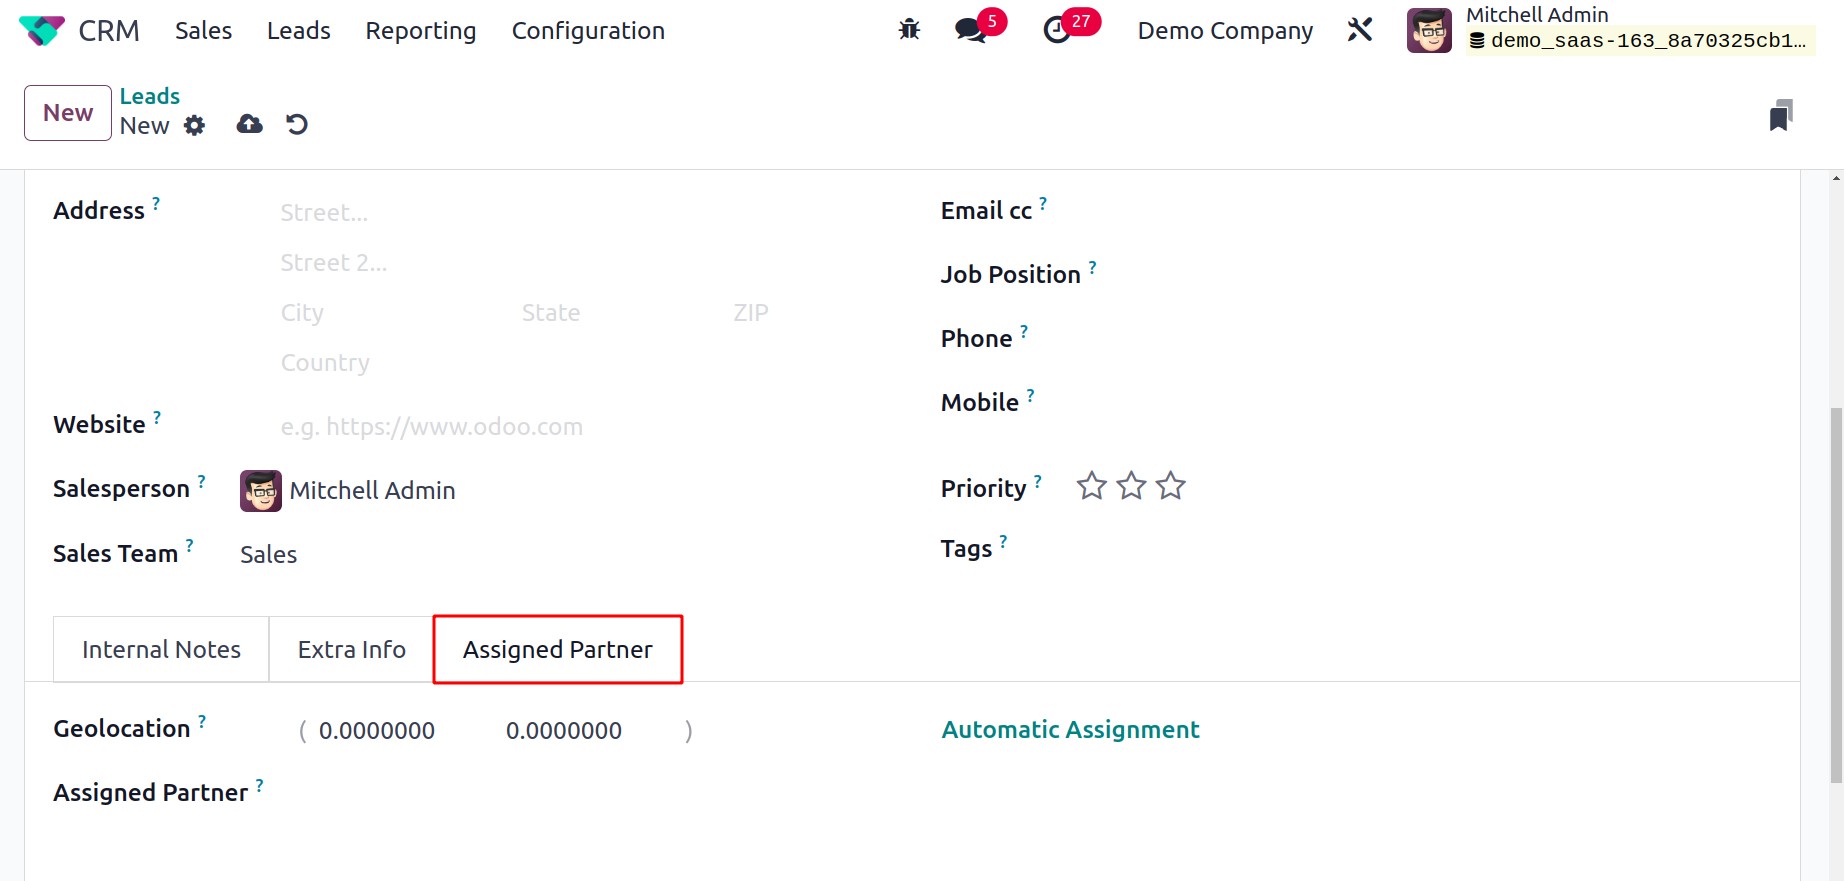
The Geolocation and Assigned Partner details can be entered under the Assigned Partner tab in the new lead creation box.
Generate leads
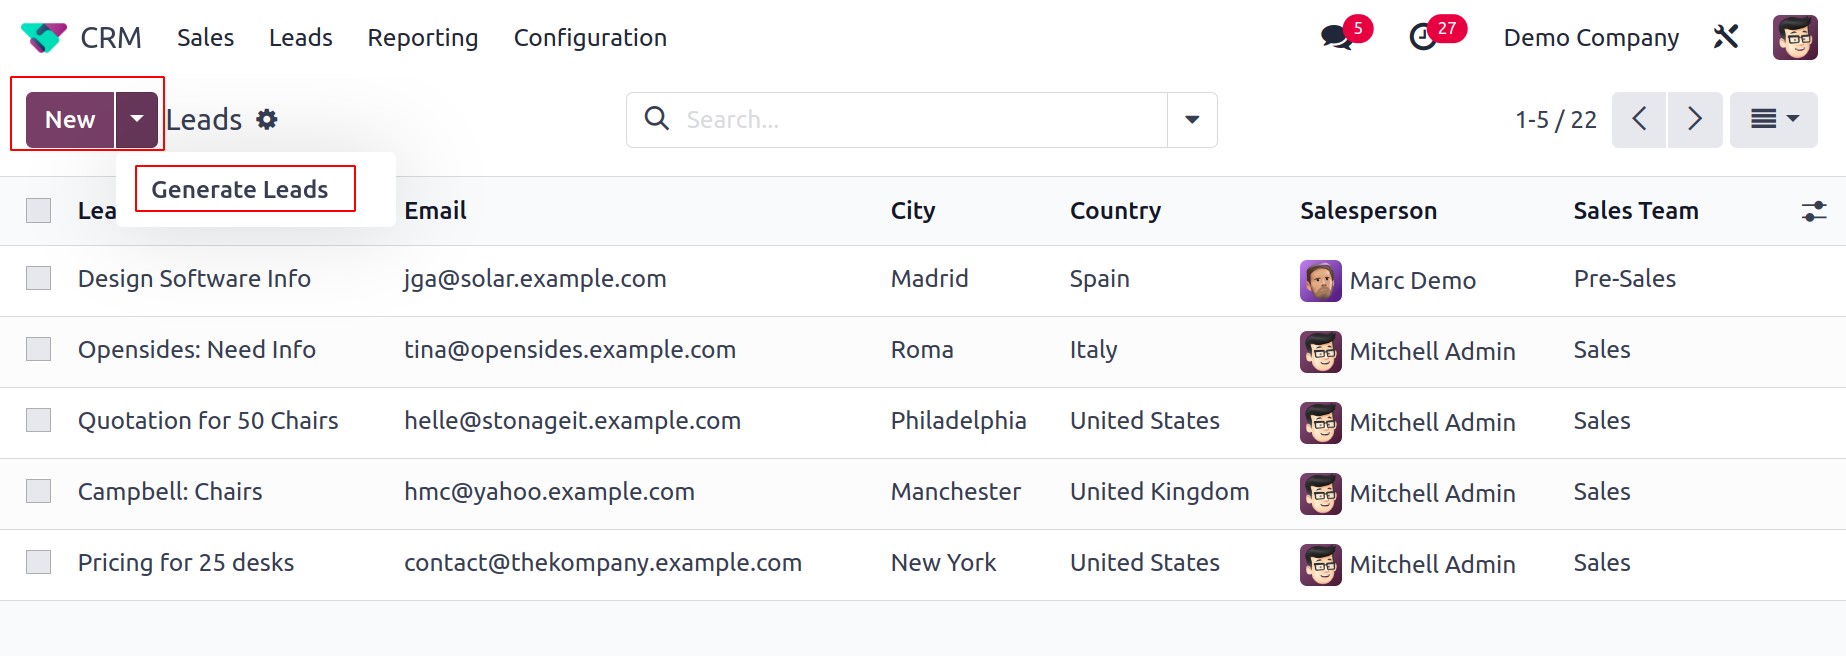
Odoo 17 provides a simple method for generating leads directly from the CRM module. Only the enterprise edition is able to use this function. You can activate the Lead Mining option from the module's Settings menu to receive this capability in your CRM module. As illustrated in the figure below, this option may be found under the Lead Generation tab.
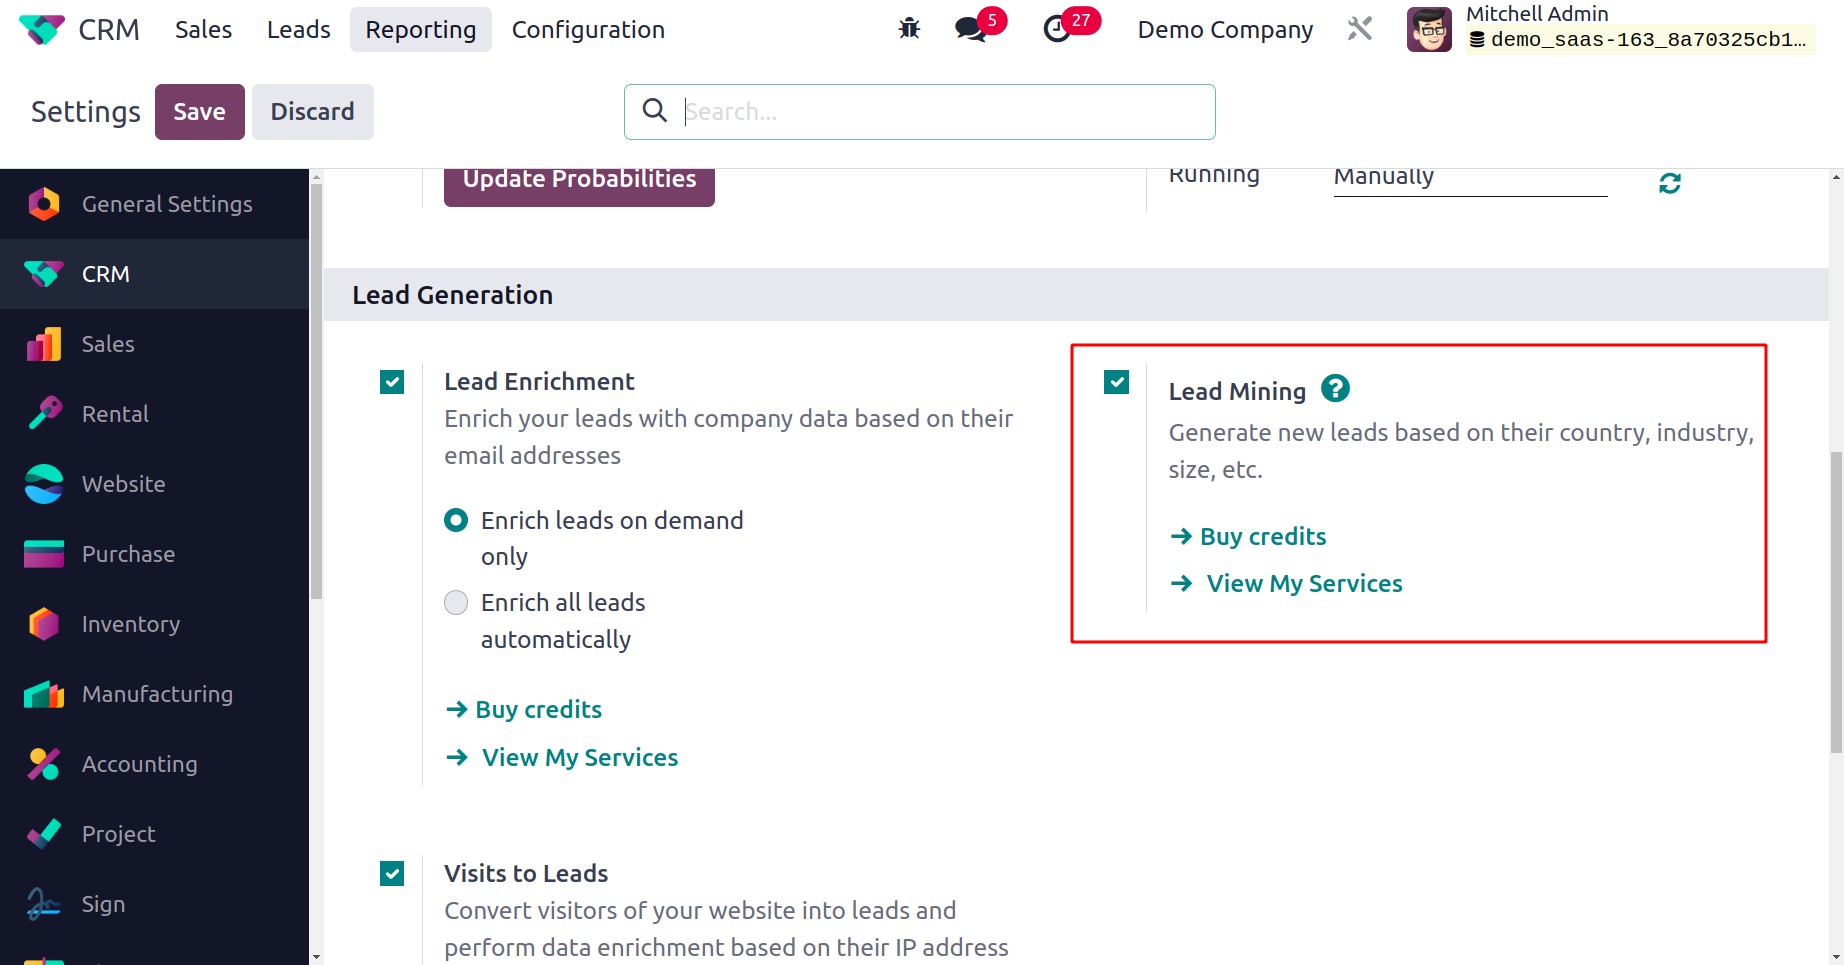
Users of Odoo 17 Enterprise can take advantage of this function to enhance the lead creation procedure. The Generate Leads button will help you generate leads automatically from the Leads management window, as you can see in the screenshot shown below.
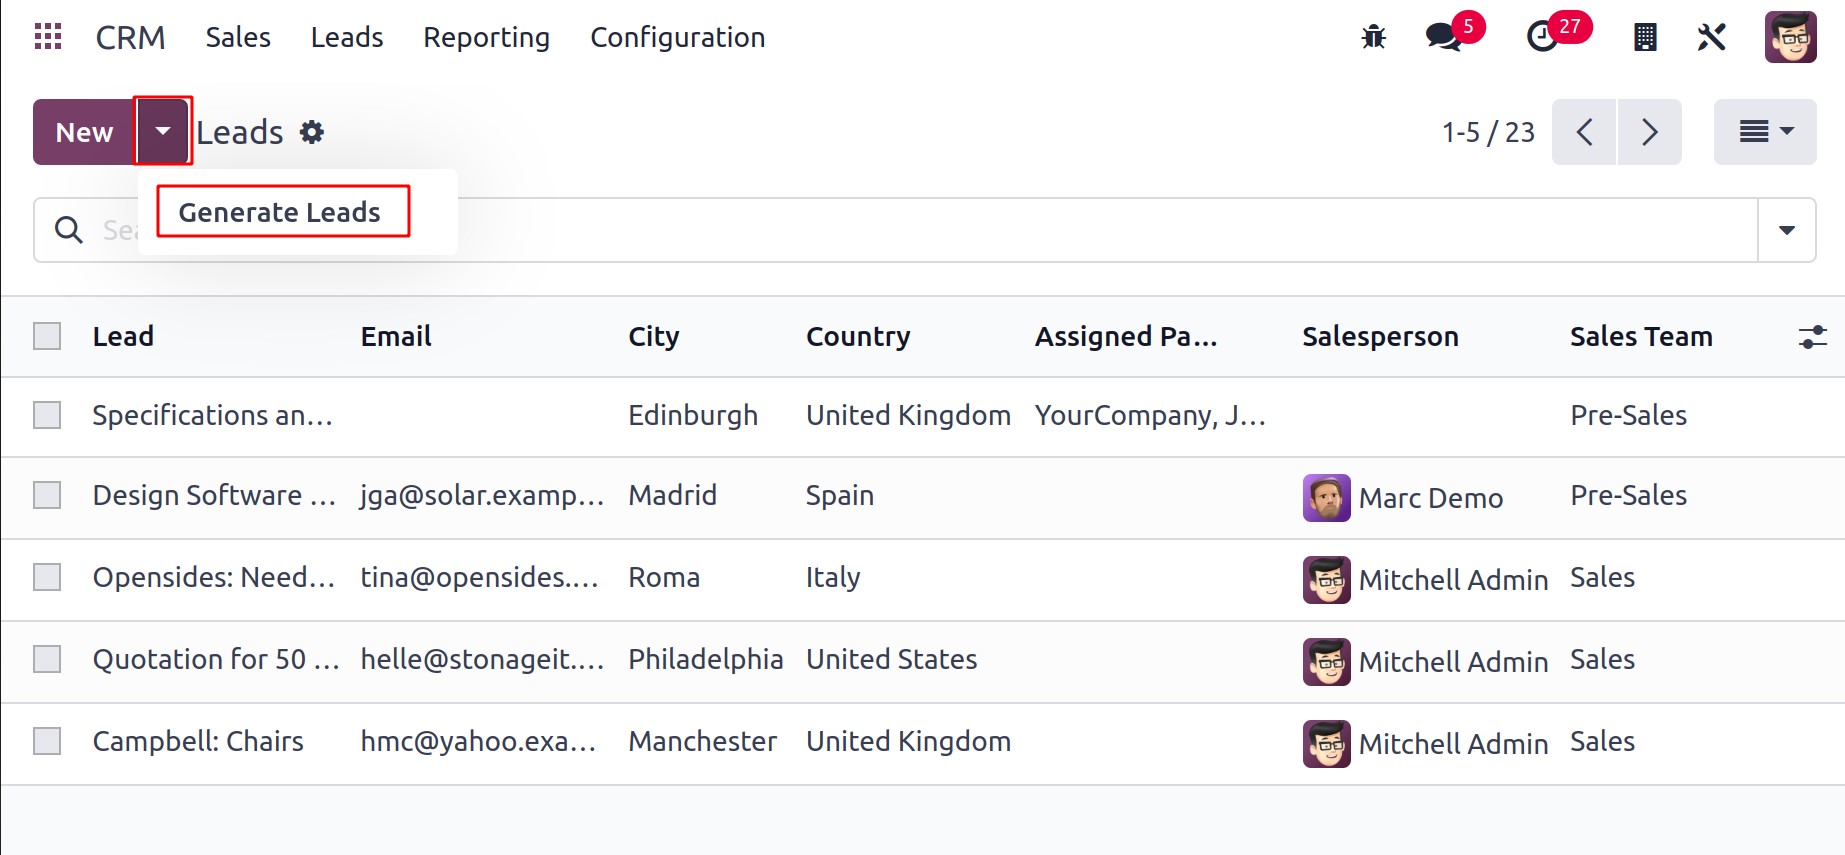
You may now set lead rules by clicking theGenerate Leads button. As soon as you click on this button, a pop-up describing the guidelines for producing leads will display. This is how the pop-up window will appear.
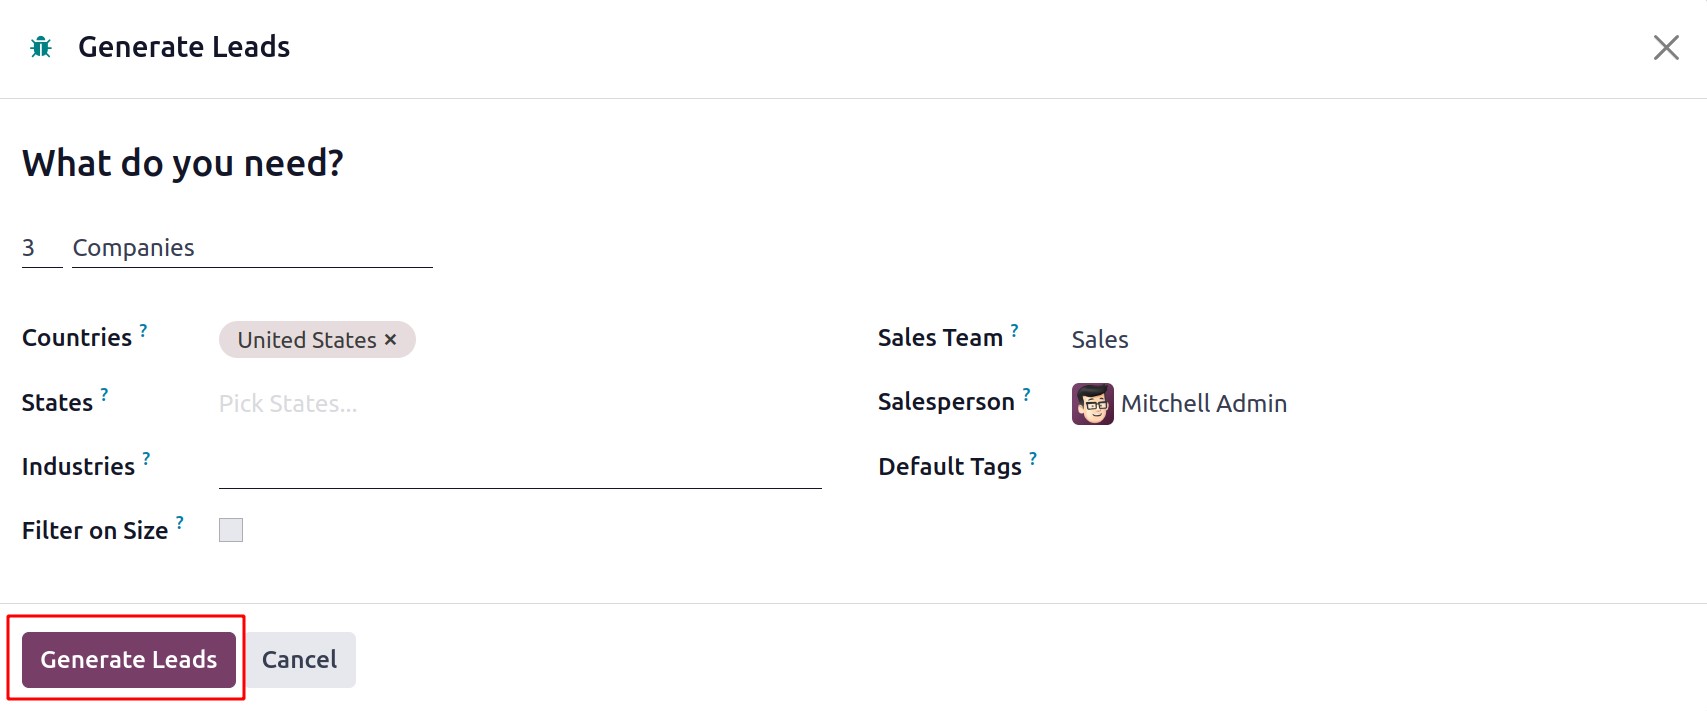
The quantity of leads needed from a certain target might be mentioned here. Targets can be either Companies or Companies and their Contacts. You may also mention the target lead's Countries, States, and Industries along with these specifics. To filter the leads depending on their size, turn on the Filter on Size option. To manage the leads, you can designate a Sales Team and a Salesperson in the corresponding areas. In the Default Tags area, enter pertinent tags for the leads. When you have finished filling out all the fields, click the "Generate Leads," button and leads will be generated based on the information you have provided.
Remember that this is a paid service and that you need to have a particular number of credits to create leads in the CRM module.
You will find a distinct platform for the generation of leads based on specific criteria in the Configuration menu of the Odoo 17 CRM module. You may find the Lead Mining Requests option under the Lead Generation tab in the Configuration menu of the module, where you can access this platform.
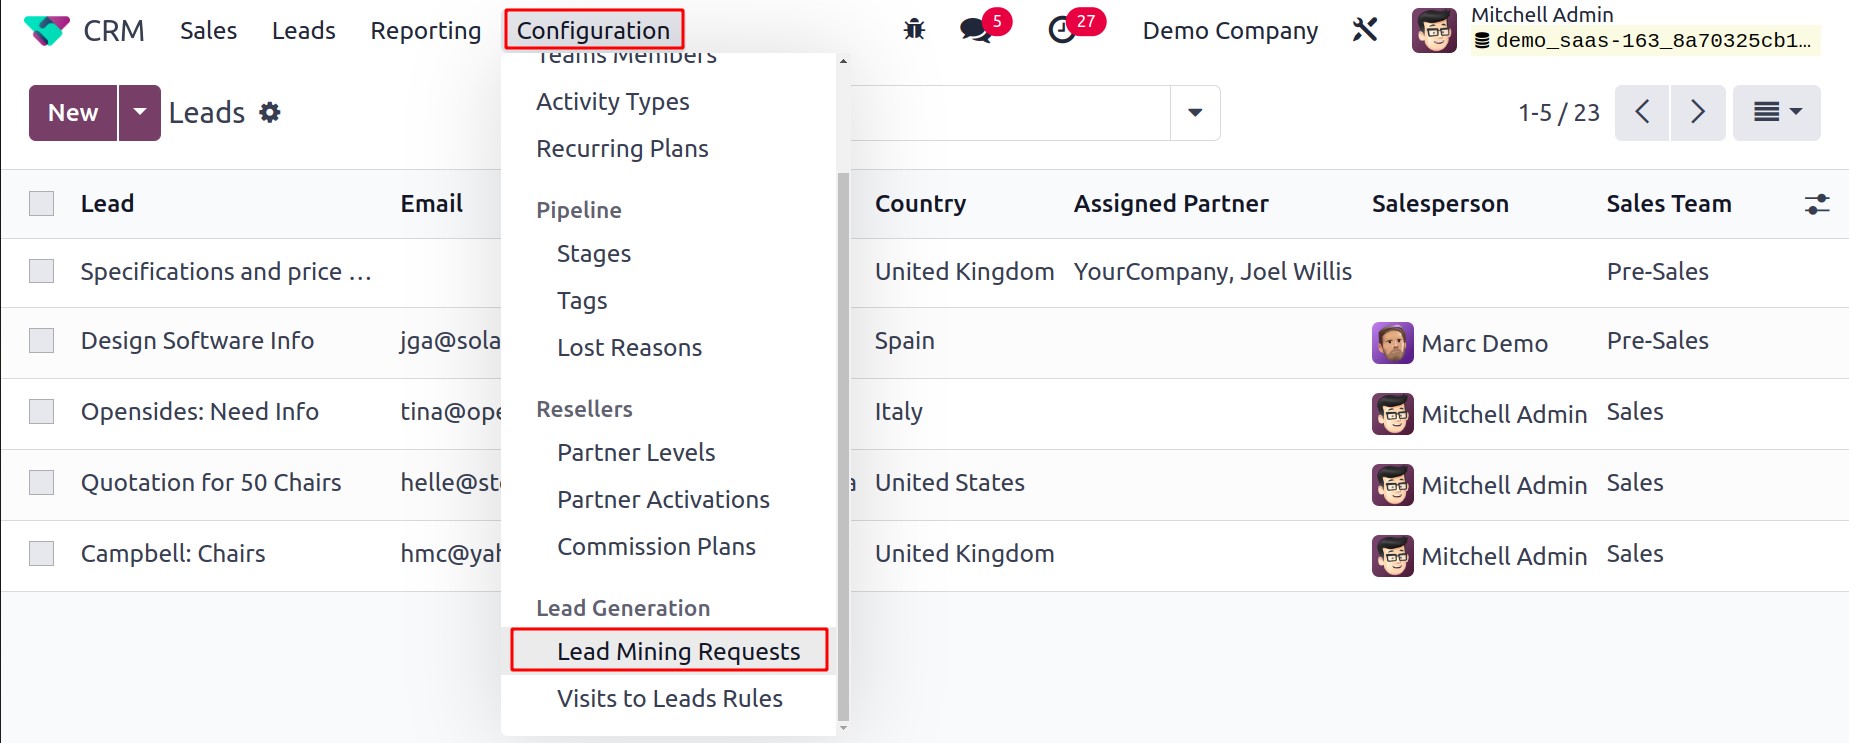
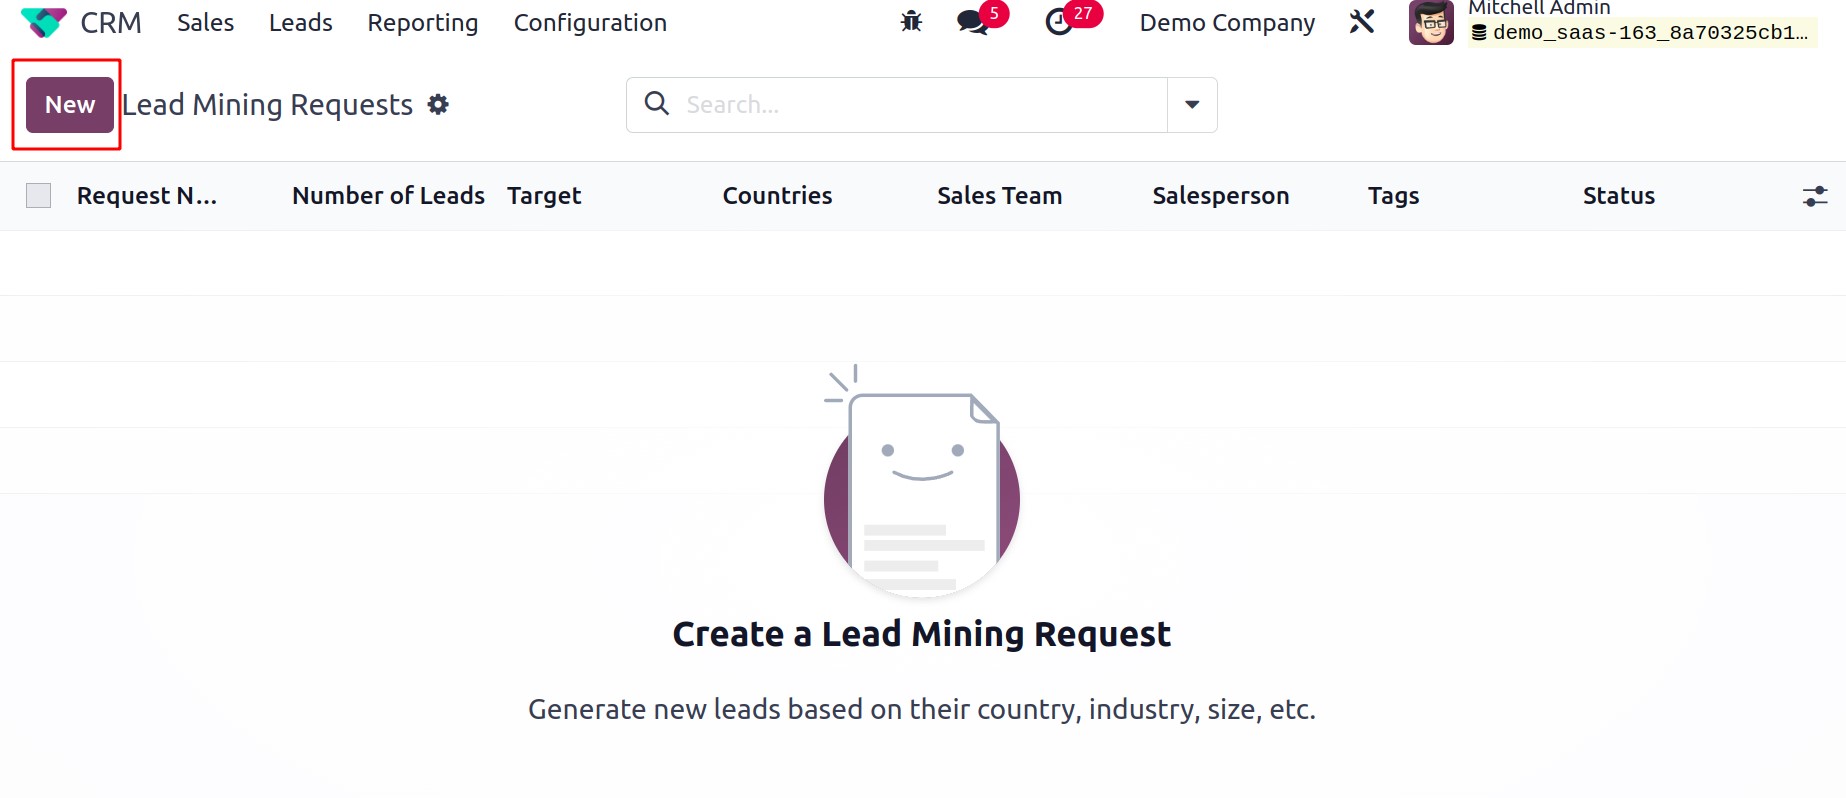
All of these lead generating requests will be shown on this platform together with information on the Request Number, Leads, Target, Country, Sales Team, Salesperson, Tags, and Status. You can make a new lead mining request using theNEW button, just as we did earlier.
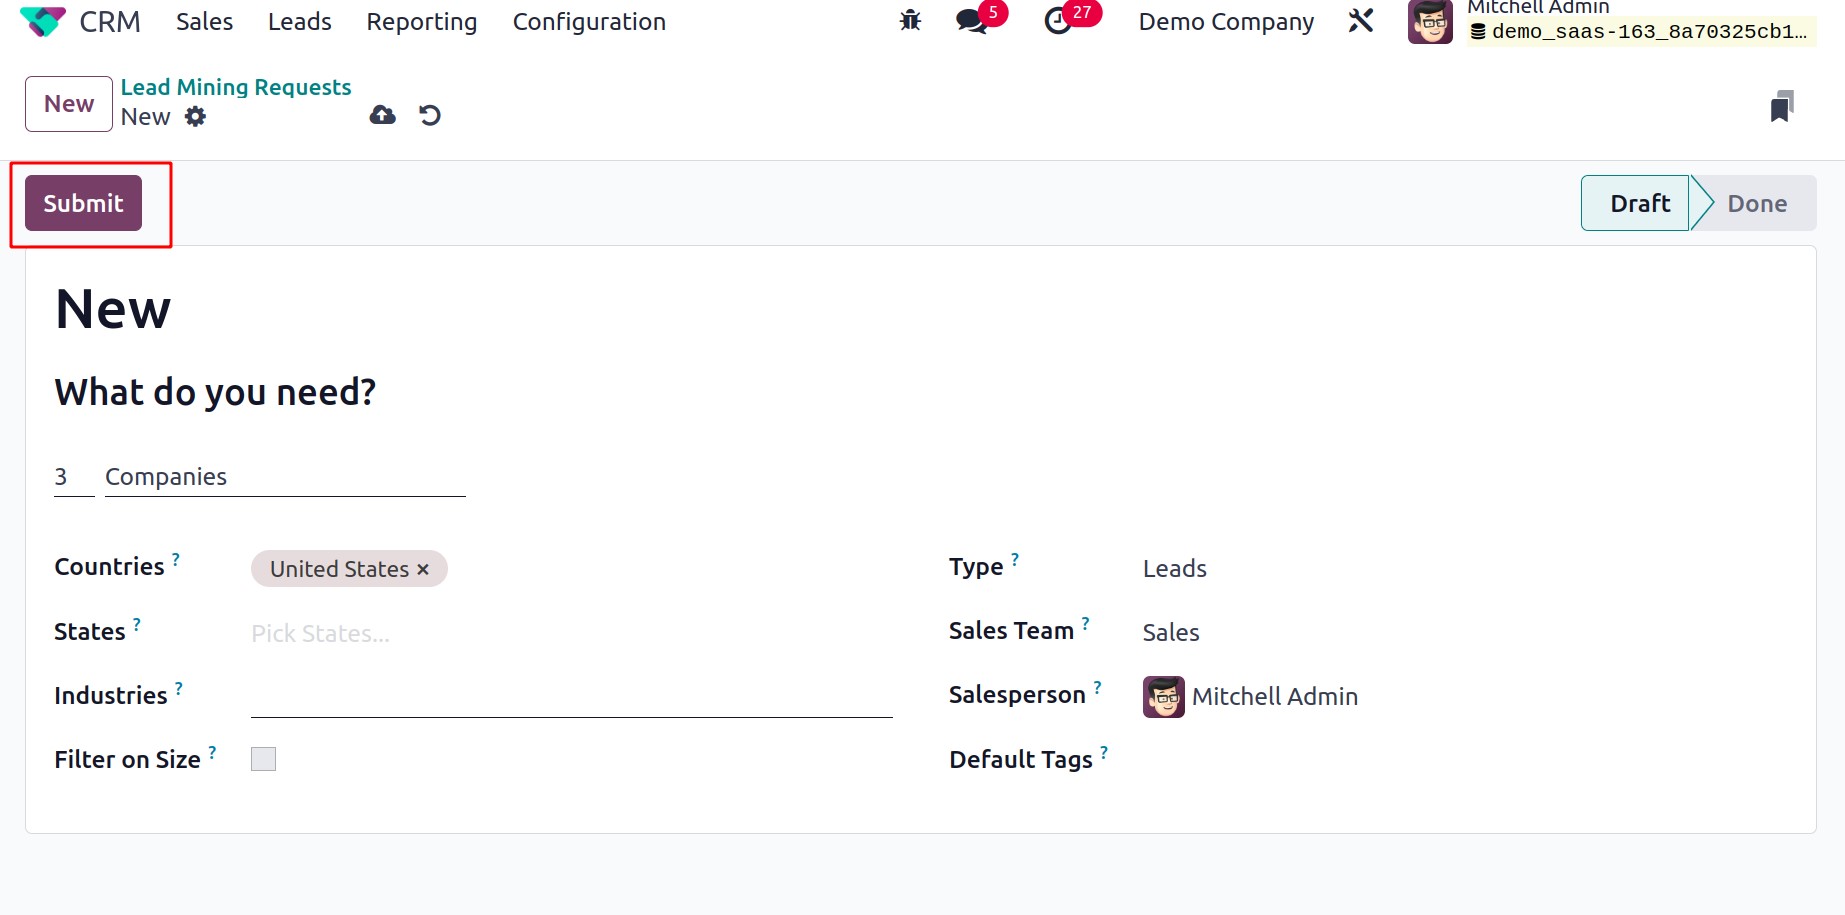
You can build fresh lead mining requests by including the requisite lead count, countries, states, industries, type, sales team, salesperson, and default tags in the appropriate fields. You can easily mine leads and opportunities with these lead mining queries. You can do this by choosing the corresponding choice in the Type field. All of this information will be immediately saved by Odoo in your database, and you can submit the request by using the Submit button.
Visits to Leads Rules
With the aid of the Odoo 17 CRM module, the user may easily convert leads from visits to their website. You can build rules for the conversion of visits into new leads using the Visits to Leads Rules platform, which is accessible from the module's Configuration menu under the Lead Generation tab. You must enable the Visit to Leads option from the Lead Generation tab under the Settings menu in order to use this feature. Using the visitor's IP address as a basis, you can perform data enrichment.
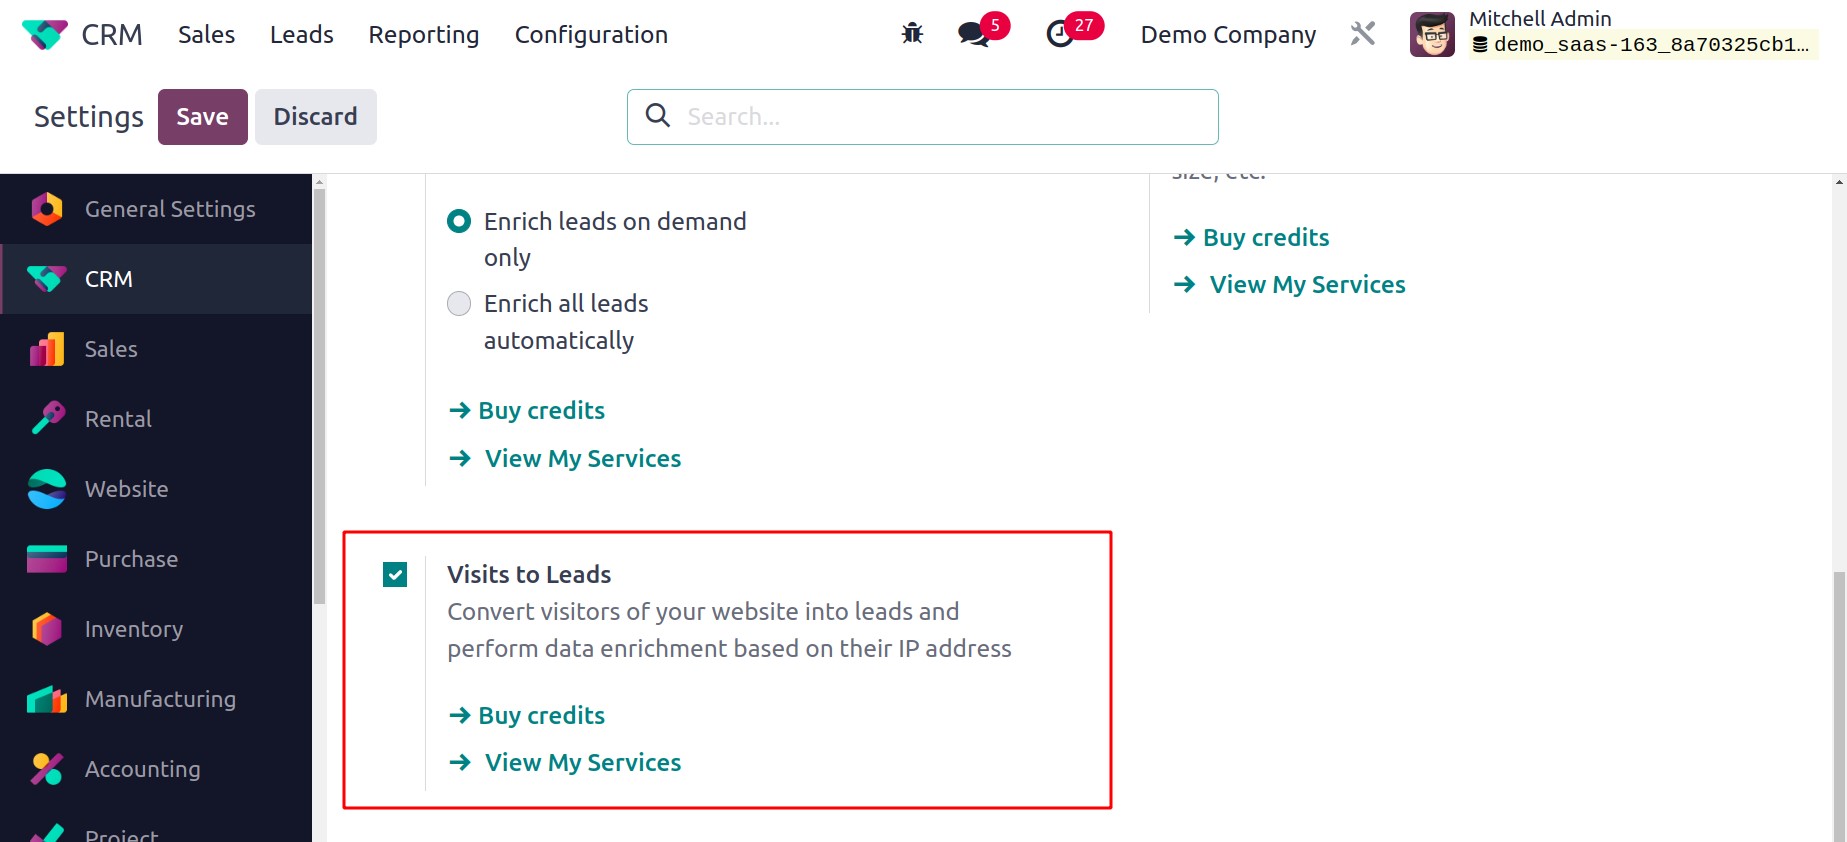
This feature is incorporated into Odoo's Website module. Therefore, be sure to add the Website module to your database before using this feature. As said before, this option is accessible from the module's Configuration menu under the Lead Generation tab.
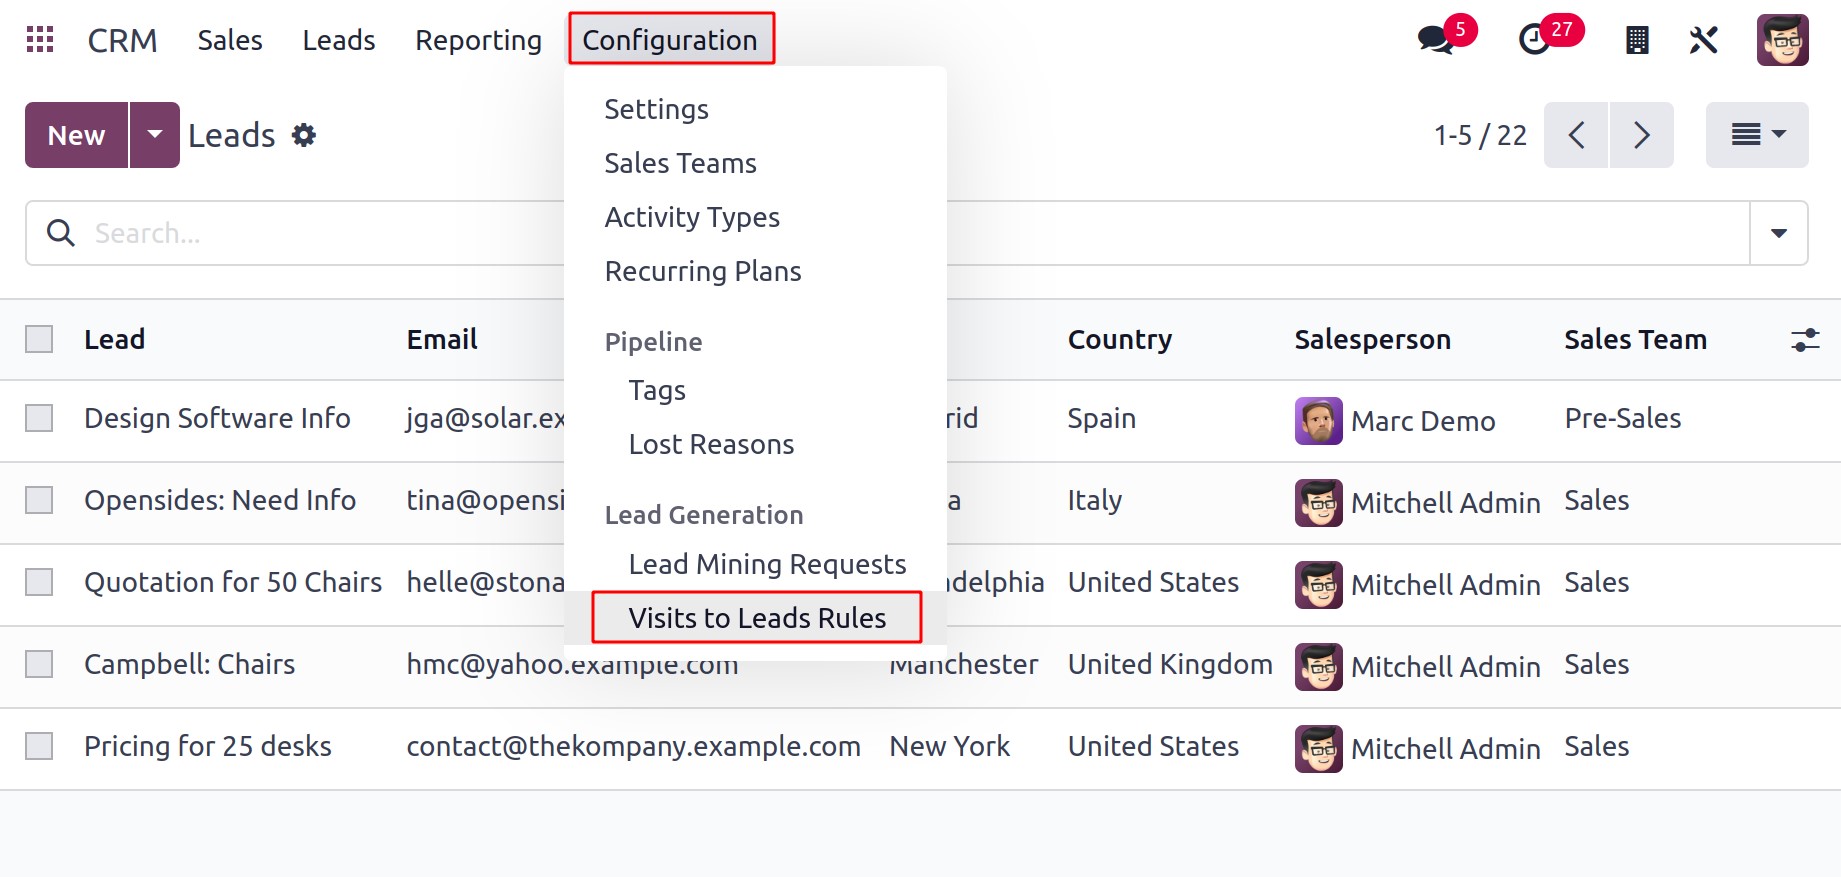
The Visits to Leads Rules platform will display already defined rules with the information of the Rule Name and Type, as you can see in the screenshot below.
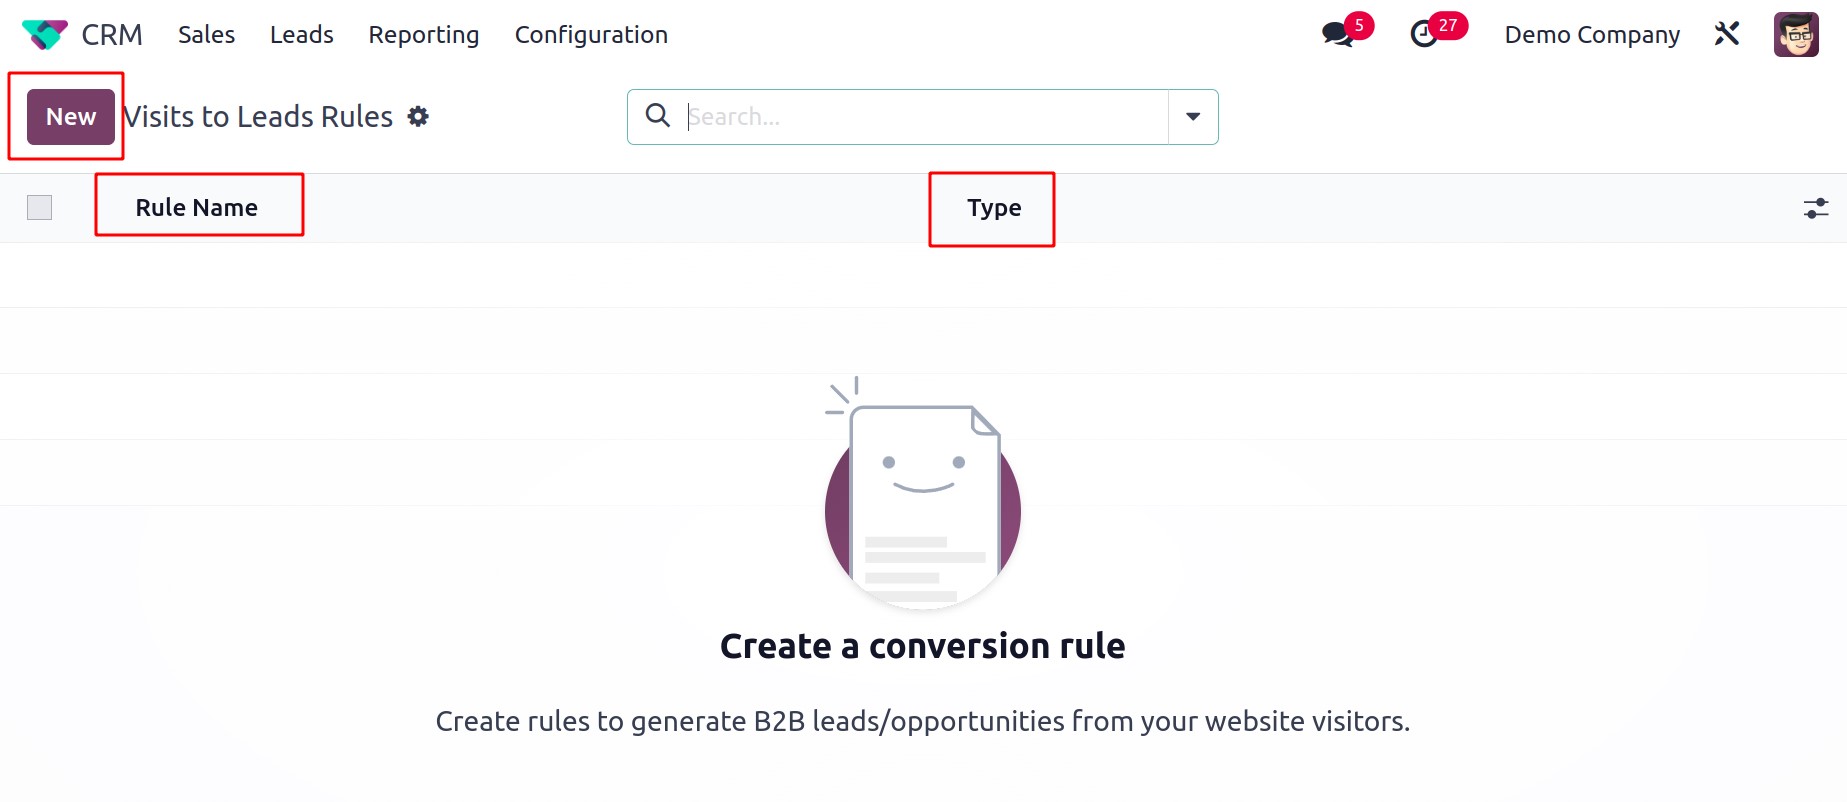
You may use the NEW button to add additional rules for the conversion of website visitors into leads. As soon as you click the NEW button, a new window where you can enter the information needed to turn visitors into new leads will emerge.
In the Rule Name field, you can first give the rule a suitable name. Next, choose the Data Tracking target. Companies or Companies and their Contacts are also acceptable options. The newly generated rule will be activated when you click the Active button.
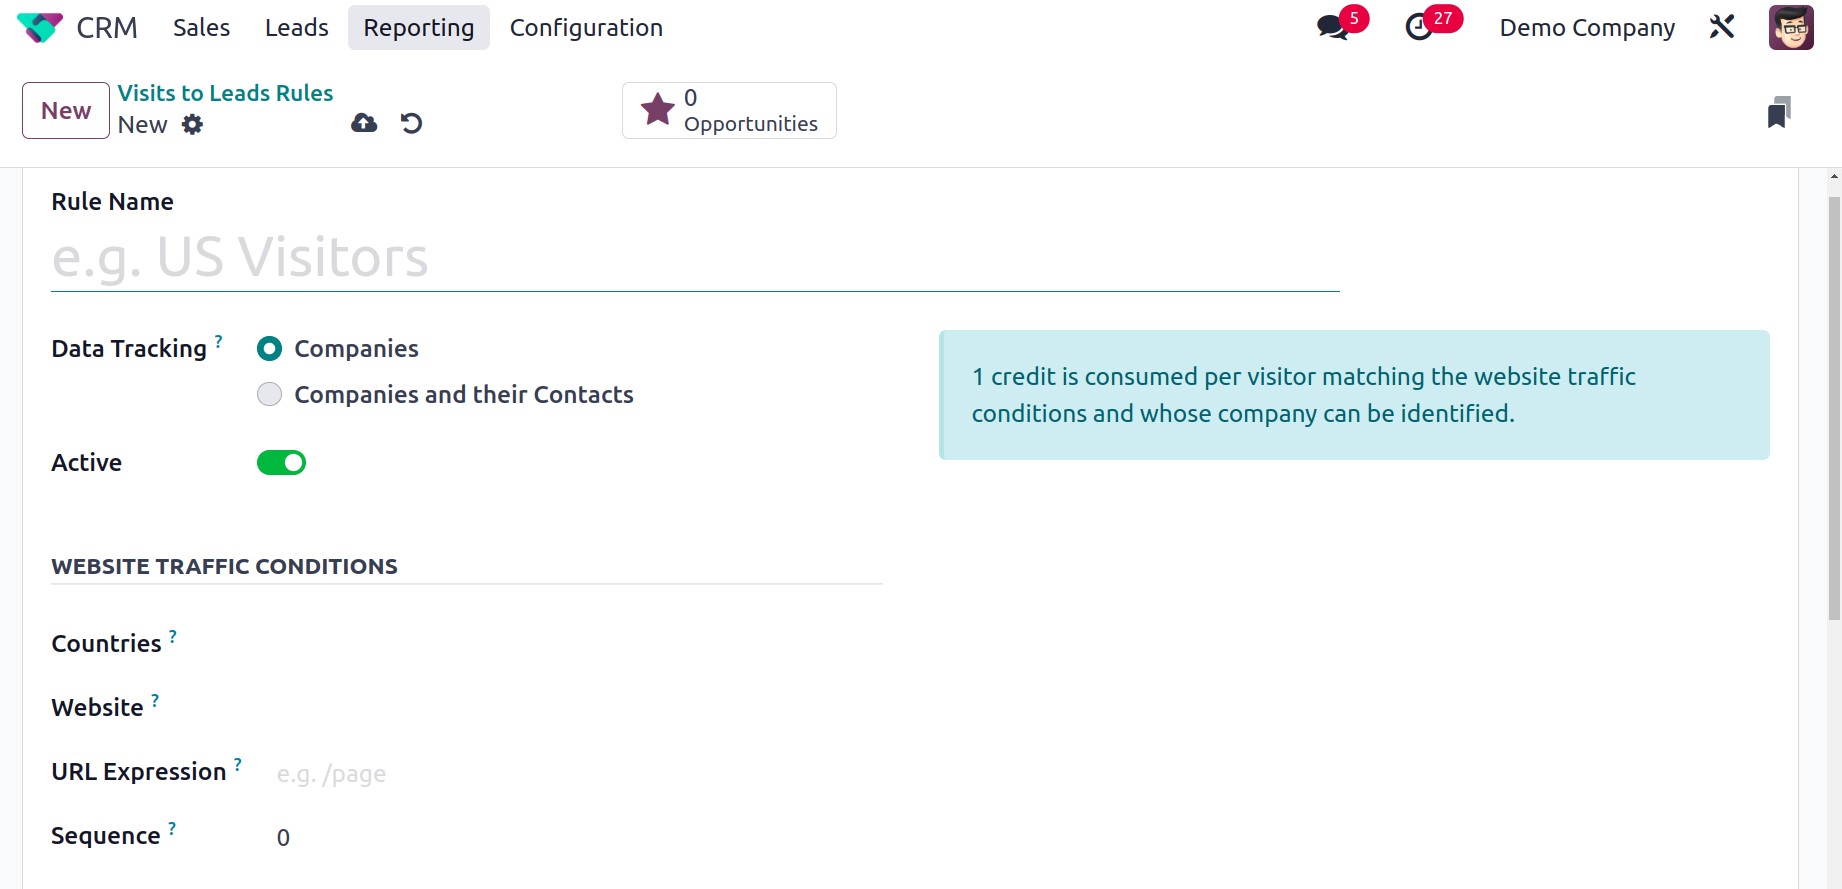
You must set up some conditions on the Website Traffic Conditions page because we are converting website visitors. The Countries box allows you to choose specific nations so that visits from those nations will be turned into leads or opportunities. GeoIP will enable this. Similarly, by specifying those websites in the Website column, you can limit lead generation to only those sites.
In the relevant box, you can include the URL Expression if you wish to track certain websites. If you wish to track the entire website, you can leave this option empty. Mention the Sequence that is used to arrange the rules for the same countries and URLs. First, consideration will be given to rules with a lower sequence number.
Conditions for opportunities can be set under the Opportunity Generation Conditions tab. You can list the industries from which you want to get leads in the Industries field. You can leave this field empty to always match leads. By turning on the Filter on Size option, you can filter businesses according to their size. You can gain an additional field to specify the Company Size by activating this one. Depending on how many people work there, the size of a company can be determined.

You can now choose the Type as Lead or Opportunity depending on your requirement under the Opportunity Data tab. You can readily identify leads and opportunities that are generated with this rule by mentioning the suffix in the space provided. The suffix will be appended to the names of generated leads. A sales team and salesperson should be assigned to manage the leads produced by this newly formed rule. You can include relevant tags in the Tags section, and using stars, you can draw attention to the lead's priority.
Once you've filled out every area needed to turn website visitors into new leads, click the Save button to save the information manually. This is how, with the aid of the Odoo17 CRM module, we establish new guidelines for the conversion of website visits into leads and possibilities.
Converting Leads into Opportunities
With the aid of the Odoo 17 CRM module, we covered all of the lead generation options. We will now talk about how leads are turned into opportunities. Since the CRM module was introduced, generating new leads has become simple. Once the clients respond favorably, you may quickly turn these leads into lucrative prospects with only a few clicks. Using the CRM module, you can turn a lead into an opportunity if the conditions are acceptable to both sides. Depending on the level of interest the customer expresses in your company, you may be able to turn a lead directly into a sales quotation in some circumstances.
You can choose a lead from the Leads menu to turn into an opportunity. Using the NEW button, you can also generate a new lead that you can subsequently turn into an opportunity.
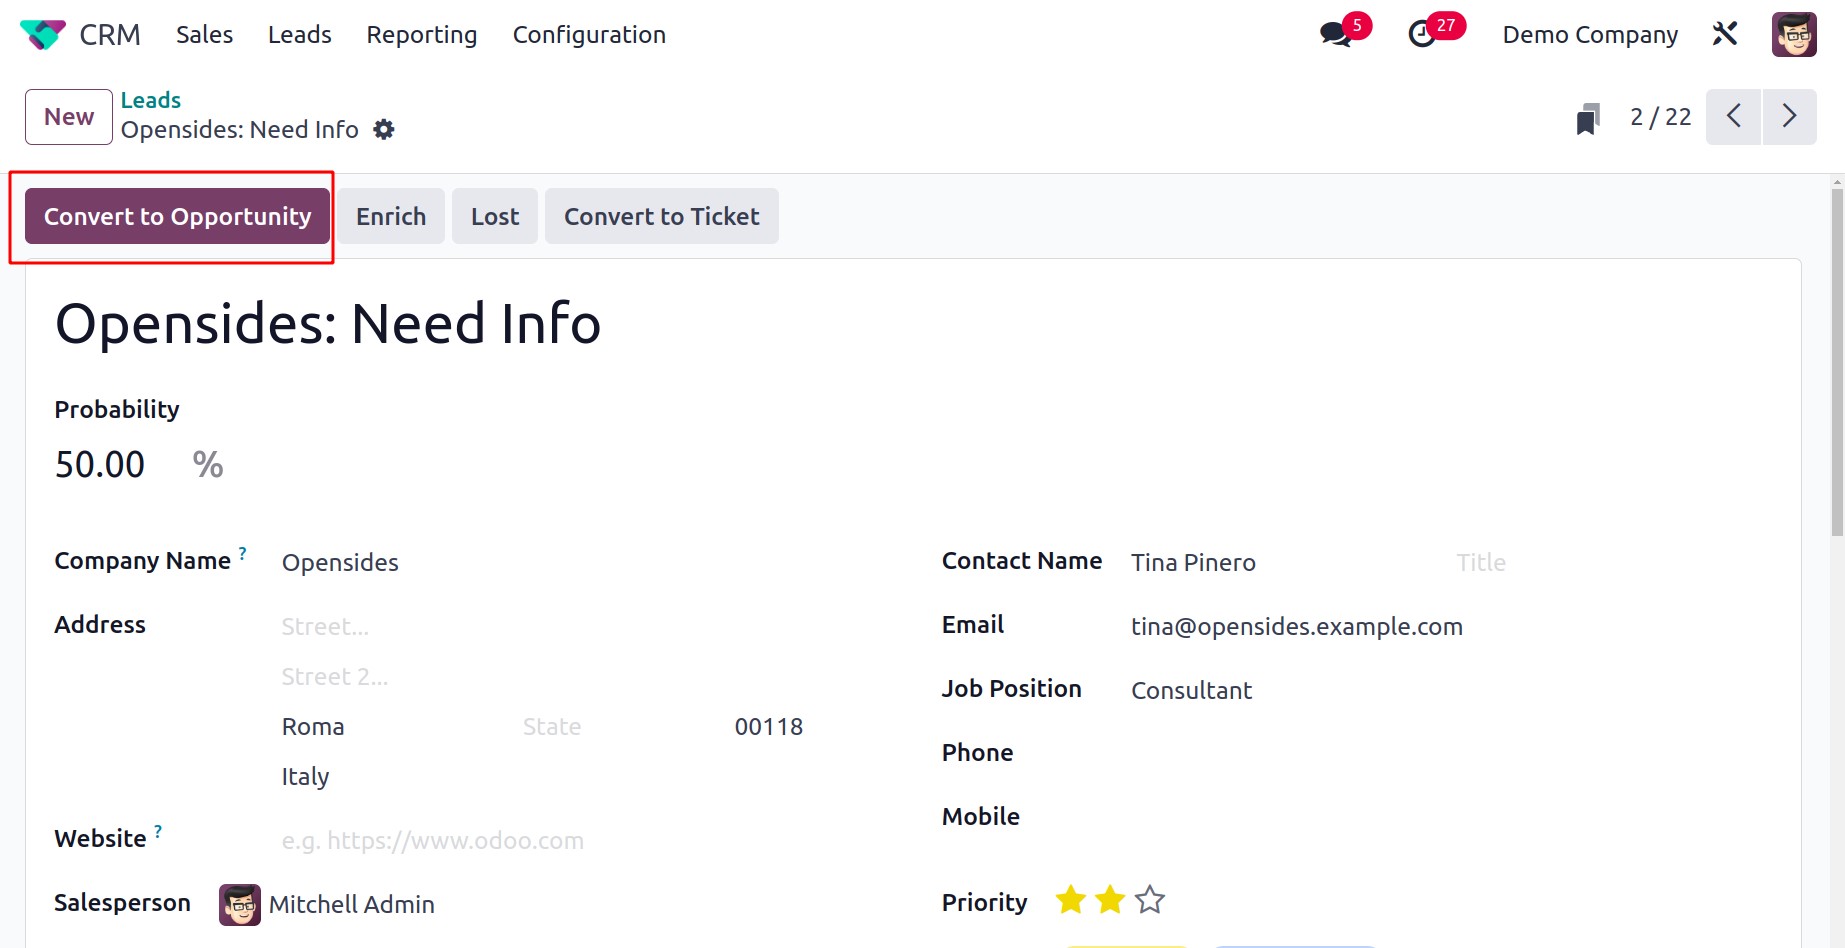
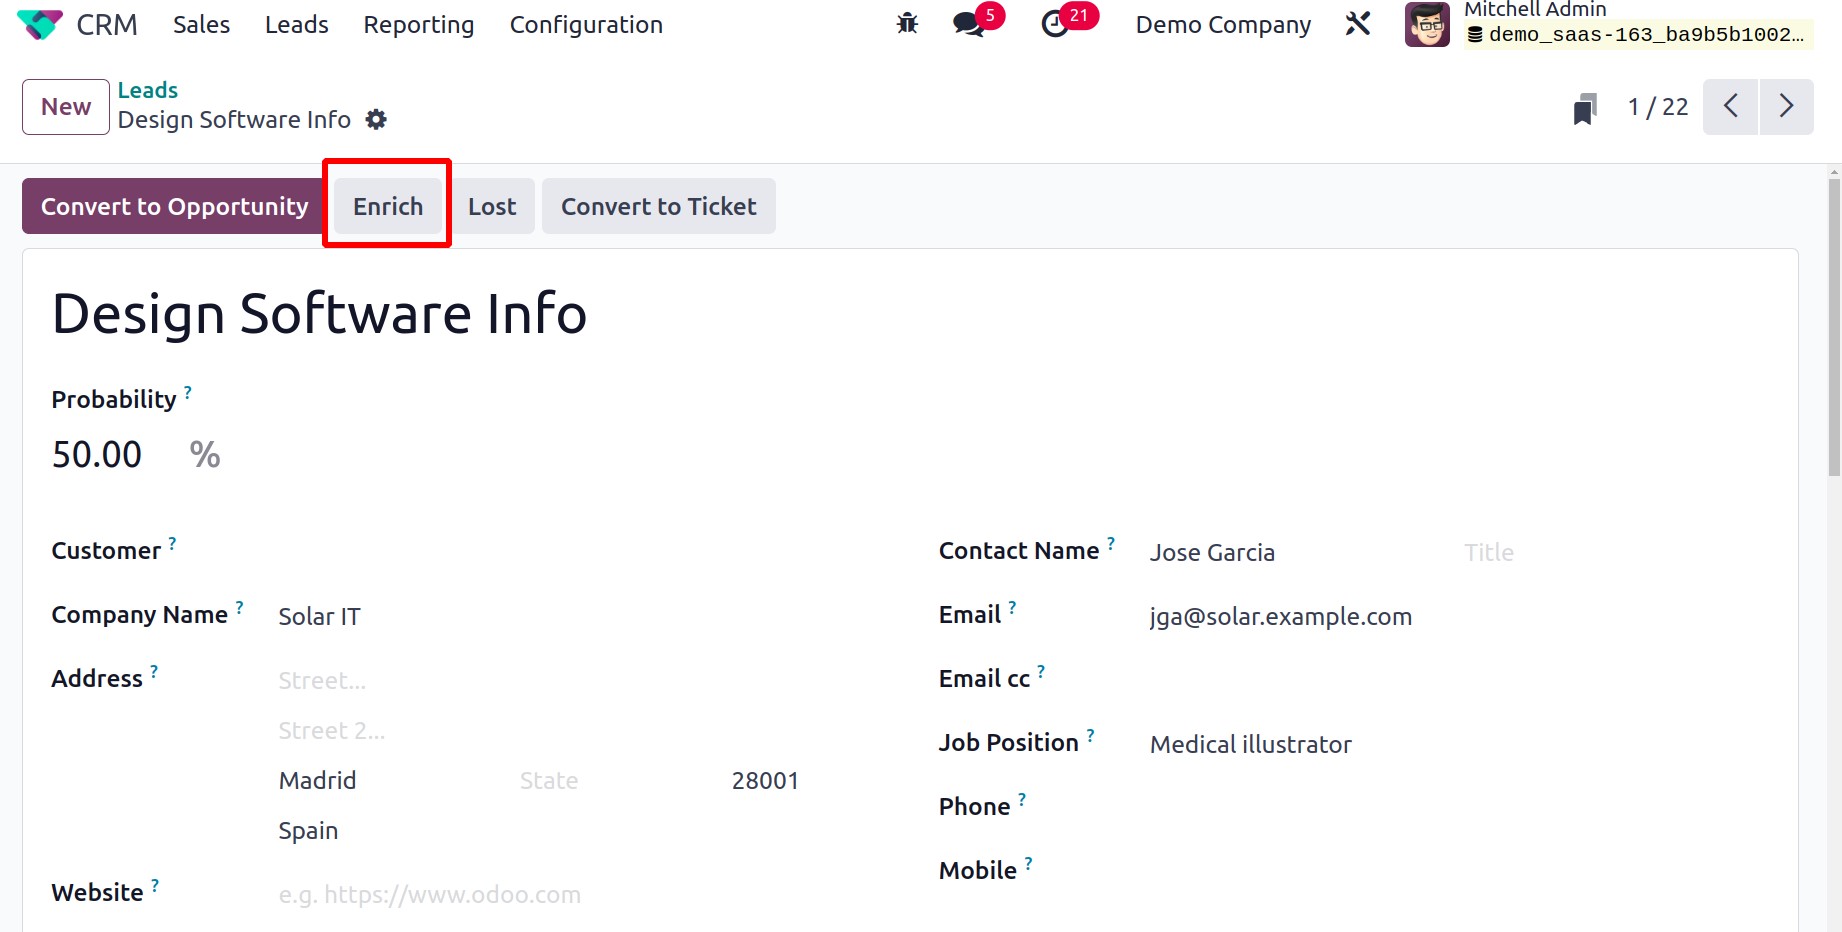
As seen in the screenshot above, we choose a pre-generated lead from the provided list in this instance. Options like Convert To Opportunity, Enrich, Lost, and Convert To Ticket buttons will be available to you.
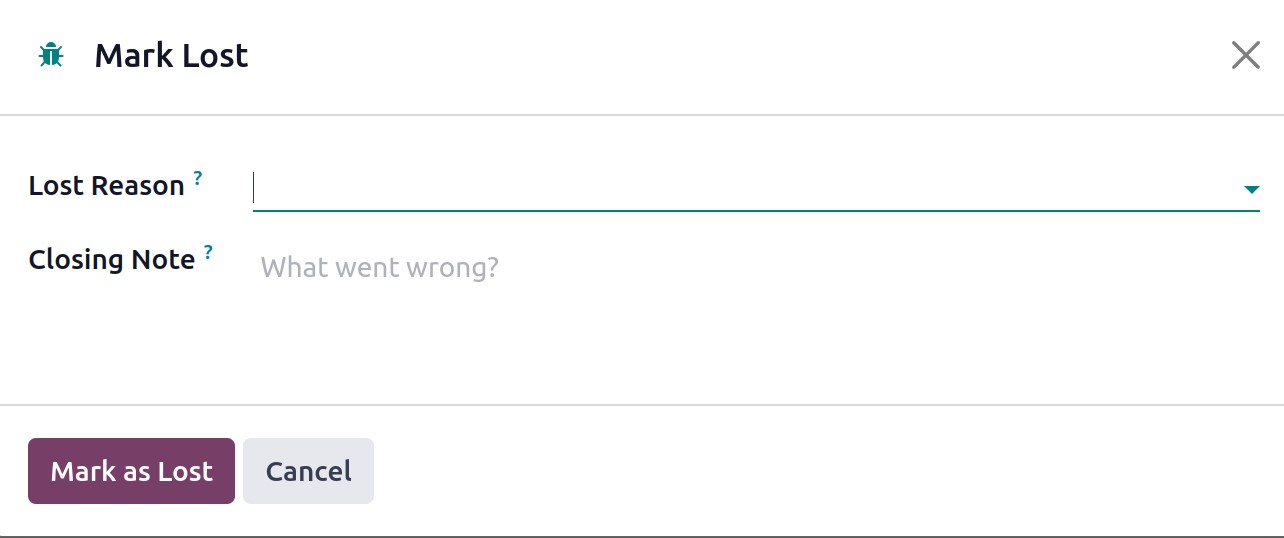
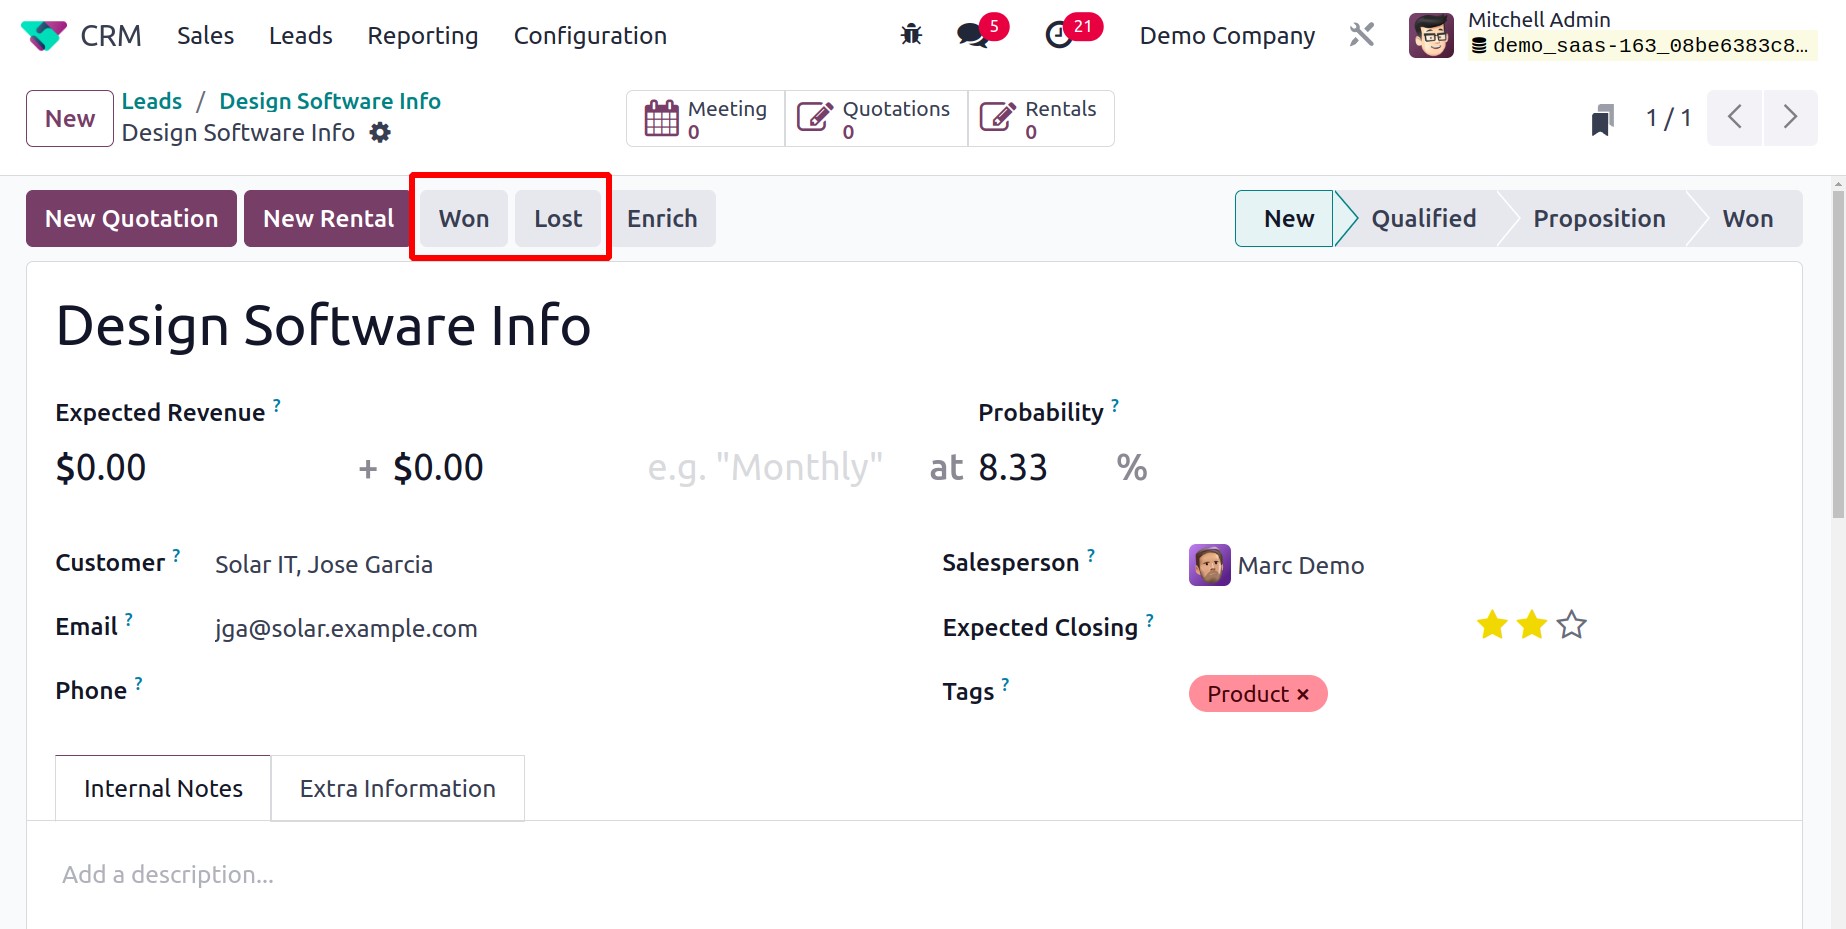
You can click the Lost button, and a new popup will appear. Add Lost Reason in the field. Then click on the Mark as Lost button.
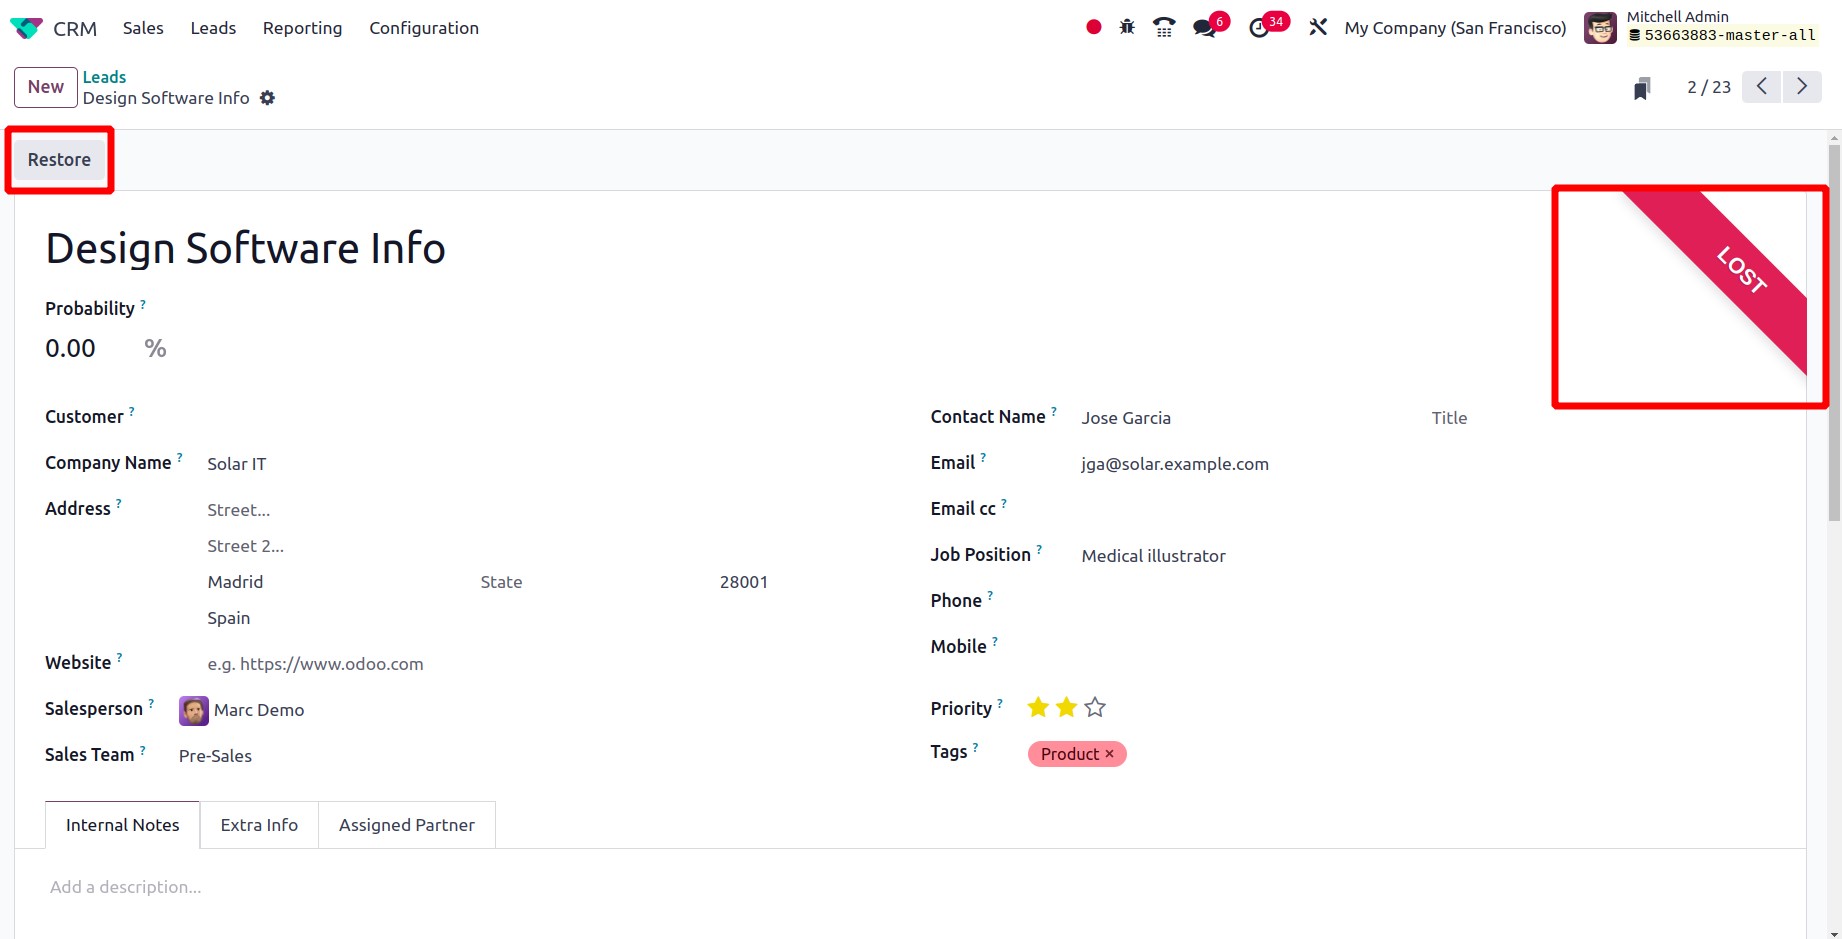
The lead will go to the stage of loss. The lead will grow thanks to the Lost ribbon. The lead can go back to the previous stage by clicking the Restore button.
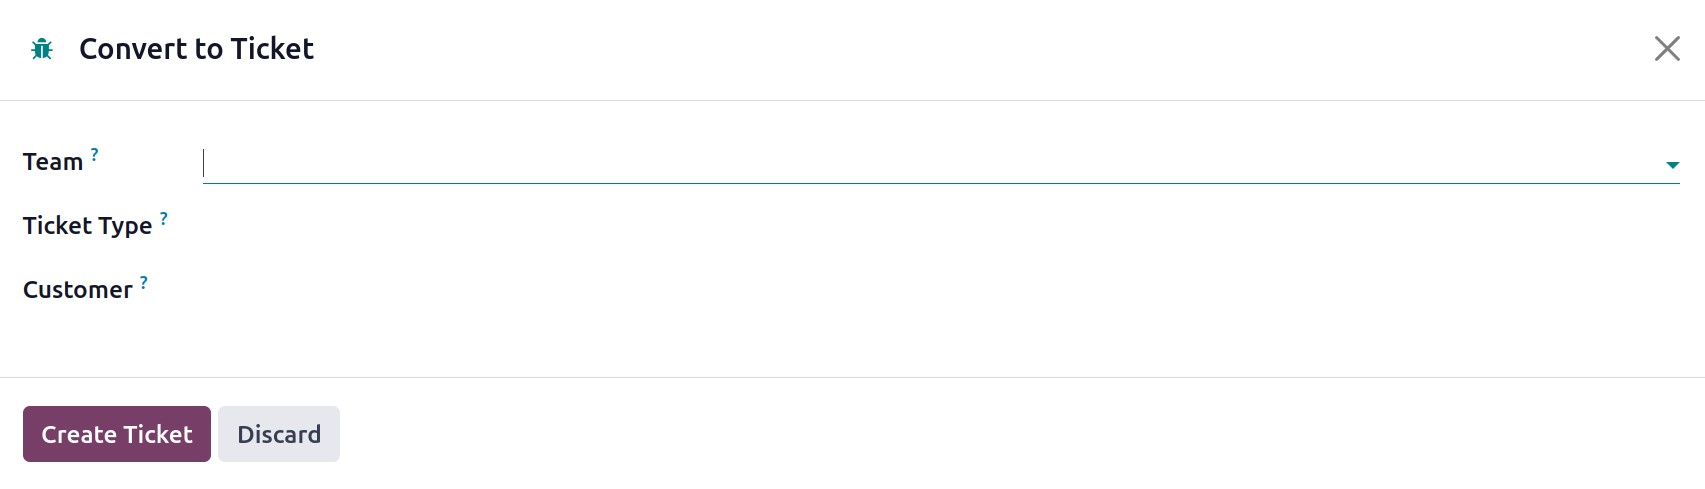
Clicking the Convert to Ticket option opens a second popup window that can be used to turn the lead into an event ticket. After selecting the Team, Ticket type, and Customer, click the Create Ticket button
You can click the Convert To Opportunity button to turn this lead into an opportunity. When you click on this button, information about the opportunity will be provided in a pop-up.
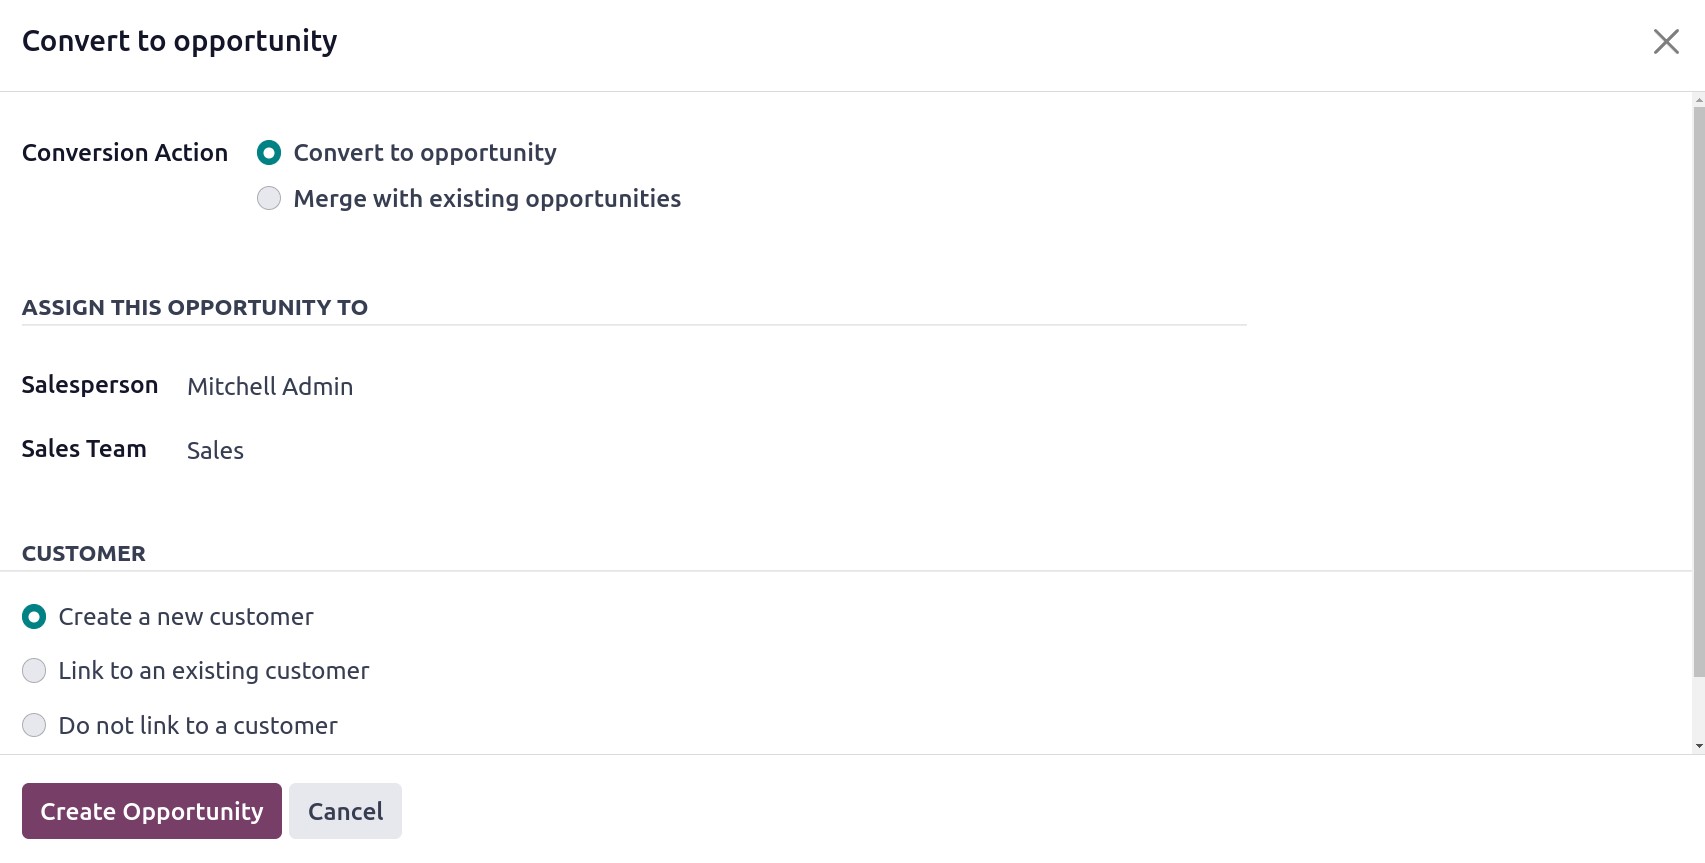
Conversion Action must be chosen from the available alternatives. This lead may be turned into an opportunity or combined with other opportunities. If you choose the option to combine this lead with current possibilities, you will see a new area where you may list the existing chances you wish to combine it with.
By entering their names in the appropriate fields, you can assign this opportunity to a certain salesperson and sales team. If you choose the Convert to Opportunity option for the Conversion Action, you will be presented with a field to specify how to generate a new customer record from this lead. According to your needs, you can create a new client, connect to an existing customer, or omit the connection. Utilize the Create Opportunity button to finish.
As seen in the aforementioned graphic, the lead has now been transformed into a fresh opportunity. Based on the customer's desire, you may now turn this opportunity into a new sales quotation.
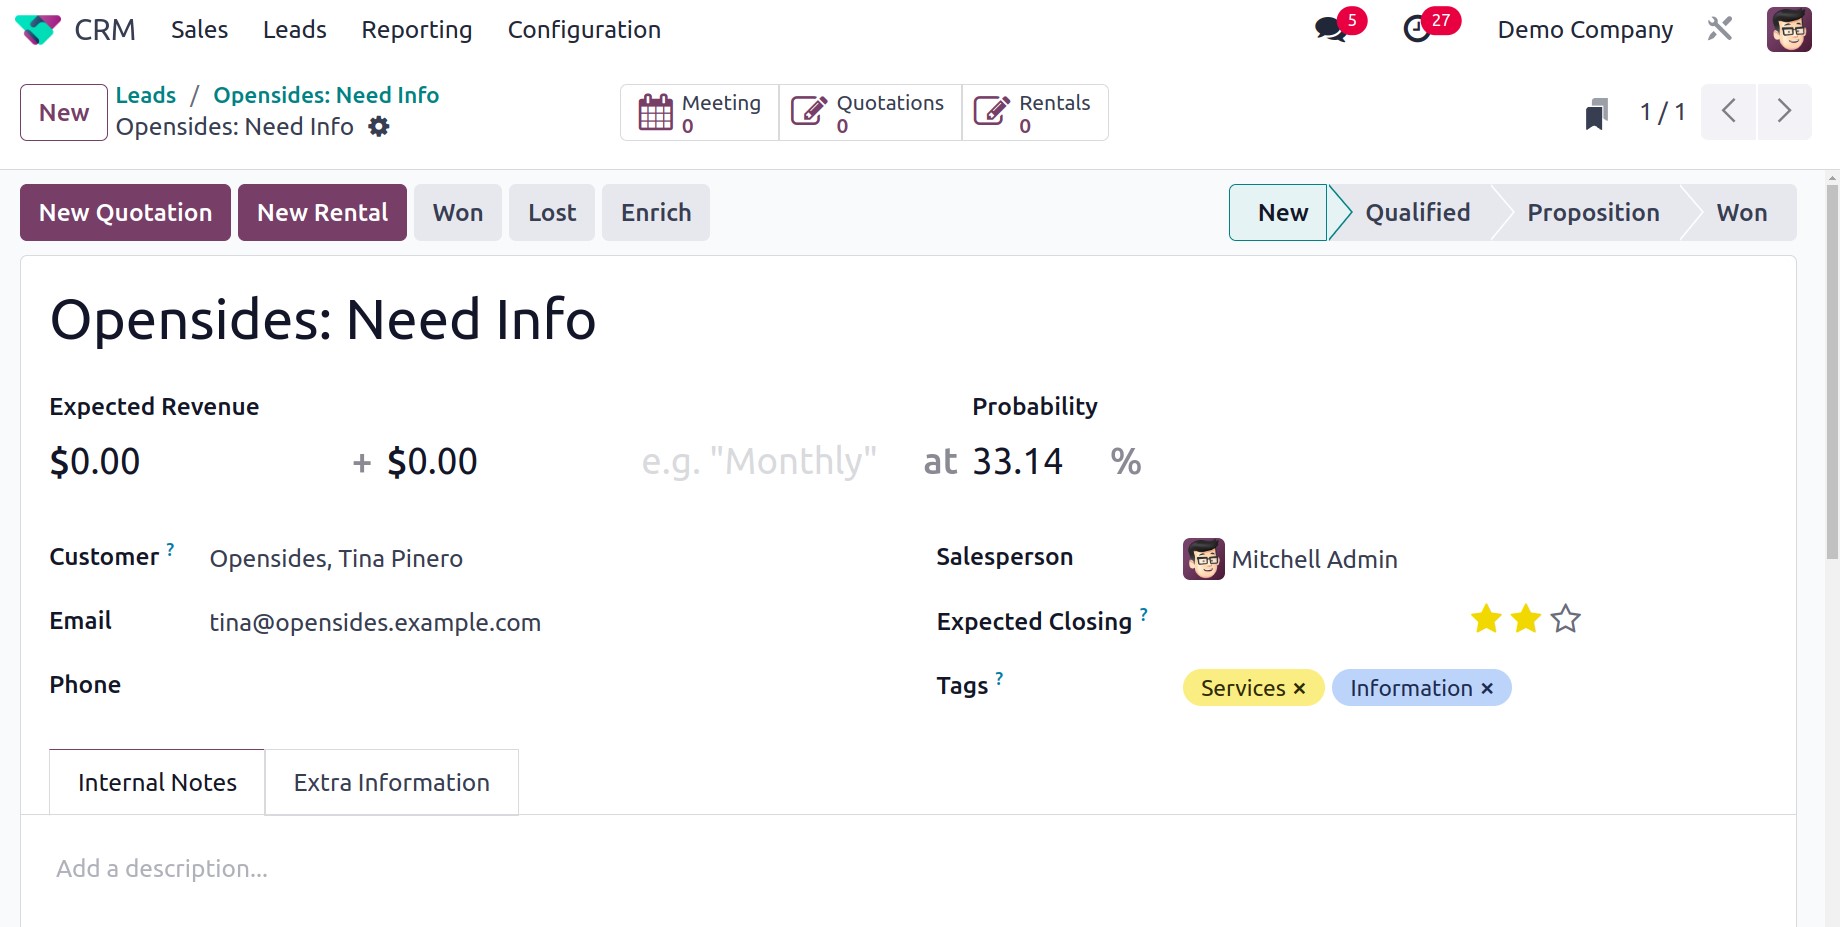
Recurring Revenue is a part of a business's revenue that is anticipated to persist into the future. The opportunity itself may include a statement of the Expected Revenue. Probability then expresses the opportunity's success rate as a percentage. As Expected Closing Date, you can include an approximation of the date that the opportunity will be won.
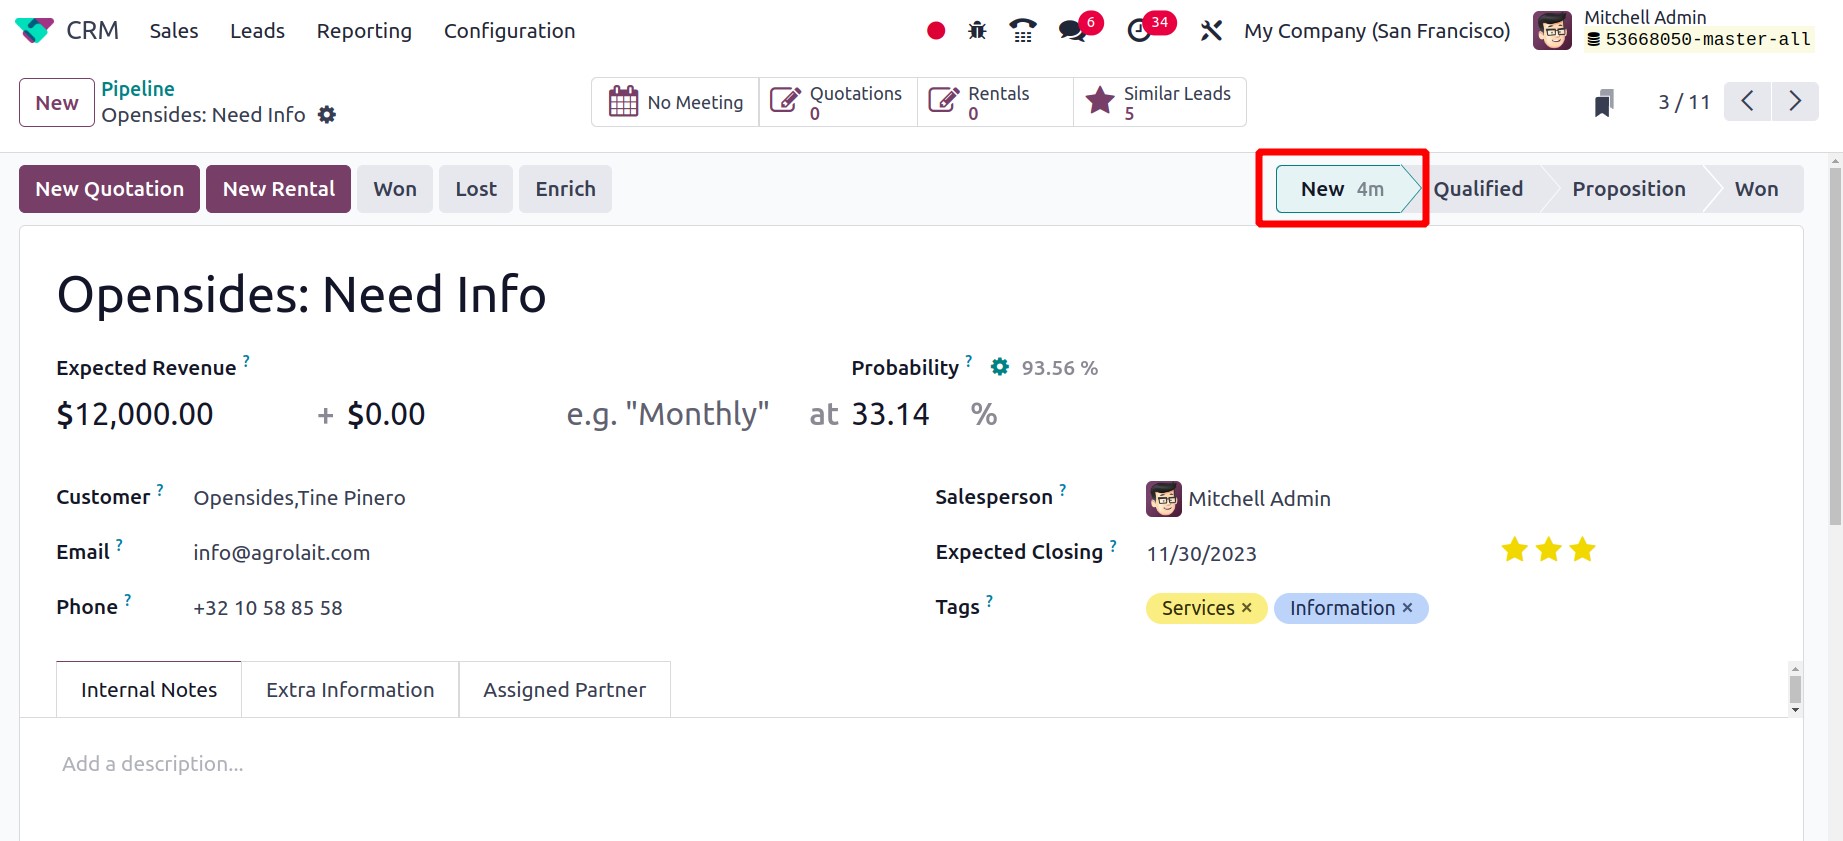
Odoo 17 added a new feature called timeline. A new time indicator has been added to the stage, indicating the duration of the lead's stay in this specific stage. This indicates that the lead has been in the new stage for the last four minutes, as indicated by the 4m here.
Converting Opportunity into Sales Quotation
If the customer is interested in your company after you turn the lead into a new opportunity, Odoo enables you to generate a new sales quotation from the original opportunity. In the earlier sections of this chapter, we already covered how to generate a fresh lead and turn it into a new opportunity. Here, we'll go into detail about how to use the Odoo17 CRM module to turn an opportunity into a sales quotation.
The opportunity that we are going to turn into a new sales quotation is seen in the screenshot that is provided below. The New Quotation, New Rental, Won, Lost, and Enrich buttons will appear on the screen, as seen in the image.
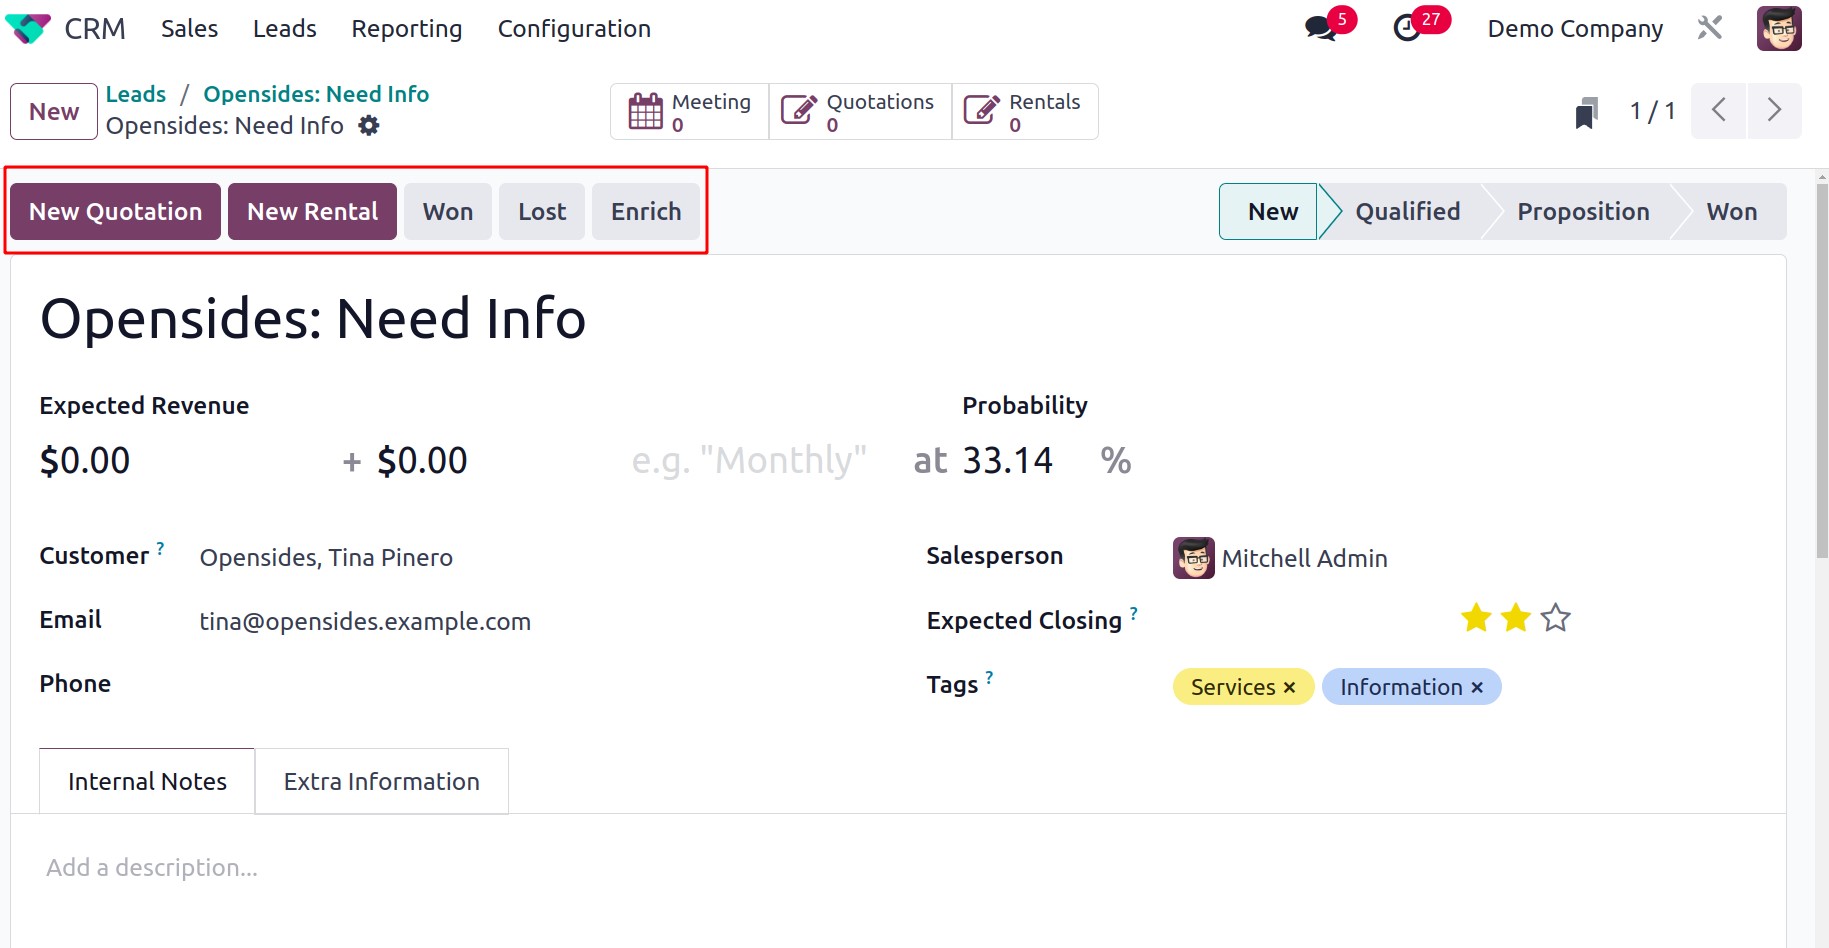
Click the New Rental button from the opportunity to start a new rental order. A rental quotation will then be generated from that point on. The opportunity's present state will change to Won upon clicking the Won button.
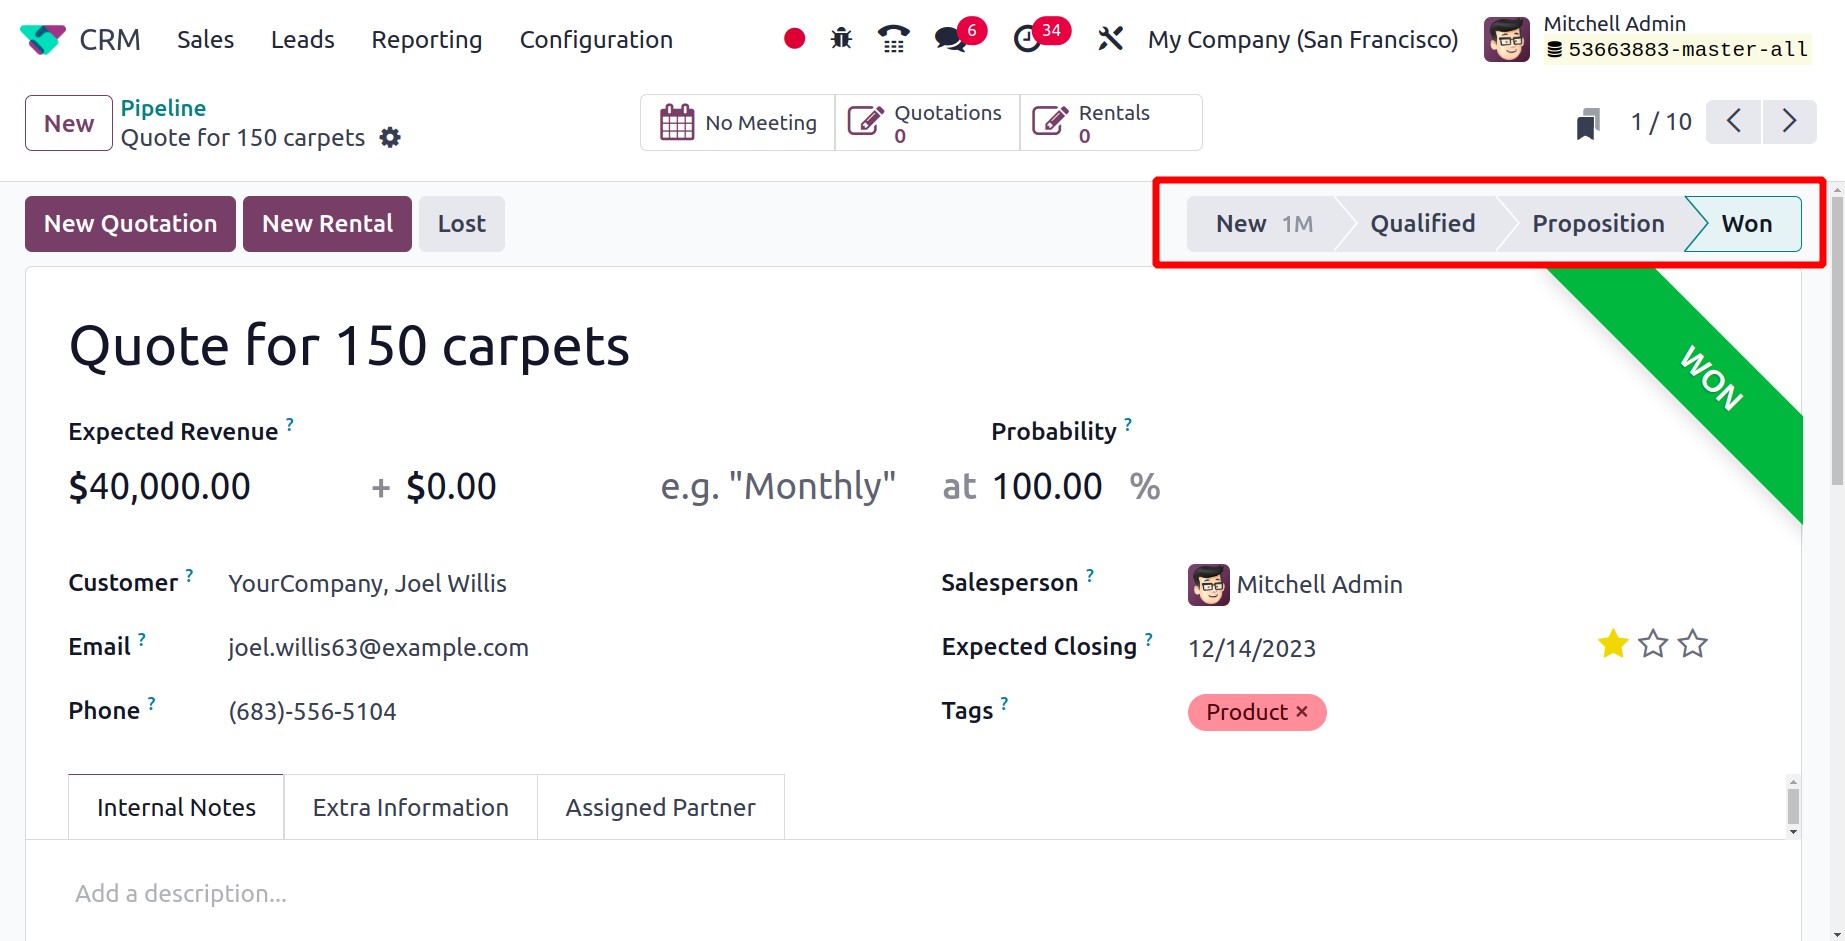
As previously stated, the opportunity is lost and moves to the Lost stage if the Lost button is active. The user must provide the Lost reason in order to do that.
To create a new sales quotation, click the New Quotation button here. When you click on this button, Odoo will direct you to the opportunity's sales quote window. The sales quotation we developed from the opportunity is depicted in the graphic below.
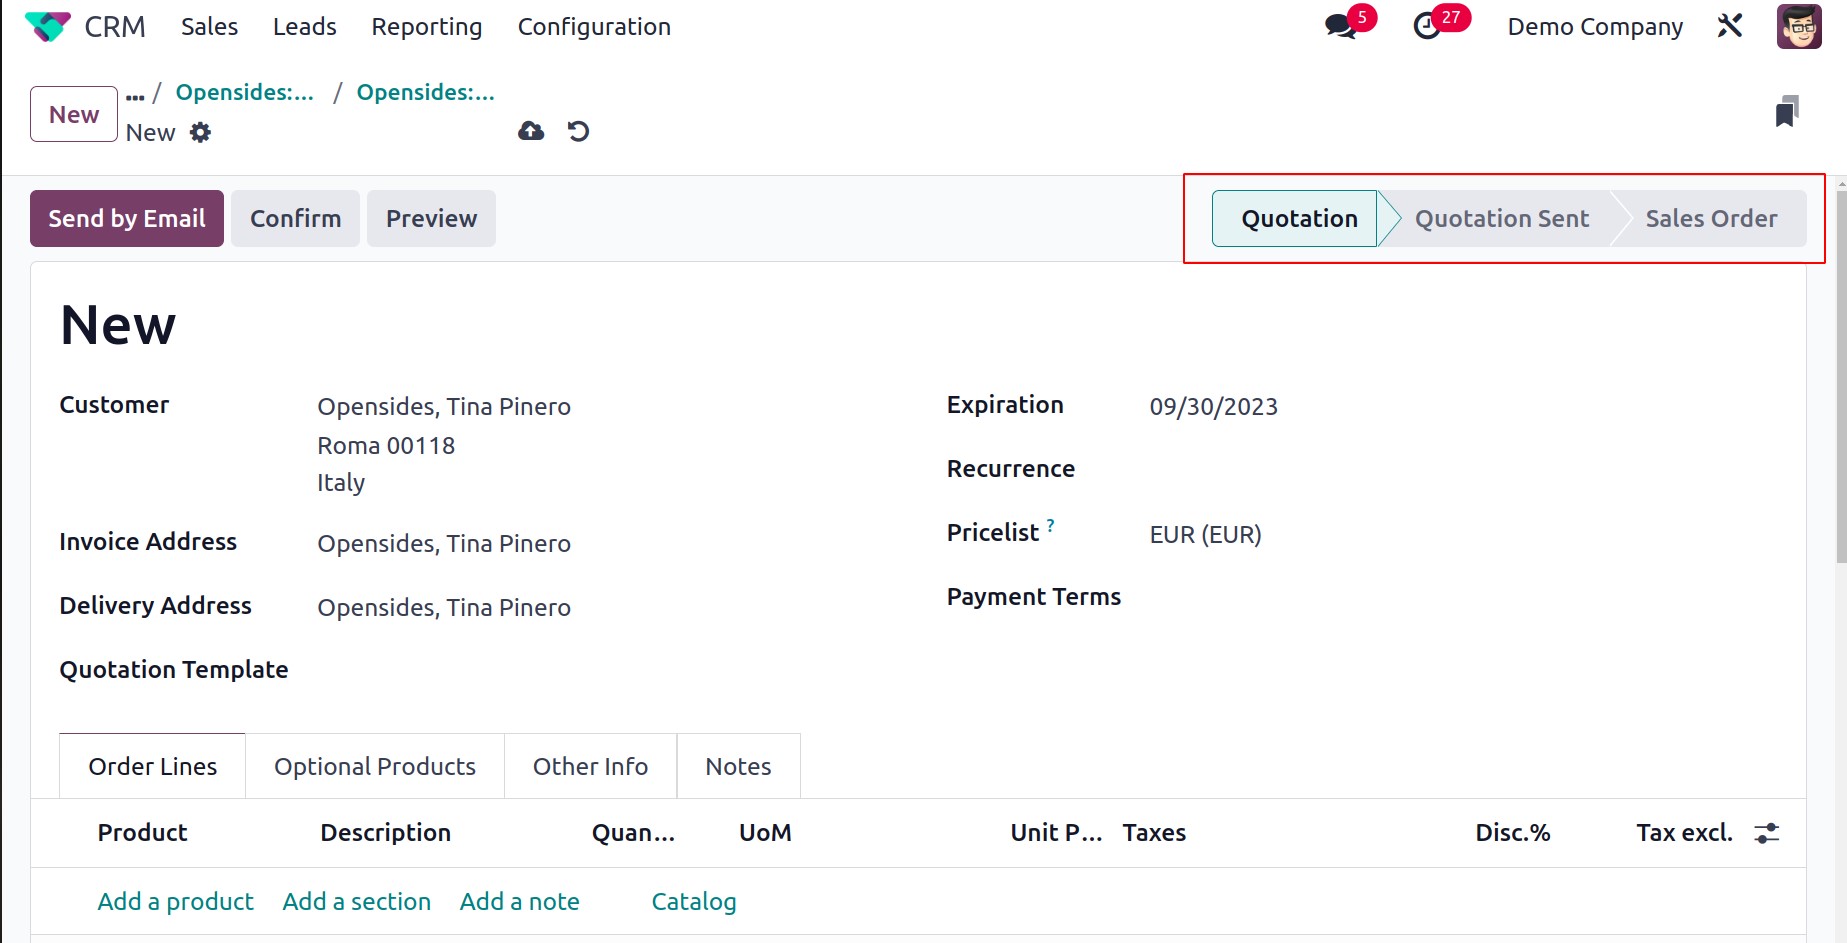
Based on the information present in the relevant opportunity, the details in the quotation will be automatically filled in. The tabs for Order Lines, Optional Products, Other Information, and Customer Signature allow you to enter more information. Using the Send By Email button, you may email the quotation to the concerned customer after reviewing the details.
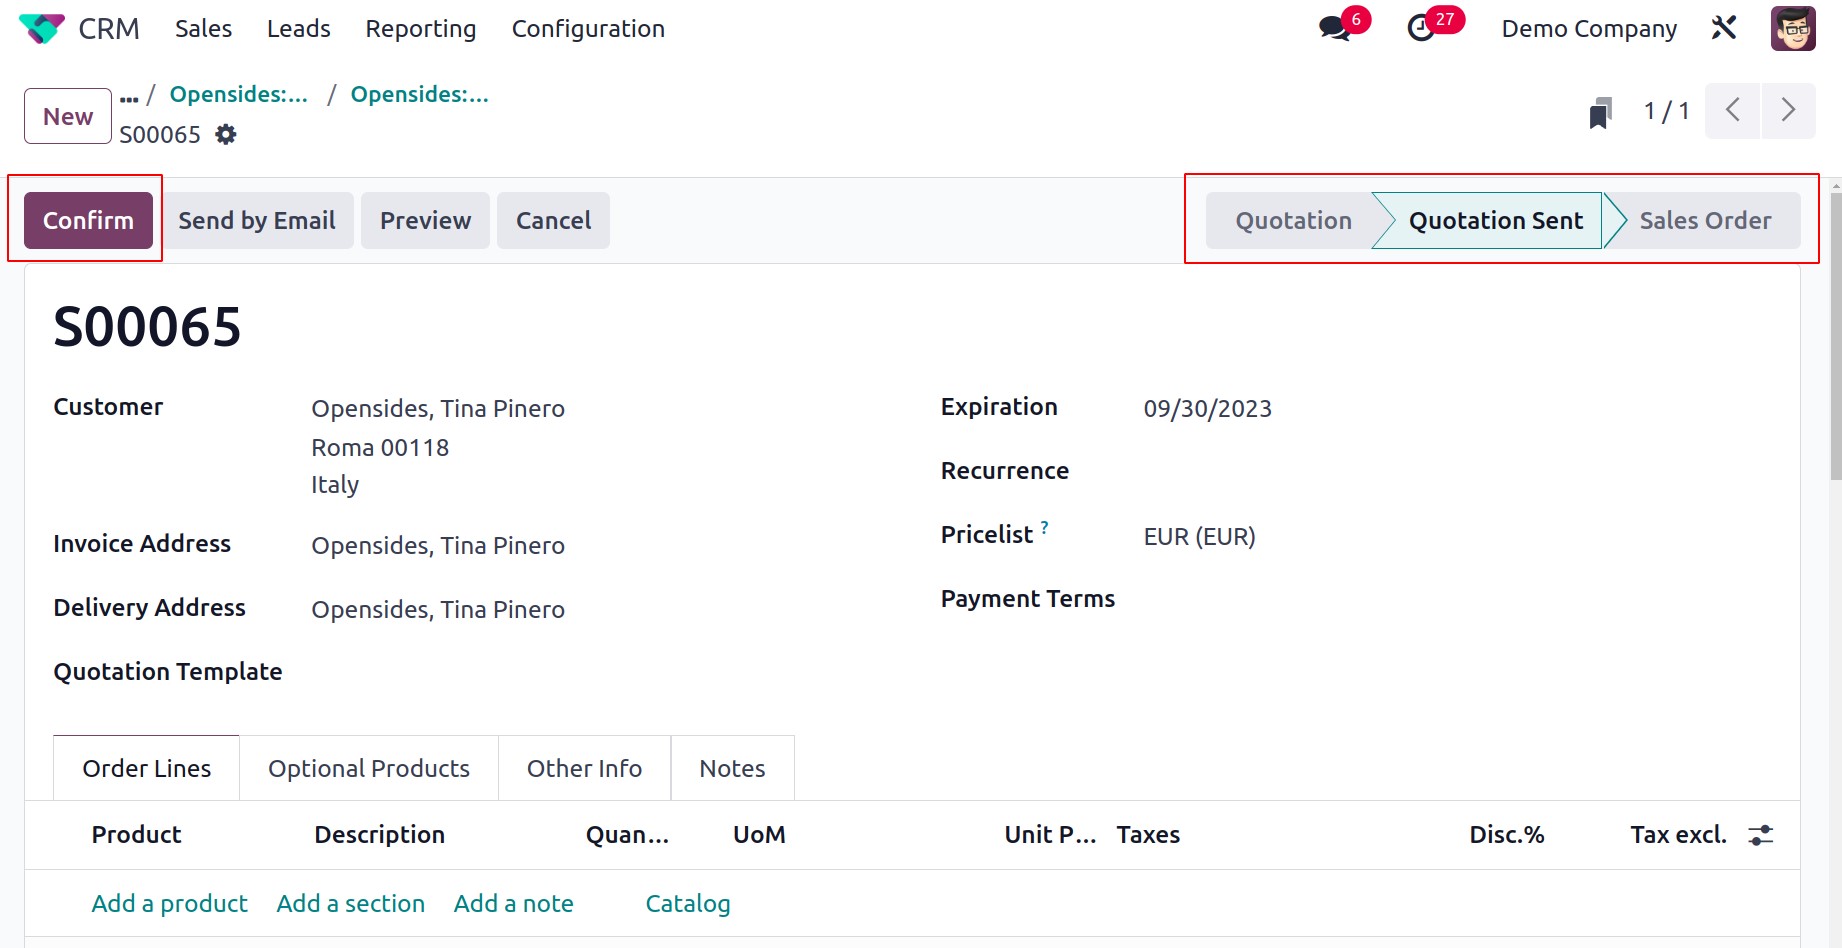
The status of the quotation can be seen as sent once it has been sent to the appropriate customer, as illustrated in the image above. In the following chapter of this book, we'll go into great detail about creating sales quotations and sales orders. You may access all quotations generated in the CRM module from leads and opportunities under the Sales menu's unique option, "My Quotations," which is found in the CRM module.
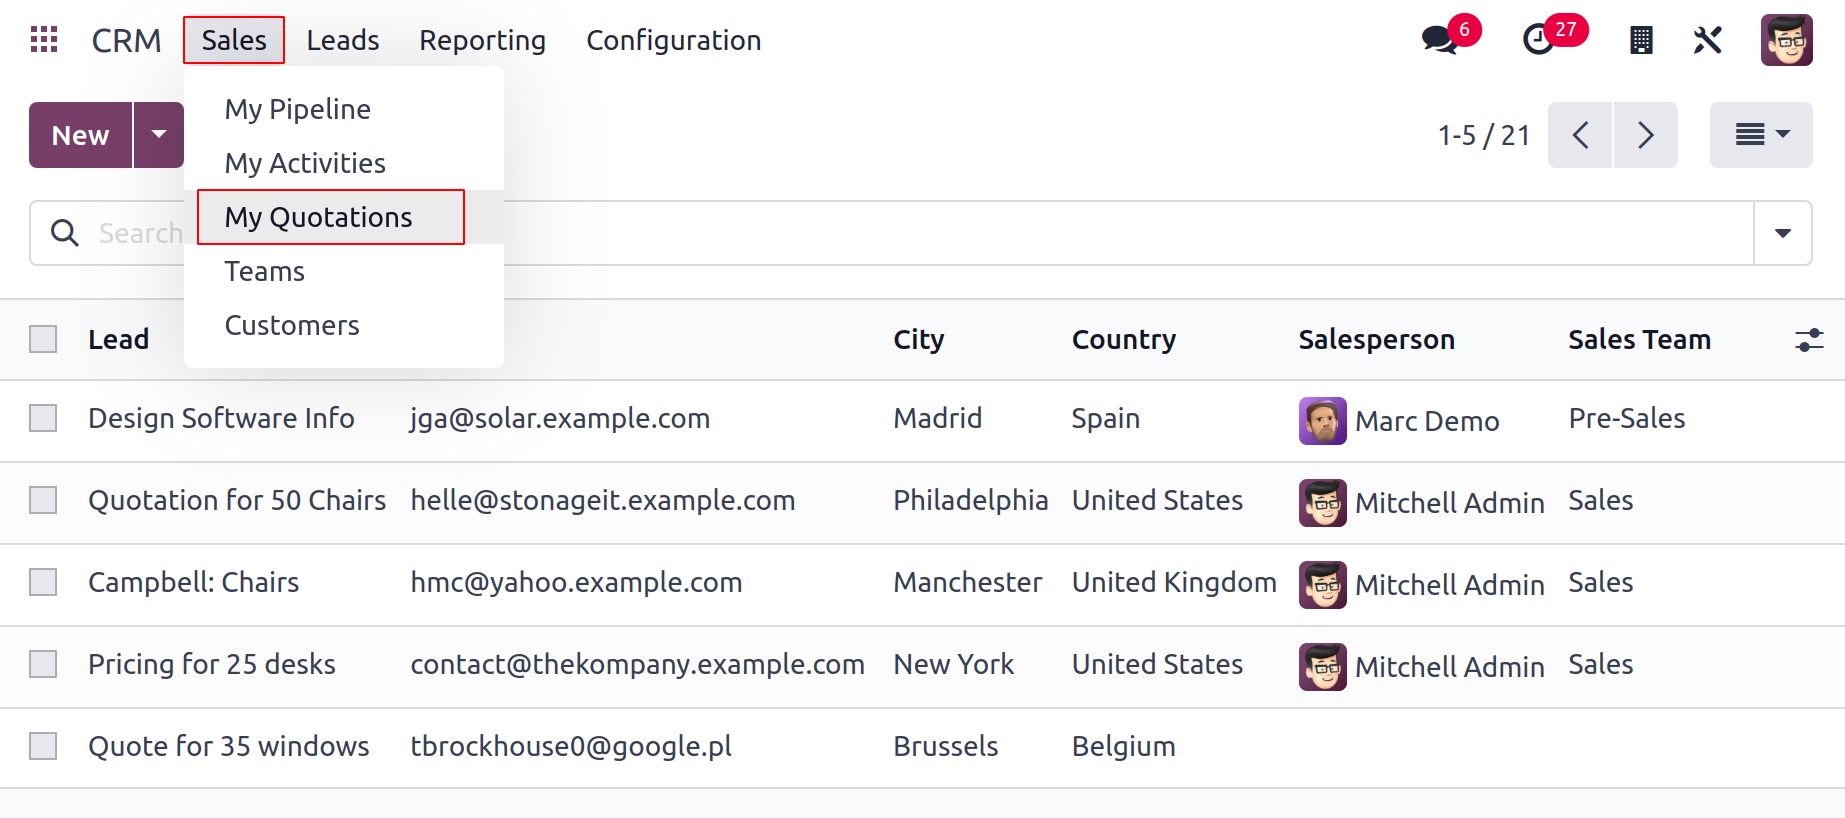
Details about the Number, Creation Date, Customer, Salesperson, Activities, Company, Total, and Status are displayed in the list. You can add new sales quotations to the CRM module by clicking the Create button. While examining the Sales module, we will also talk about creating quotations.
Sales Teams
You can access the platform where all sales teams are maintained by selecting the Sales Teams option under the Sales menu of the CRM module. Assigning sales teams is crucial for the efficient administration of leads, opportunities, and other CRM-related processes.
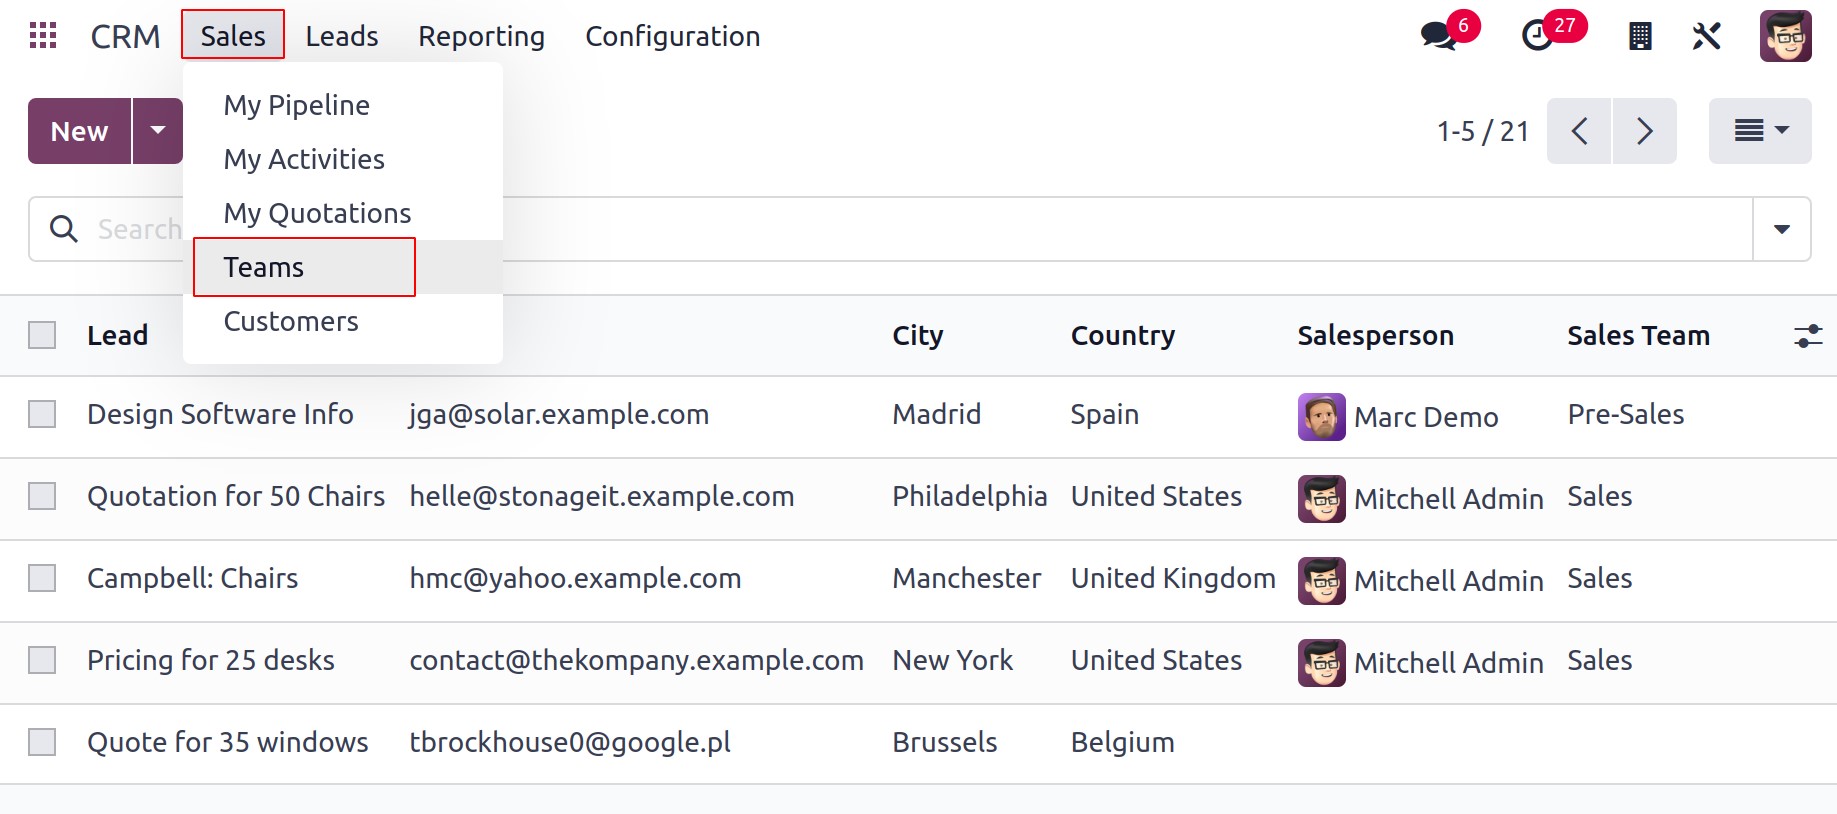
You will receive distinct tabs for each configured sales team in the CRM module, as seen in the image. The entire number of possibilities, quotes, and orders to invoice, as well as the corresponding estimated revenues, are displayed in the preview itself. By selecting the Pipeline button, Odoo will take you to the associated sales team's pipeline.
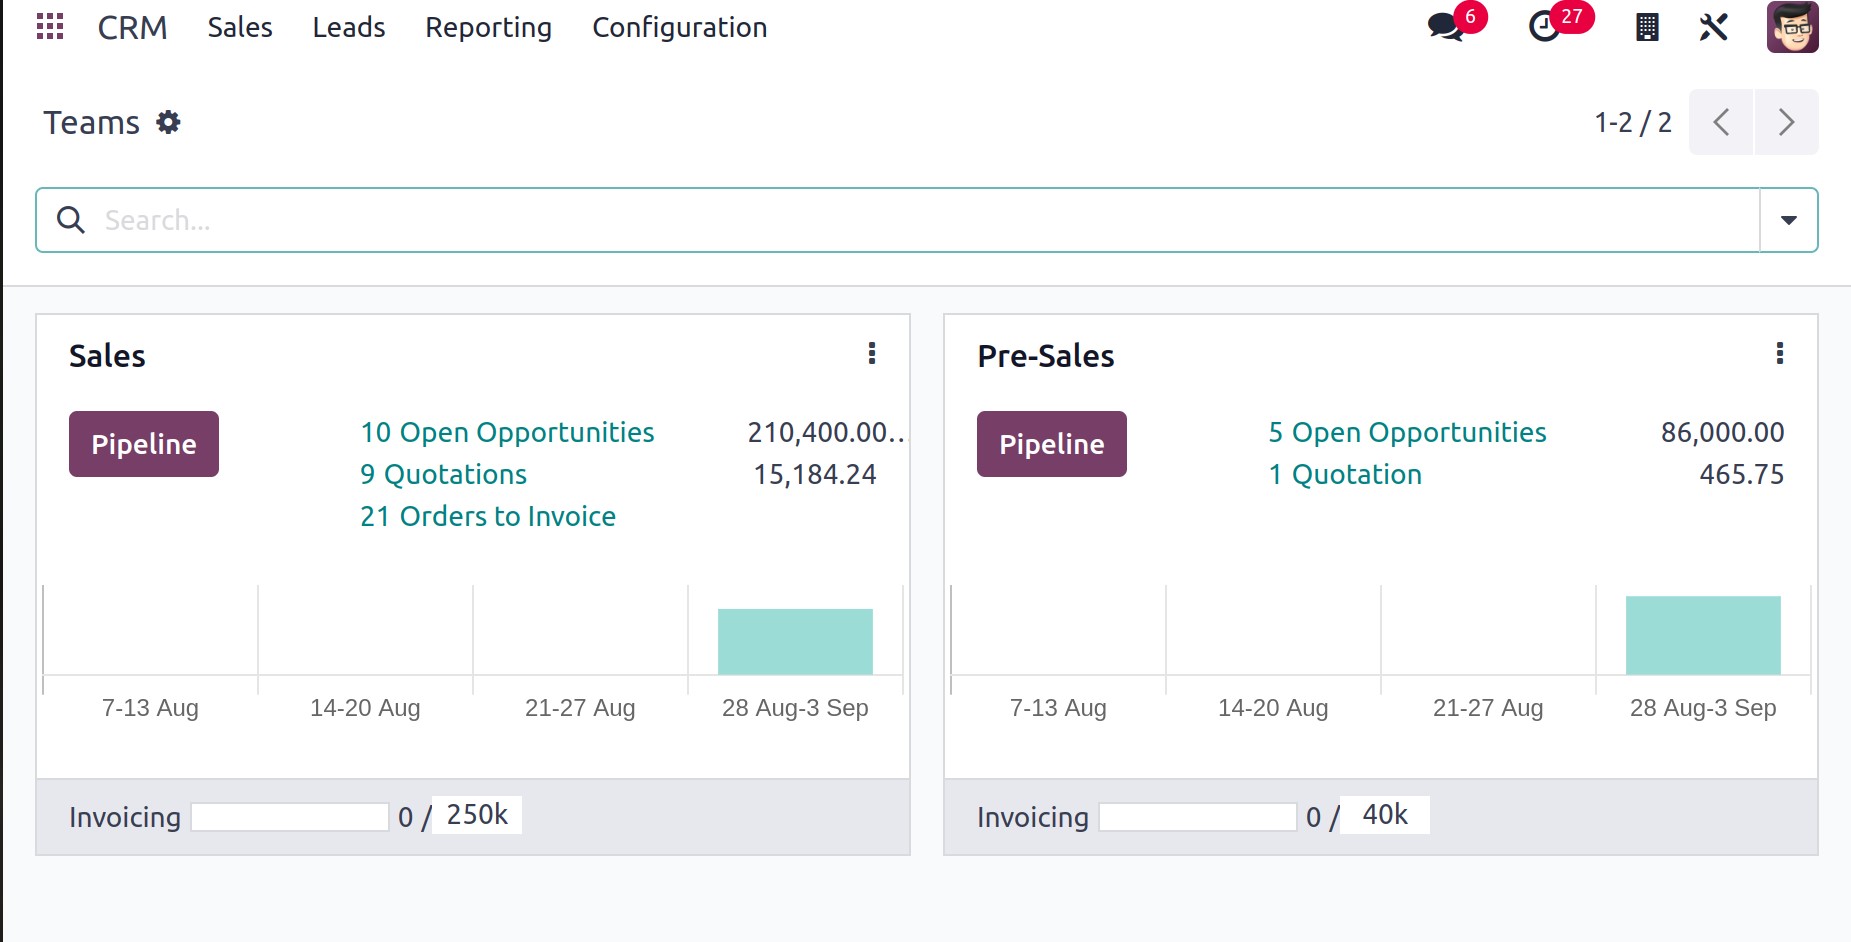
You may access more management options for each sales team by selecting the three vertical dots that are located in the right corner of each tab. For that specific team, there are choices to View Leads, Opportunities, Quotations, Sales Orders, and Invoices.
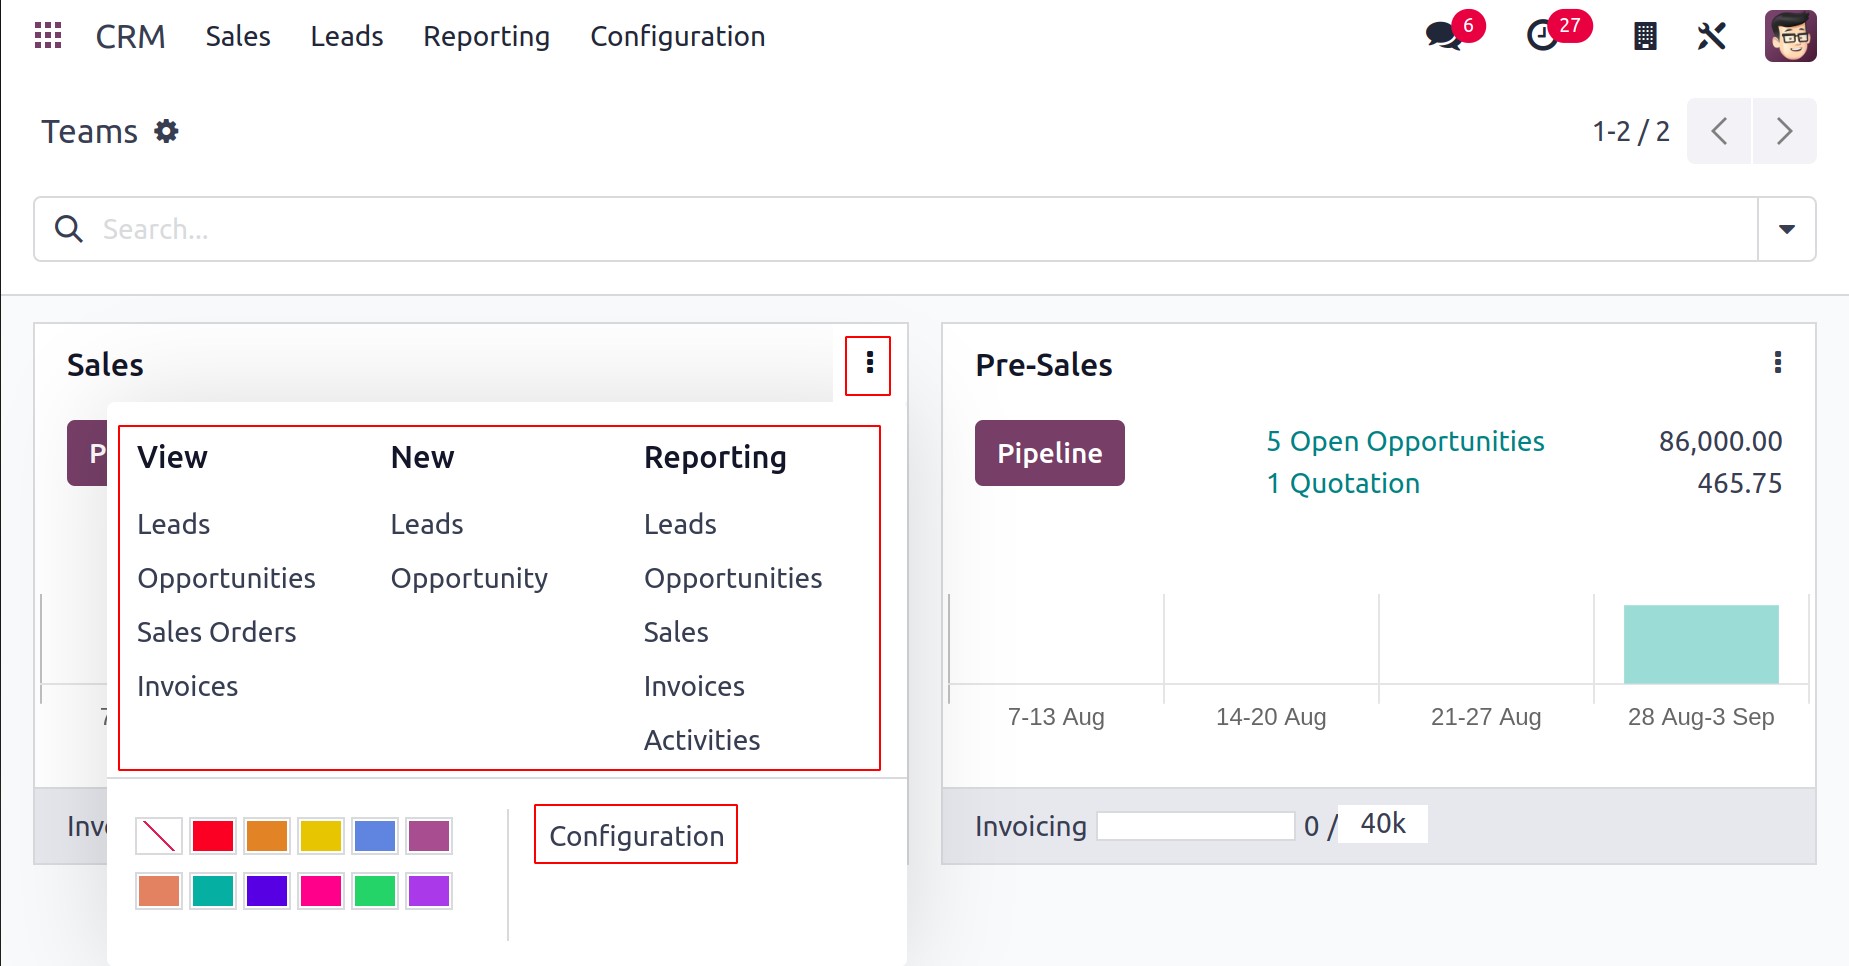
The sales team members will have options to create New Leads, Opportunities, and Quotations under the New option. Each sales team's advanced Reporting option displays reports on the Leads, Opportunities, Quotations, Sales, Invoices, and Activities of that team. Along with these choices, you will also have access to a Configuration button, which will enable you to modify the relevant sales team.
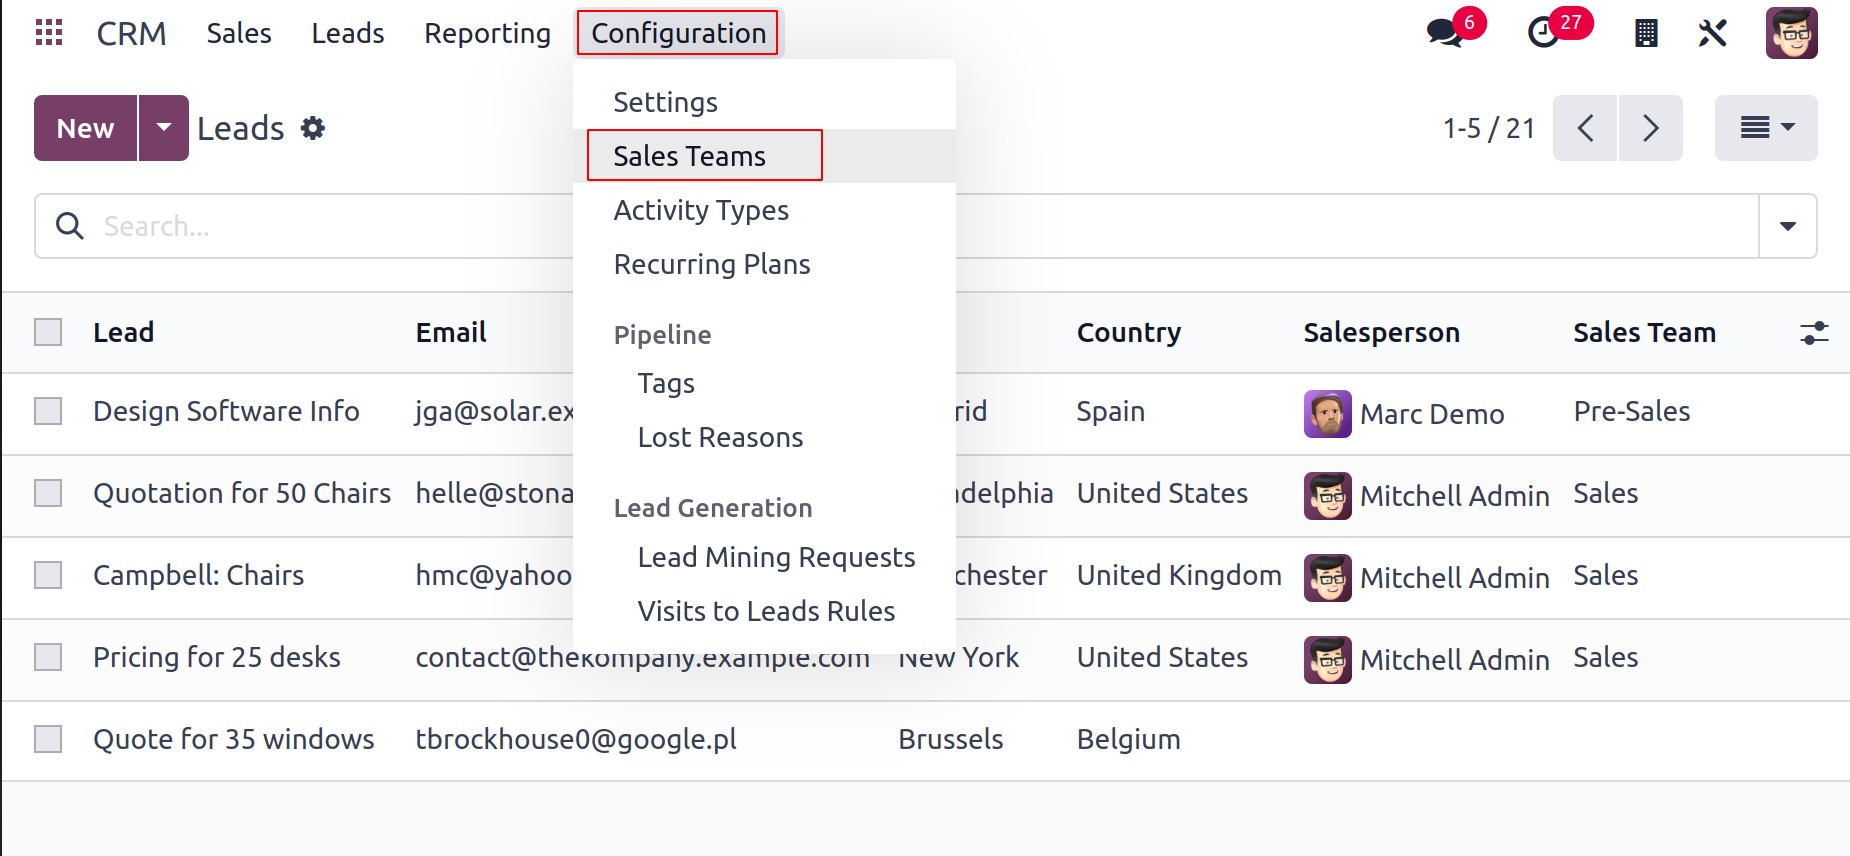
You can find the Sales Teams option in the module's Configuration menu, as shown in the image, to create and manage new sales teams in the Odoo17 CRM module.
On this platform, a list of the sales teams that have previously been set up may be seen, together with information on the team's name, alias, team leader, and company.
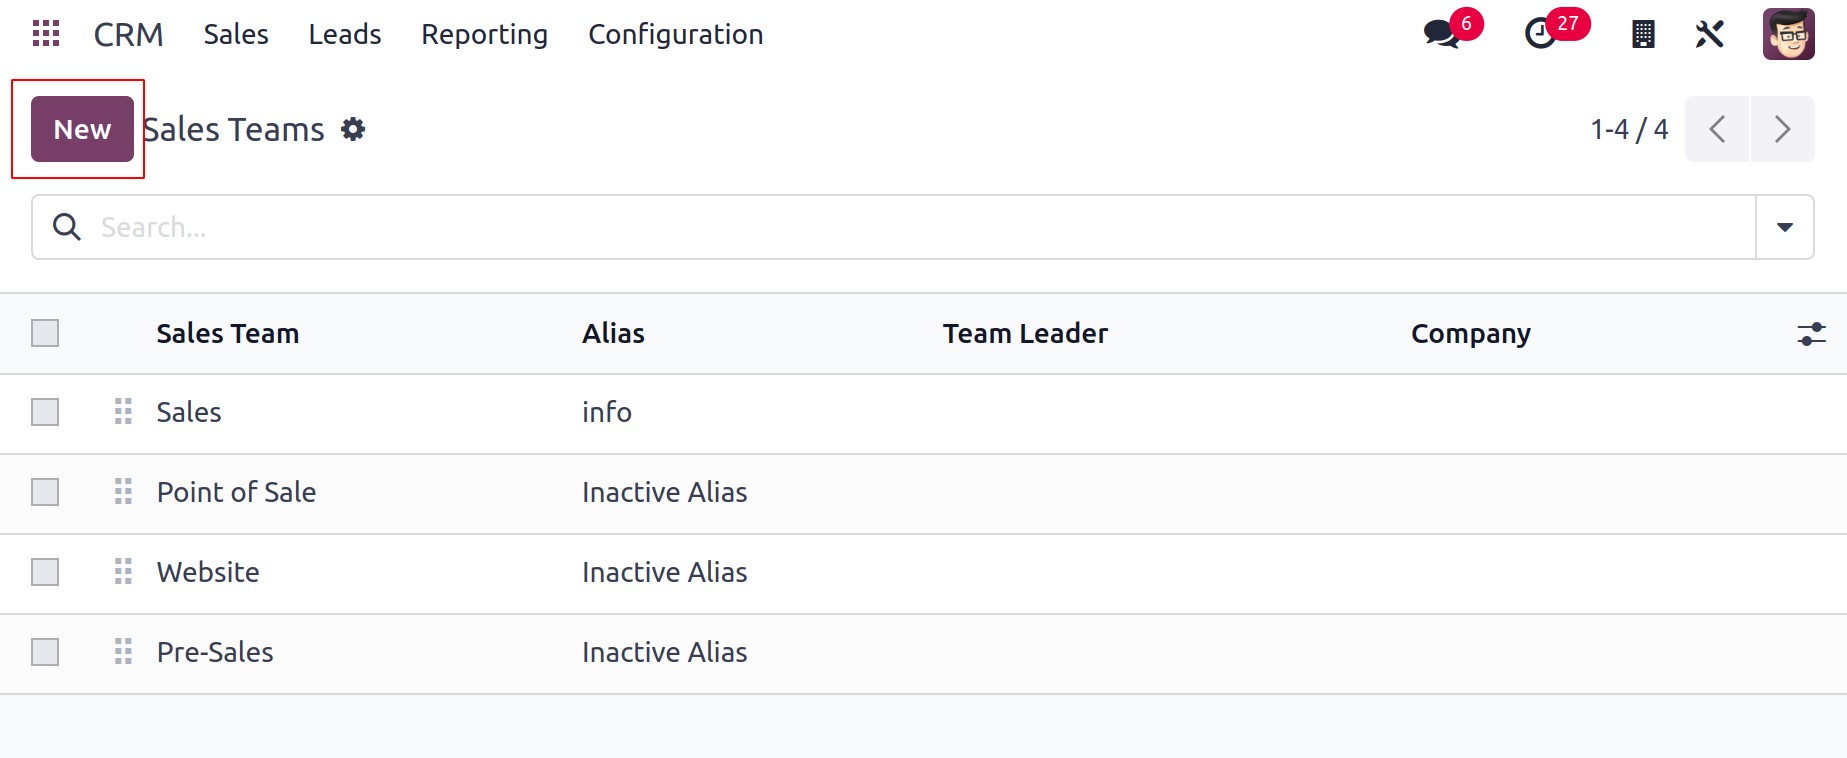
You can set up a new team for the management of sales operations by using the New button. You can enter the information needed to create a sales team in the sales team creation box.
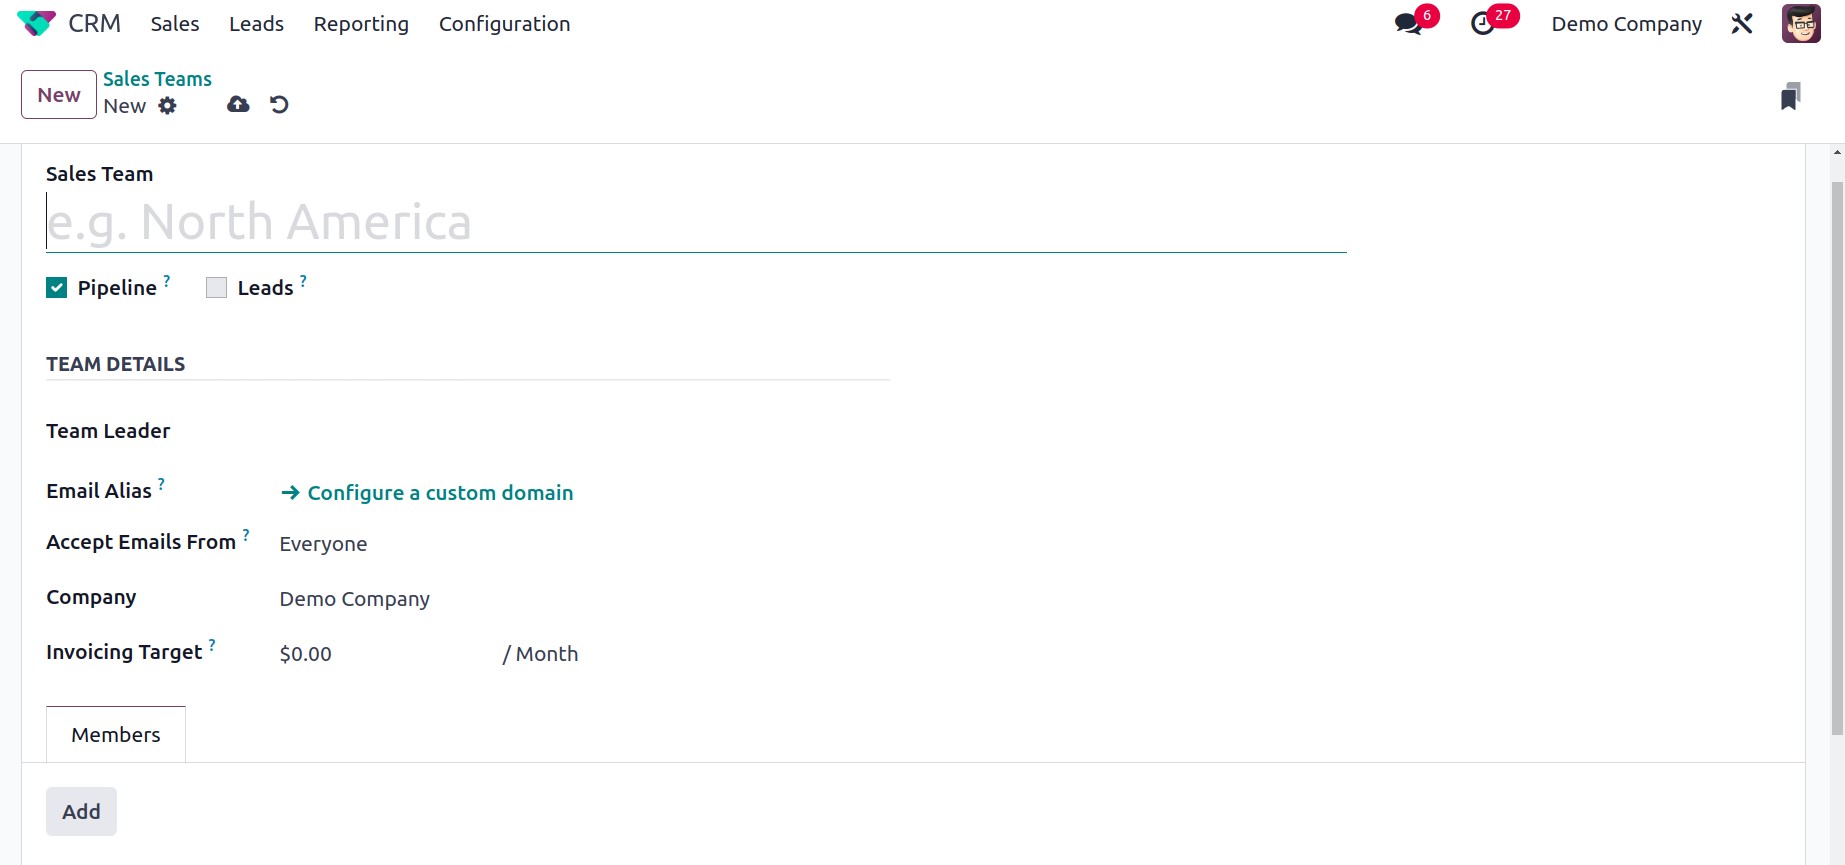
In the chapter on the Sales module, we'll describe how to configure the sales team in Odoo 17.
Using the Team Members option found under the Configuration window, it is possible to view the list of team members that make up each sales team separately. The list of Team Members is located under each sales team, as seen in the figure below.
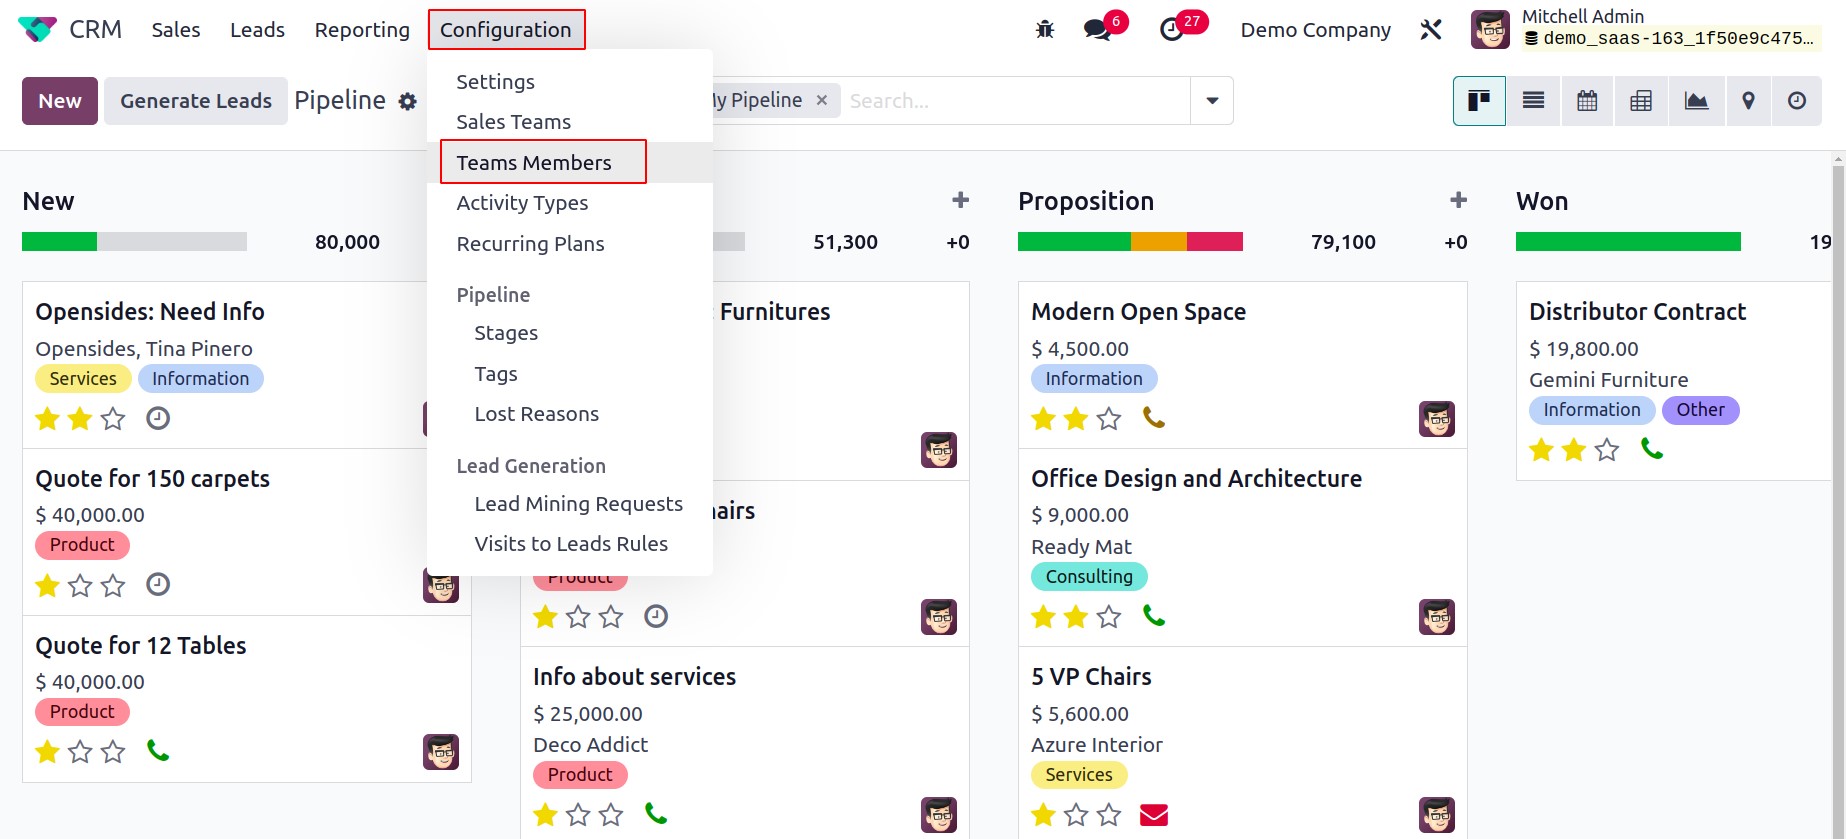
On this platform, adding additional team members is simple. You can do this by selecting the New button.
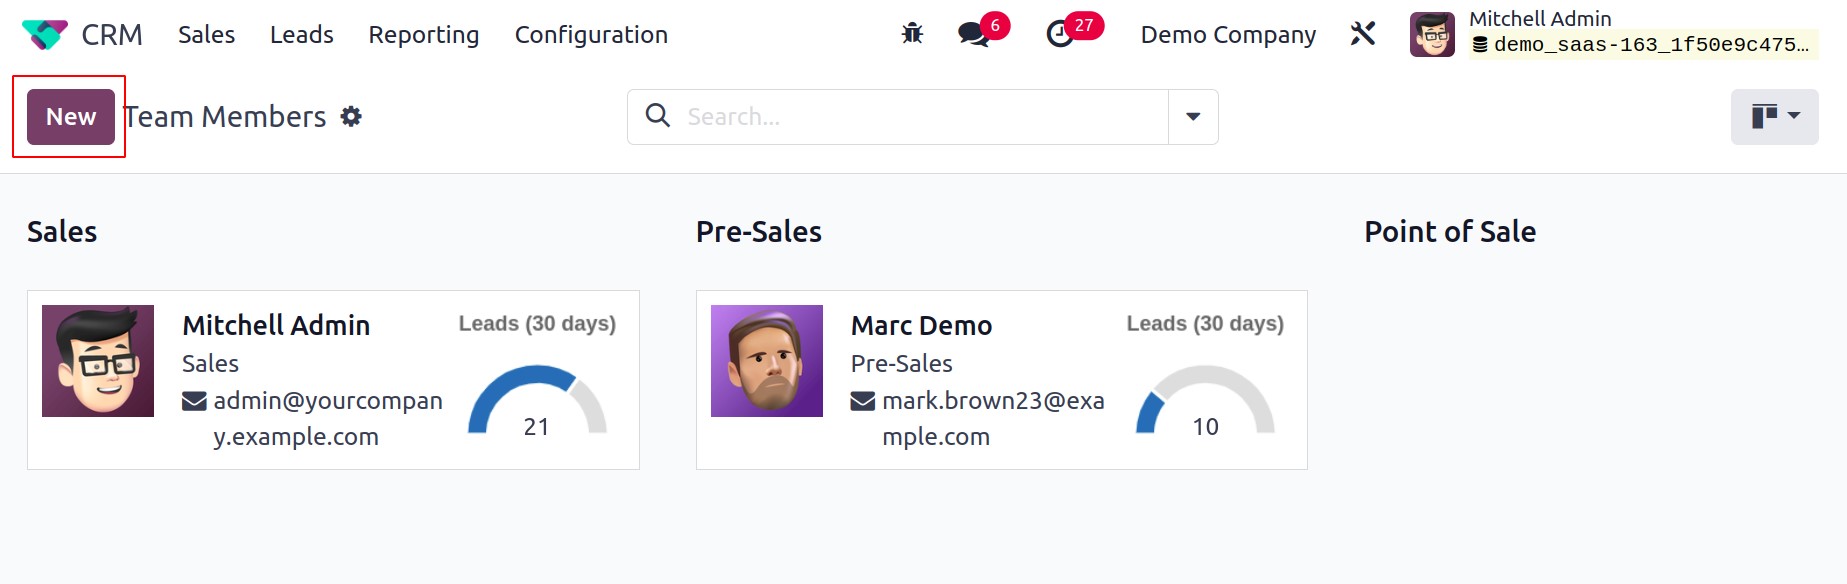
The Salesperson will be mentioned in a window that will display as seen below. The employee will be added to the specified sales team if they mention it in the form provided.
Customers is a different option under the Sales menu that will keep track of all customers created in Odoo 17 from different sources.
There will be a record of every new customer acquired through leads on this platform.
Activity Types
Keep in constant contact with the concerned clients if you want to lead your organization to the following level. With the aid of the schedule activity feature in Odoo 17, you are able to schedule a variety of activities with the customer. Almost all of Odoo's sales- and customer-related modules include this capability. Through planned programmes, you can interact with your customers using this capability. In Odoo 17, configuring various activity kinds is now simple. You can create new activity kinds with the help of the Configuration menu's Activity Types option.
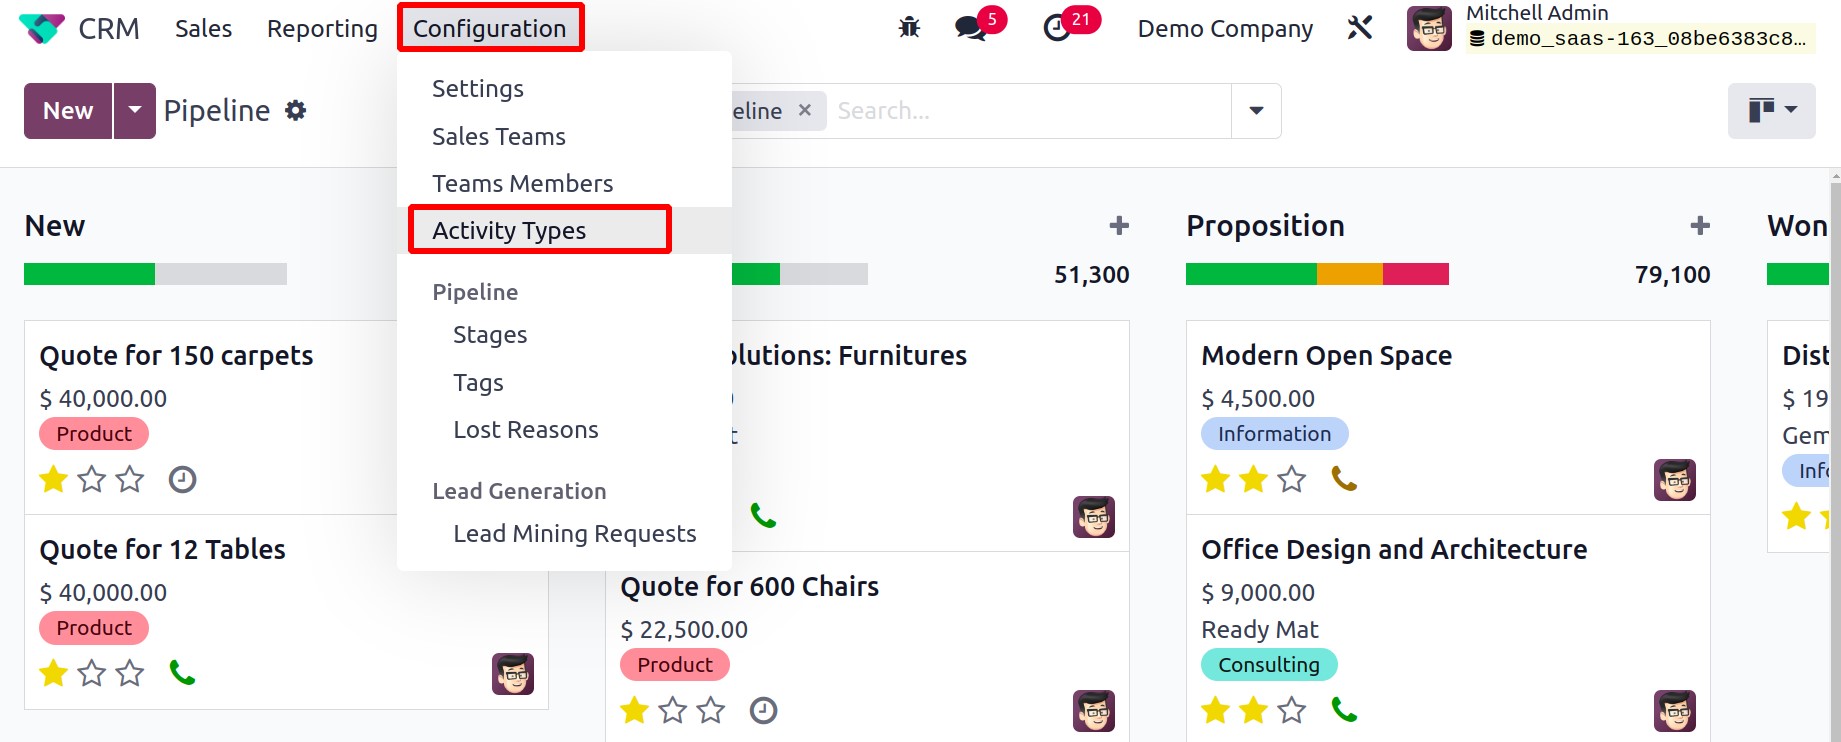
The already defined activity types as well as the specifics of the Name, Default Summary, Planned In, Type, Model, and Icon can be seen on this platform, as shown in the screenshot below. Let's now examine how a new Activity Type can be created on this platform.
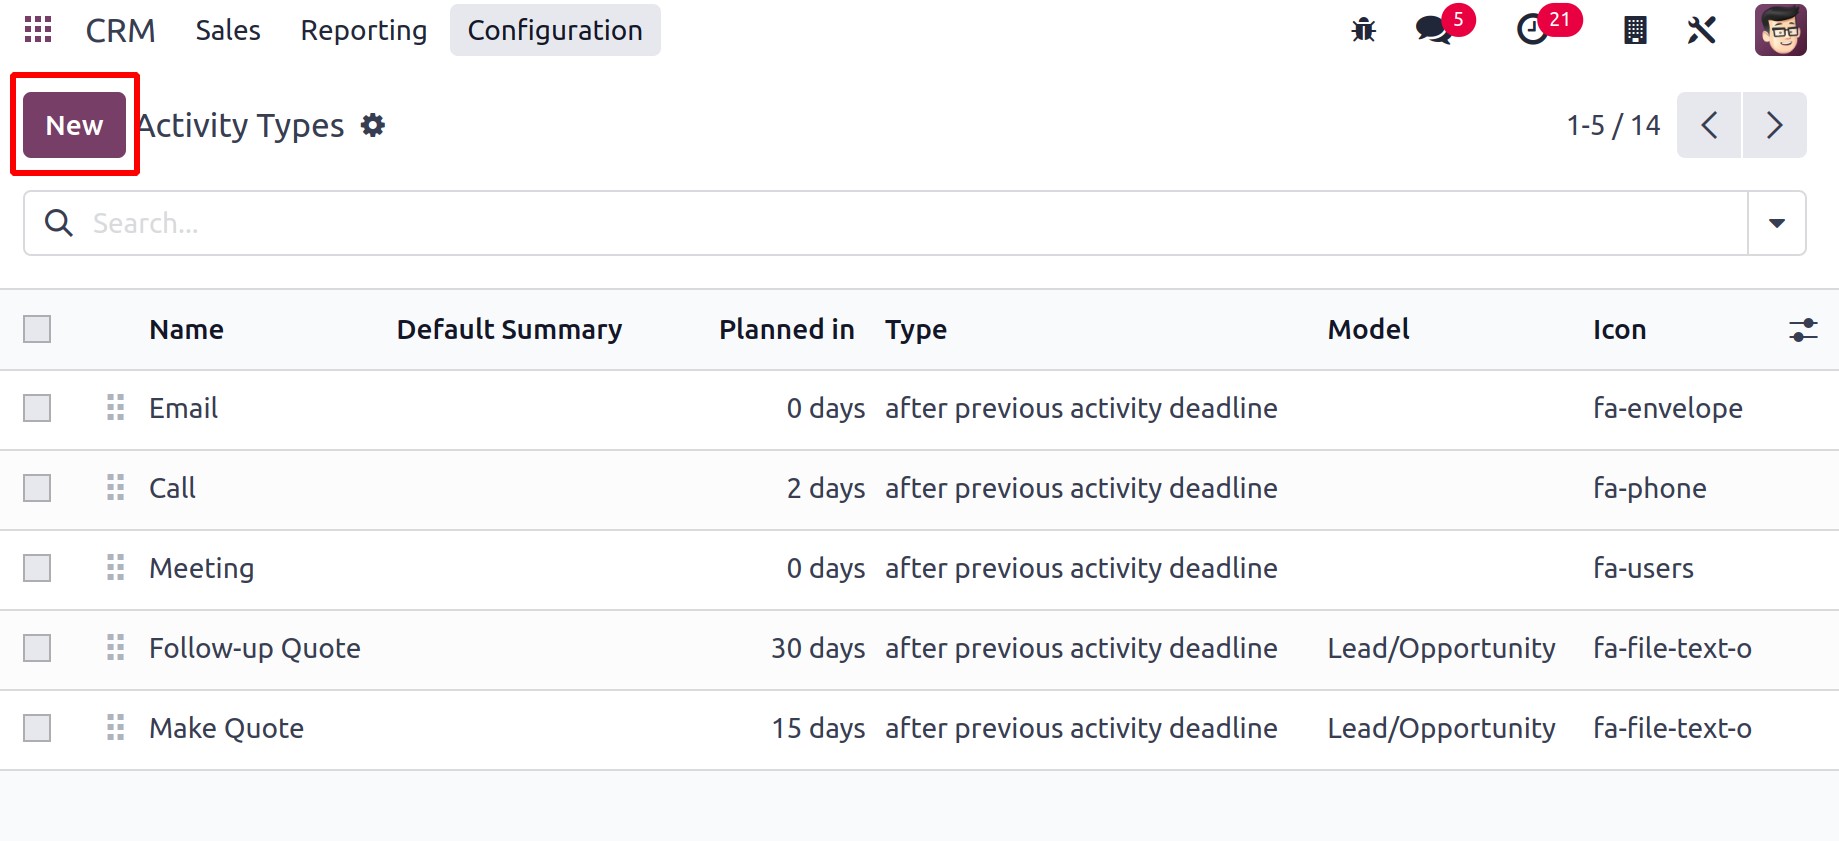
You may select the New button for this purpose. You can first enter the activity's name in the designated space in the box to create a new activity type. You can choose an appropriate Action from the provided list after mentioning the name of the activity.
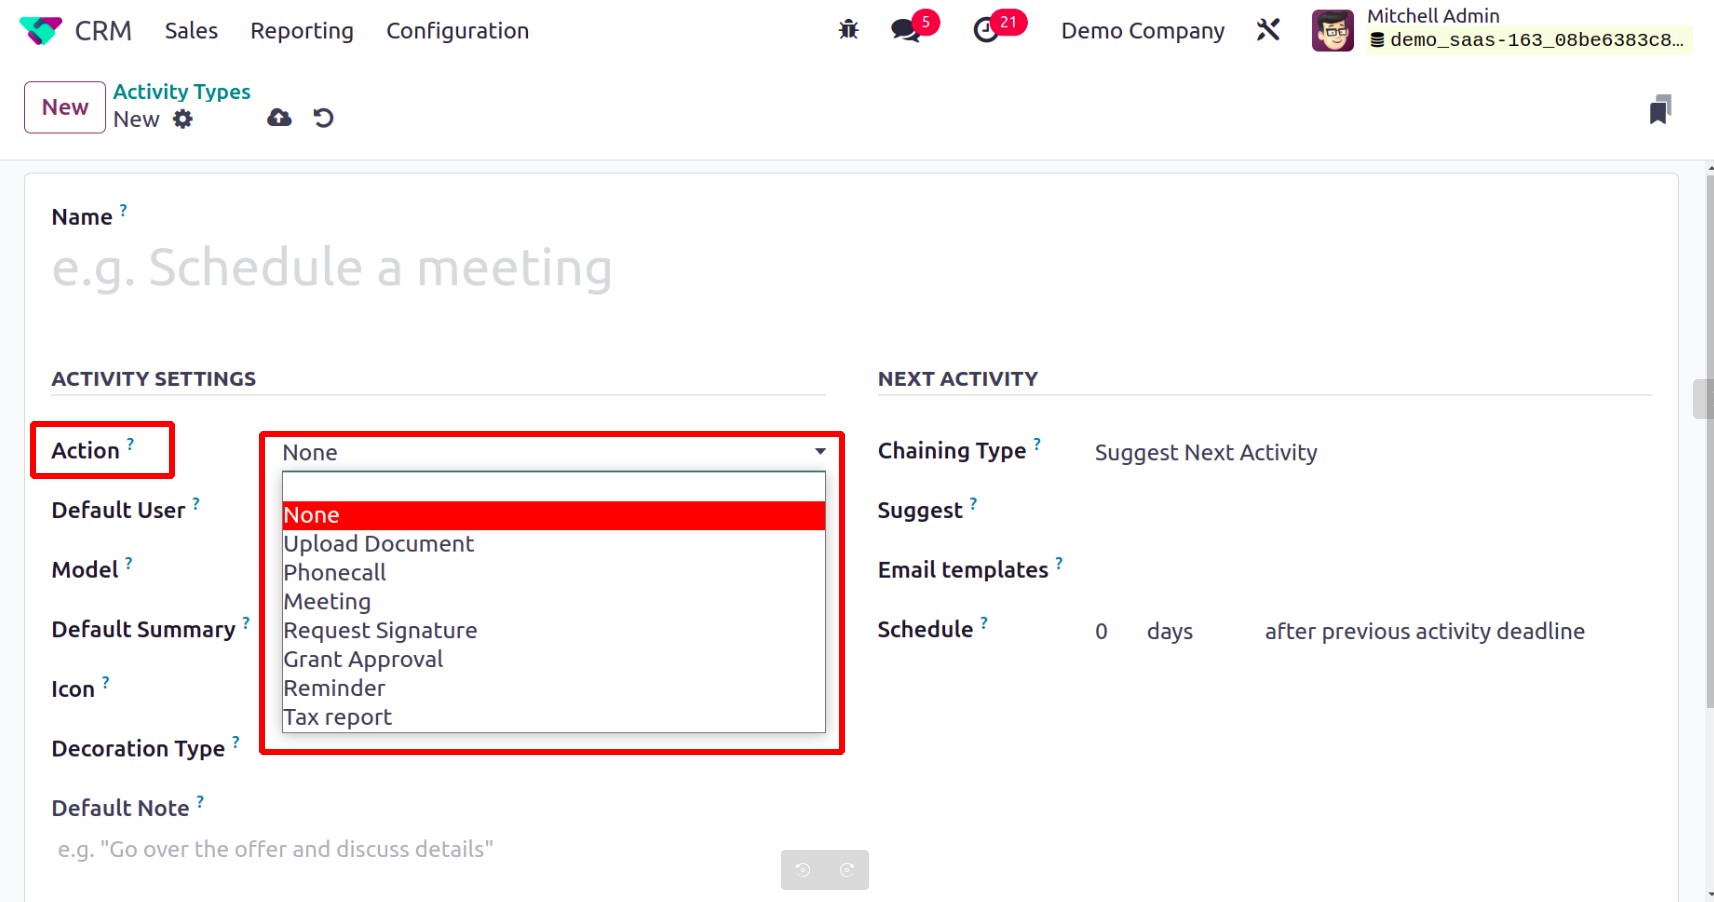
Specific behaviors may be triggered by actions, such as viewing the calendar view or marking something as done when it is submitted. A document upload, phone call, meeting, reminder, request for signature, tax report, or none of the above can be chosen as the action. In the appropriate fields, mention the Model and Default User for this activity type. When a model is mentioned, this activity type will only be applicable to that model and won't be present when managing activities for other models. You can enter a few sentences about the activity in the Default Summary field, and these will be used as the default summary for this particular activity type. In the relevant boxes, you can indicate the activity type's icon, decoration type, and default note.
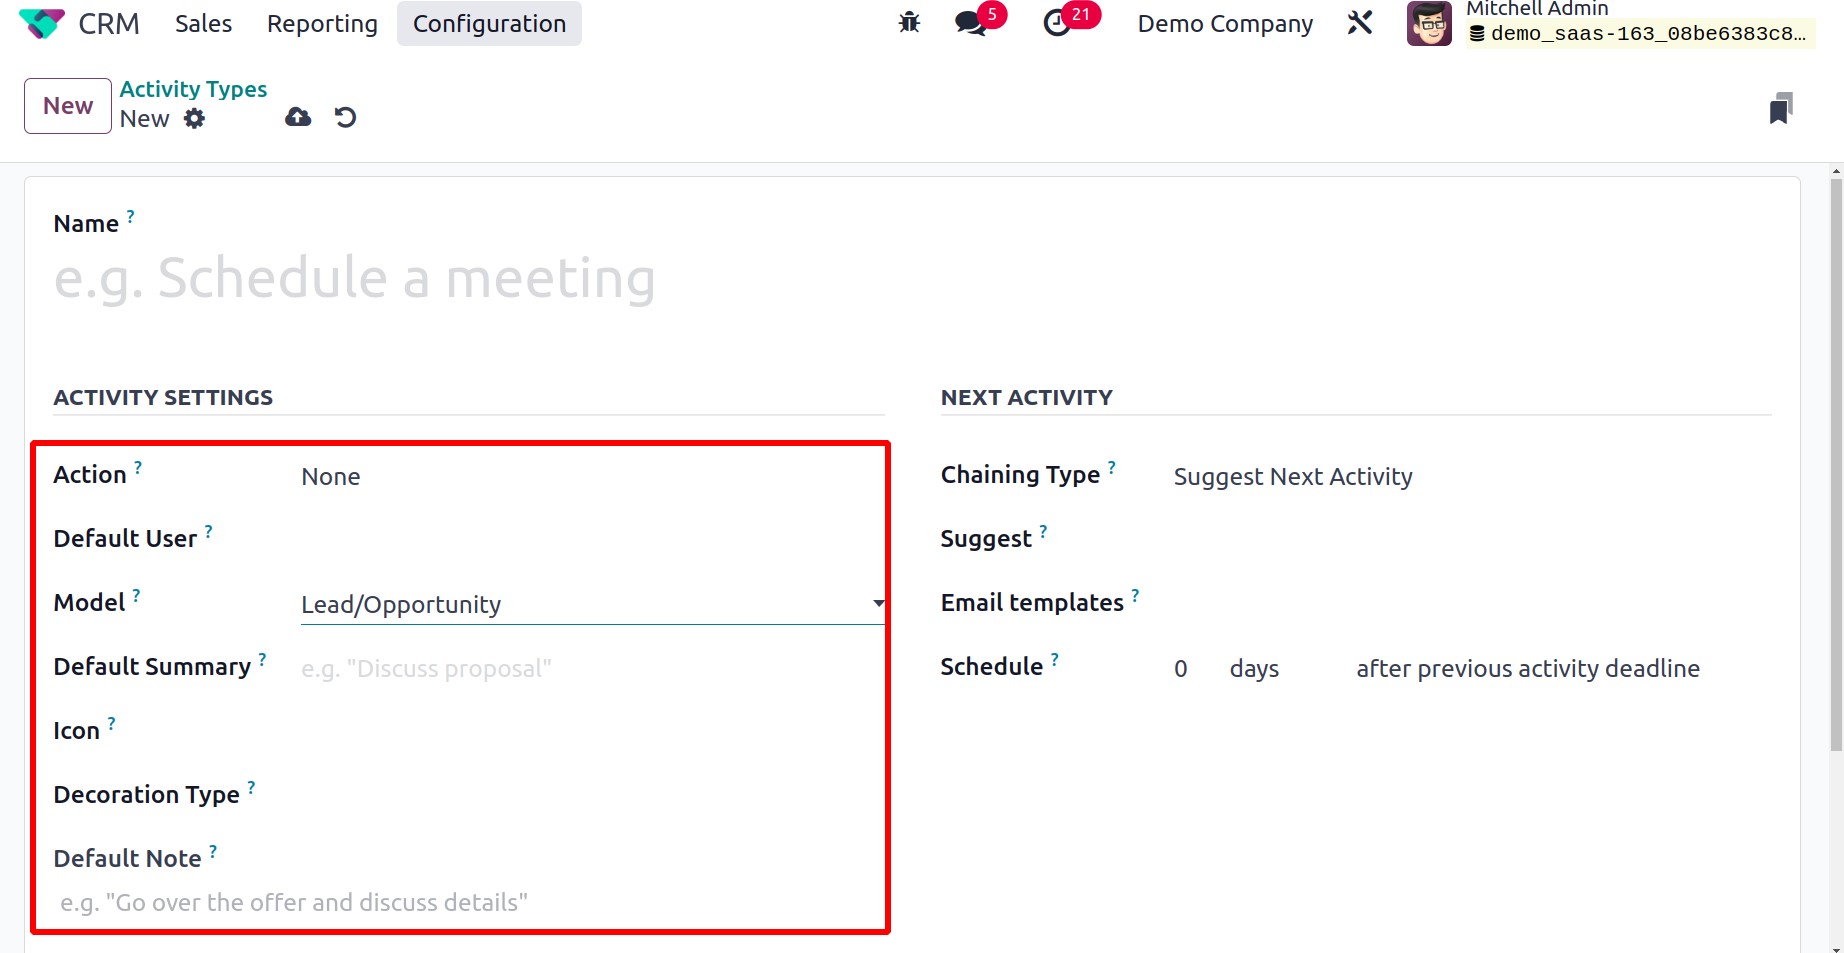
You will be given an additional tab when creating a new activity type where you may describe the NEXT ACTIVITY specifics.
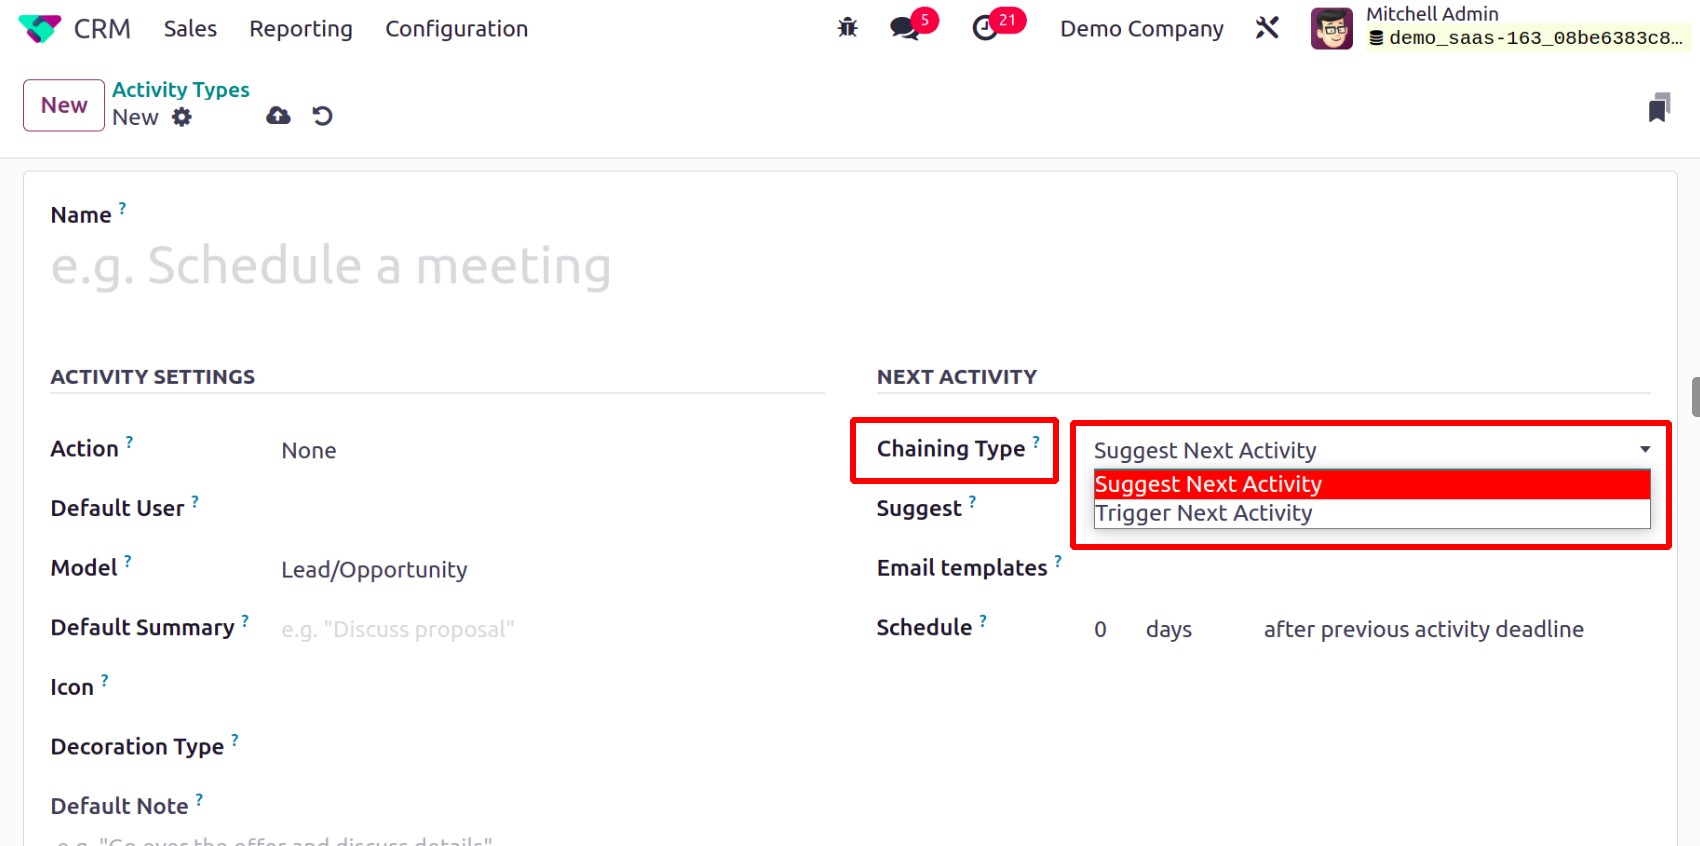
You can select Suggest Next Activity or Trigger Next Activity as the Chaining Type action under the Next Activity tab. You can enter the next activity as a suggestion by choosing the Suggest Next Activity option. By implementing this, once the current action is designated as complete, Odoo will offer the previously indicated one.
You can specify the subsequent activity in the Trigger box when using the Trigger Next Activity option. Odoo will immediately start the subsequent activity as soon as the current activity is complete. When this activity is booked with the affected customers, you may add email templates that can be used to send emails to them. The Schedule box allows you to specify the action's due date.
Here, you can indicate how many days, weeks, or months must pass before this activity is carried out. You may easily create new activity kinds in Odoo 17 by following these steps.
Let's now talk about adding more steps to the Odoo 17 CRM pipeline.
Stages
In our discussion of the Odoo 17 CRM module's primary dashboard, we brought up the organization of leads and opportunities at various points in the pipeline. Giving records different stages will always make it easier for you to see how each operation is going. You can group data into different stages based on your needs. You may easily drag and drop the record into the following stage if you fulfill the conditions of a specific level. New stages can be easily created right from the dashboard. This chapter's prior section already describes how to build new stages using the pipeline. Let's now examine the stages creation process utilizing the Stages option found in the Configuration menu.
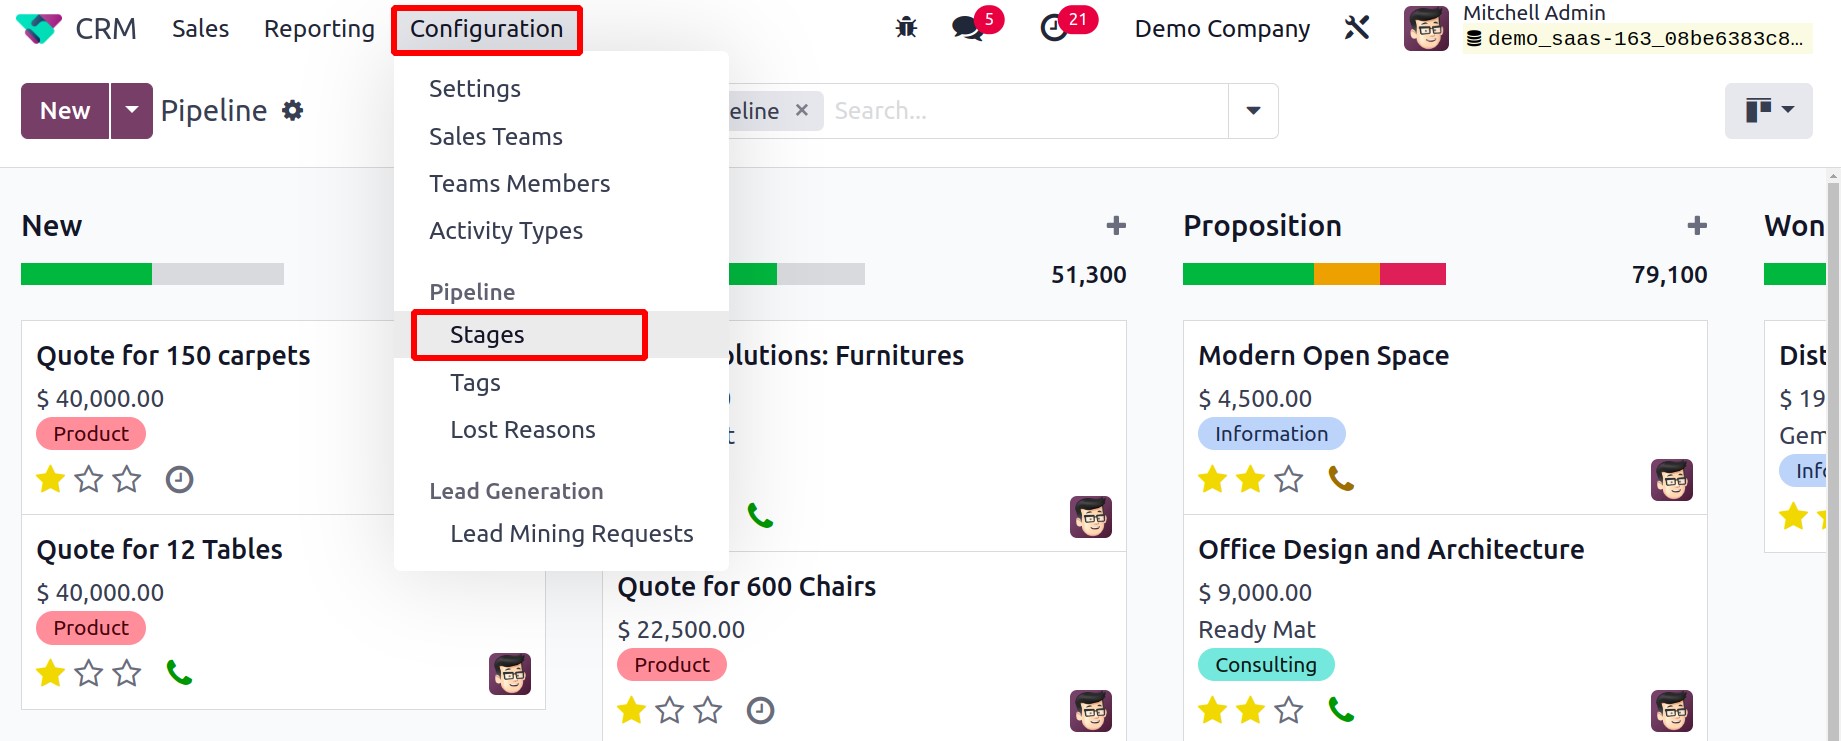
This window, as seen in the image below, contains a list of the stages that have previously been configured. By selecting the necessary stage from the provided list, you can make changes to the current stages. You can click the New button in the top left corner of the screen to add a new stage to your pipeline of leads and prospects.
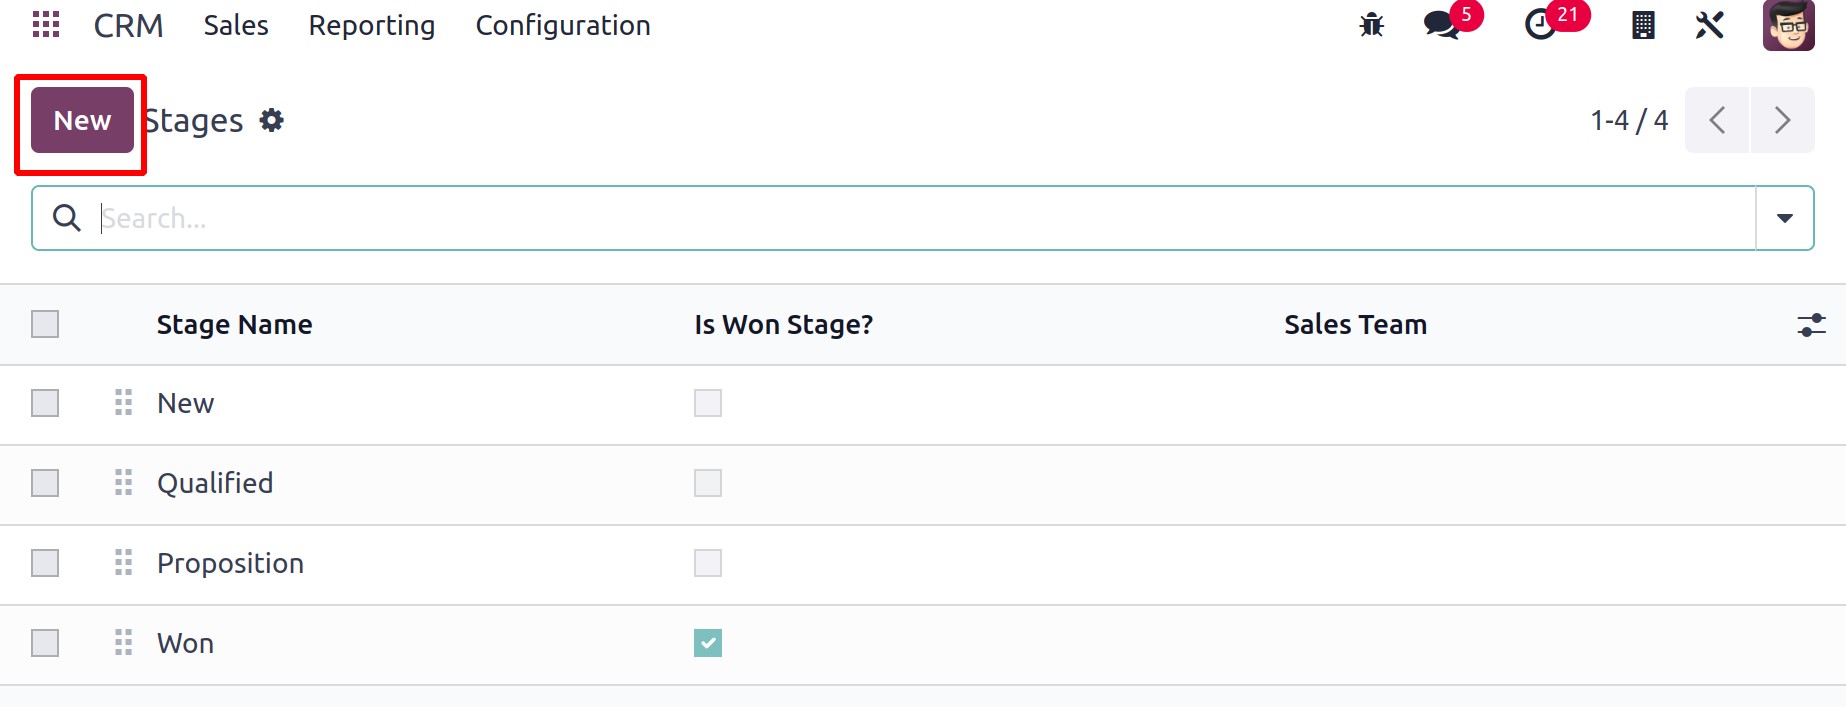
In the Stage Name section, enter a descriptive name for the stage. If you wish to consider this specific stage as the won stage for the Leads/Opportunities, you can turn on the Is Won Stage setting. By turning on the Folded in Pipeline option, you can fold this stage into the pipeline. In the Sales Team section, you can name specific teams who utilize this stage. By noting this, you will prevent other teams from seeing or using this specific stage.
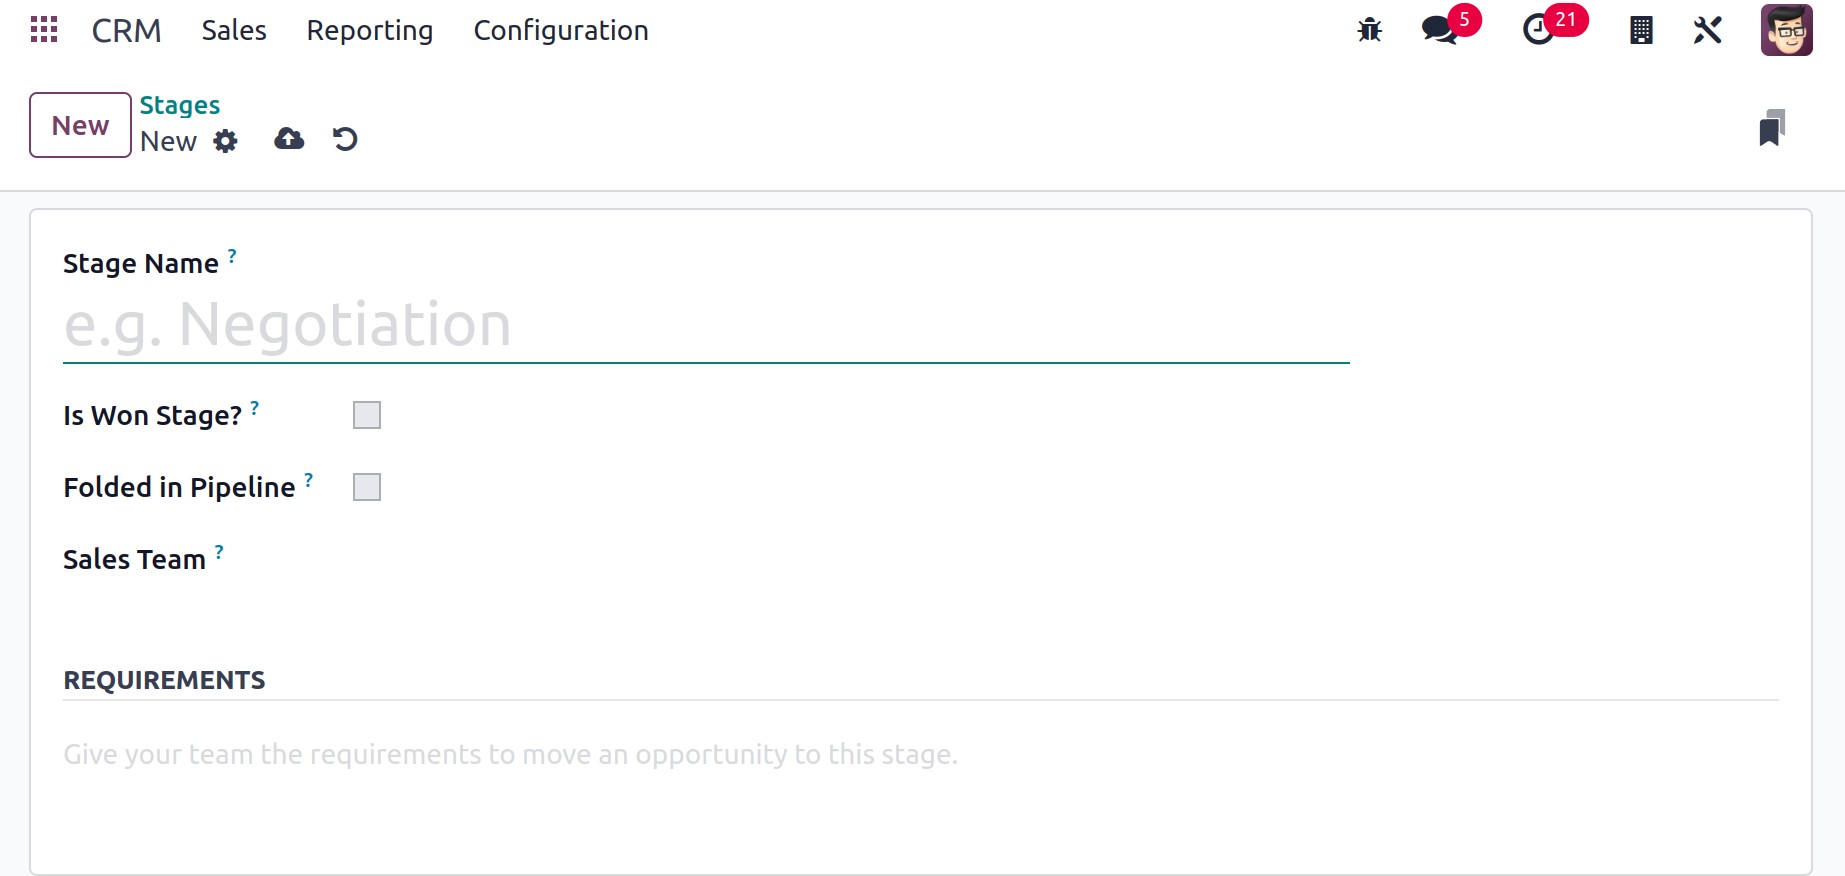
To bring a lead or opportunity to this level, you can specify some requirements in the Requirements section. The new stage will be added to the current list of stages once you have filled out all required fields.
One new feature that Odoo 17 gradually added is the ability to create new automations. The user can also update or modify the steps from the pipeline, as seen in the screenshot below. There will be a new Automation option displayed. With this, users can create automatic rules that will carry out automated tasks.
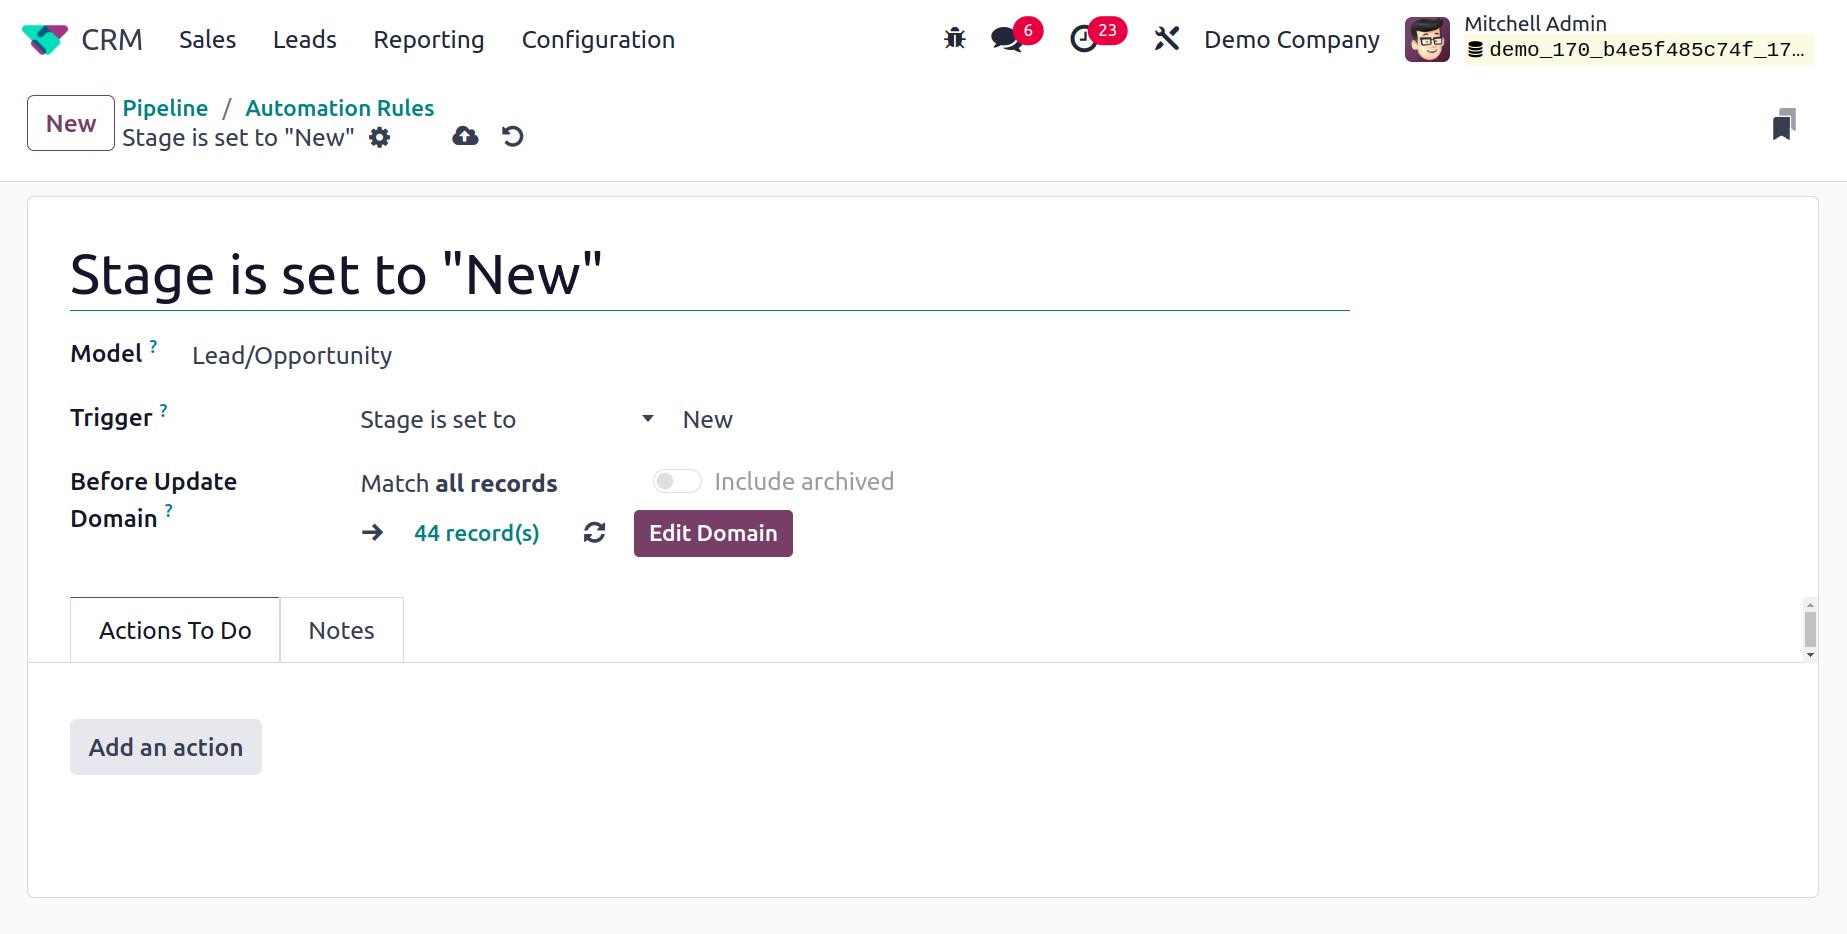
Select the Lead/Opportunity model. Select the Trigger, and then use the Edit Domain option to add other requirements. You can add actions using the Actions To Do tab. When you click on the Add an action button, a new page will open.
Select the kind of action. A number of actions are available as Types, including updating records, creating activities, sending emails and SMS, adding and removing followers, creating records, executing code, sending webhook notifications, and executing already-completed actions.
Adding Allowed Groups is possible in the TECHNICAL SETTINGS section. The groups that are able to carry out the server action are mentioned. To make space for everyone, leave the pitch unoccupied. Next, provide the selected action type's details in the ACTION DETAIL box.
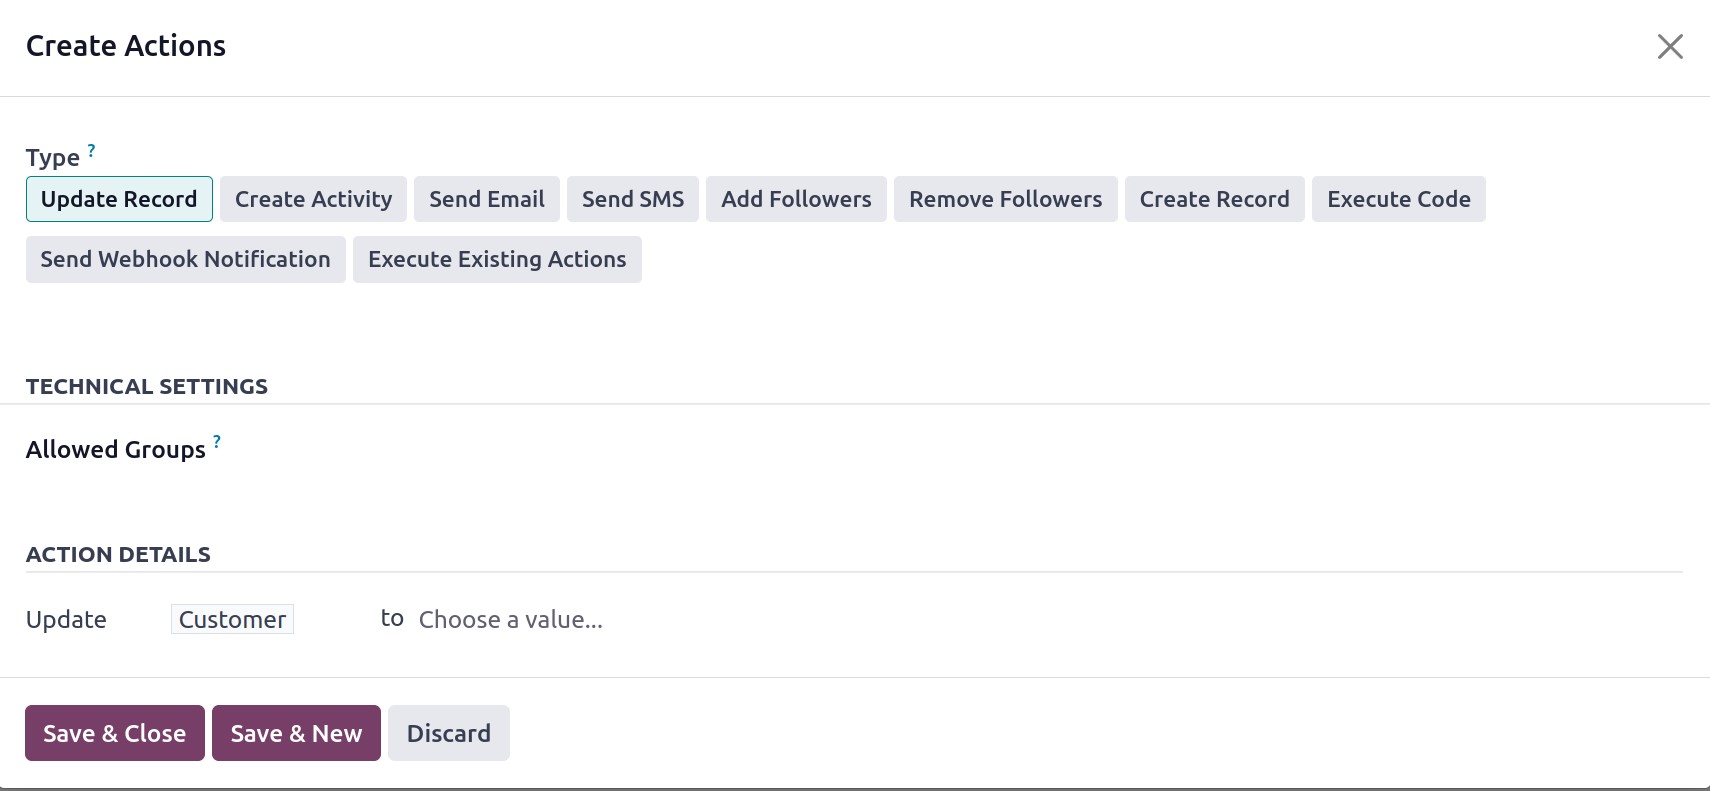
Click Save & Close when you've finished entering all the information. If the specified condition is met, the automation action that was established will then execute
Lost Reason
You can lose certain leads or possibilities while working with them for various reasons. Such leads/opportunities can be tracked in Odoo 17 CRM along with the reasons. Later, with the aid of Odoo 17, you may recover these missed possibilities. You can access the platform to configure the reasons for losing leads/opportunities by selecting the Lost Reasons option under the Configuration menu of the CRM module.
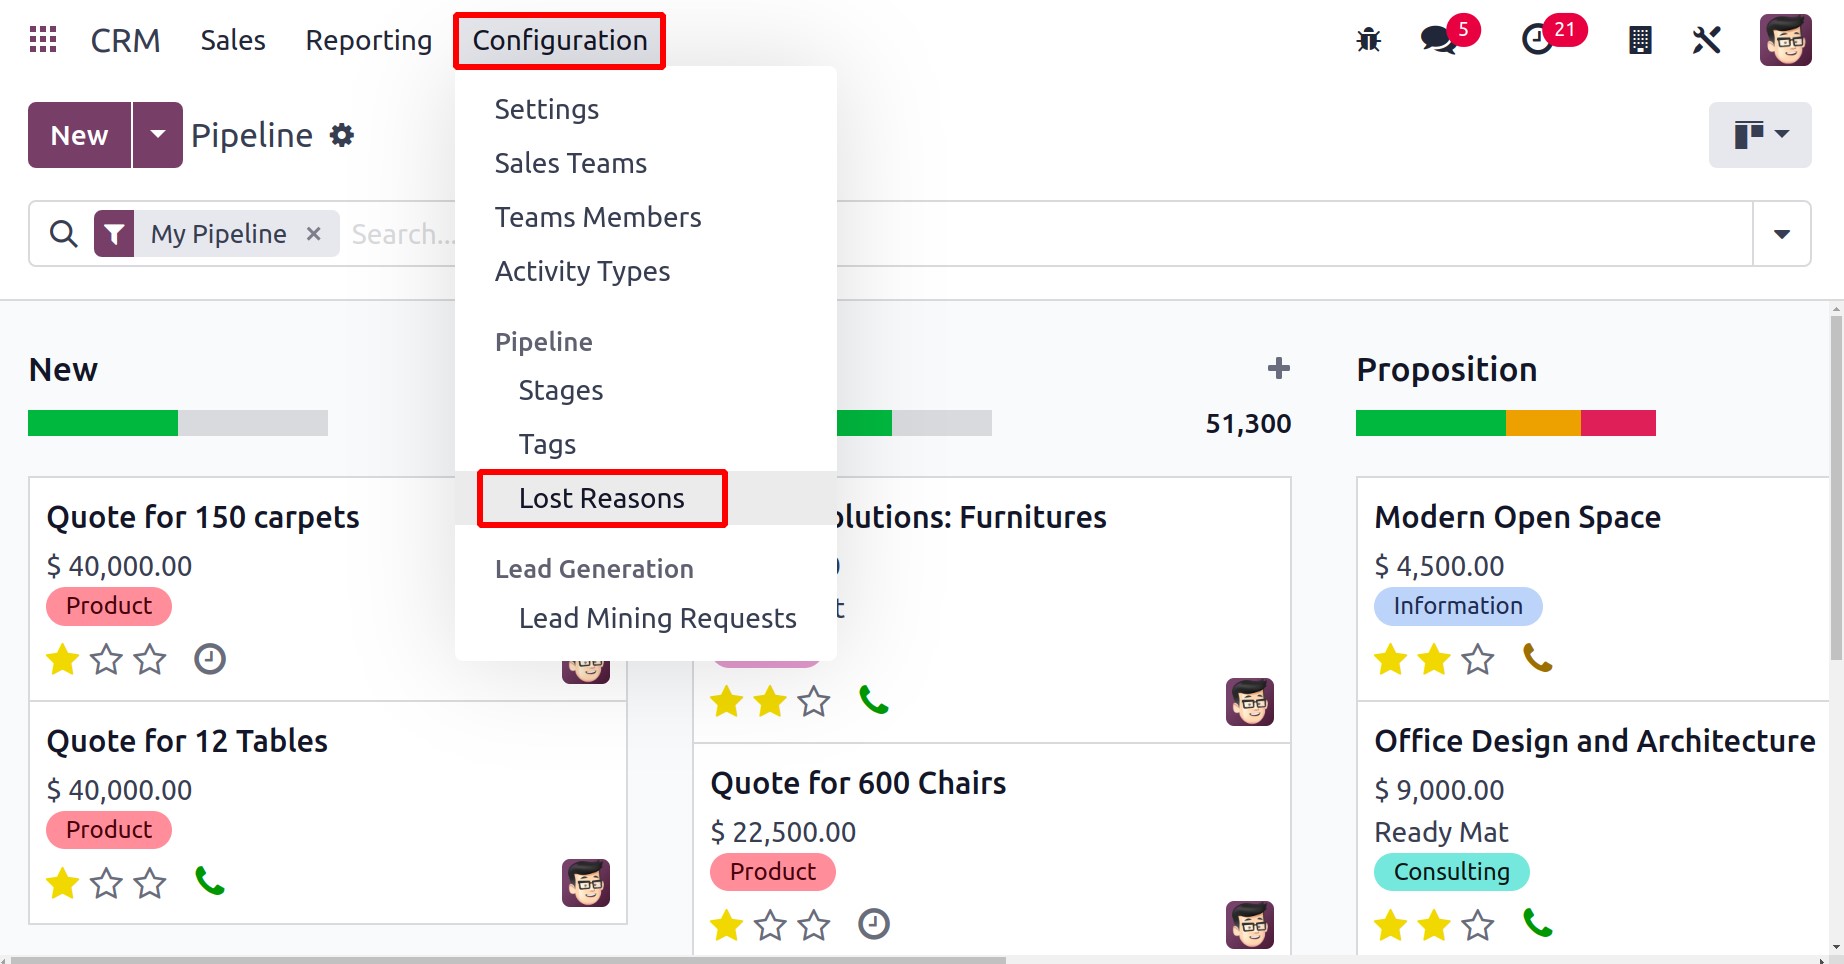
On this site, you can locate various Lost Reasons that have already been set up. We can now create a new lost cause by using the NEW button. With a few clicks, this can be accomplished.
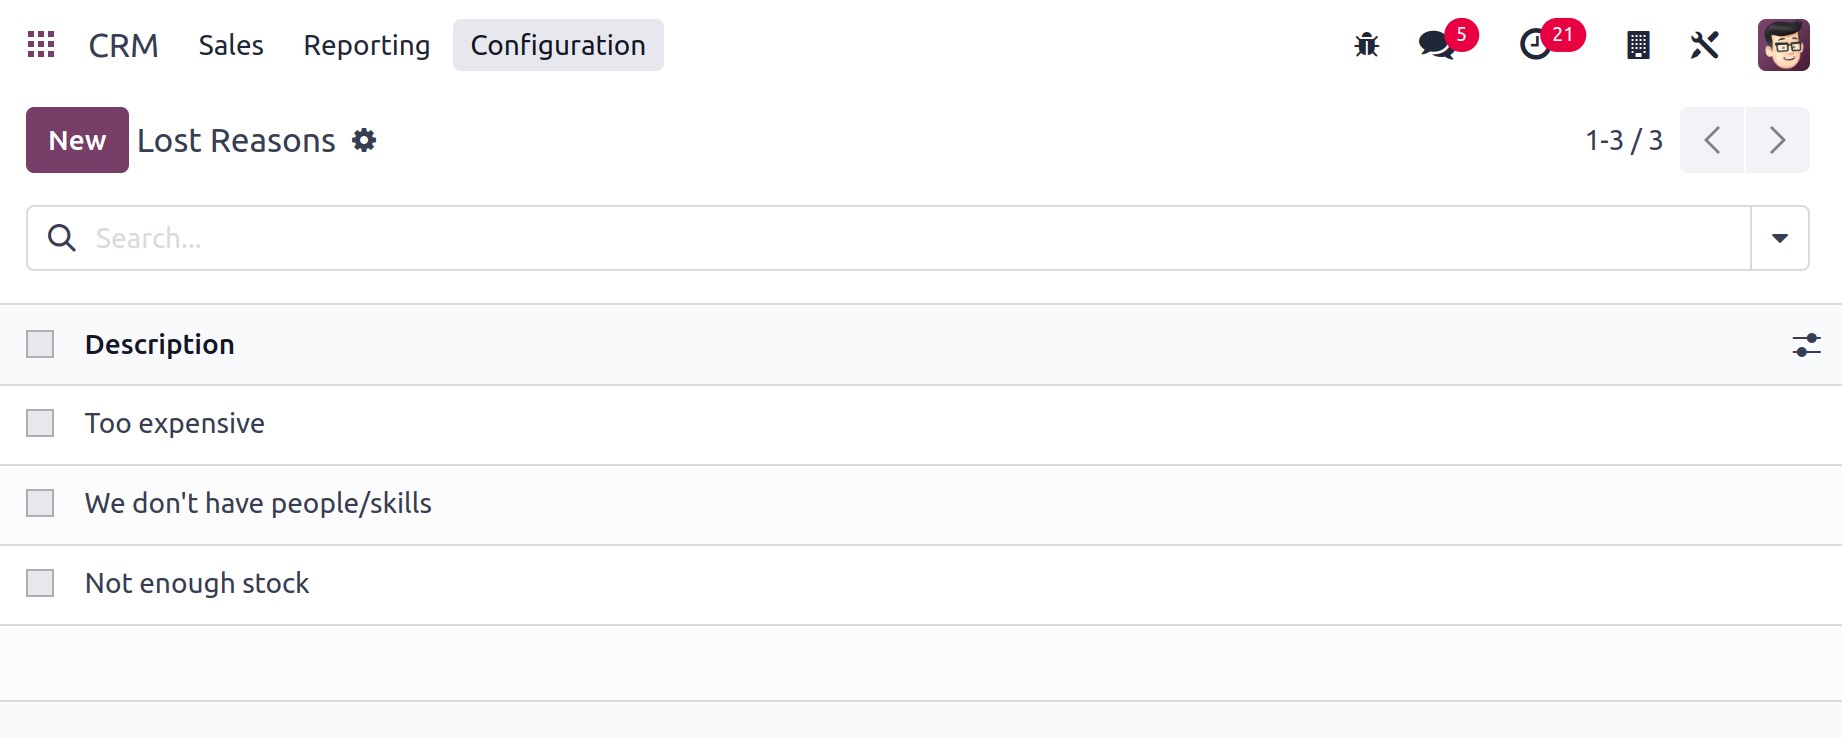
Just state the lost cause in the new line that appears under the existing line as soon as you click the New button. The new Lost Reason will be kept in your database after being mentioned. Let's now examine how to apply these explanations for a lost lead or opportunity. You will have the choice to mark an opportunity as Won or Lost while managing a lead/opportunity in the Odoo CRM module.
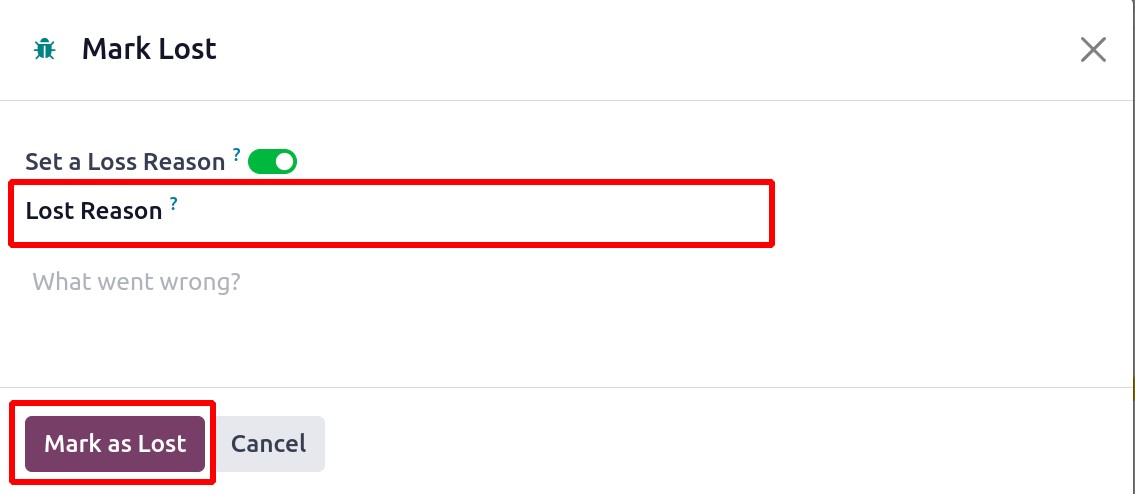
You can access the list of lost causes that we previously set in the drop-down menu. From the list of reasons provided, pick one that applies, then press the Mark as Lost button. Your opportunity will be recorded as loss after reporting the loss reason, as seen in the screenshot below.
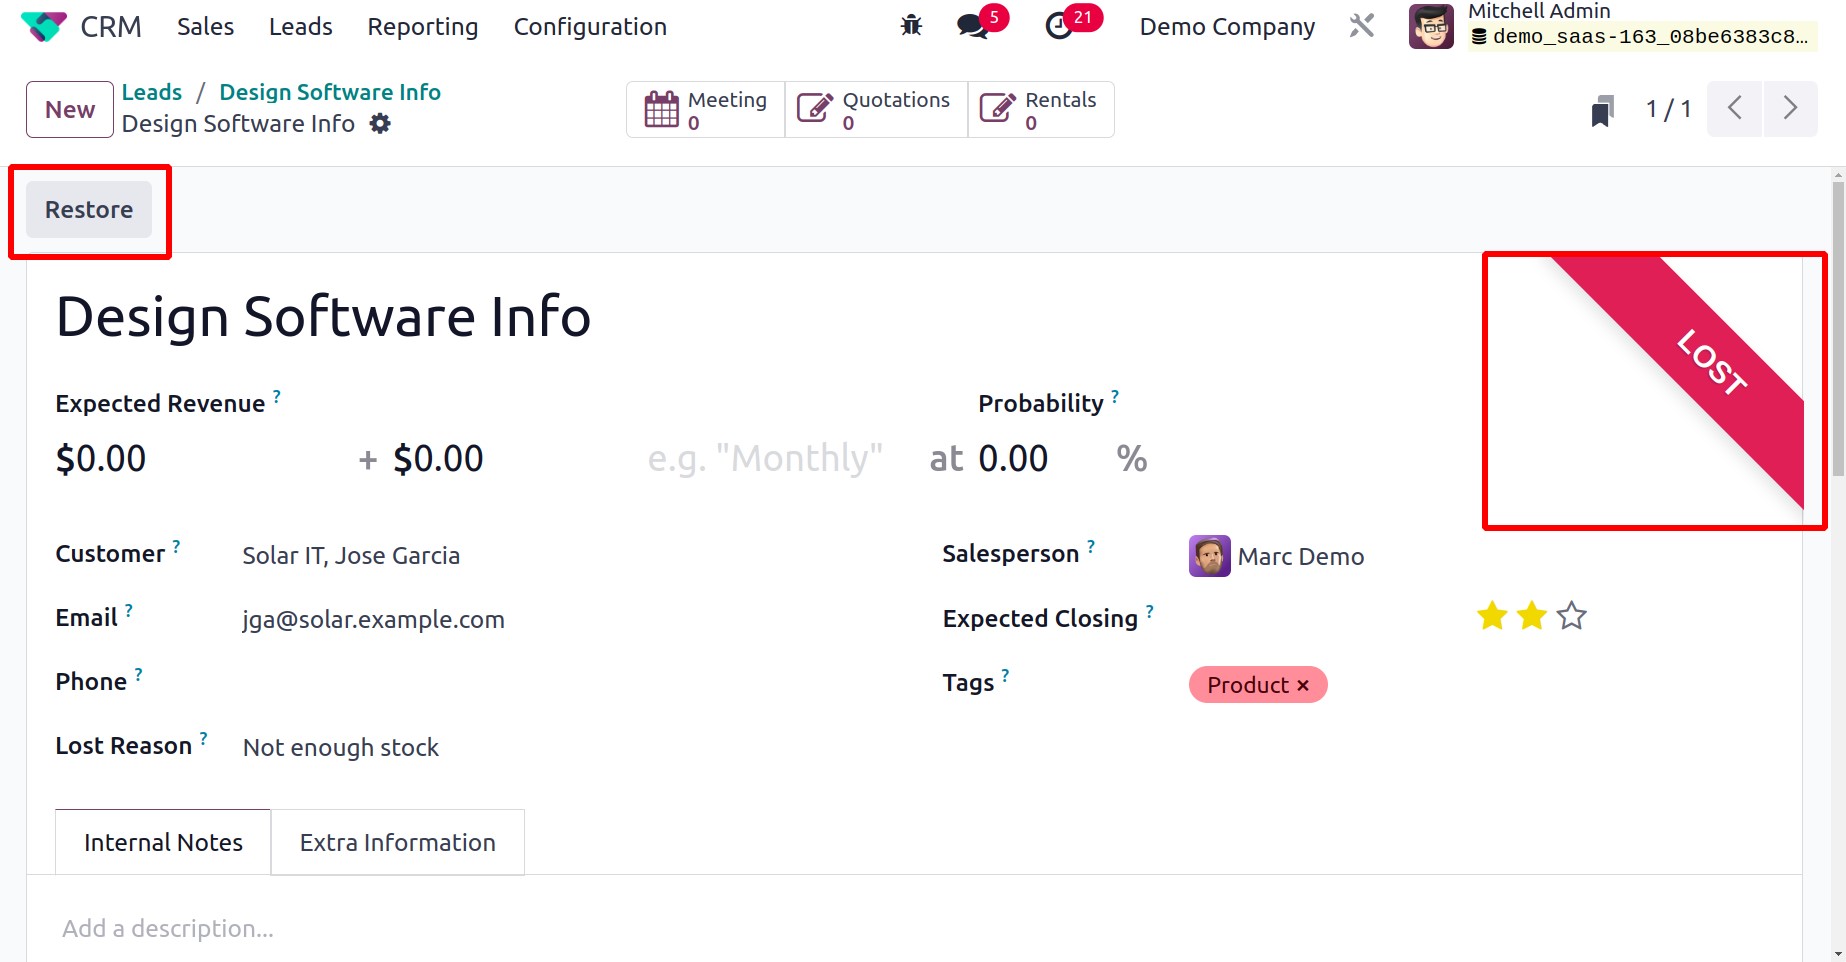
You are able to utilize the Restore button to get back the missed opportunity. You can use this option to establish a fresh opportunity if there is a chance to restart your business from a missed opportunity
Resellers
You can set up resellers using the Odoo 17 ERP system, and you'll have the ability to share some leads and possibilities with them. The Resellers module that comes standard with Odoo 17 is connected to this feature. On your website, under the Resellers tab, you'll find a list of resellers.
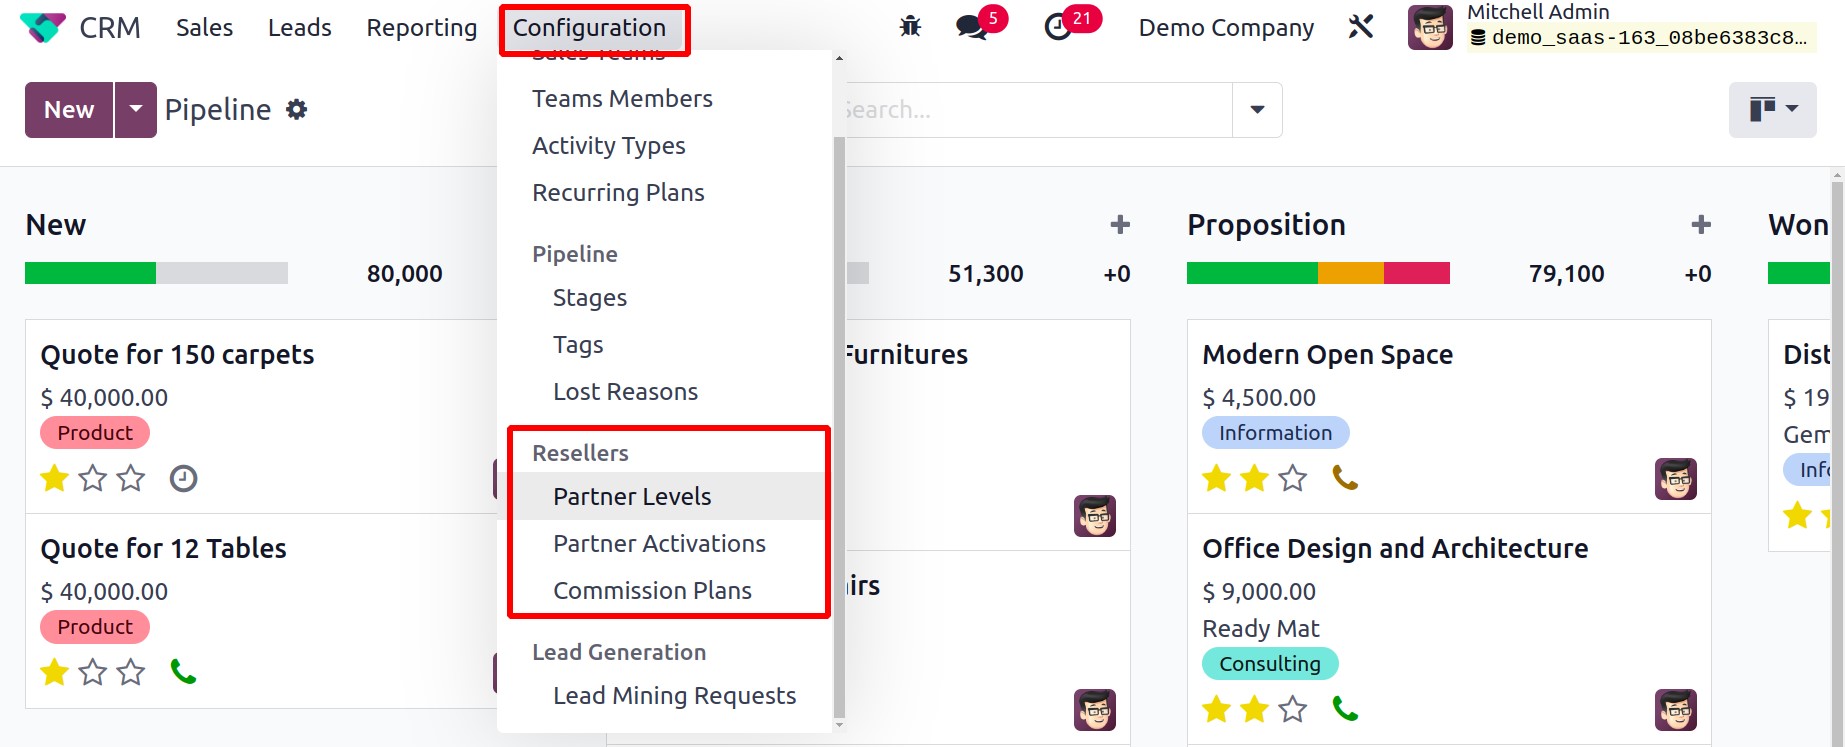
Partner Level
You can provide the resellers different Partner Levels in the Odoo 17 CRM module.You can configure several levels for the partners with the assistance of the Partner Levels option found under the Configuration menu.
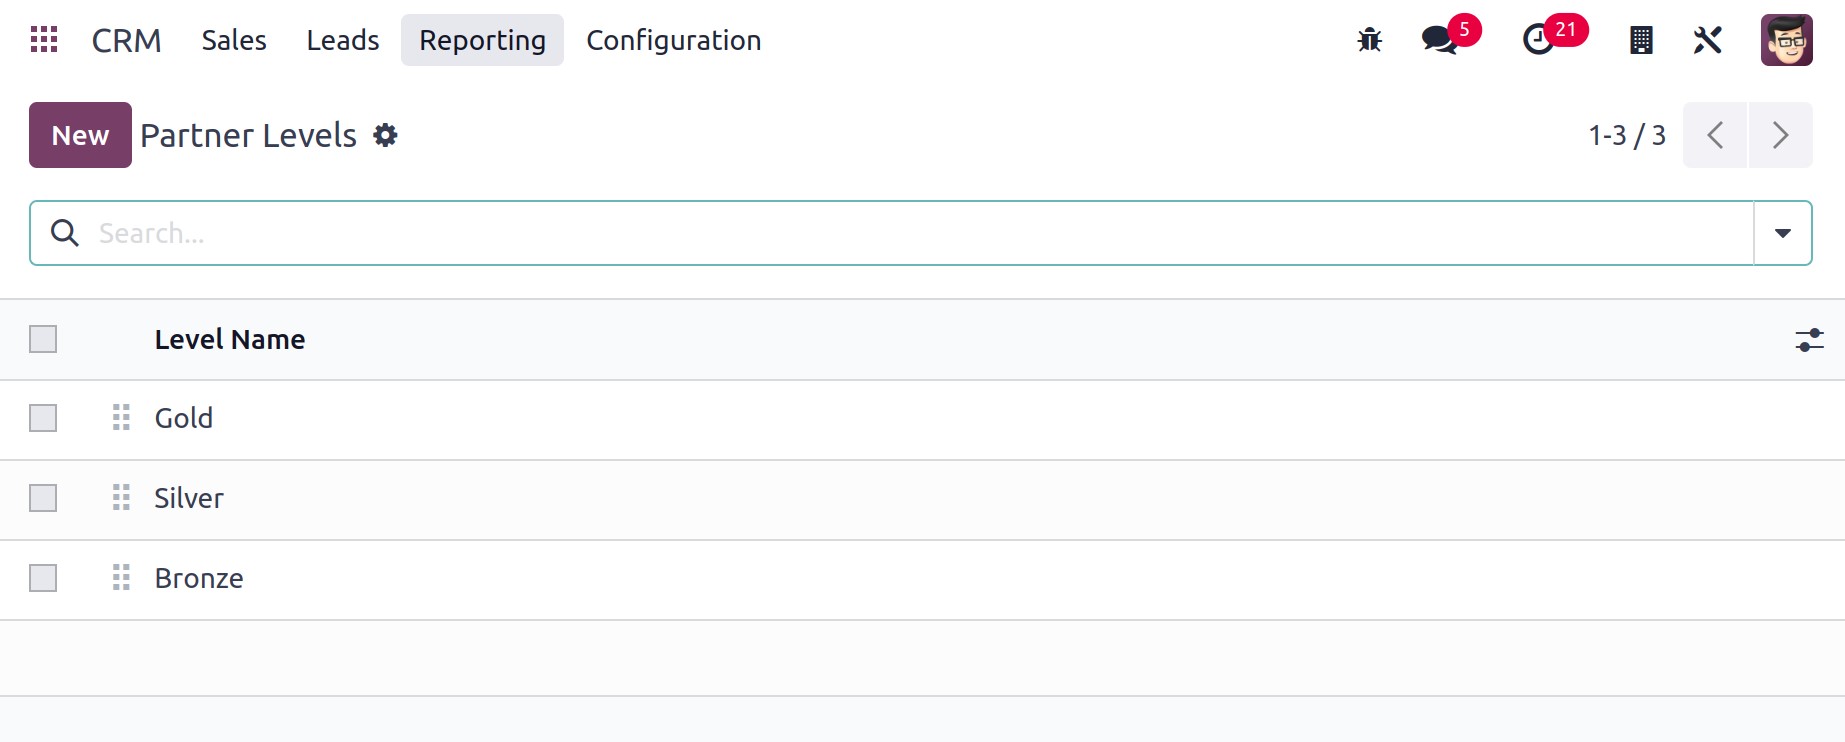
On this platform, you will automatically receive some partner levels. You can give the partners a new level by using the New button.
In the available space, you may enter the Level Name. You can indicate the likelihood of giving the partners in this level a lead in the Level Weight area. This window displays the level's Sequence number.
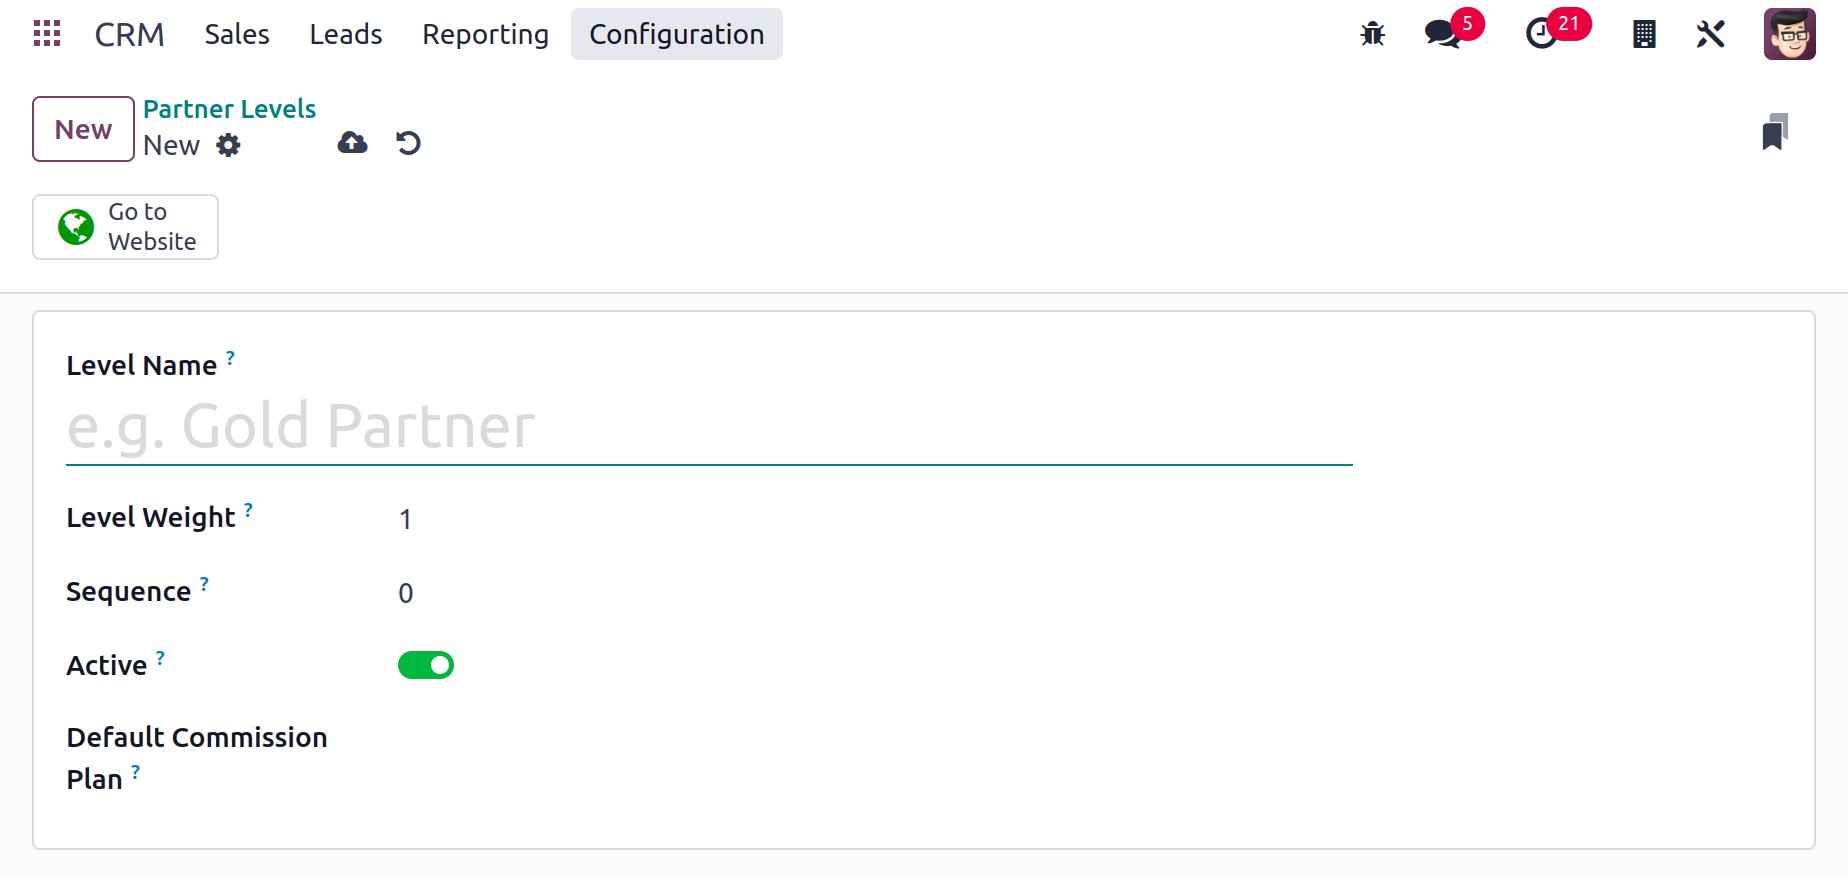
This level can be accessed by selecting the Active button. Include a commission scheme for this partner level in the Default Commission Plan. The new partner level will be added to the current list when the Save button is clicked.
Partner Activation
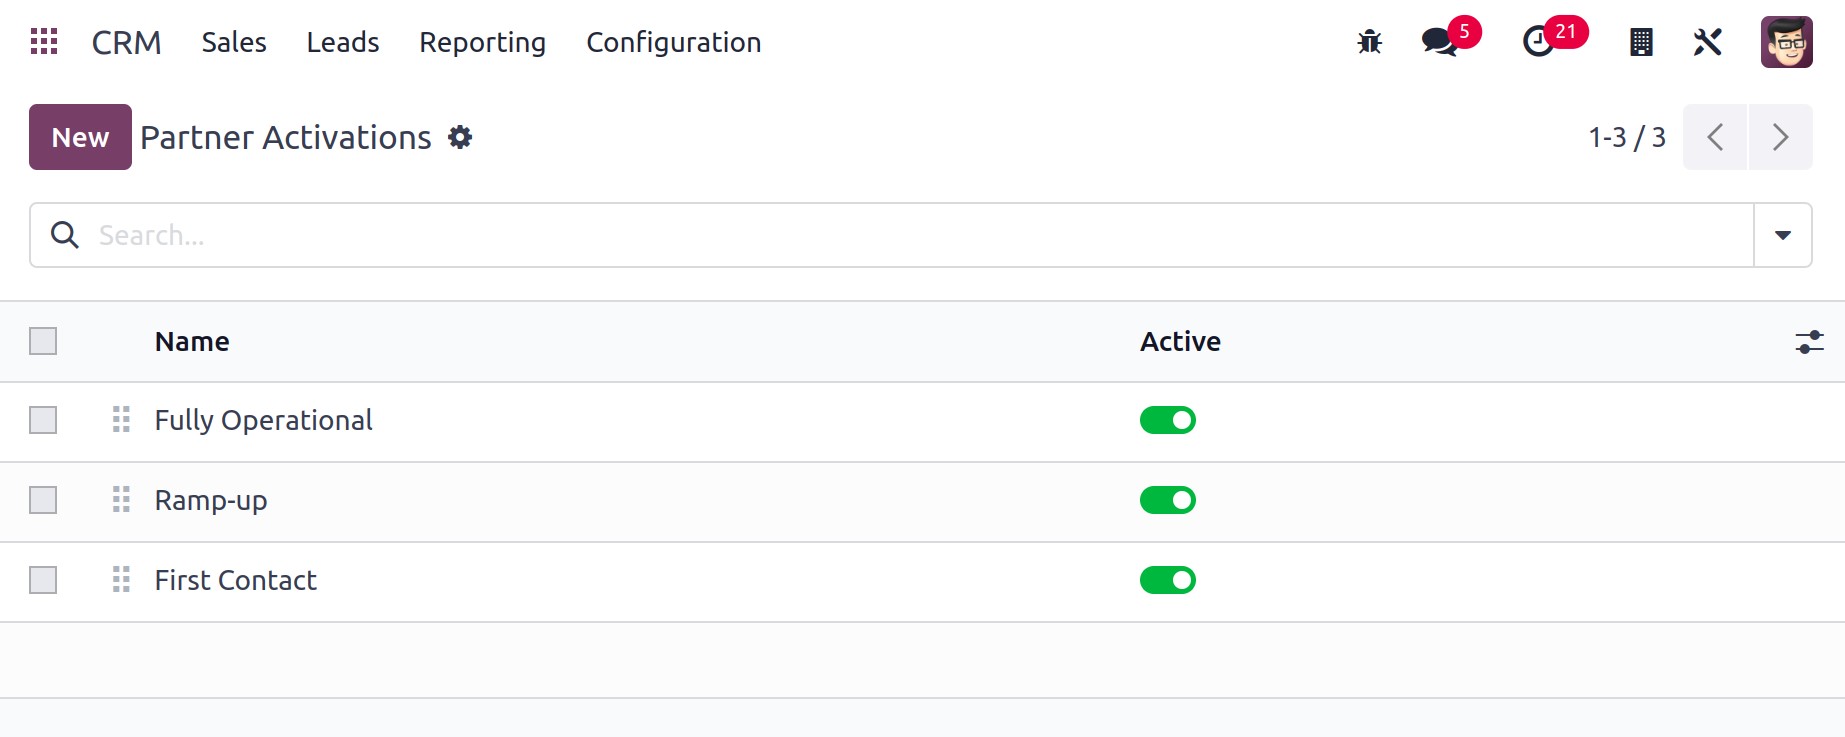
You can create different partner activation methods by using the Partner Activations option in the Resellers tab of the Configuration menu. You can quickly enter the name of the Partner Activation in the provided field by using the New button.
Commission Plan
You have the option to work with partners thanks to Odoo 17. To strengthen the bond between partners and consequently advance the business, you might share your leads and opportunities with them. Once the sales order is confirmed, you can give one of your partners a commission if they bring you any sales prospects. You and your business partners will be able to build your company with the aid of this marketing plan. You can give the partner who recommended the sales opportunity to your business a specific portion of the final billed amount using the commission plan feature in the Odoo17 ERP system.
The Resellers tab in the Configuration menu contains the option to set up new Commission Plans. In order to establish a new Commission Plan, click the New button.
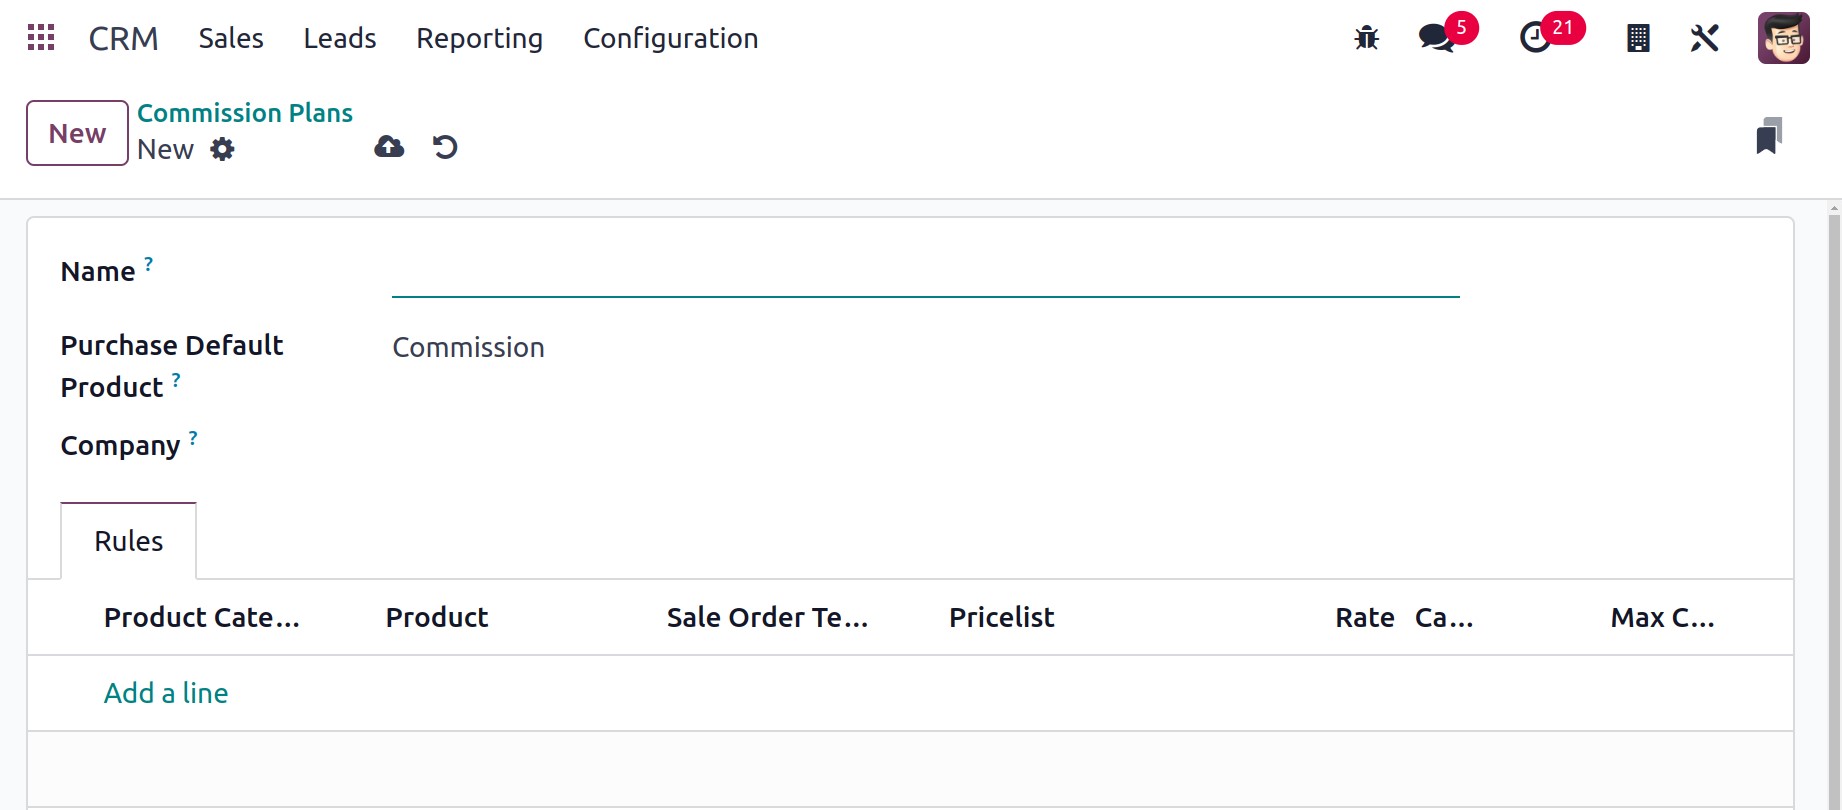
In the Name area, you can provide the commission plan's name. If you want to pay a partner a commission of 10% of the invoiced amount, you might refer to the commission plan as "Commission 10%." In the relevant field, the Purchase Default Product appears as Commission. The commission operations will use this service offering to create a purchase order. When the purchase default product is mentioned, the Purchase module will automatically produce a purchase order. Put the company's name in the Company area. Under the Rules tab, the commission plan's rules can be added. You can mention the Product Category, Product, Sales Order Number, Pricelist, Rate, Capped, and Maximum Commission by using the Add a Line button. After you've filled out the new commission plan in every detail, click the Save button.
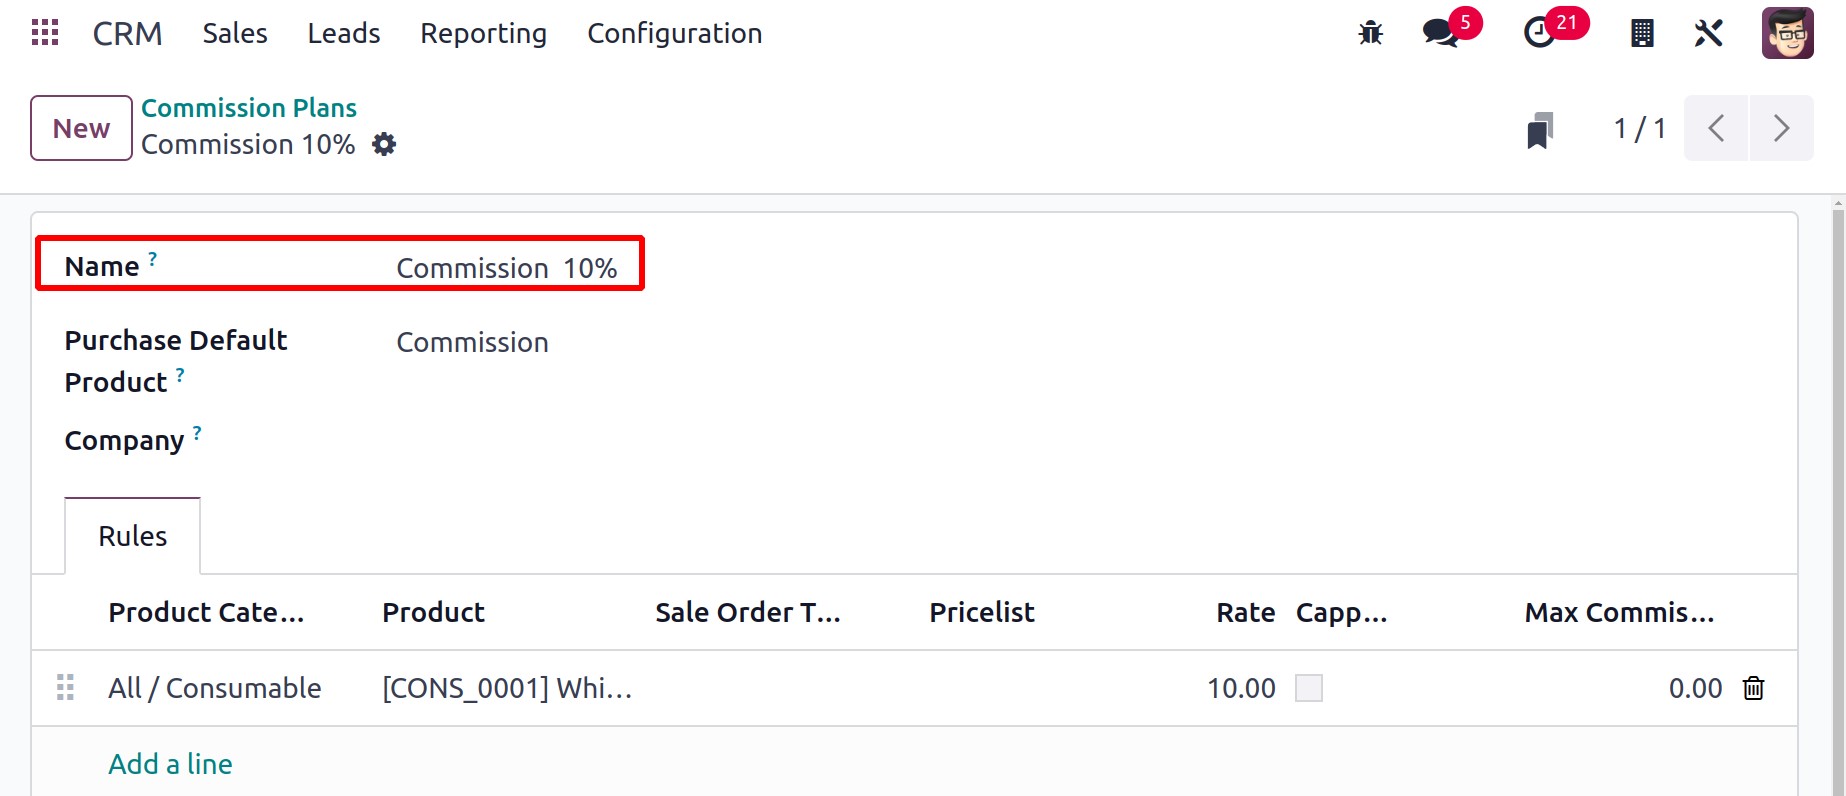
You can now transfer ownership of this commission plan to your alliance partner. By choosing the partner's contact information from the Customers menu, you can accomplish this quickly.
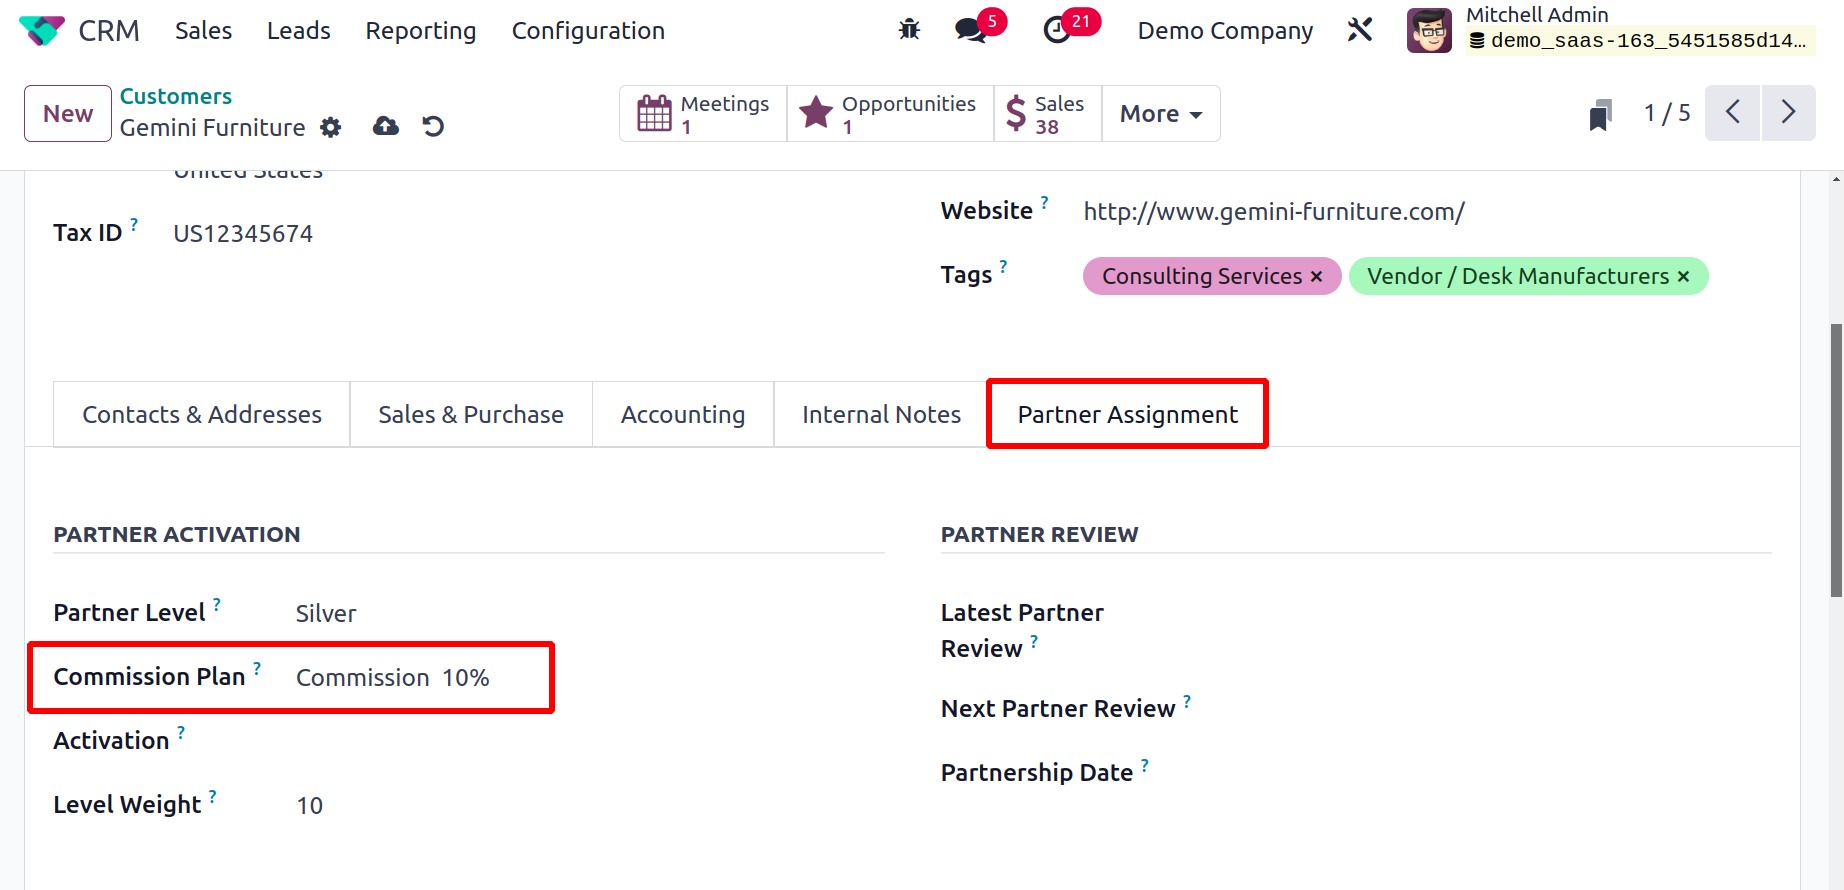
You can indicate the Commission Plan in the Partner Activation section found under the Partner Assignment page.
10% of the invoiced amount will be transferred to the partner as a commission after a customer who was suggested by your partners purchases a product from the specified product category. You will find a space to enter the Referrer information while making a sales order for the customer, where you may enter the partner's ID.
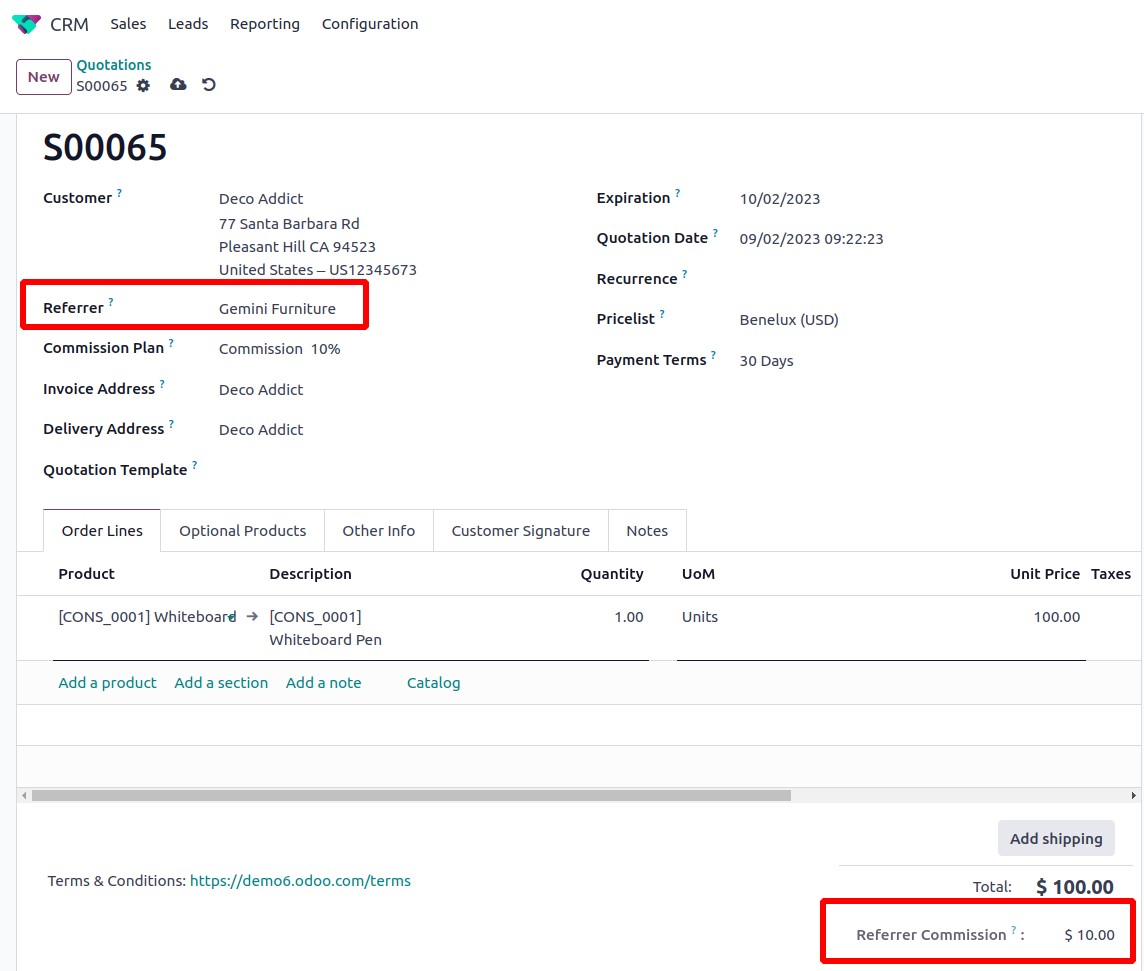
Due to the fact that we have previously set up a specific commission plan for the partner, the Commission Plan will automatically show up in the relevant area. You can now create an invoice and confirm the sales order.
10% of the billed amount will be sent to the partner account once the customer has completed the payment. The Purchase module will produce an RFQ for your partner with the product Commission.
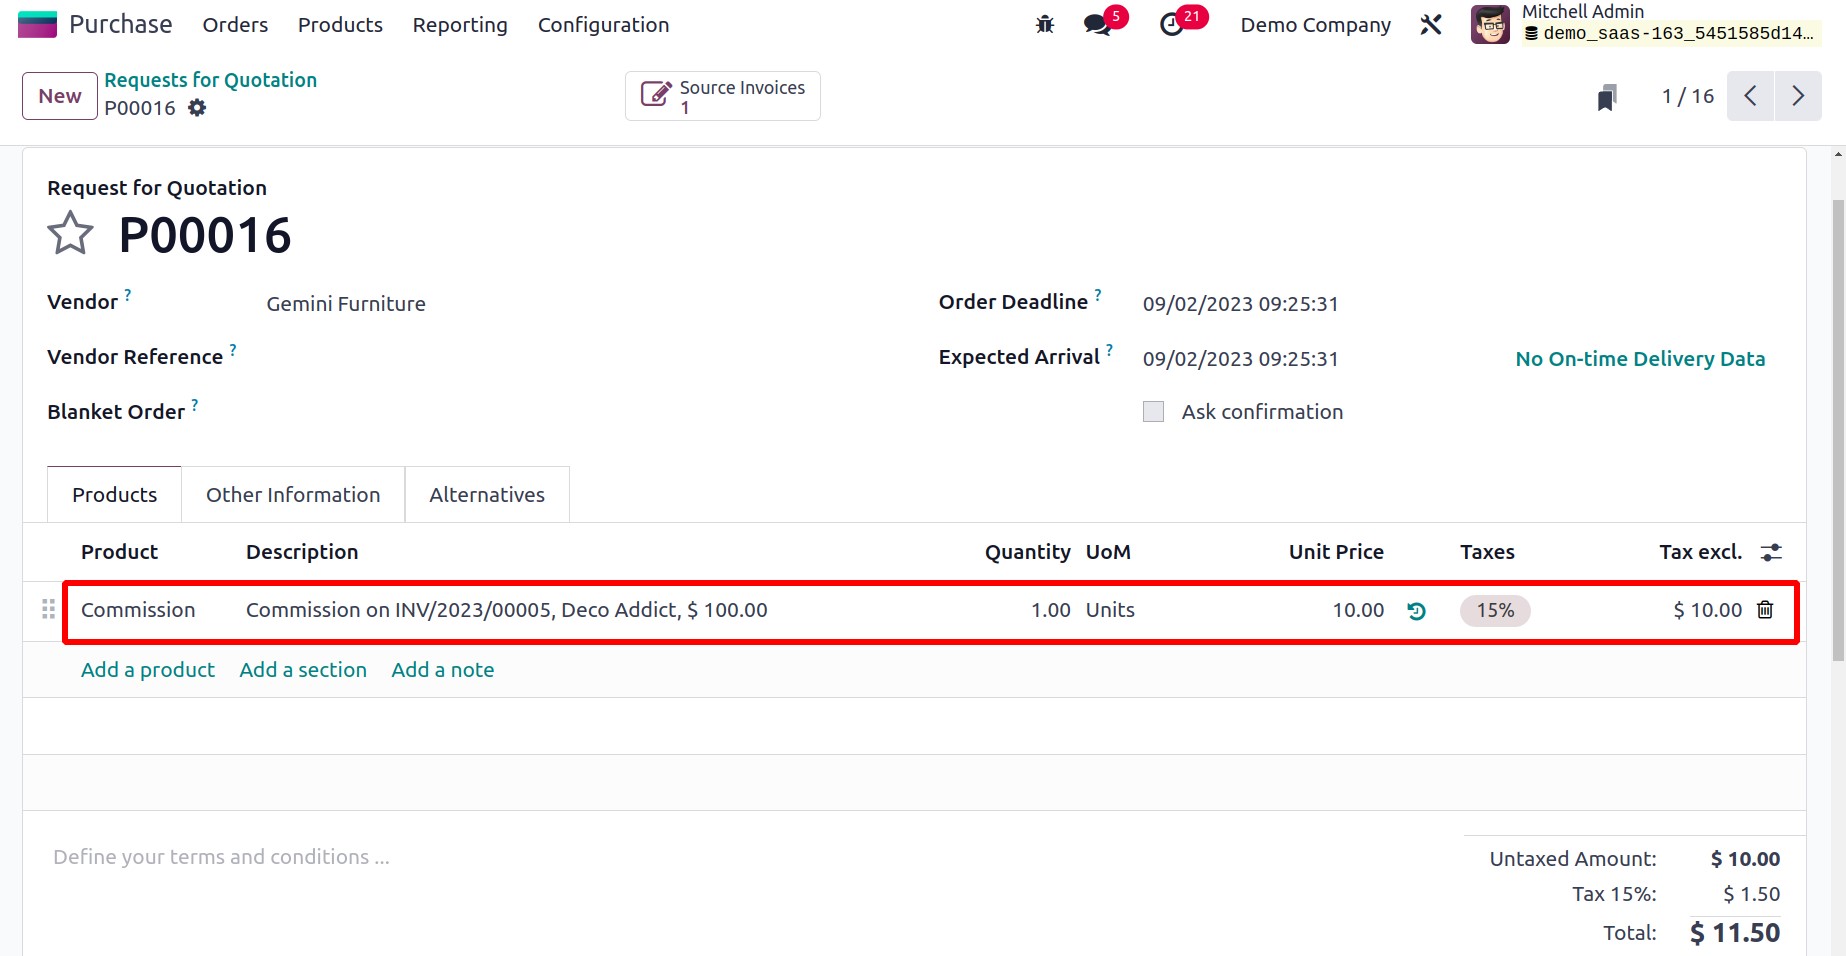
You can construct the vendor bill and confirm the order. The commission sum can then be given to your partner.
Settings
The user has a variety of settings options in the Odoo 17 CRM module. Several options to activate may be found under the CRM, Lead Generation, and Partner Commissions tab to enhance the functionality of the CRM module. Let's go over each of these choices in greater depth. The Settings option is available under the Configuration.
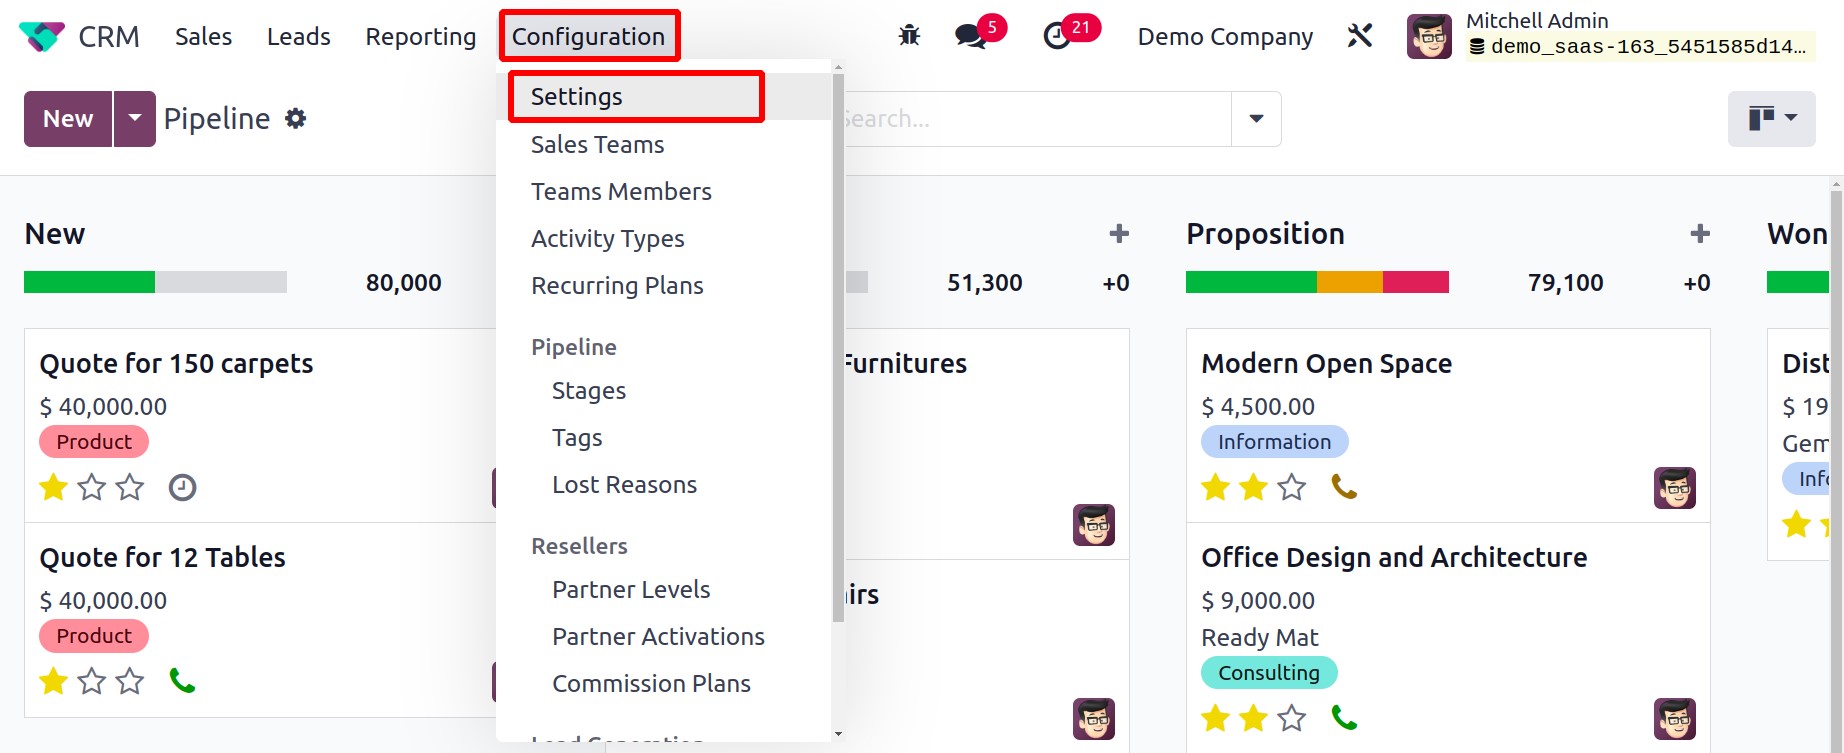
Recurring Revenues
You can define recurring plans and revenues on opportunities by activating the Recurring Revenues box under the CRM tab.
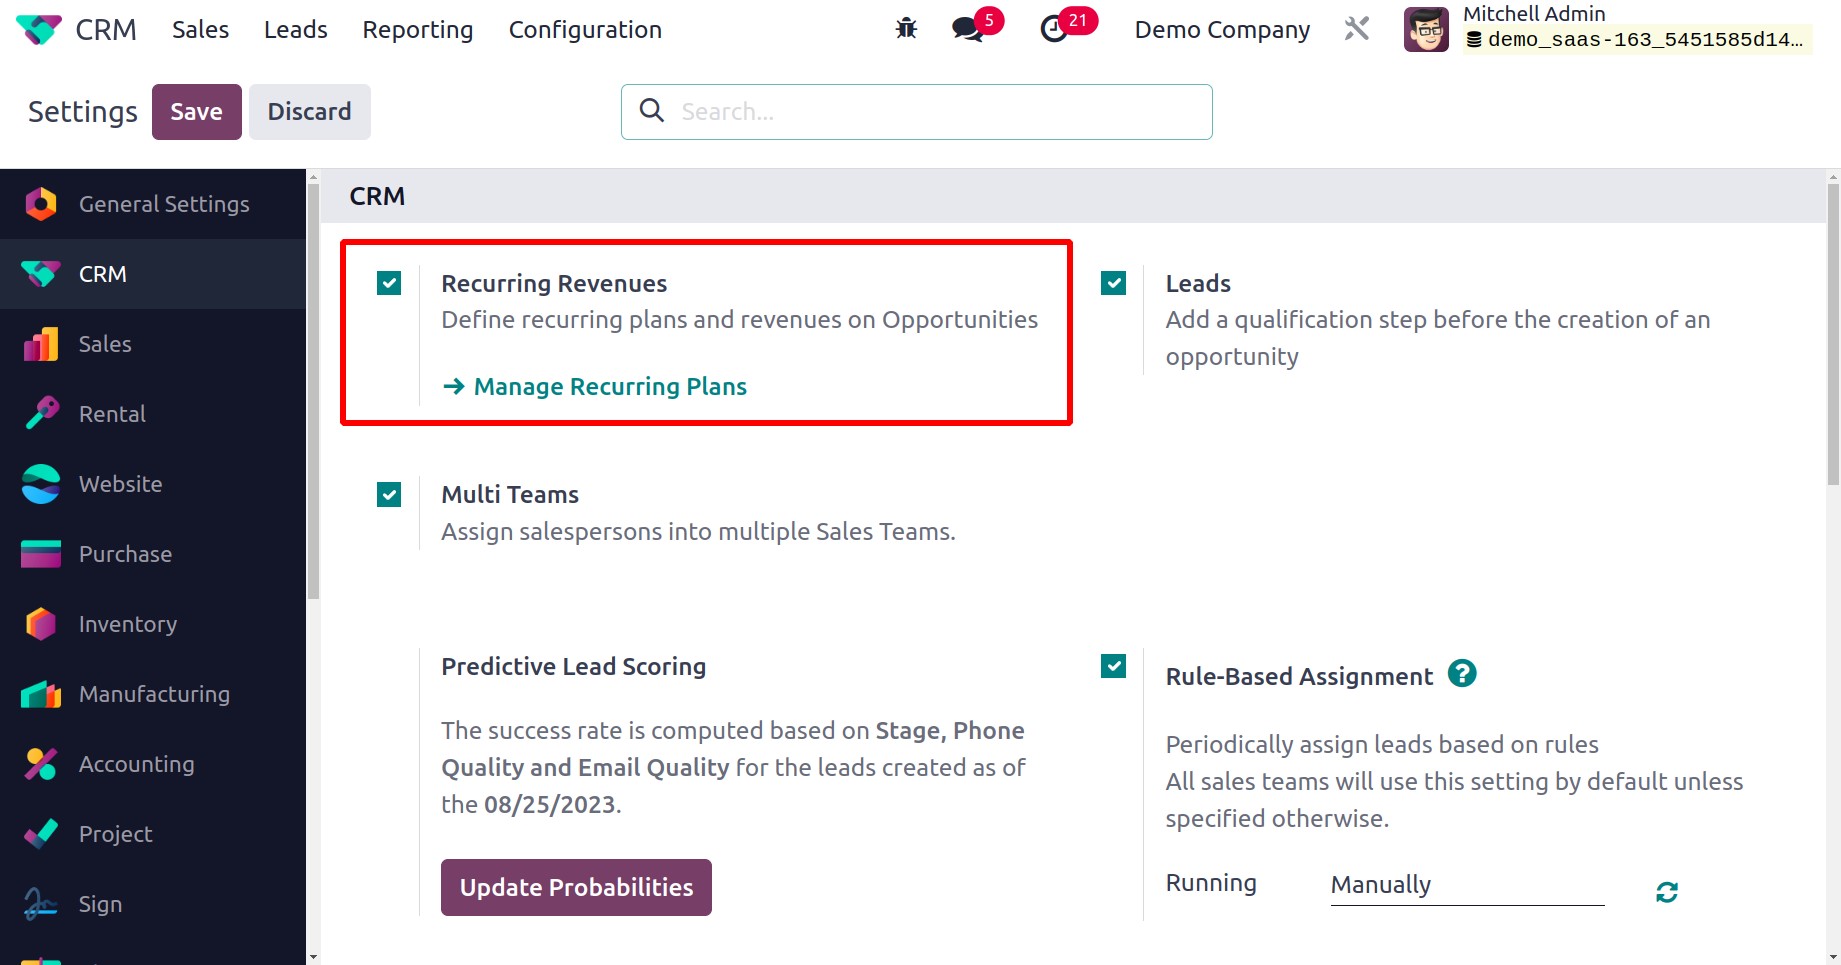
When this option is activated, you will receive an external URL to control the Recurring Plans. You can visit a brand-new site where you can set up new recurring plans by using the external link provided below.
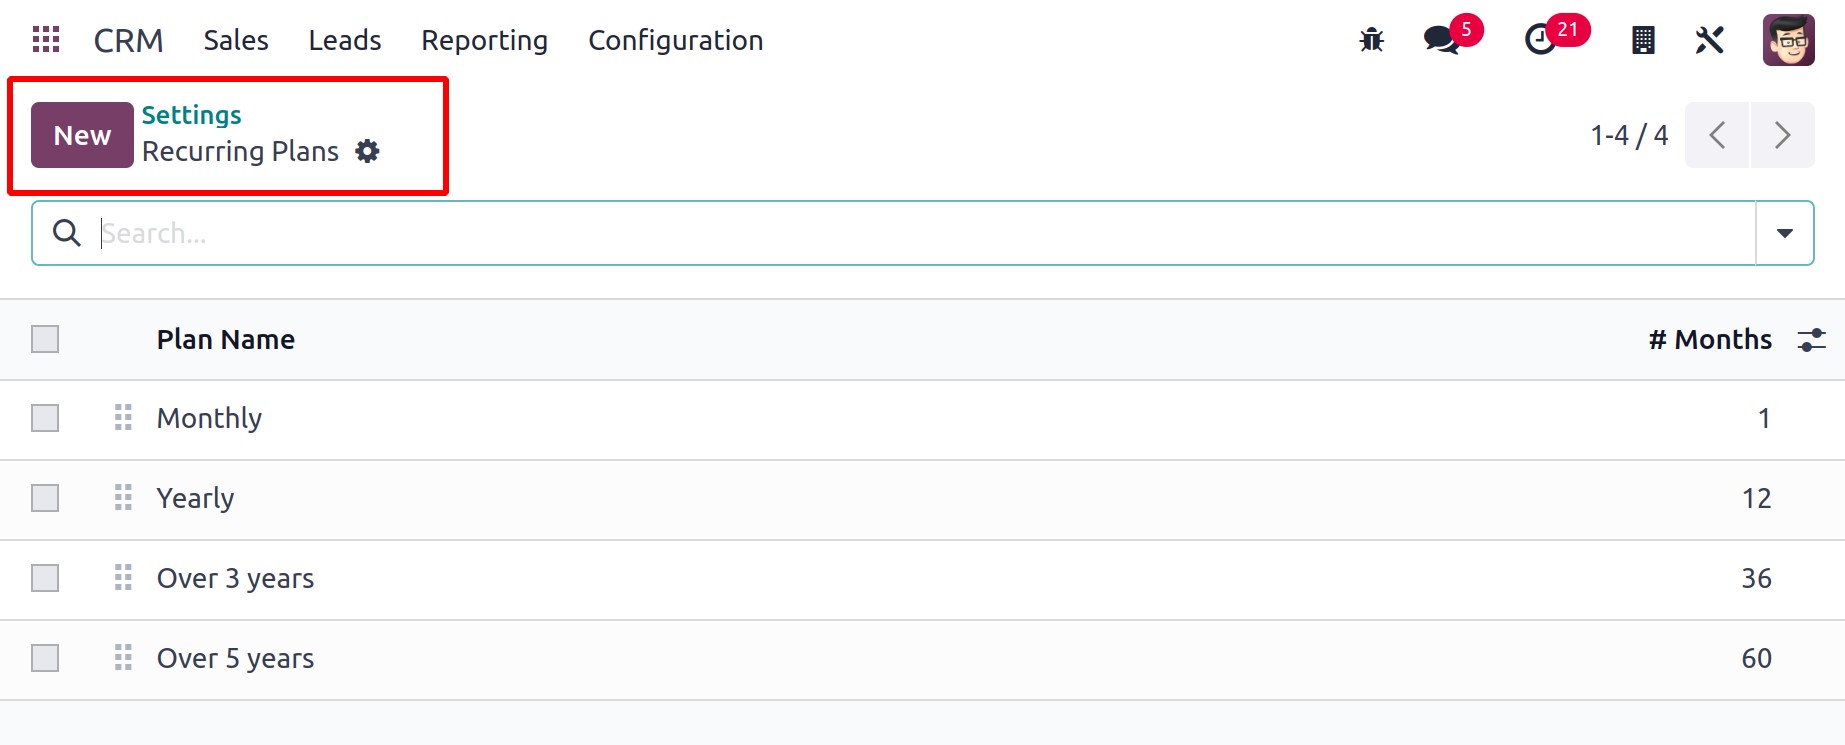
You may just enter the Plan Name in the provided field by using the New button. On opportunities, you can see the recurring revenues depicted here.
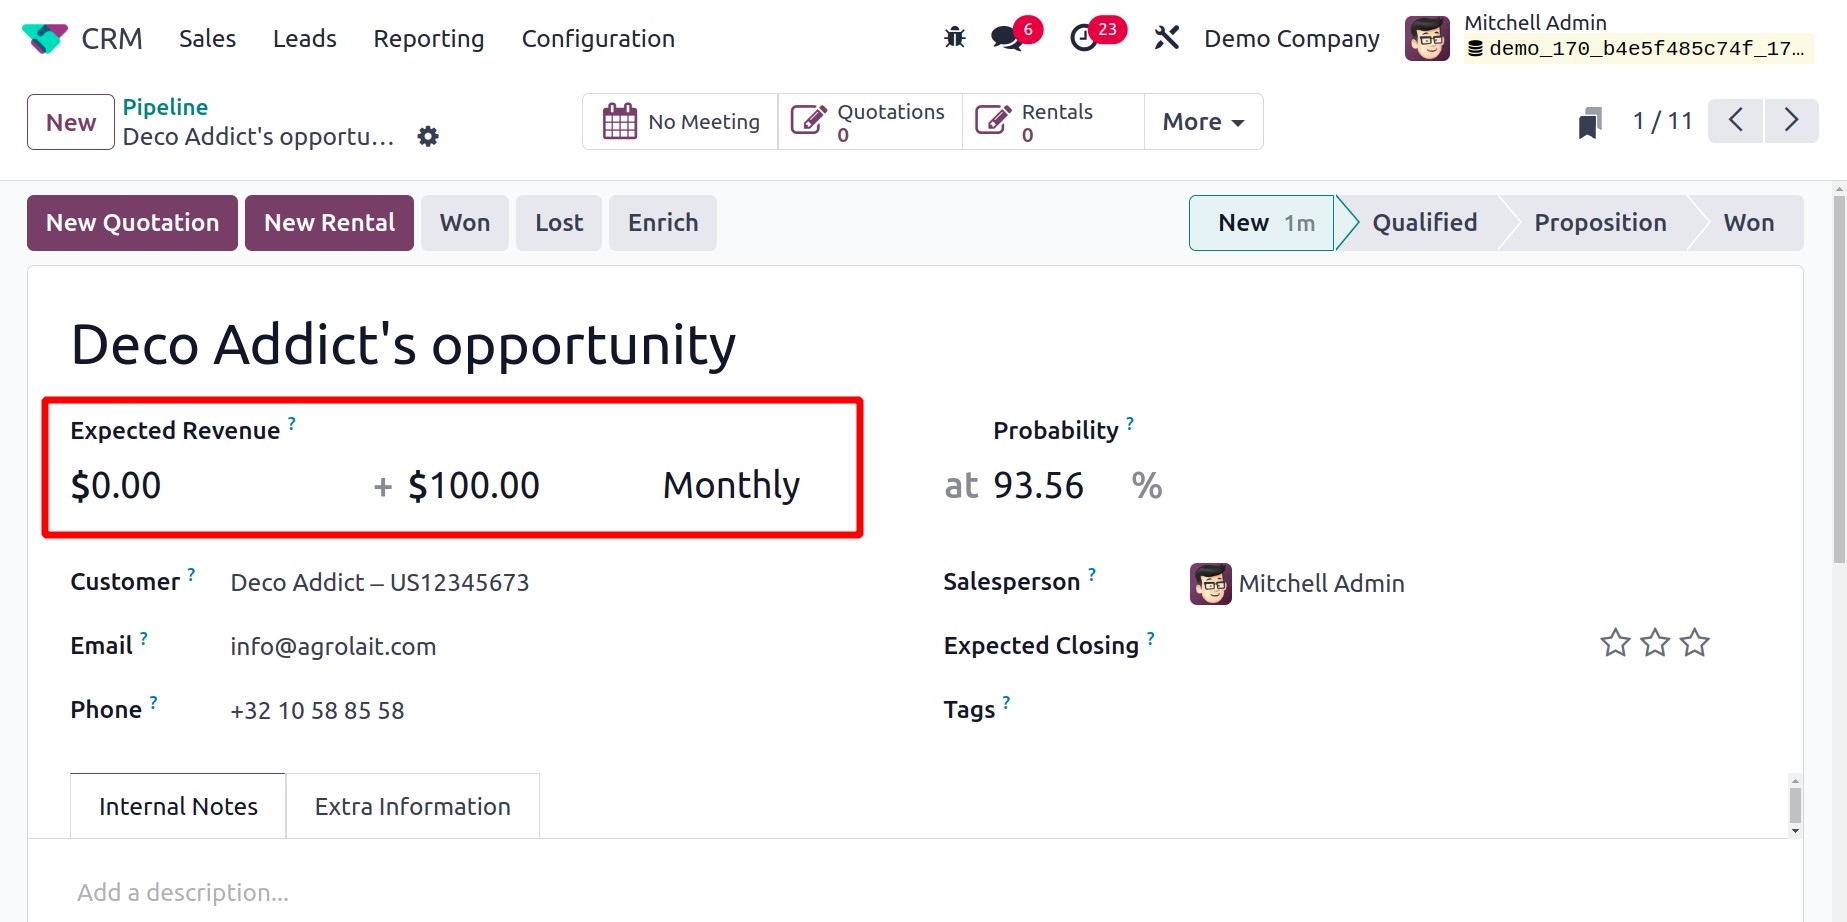
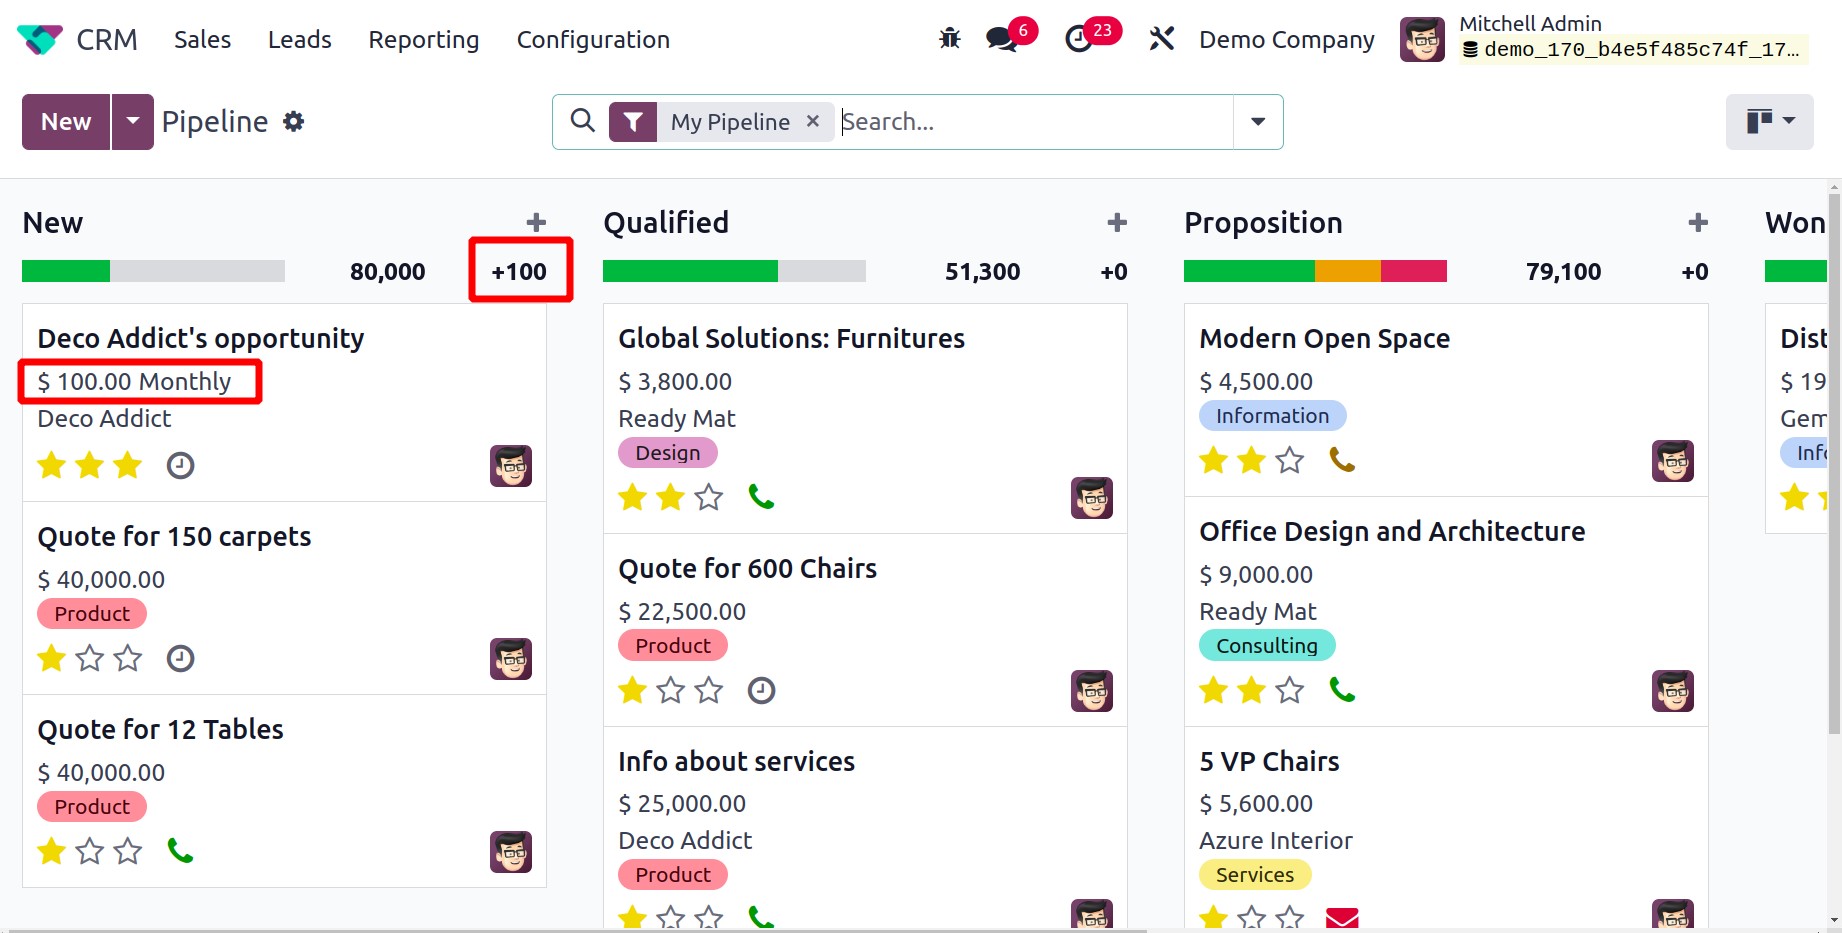
Recurring sum will be displayed from the platform as well. Here, $100 is added as the recurring revenue amount. As seen in the screenshot below, Recurring Revenue will be visible separately while monitoring the stage.
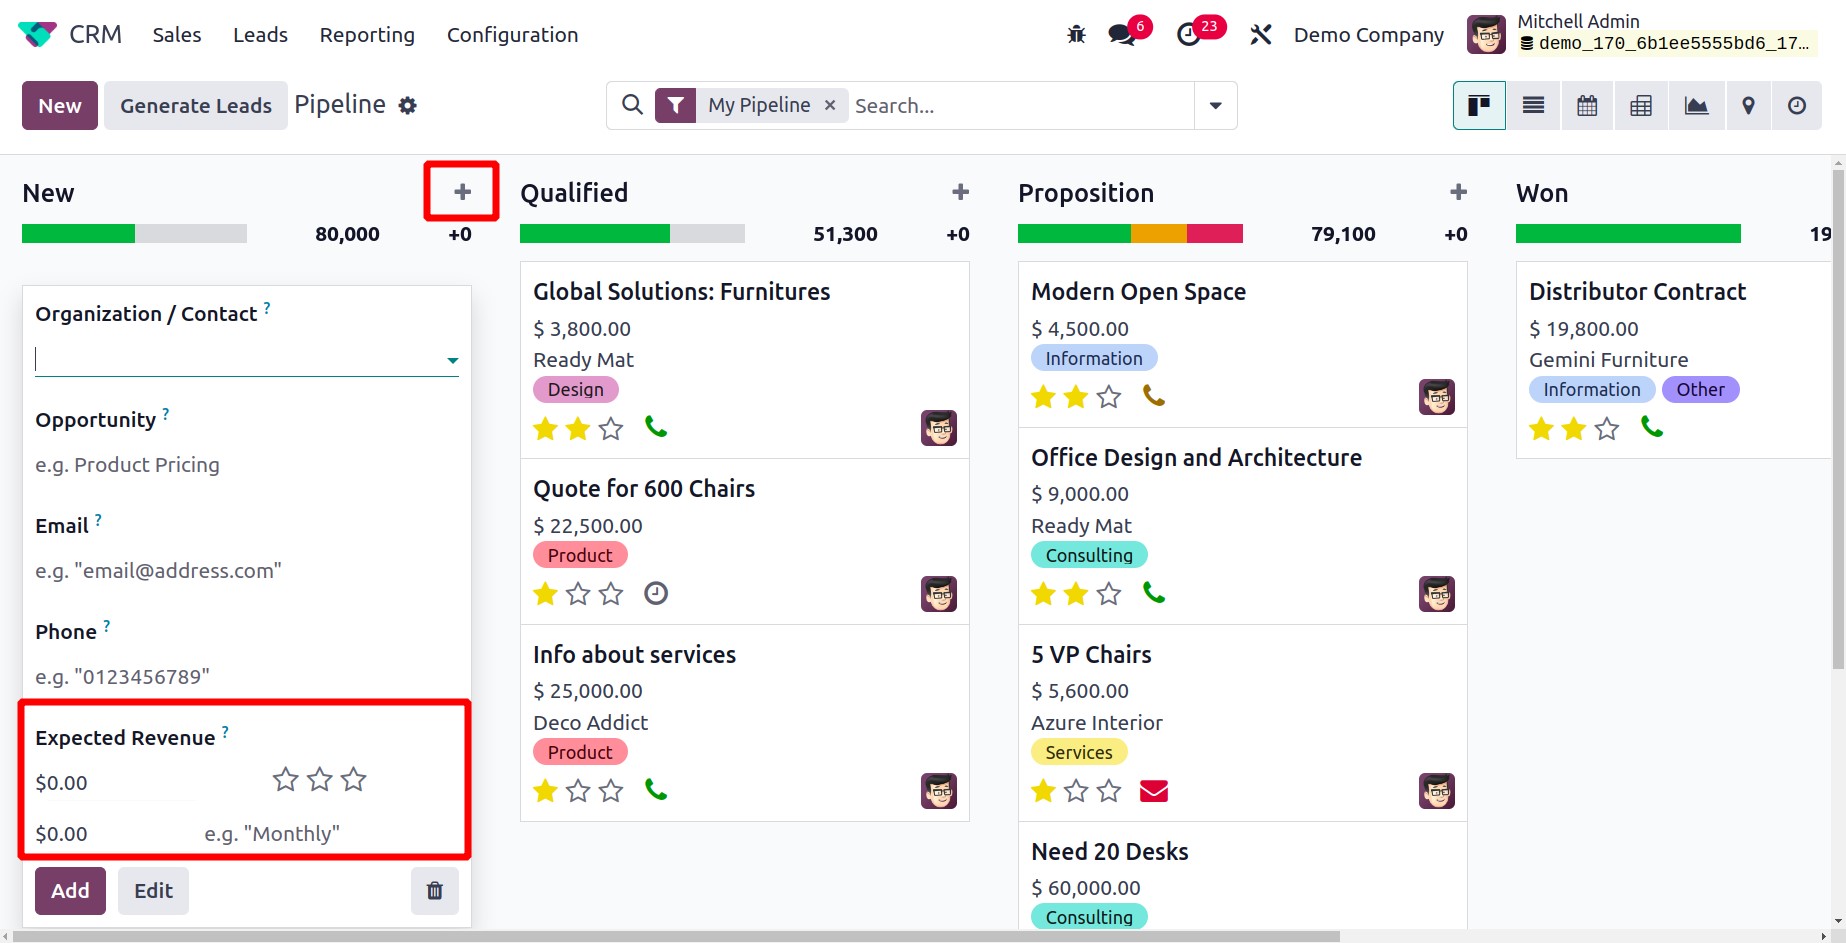
Recurring Revenue and the Recurring Plan can also be established from the stage when a new opportunity is created. To generate a fresh opportunity, press the + symbol. Expected revenue, recurring revenue, and recurring plan can all be added to the field, as shown in the screenshot below.
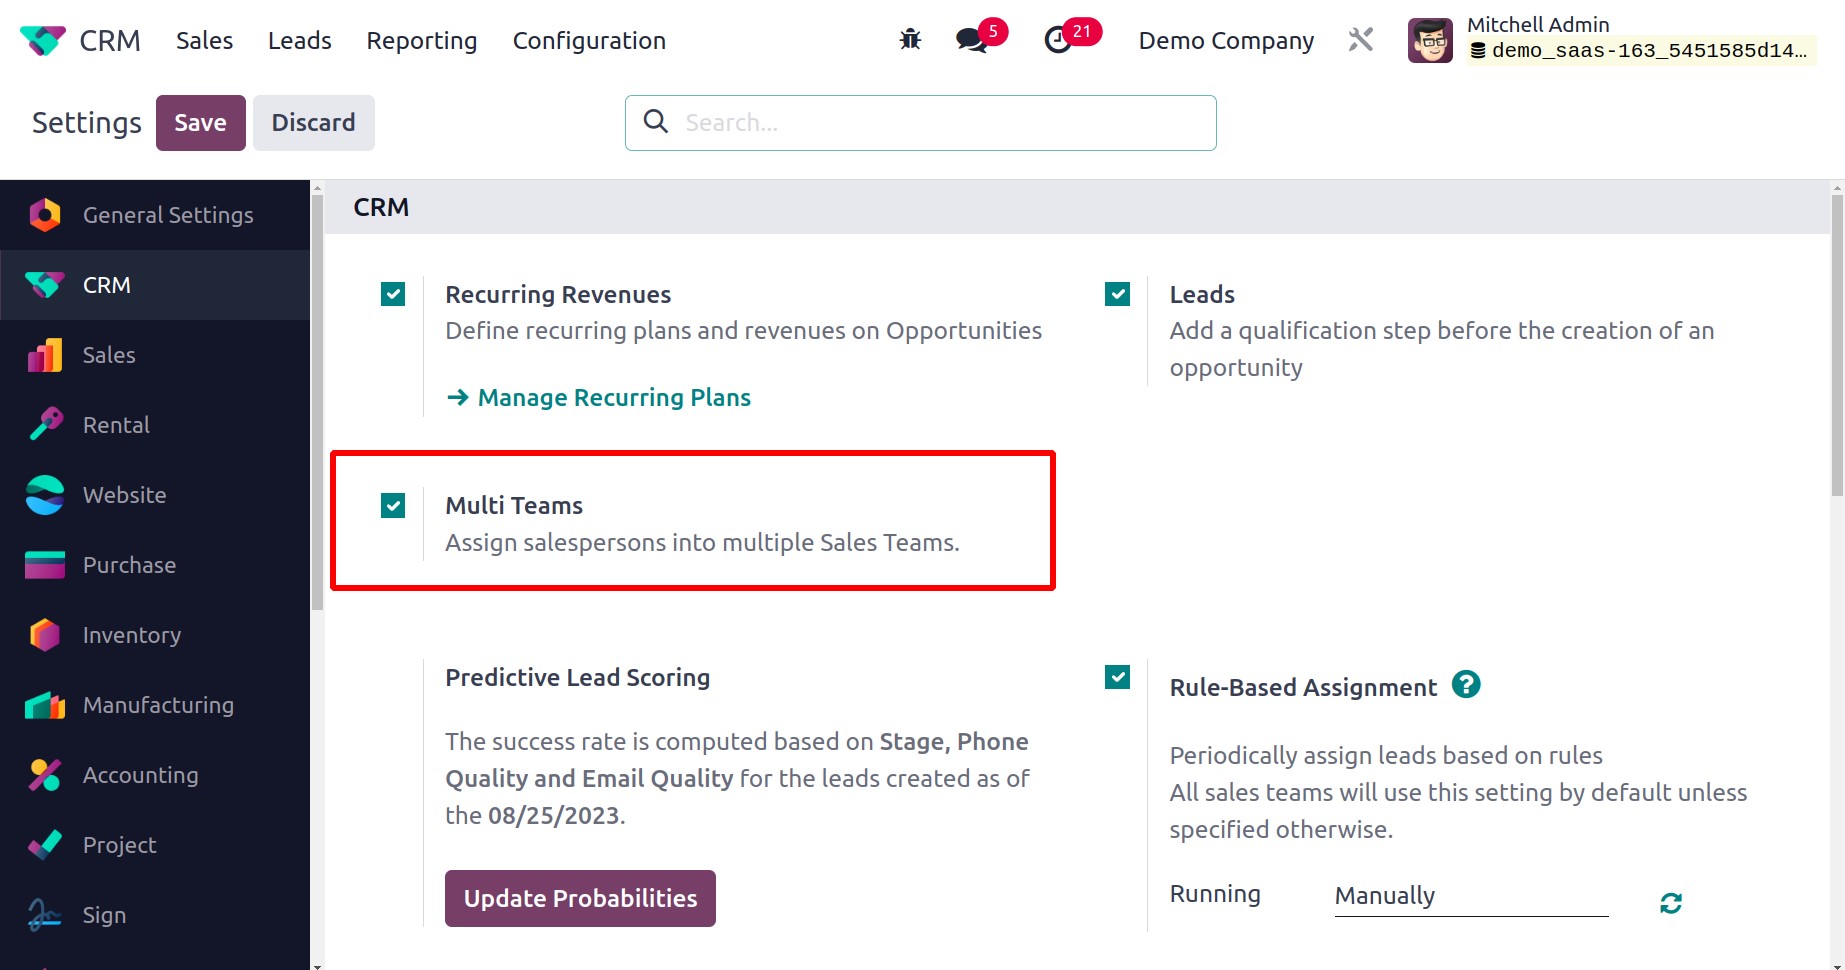
Multi Teams
You can quickly assign a salesperson to several sales teams by turning on the Multi Teams option from the Settings platform.
Let's test this functionality with a demonstration. As seen below, we established a new sales team named Team 1 with the participants Mitchell Admin and Marc Demo.
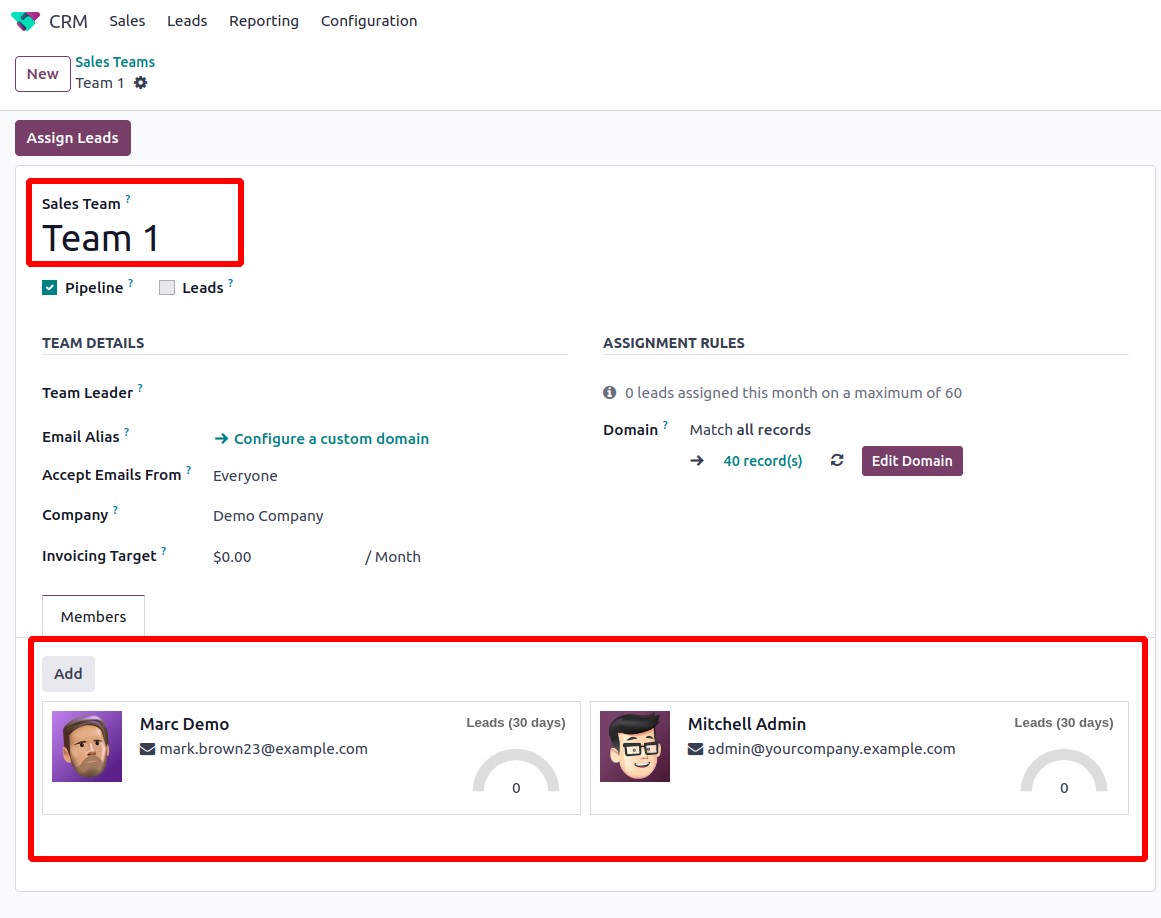
You can add a salesperson to numerous sales teams after turning on the CRM module's Multi Teams capability. Here, we formed a second sales team, Team 2, with the same personnel as Team 1.
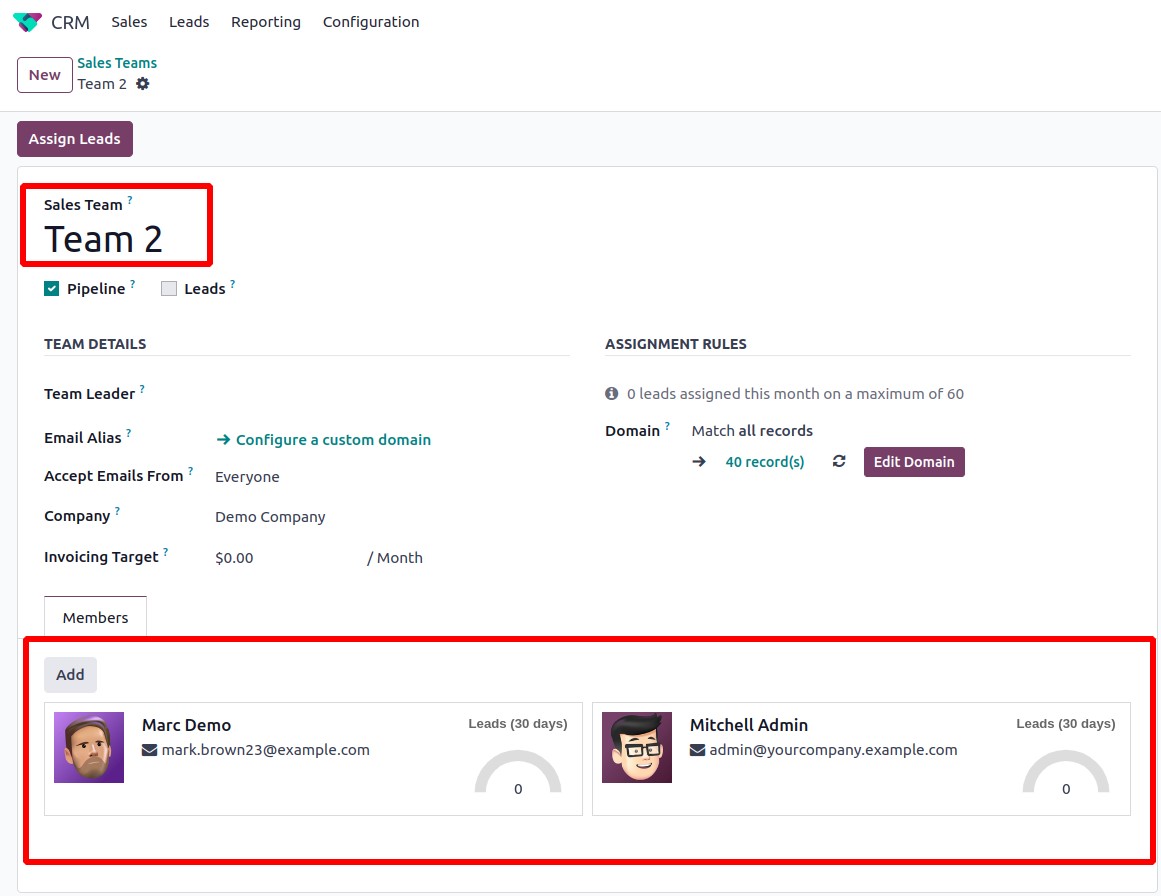
This sophisticated feature of the Odoo 17 CRM module enables you to simultaneously add a salesperson to multiple sales teams.
Predictive Lead Scoring
Utilizing the Predictive Lead Scoring tool will help you determine the statistical likelihood of closing a lead. For the leads generated on a particular date, the success rate is calculated depending on stage, phone quality, email quality, and many other variables.
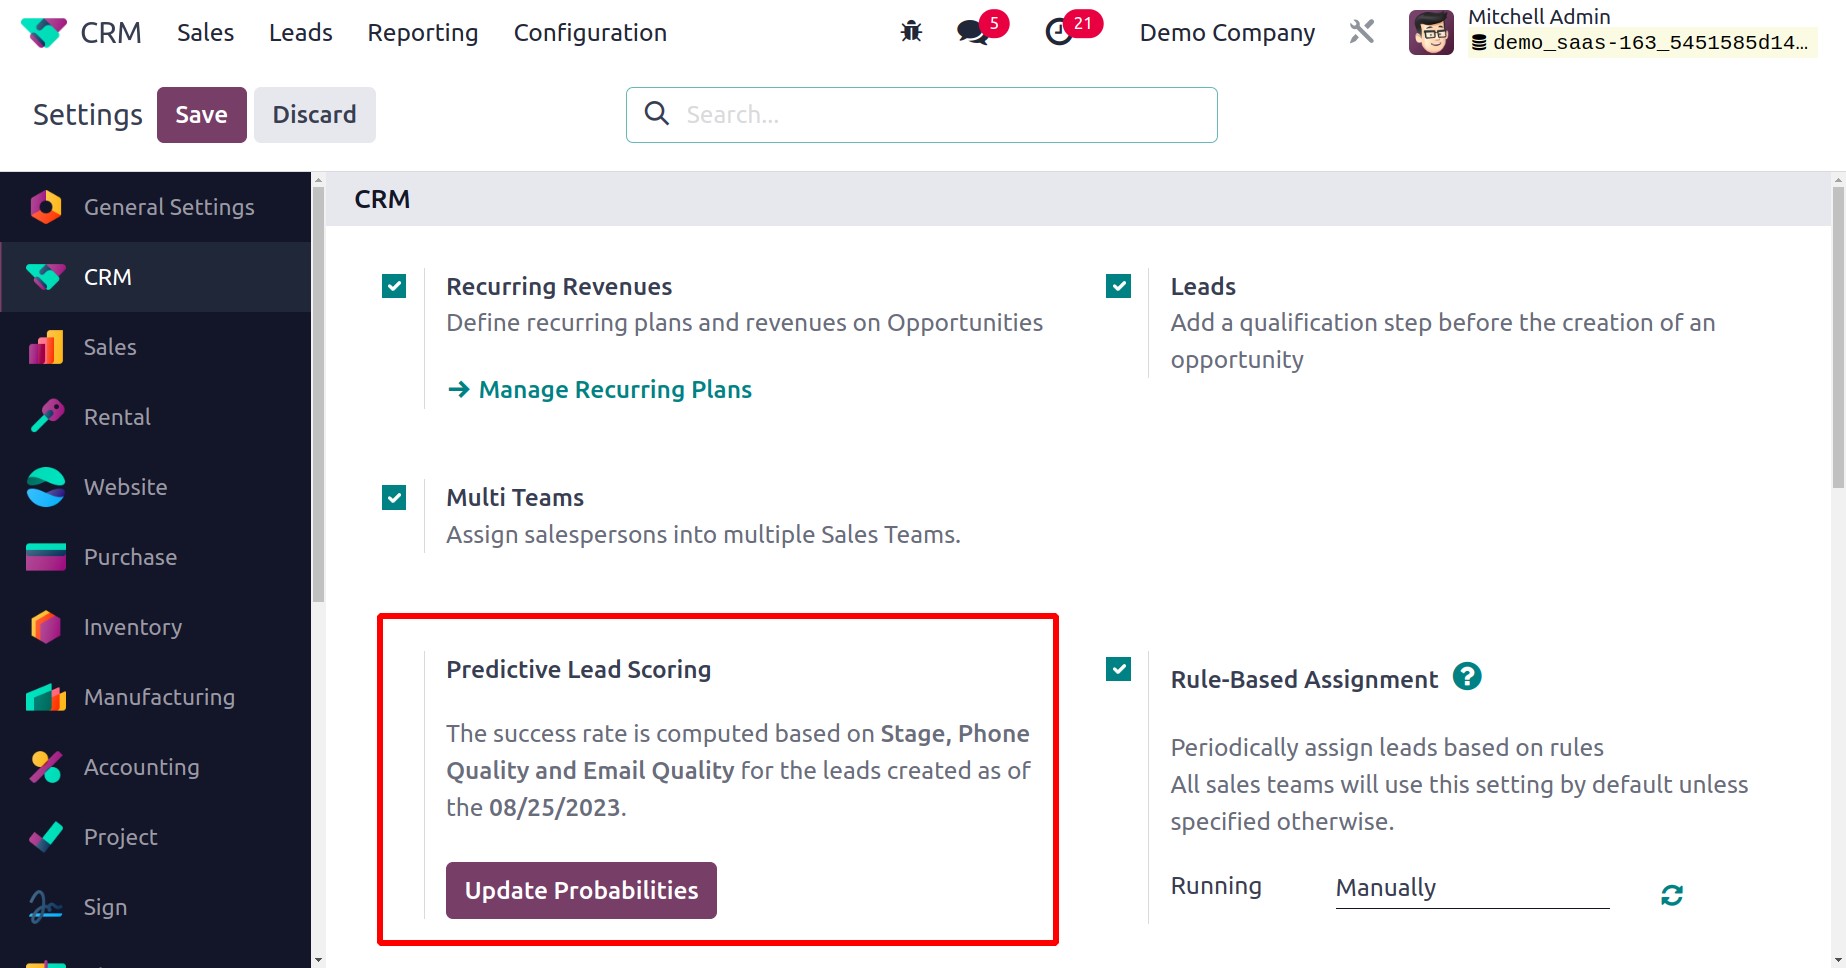
With the help of the Update Probabilities button, you may update the variables that are taken into account while calculating success rates. As per your request, a new wizard will appear to add or delete the fields from the statistical analysis.
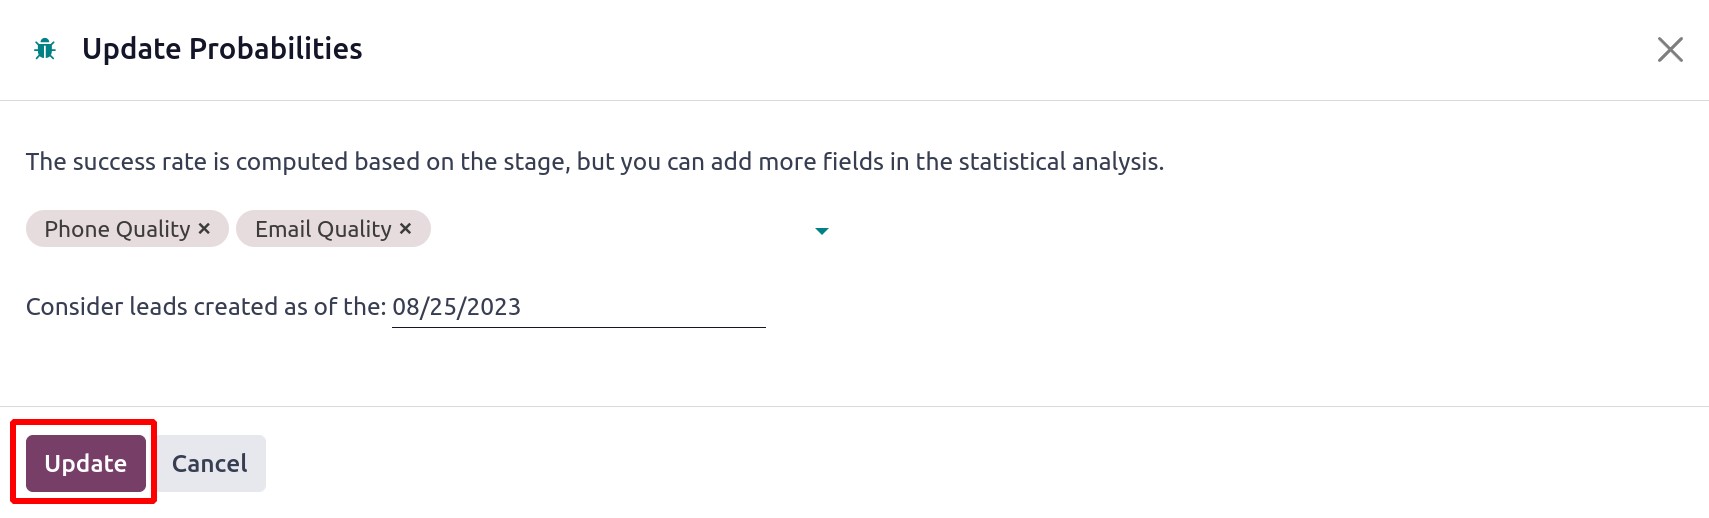
Odoo will take into account leads created on the date you provide if you mention a specific date in this field. You can save the new modifications by clicking the Confirm button after setting the fields and the date. You may compute probability with this.
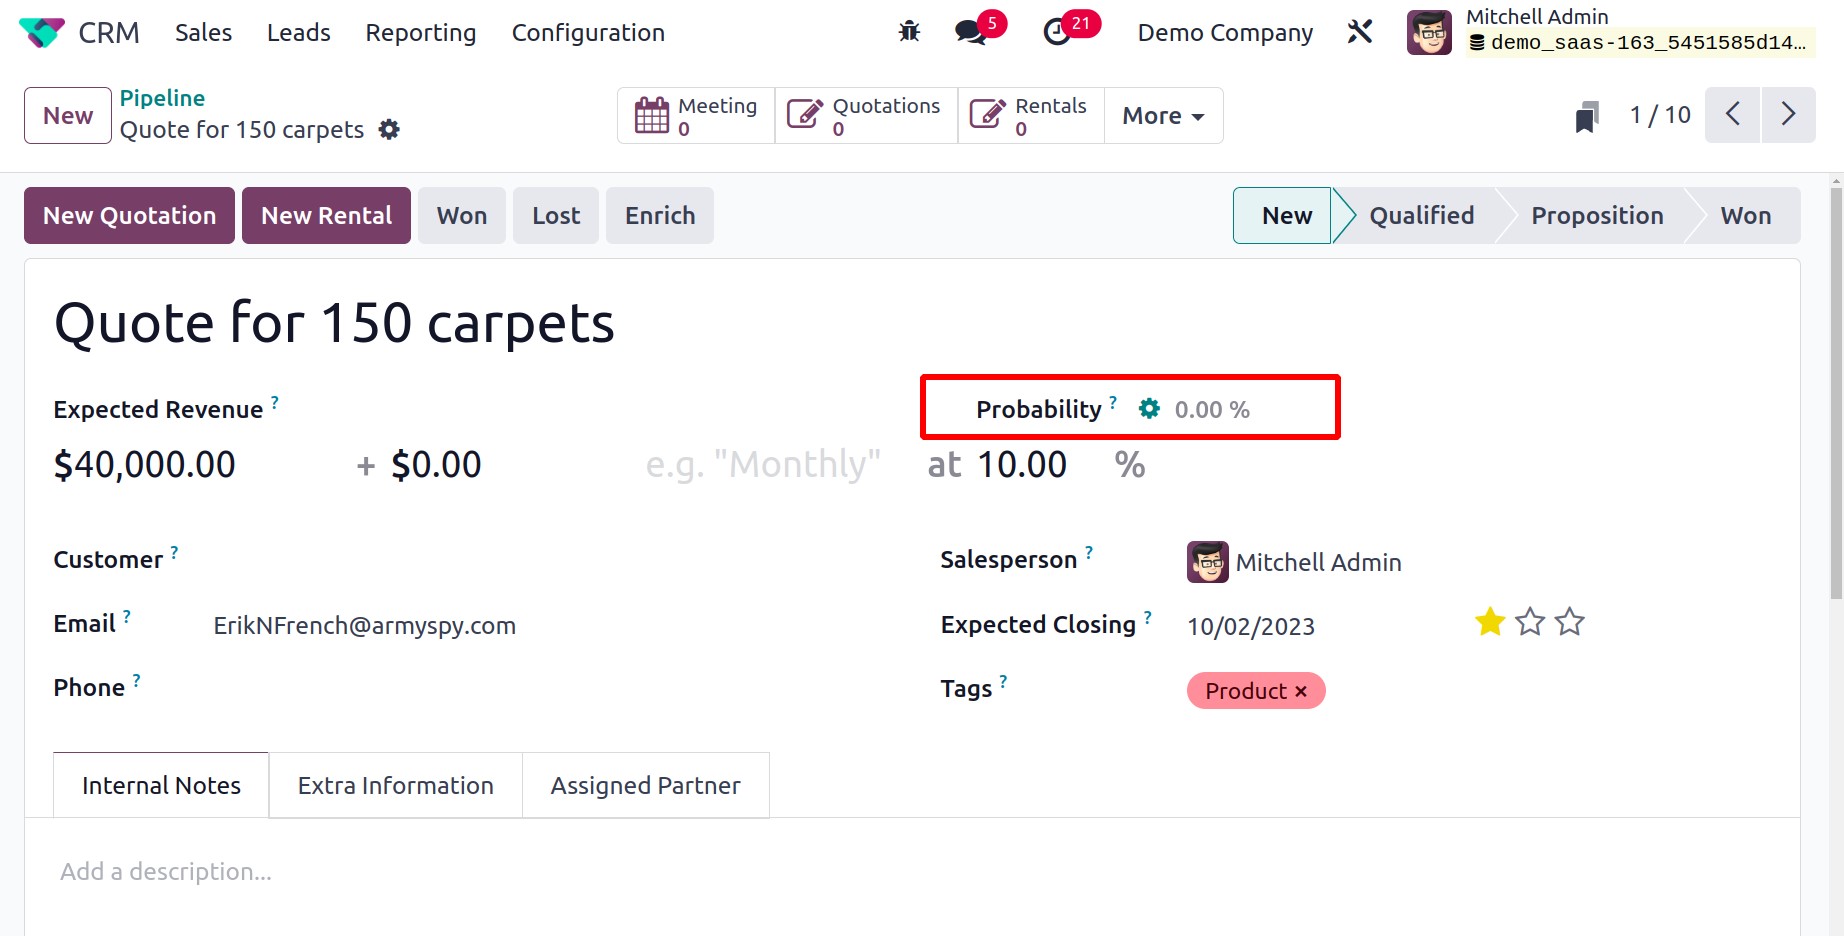
You will determine your chances of winning the opportunity using the success rate calculation parameters, as stated above.
Rule Based Assignment
Using a set of criteria, the Rule Based Assignment capability may be utilized to automatically assign leads to salespeople.
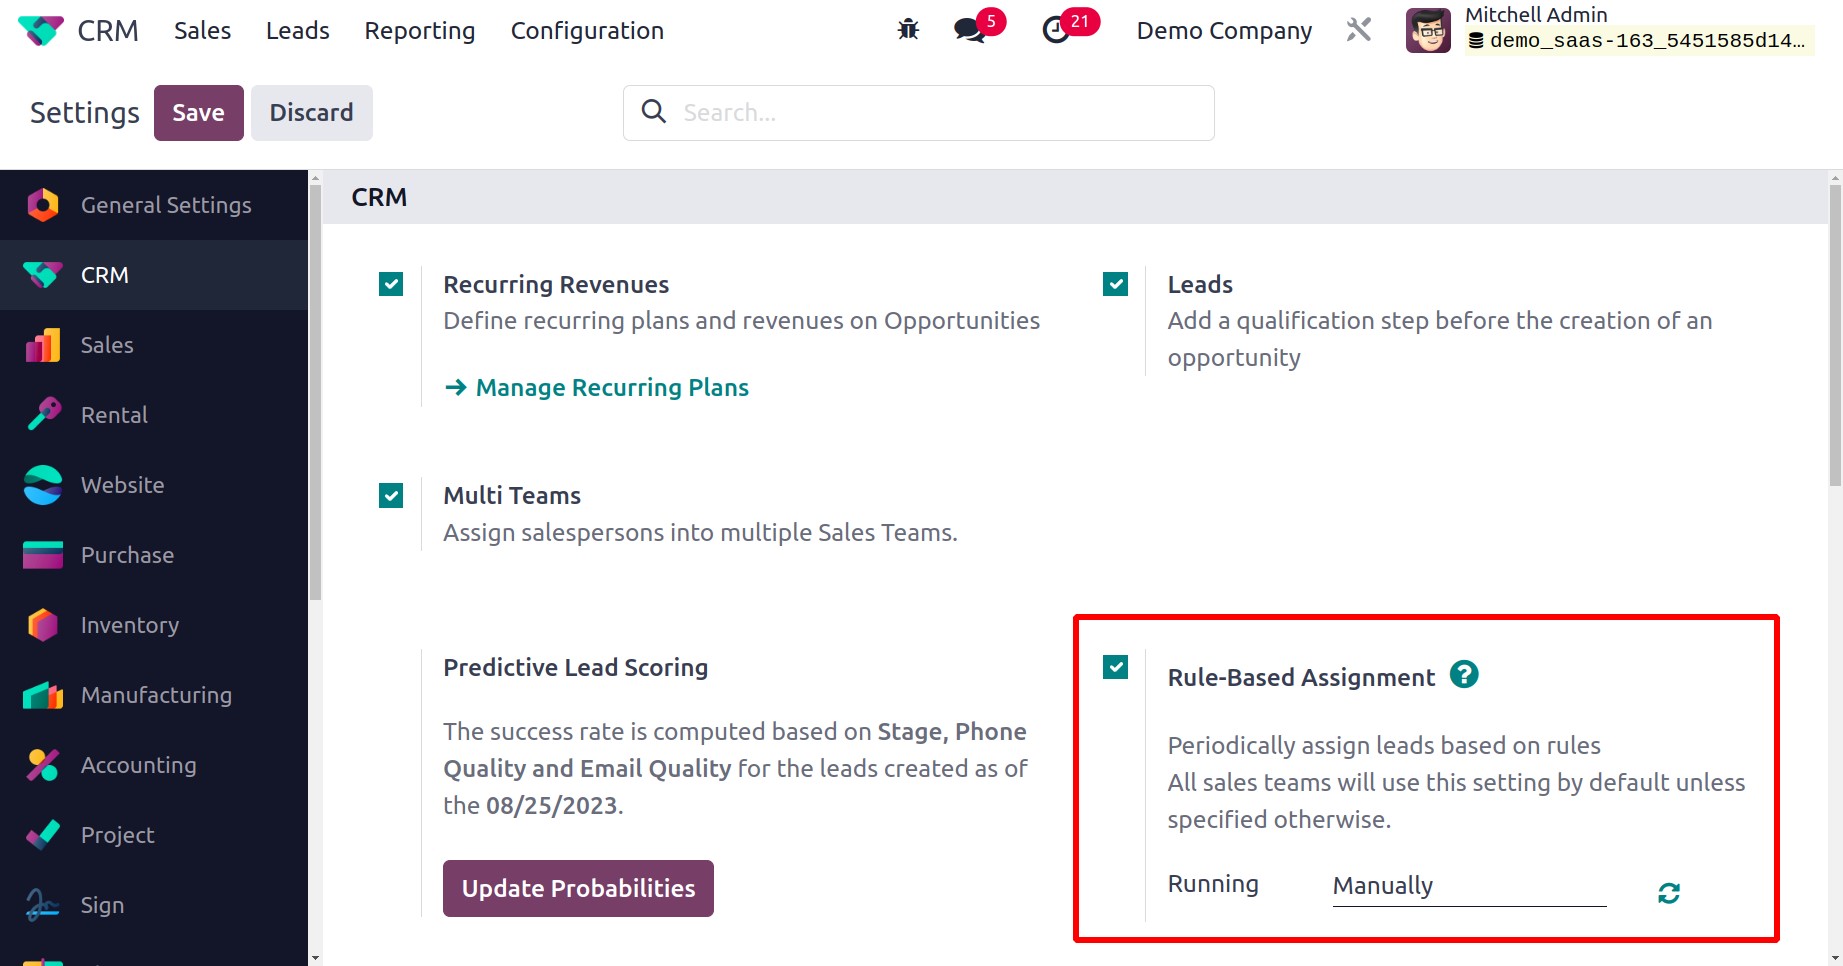
By turning on this function, Odoo will periodically allocate leads in accordance with the rules. Unless otherwise provided, this setting will be applied by default to all sales teams. The assignment can be completed Manually and Repeatedly. You can choose a repeat interval if you want to conduct this procedure frequently. Based on the interval, the next run date will be automatically updated. By choosing the appropriate option, you can carry it out manually. In this case, we chose Manual.
You can now establish a new Sales Team. To do that, select the Sales Team option under Configuration from the menu. You will see a new section titled Assignment Rules on the screen after giving the necessary information for the new sales team.
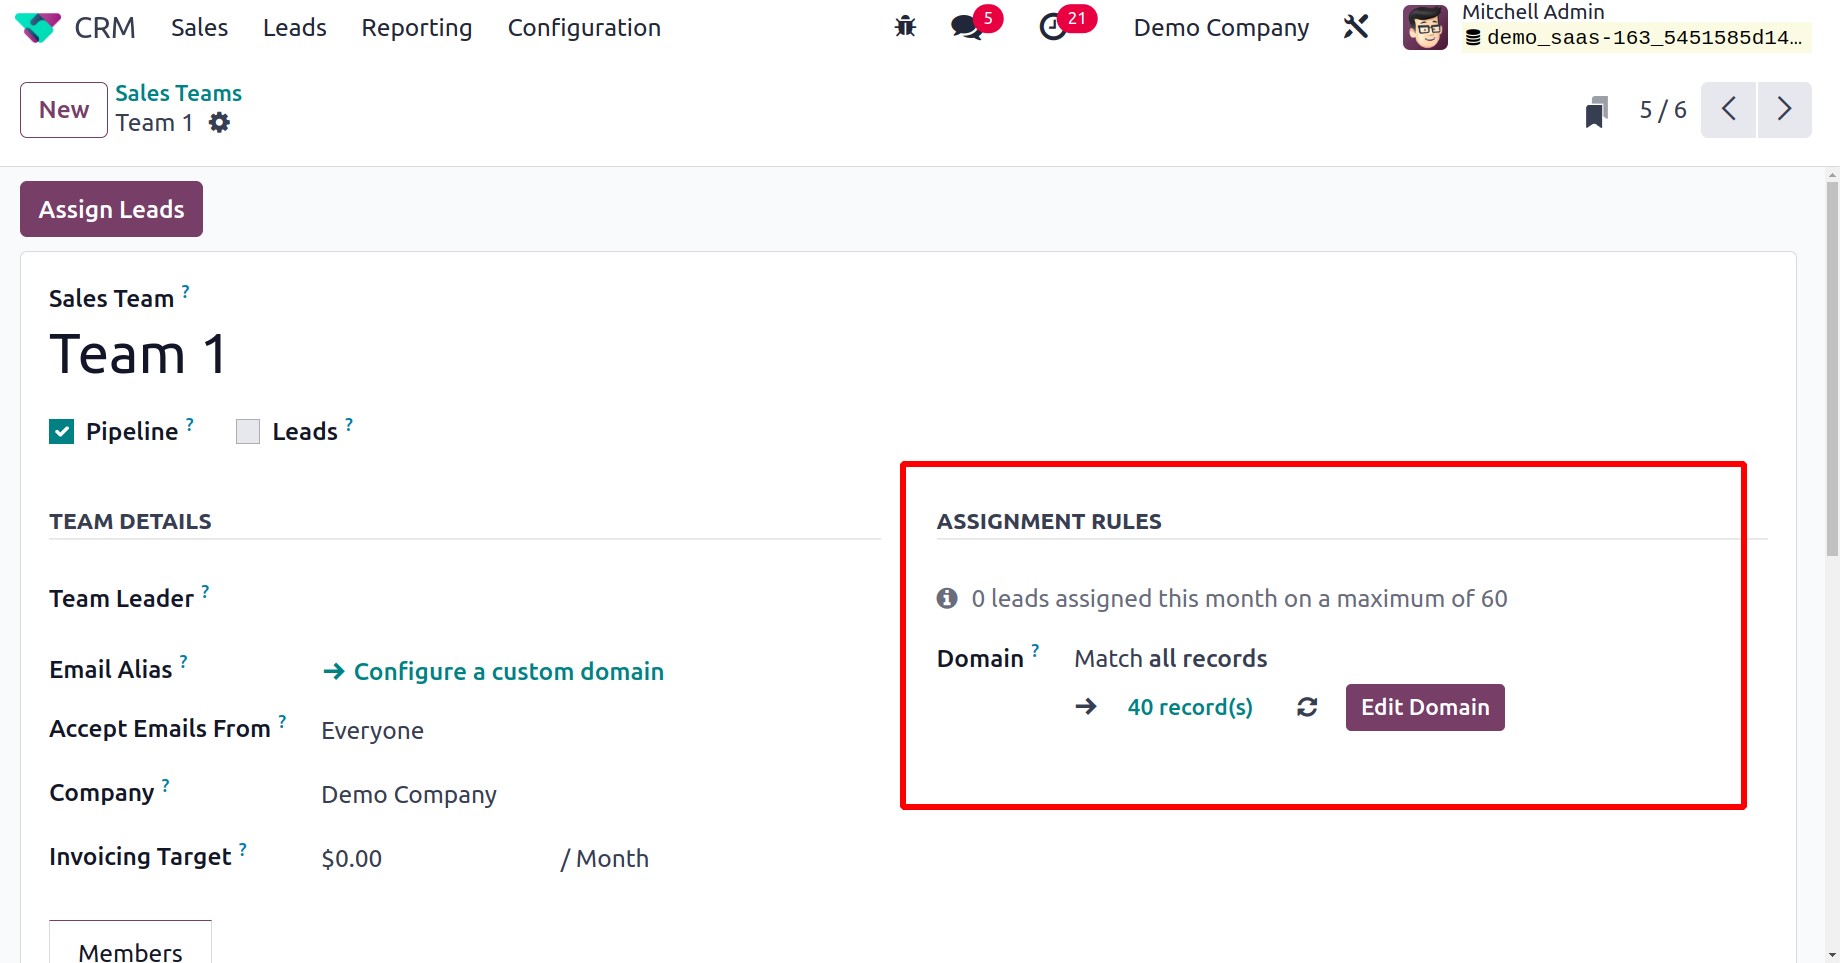
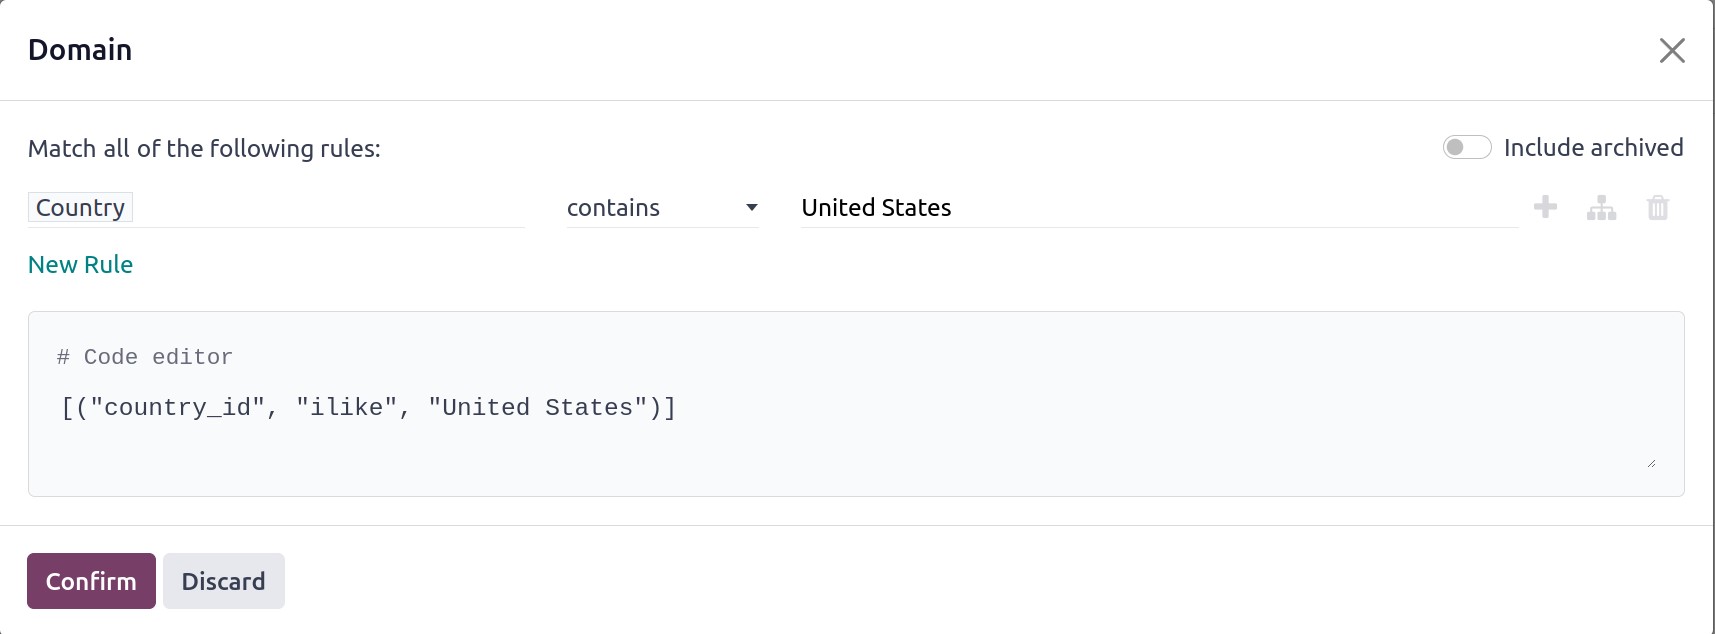
The assignment rules can be configured by clicking the Edit Domain button. You'll see a pop-up window like the one below.
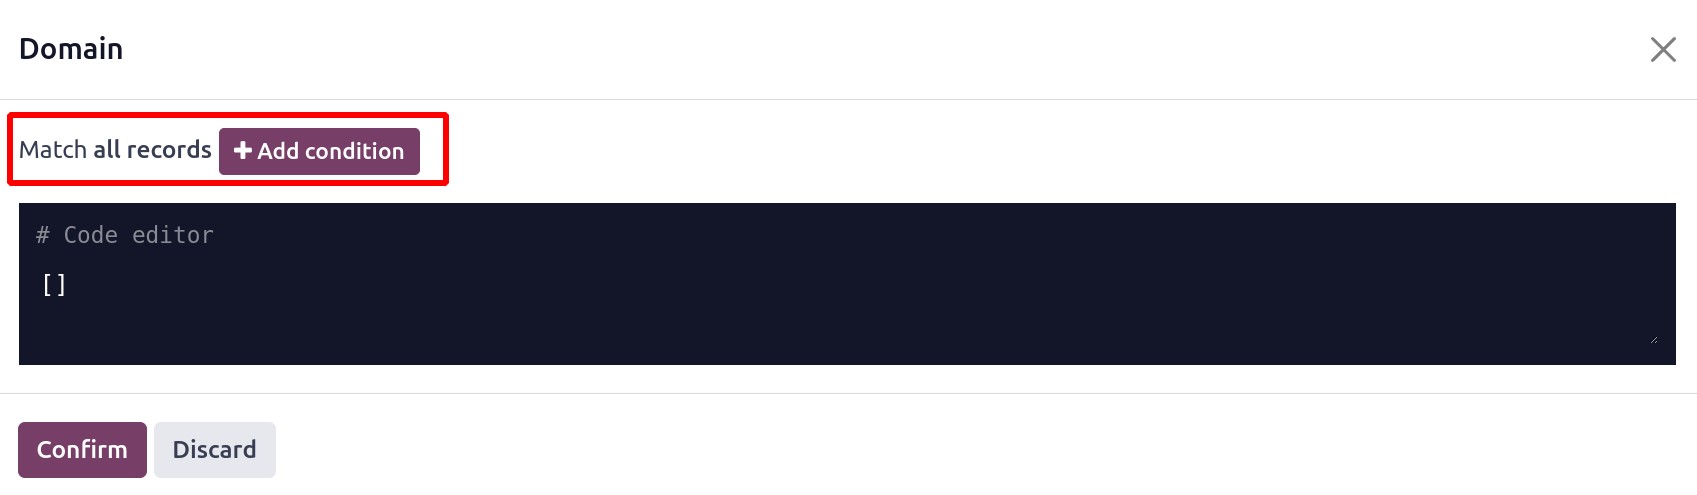
This wizard allows you to add filters. The leads that meet the requirements will be given to this sales team by Odoo17 based on the filters you choose. Here, we chose the filtering option "Country contains United States." Thus, this sales team will be immediately assigned any leads from the United States.
Additionally, you can assign a domain to each salesman. While expanding the crew, it is simple to complete. A pop-up will display once you click the Add button on the Members tab, as seen below.
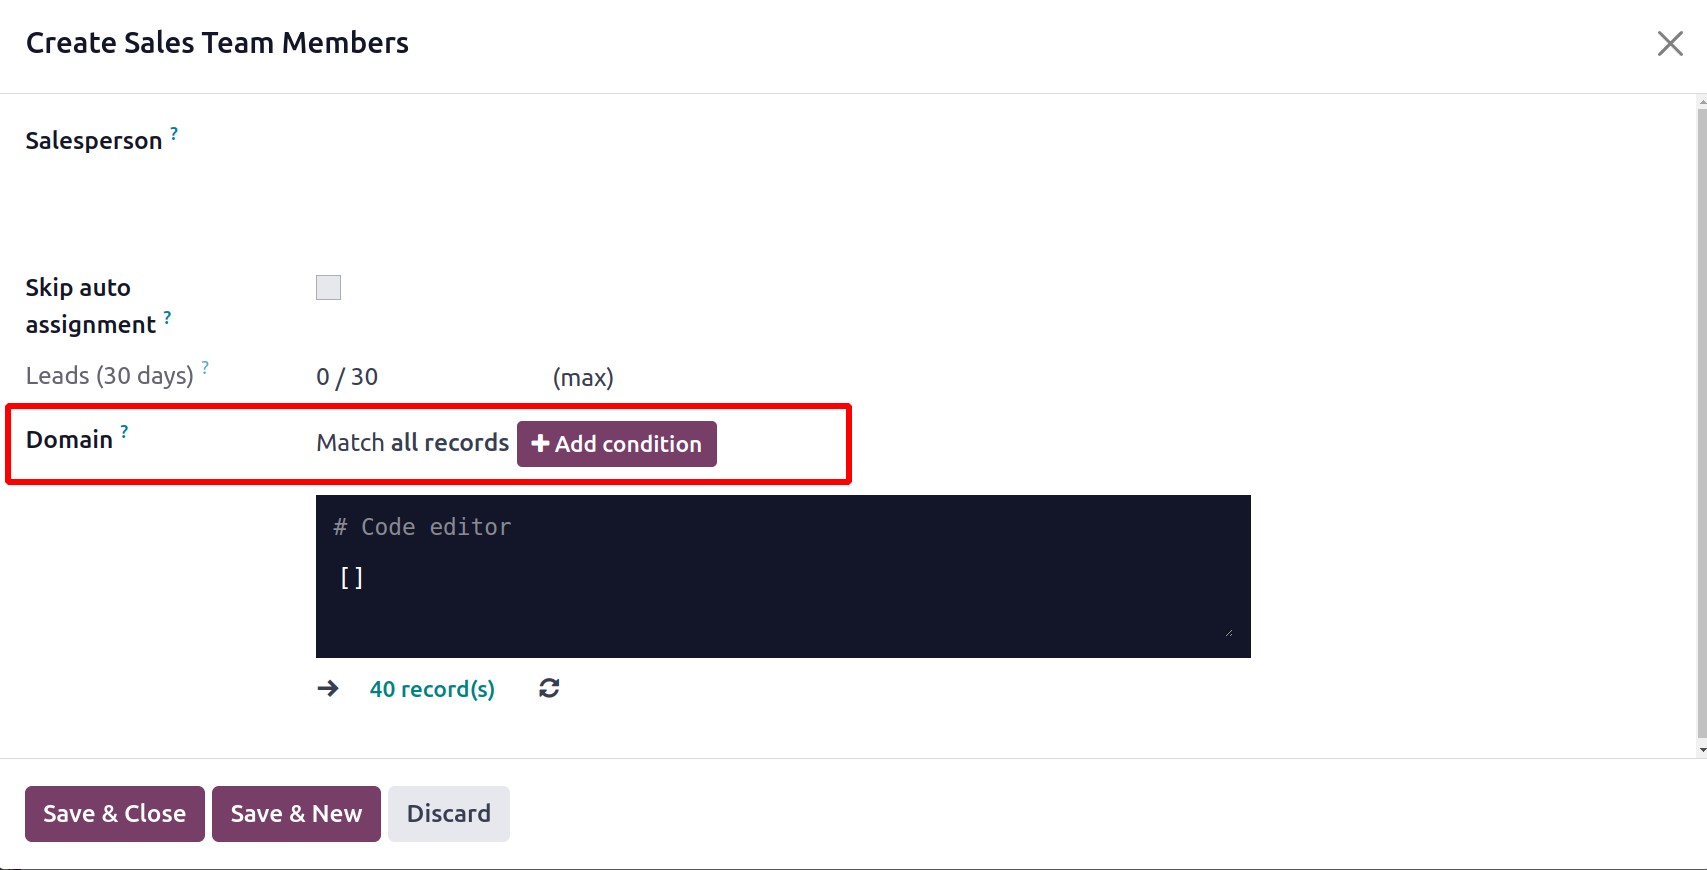
You can add filters to the assignment domain by using the Add Condition button. You can carry out this for each team member.
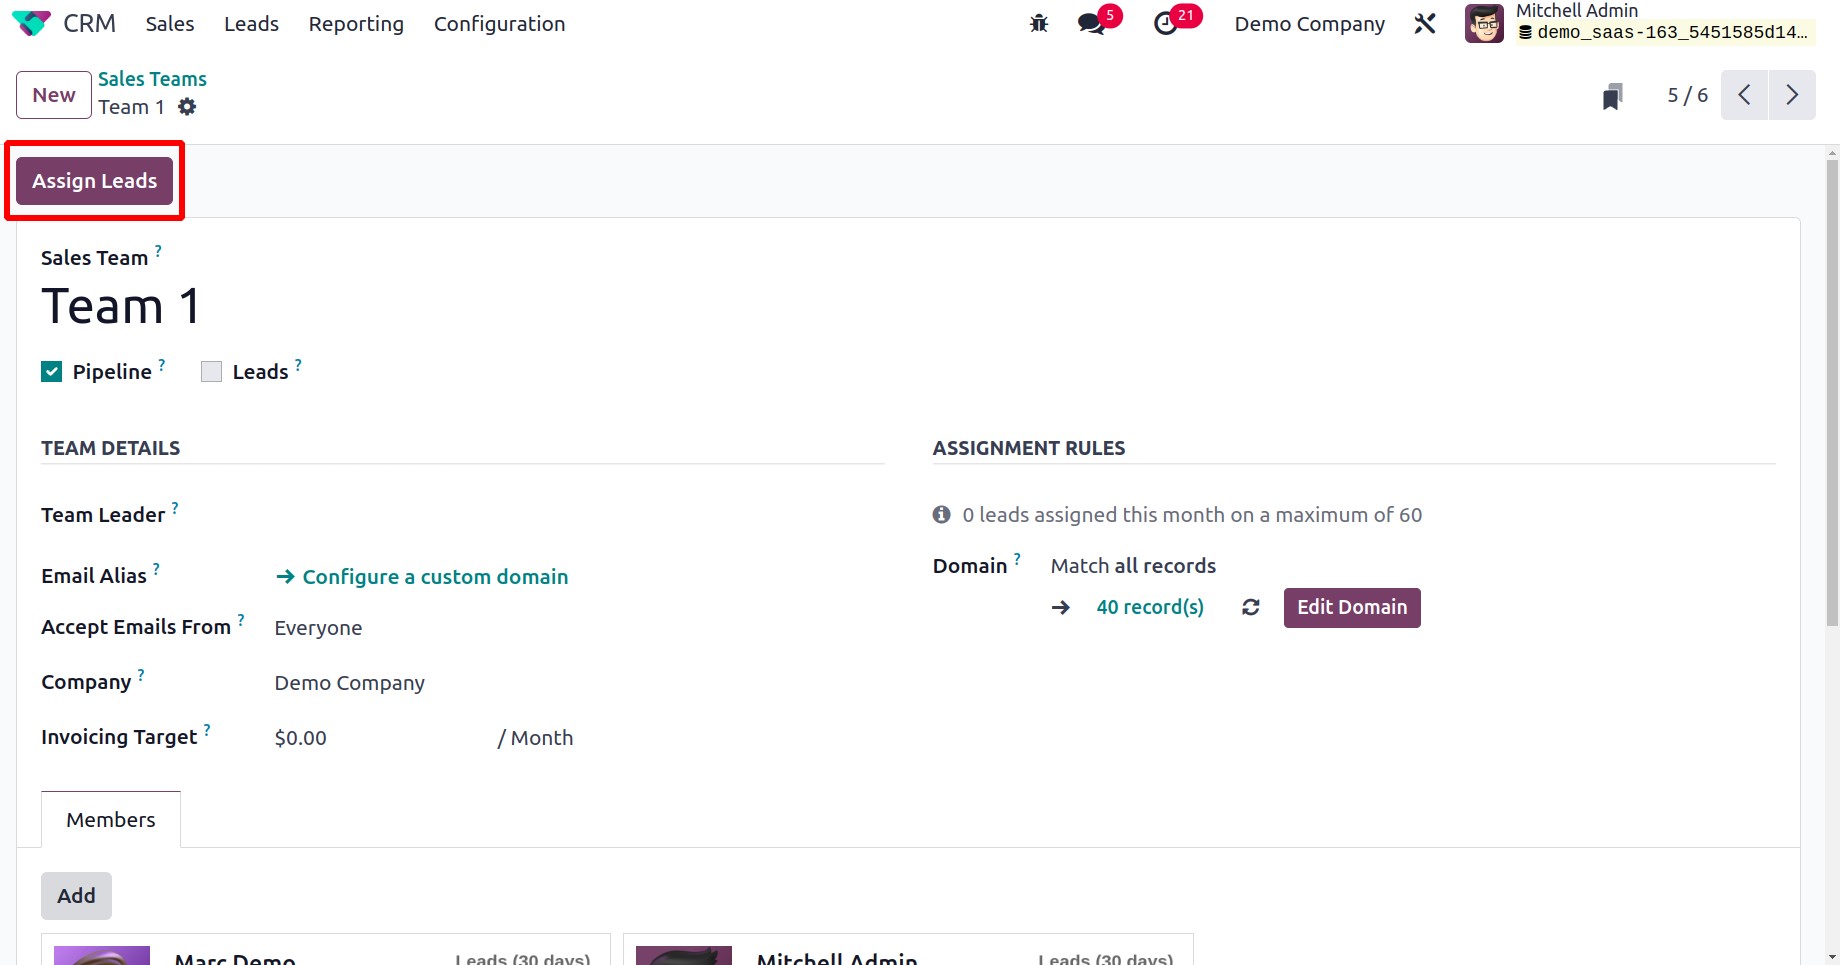
You can assign the leads to every member in accordance with the domain defined by selecting the Assign Leads option.
Lead Generation
You may find several sophisticated choices to enhance the lead generation activities under the Lead Generation tab in the Setting menu.
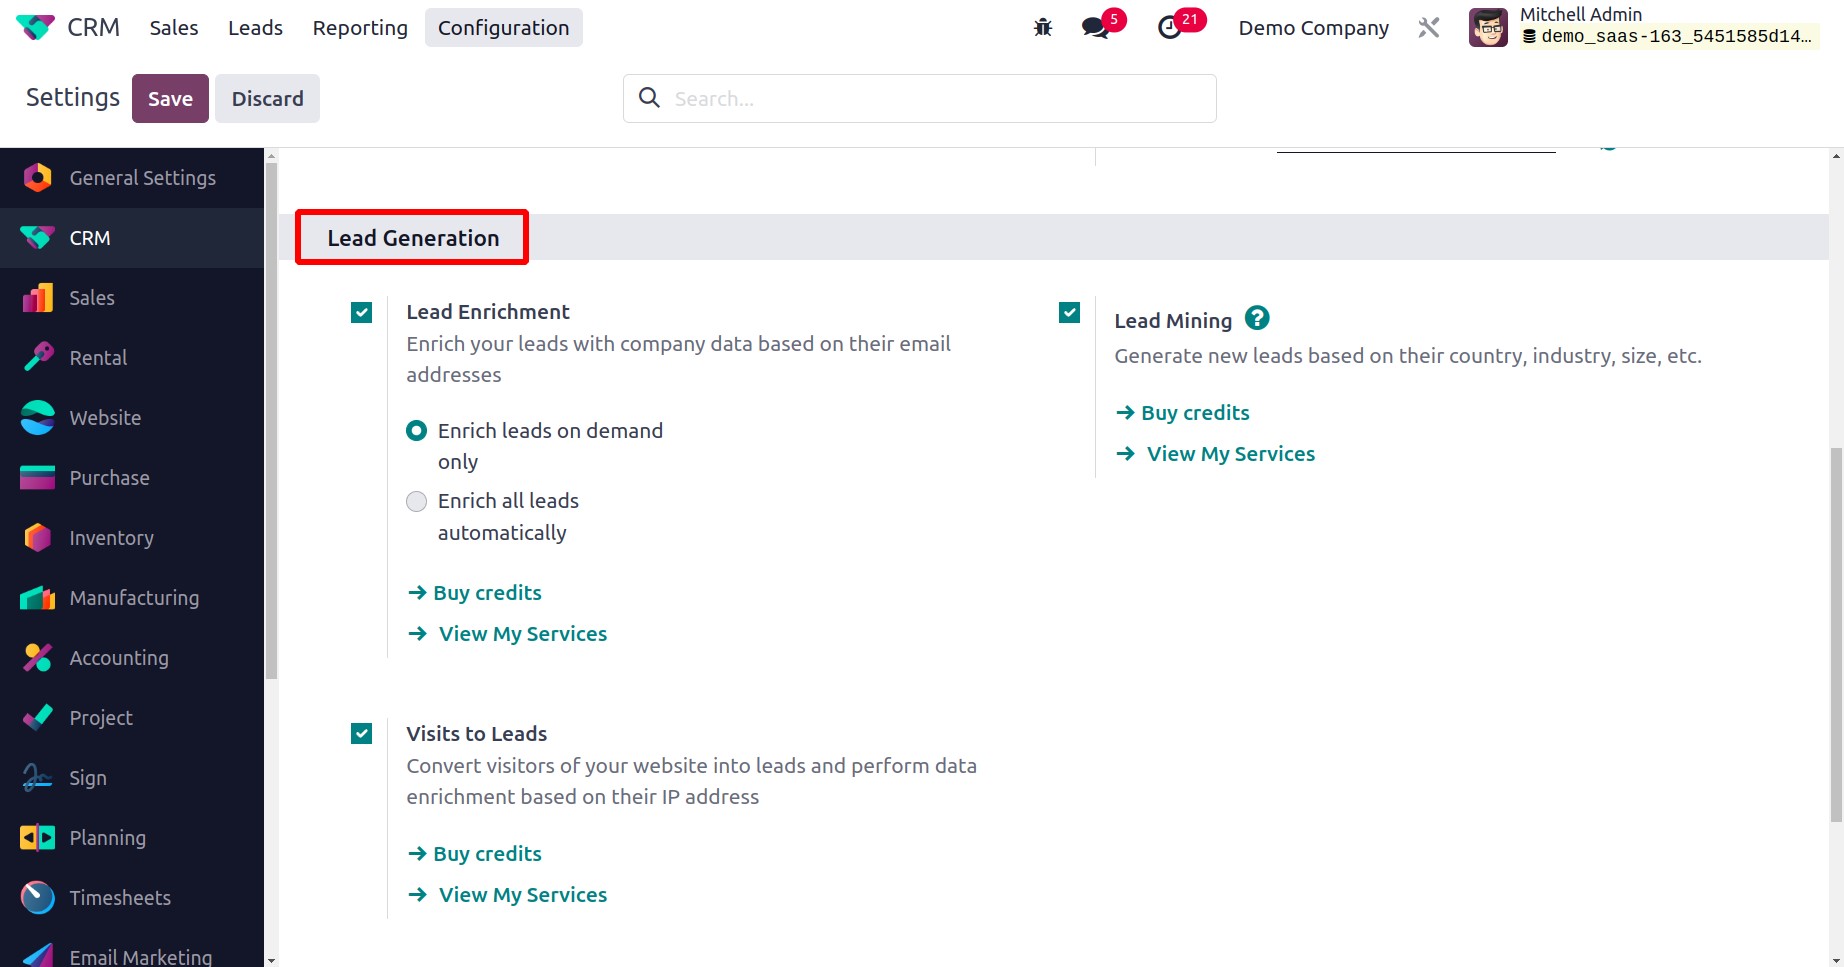
On this platform, you can choose to enable the Lead Enrichment, Lead Mining, and Visits to Leads choices. By selecting the Buy Credit option, you can quickly purchase credits, which are the basis for all of these advanced choices.
You can use the Lead Enrichment option to add corporate data to your leads based on their email addresses. By choosing the correct option from the lead enrichment tab, you may automatically enrich leads as well as manually enrich them.
With the help of the Lead Mining feature, you can find fresh leads based on factors such as their country, industry, size, etc. By turning on the Visits to Leads option, you may undertake data enrichment based on the IP addresses of website visitors and turn them into leads.
Partners Commissions
In the Partners Commissions tab, you will find the options to turn on Automatic PO Frequency and Minimum PO Amount Total.
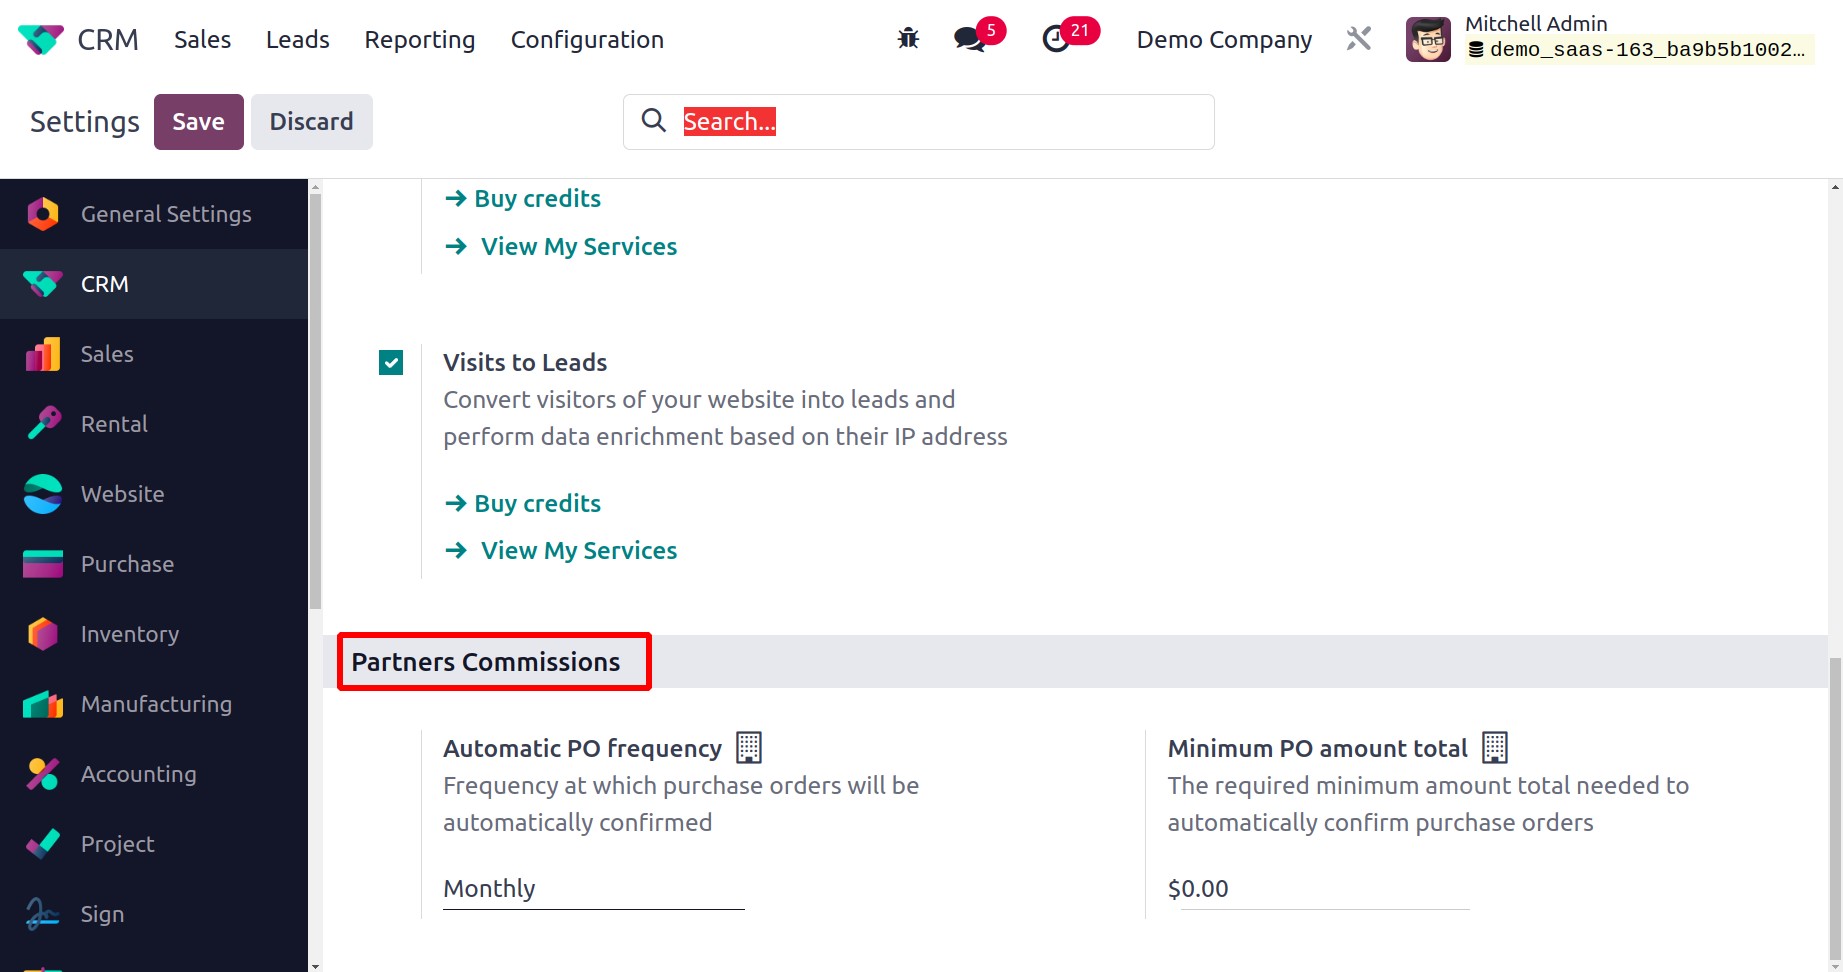
The frequency at which purchase orders will be automatically confirmed can be specified using the Automatic PO Frequency field. In the Minimum PO Amount Total section, you can choose the minimum amount needed to automatically confirm purchase orders.
Let's now examine the reporting function offered by the Odoo 17 CRM module.
Reporting
One of the best elements of any ERP system that enables us to comprehend the overall functioning of a module is the reporting tool provided by Odoo 17. You can efficiently analyze the daily, monthly, and annual CRM activities using the Reporting menu in the CRM module.
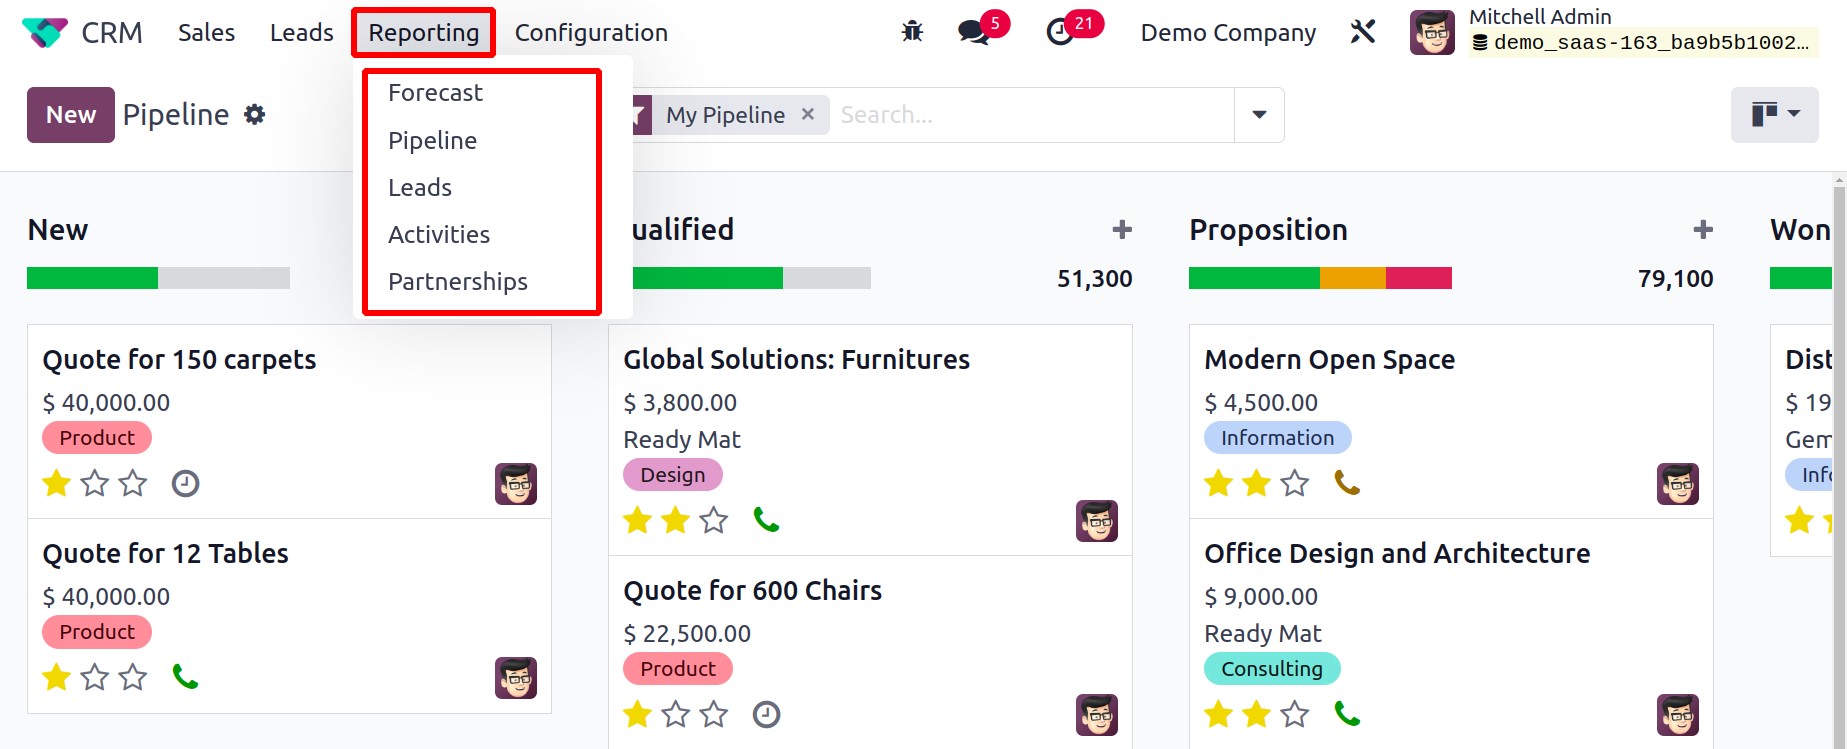
The information from these reports will be useful in guiding the essential steps towards improving the company's production over prior periods. The reporting options provided by Odoo 17 include views for the Dashboard, Forcast, Pipeline, Leads, Activities, Partnerships, and Lead Generation.
Forecast
With the use of the Forecast reporting feature found in the Odoo17 CRM module, reports of anticipated revenues may be examined.
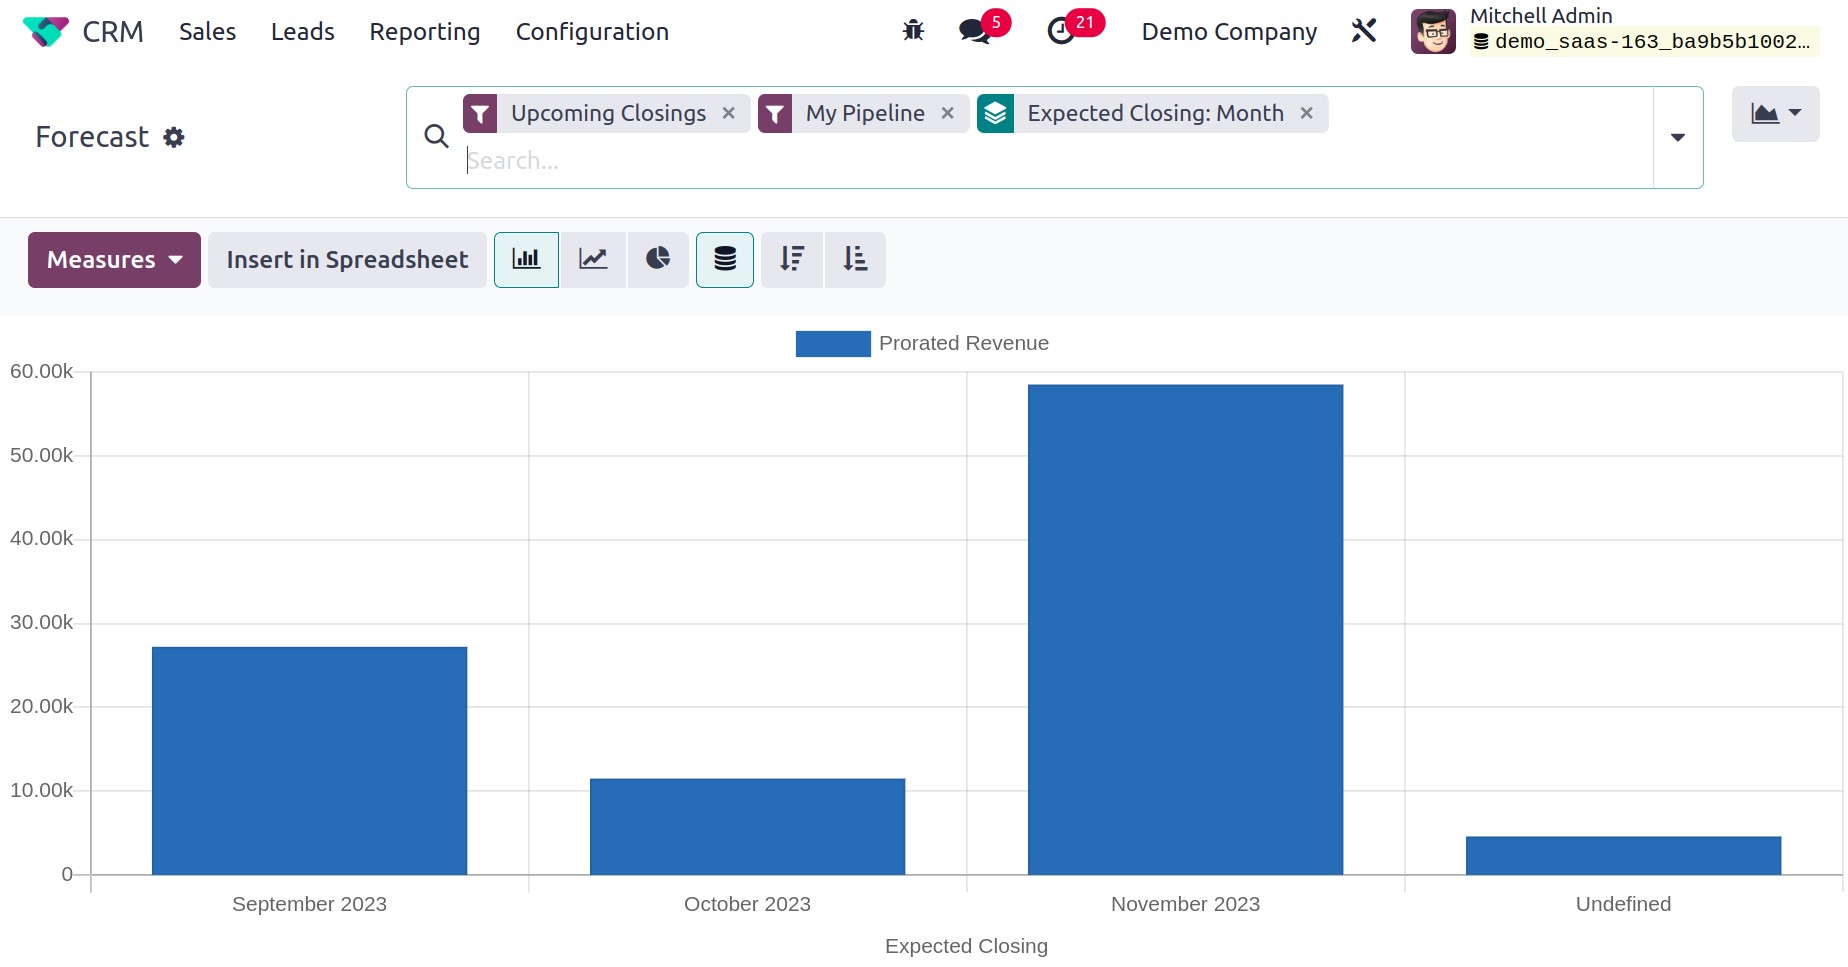
You can see this platform in Kanban, Graph, Pivot, and List formats. You can enhance the forecast reports by utilizing the appropriate Measurements, Groups, and Filters.
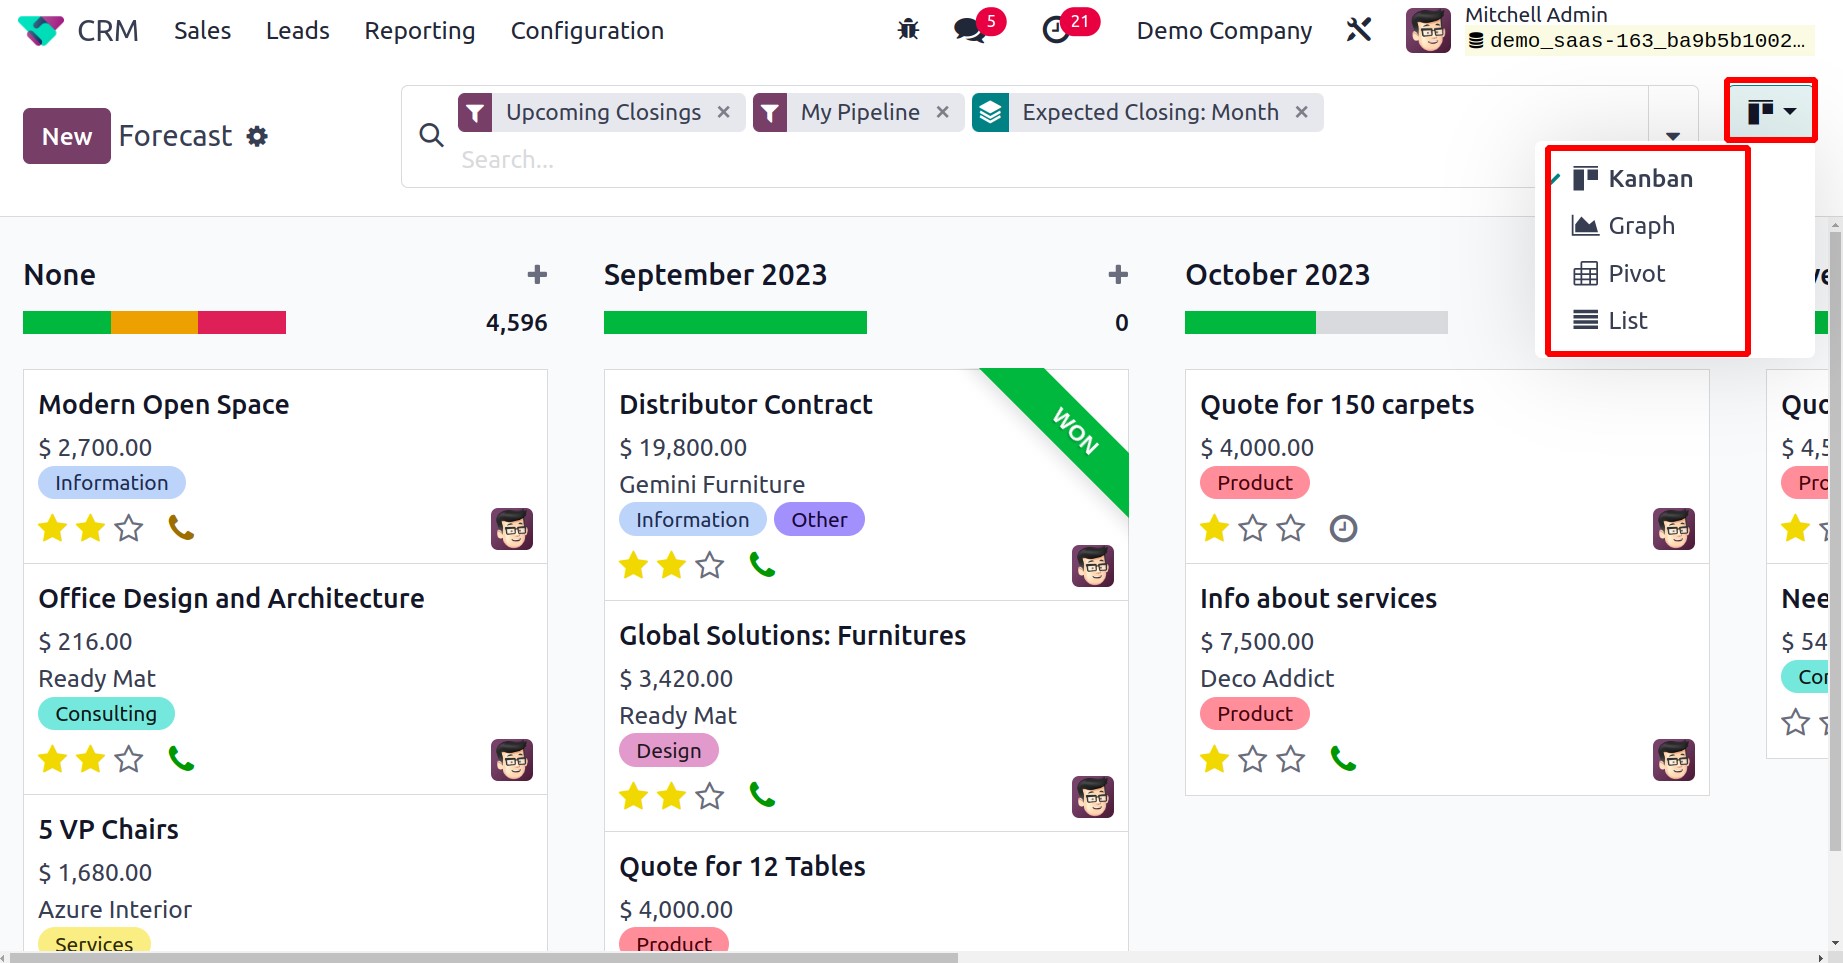
The forecast report will be presented in the Kanban view separately for each month. In this view, you can see the prorated revenue for each month.
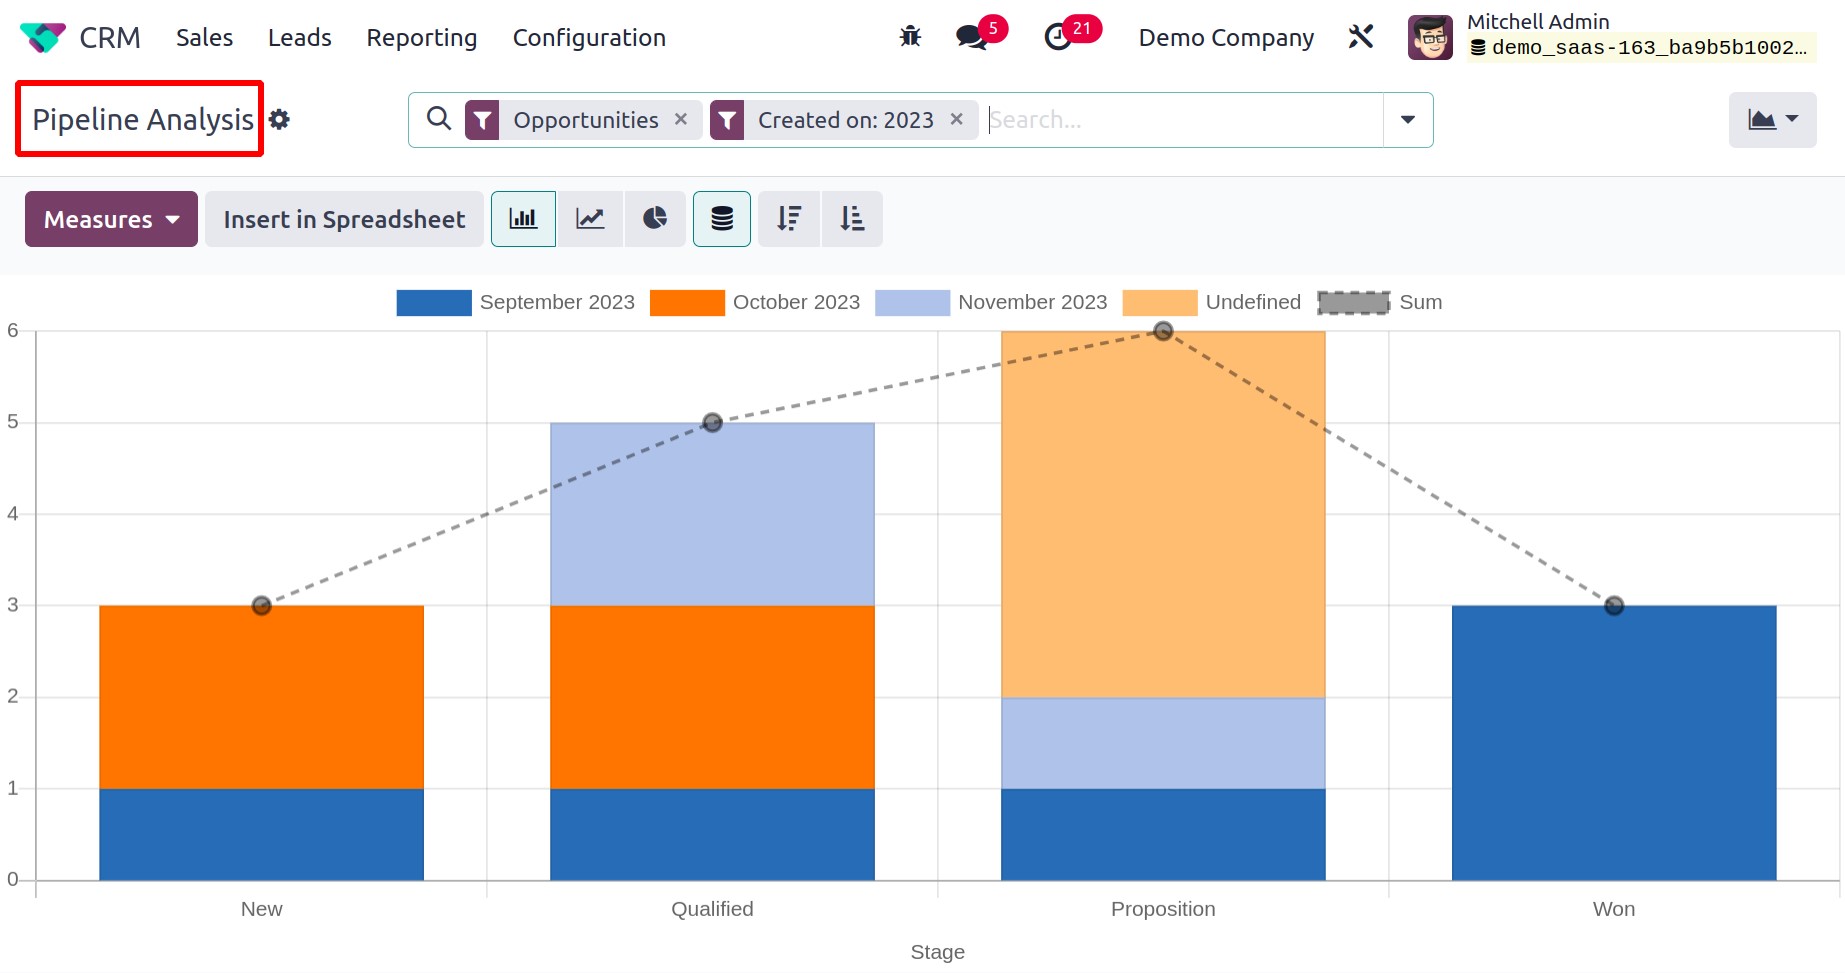
Pipeline Analysis
Using the Pipeline Analysis option found in the Reporting menu of the Odoo CRM module, all pipeline operations can be analyzed.
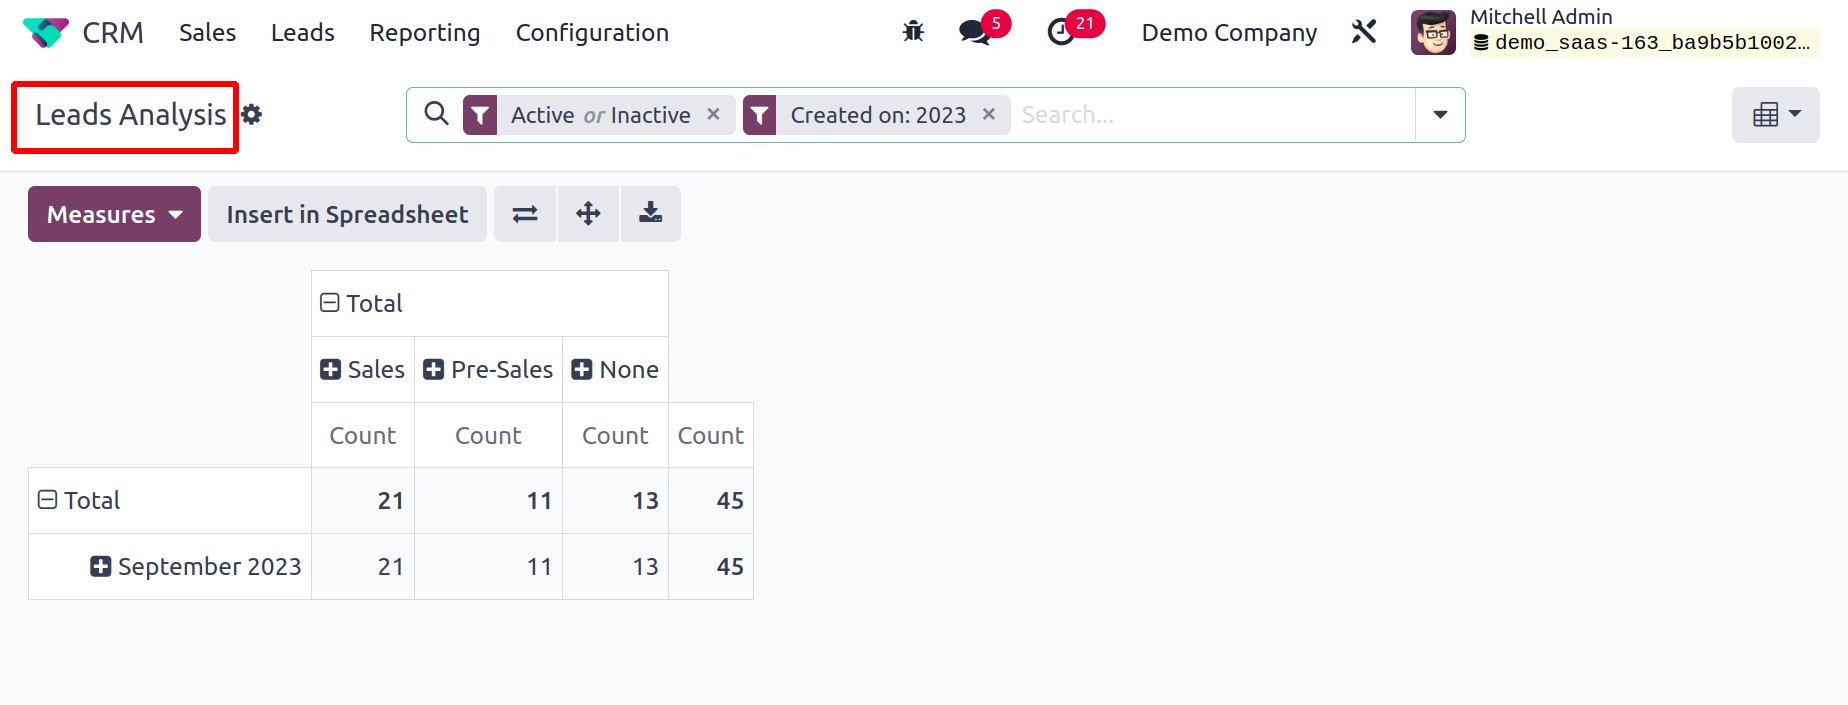
Leads Analysis
The Leads reporting platform in the Odoo 17 CRM module allows users to view reports for all leads created through multiple channels. You may efficiently analyze the leads in the module and make wise decisions to improve the lead creation operations by utilizing the sophisticated reporting capabilities.
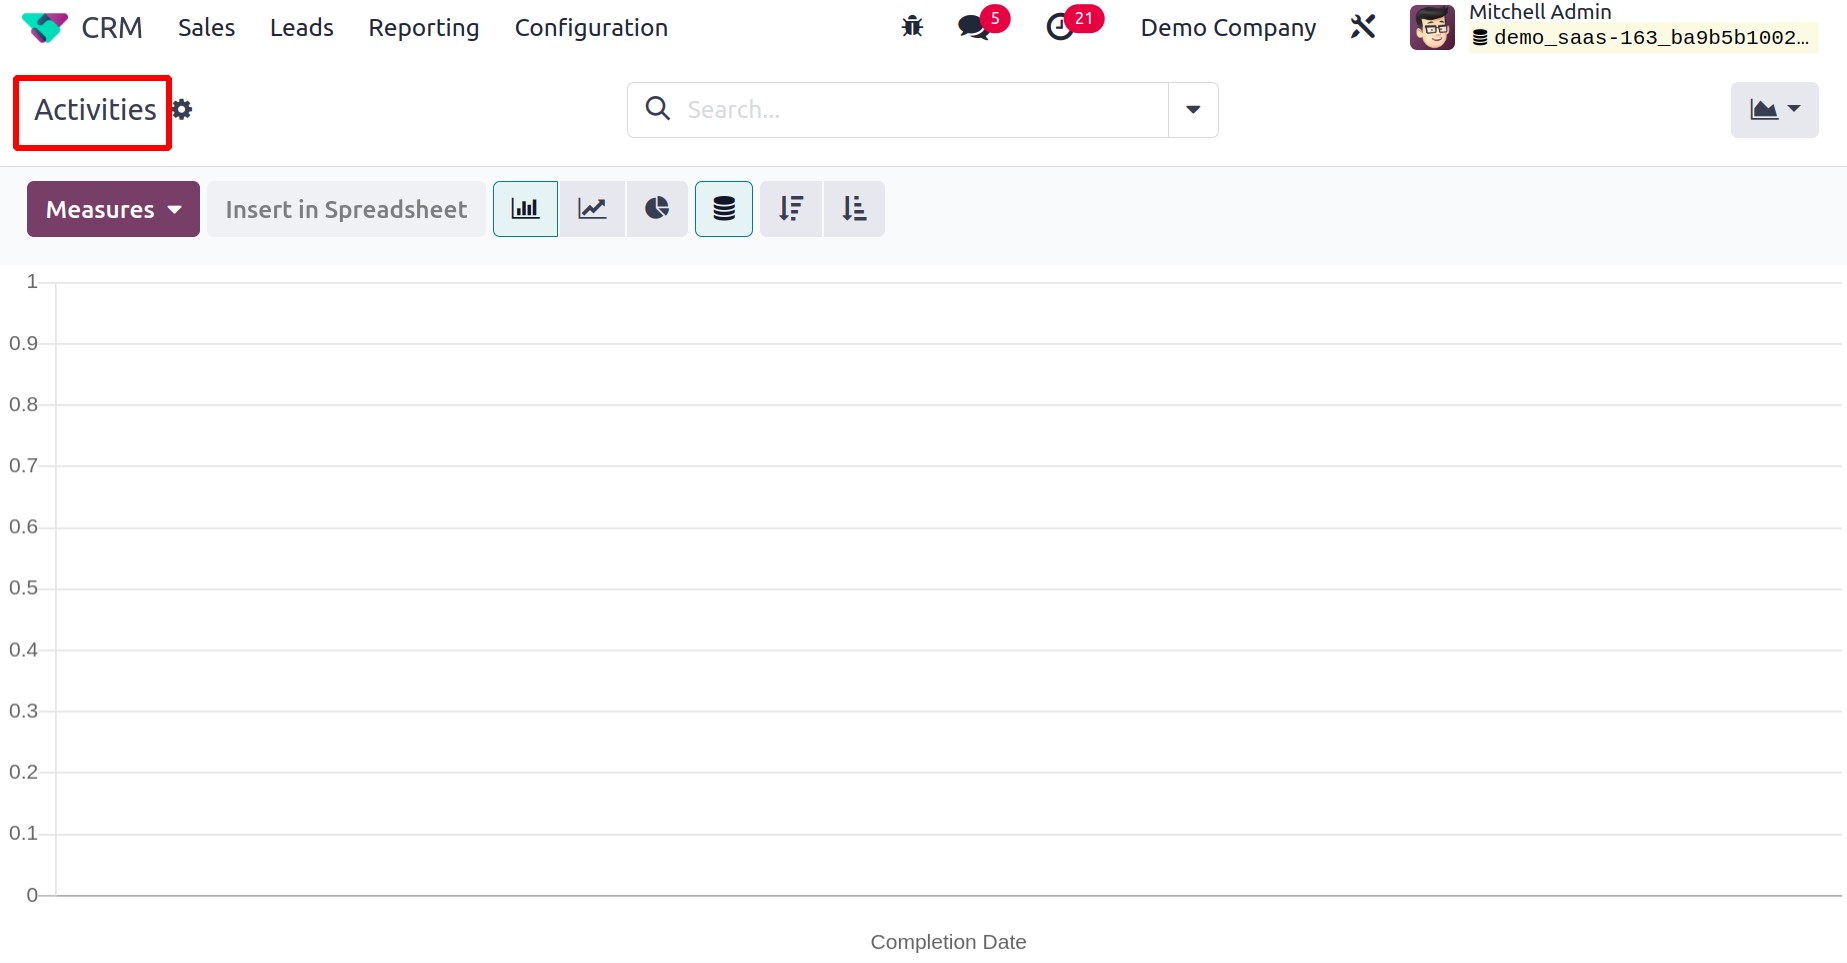
Activities
You may see reports of all scheduled and completed activities in the Odoo17 CRM module by selecting the Activities option from the Reporting menu.
Partnerships
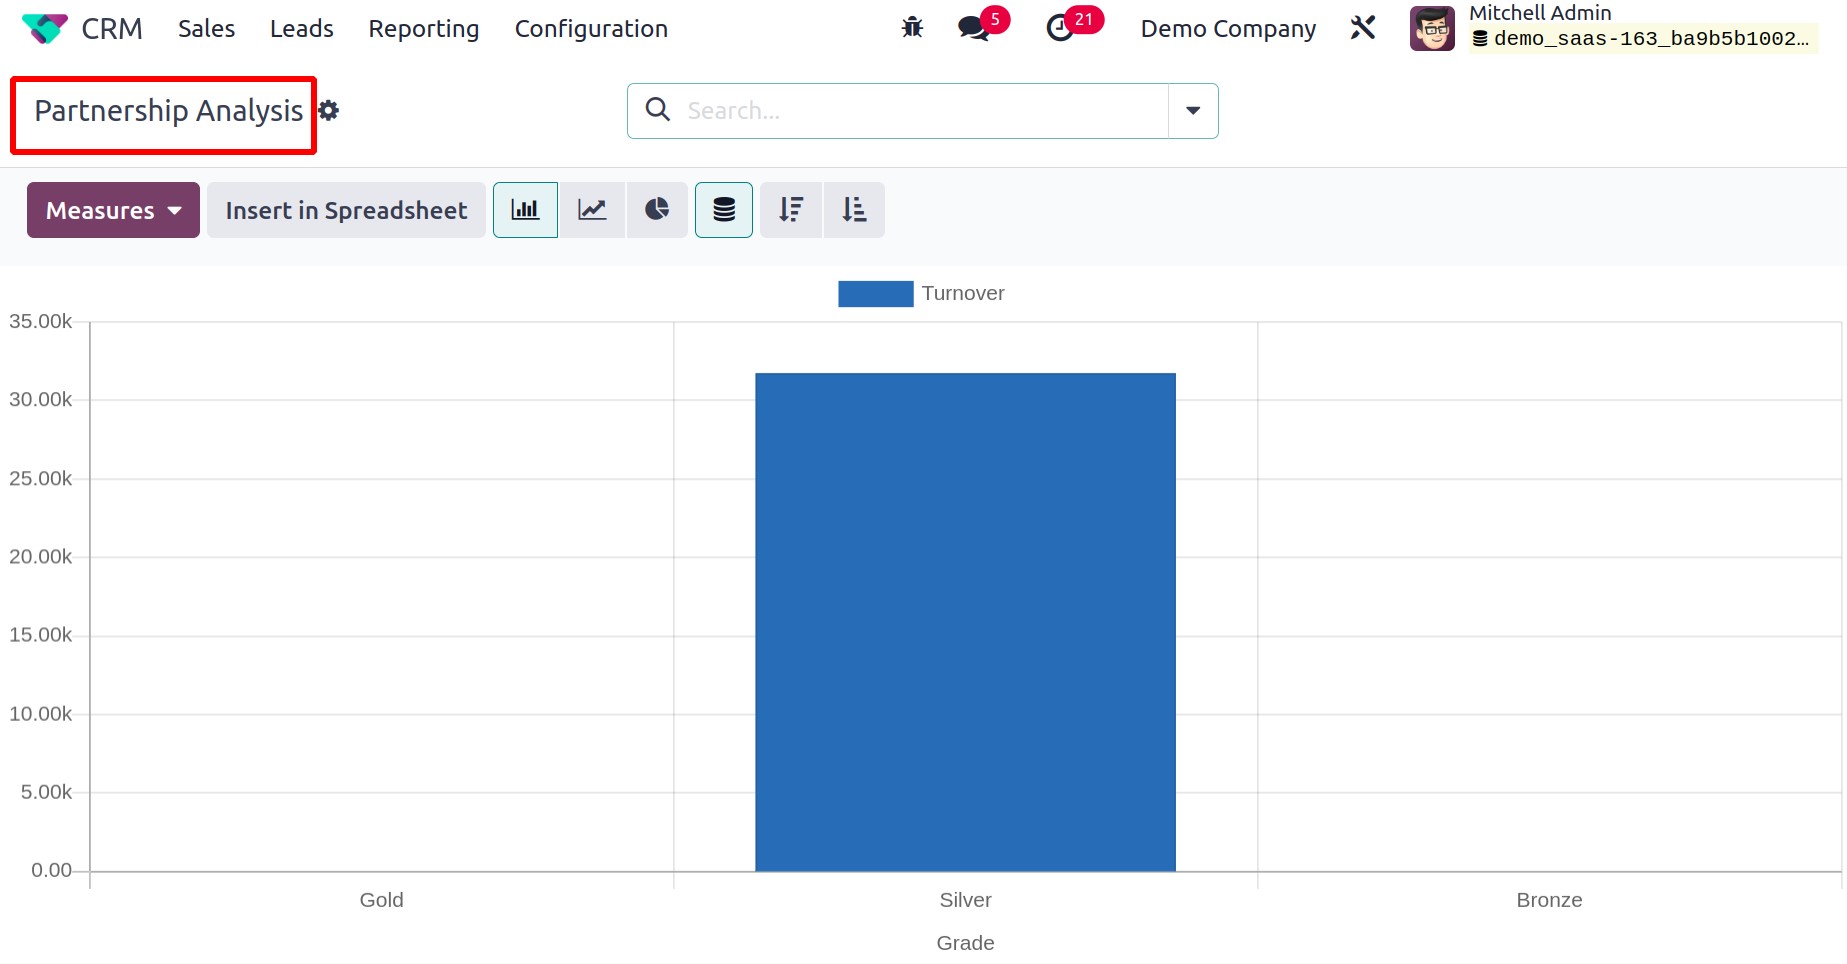
The graphical representation of the financial turnover with your partner will be shown on the Partnerships Analysis platform, which is accessible from the Reporting option. Using the corresponding option from the Measures, you can also produce reports of the opportunities created with partners' assistance.
You may manage leads from the moment they are generated using a variety of media until they are successfully converted into sales orders with the help of the effective Odoo CRM module. Odoo 17 CRM is the finest option for your company if you're looking for a specialized software solution for the administration of leads and opportunities.