PURCHASE
Purchase
The Odoo17 ERP system's Purchase management feature will guarantee that all purchase procedures are automated as effectively as possible. With the aid of Odoo17, you can manage your inventory based on your stock levels by contacting vendors for quotes. An organization must regularly go through several buying procedures in order to satisfy various business criteria. Given this information, managing purchase-related activities is a critical step in running a successful firm. You will profit from optimizing your administrative operations by using a dynamic ERP system like Odoo 17. With only a few clicks, a user can easily manage purchase operations, vendor invoices, product modifications, and many other tasks with the help of the Odoo17 Purchase module.
Odoo17 never lets its users down by integrating the module with other modules like Sales, Inventory, Accounting, Manufacturing, and so forth to ensure superior performance. For your company, the Purchase module will serve as a complete solution. We will go into great detail about the Purchase module in Odoo 17 in this chapter.
Product Management
The Purchase module allows you to configure and manage the products you want to buy from specific vendors. The Purchase module's Products menu operates in the same manner as the one we covered in the Sales module.
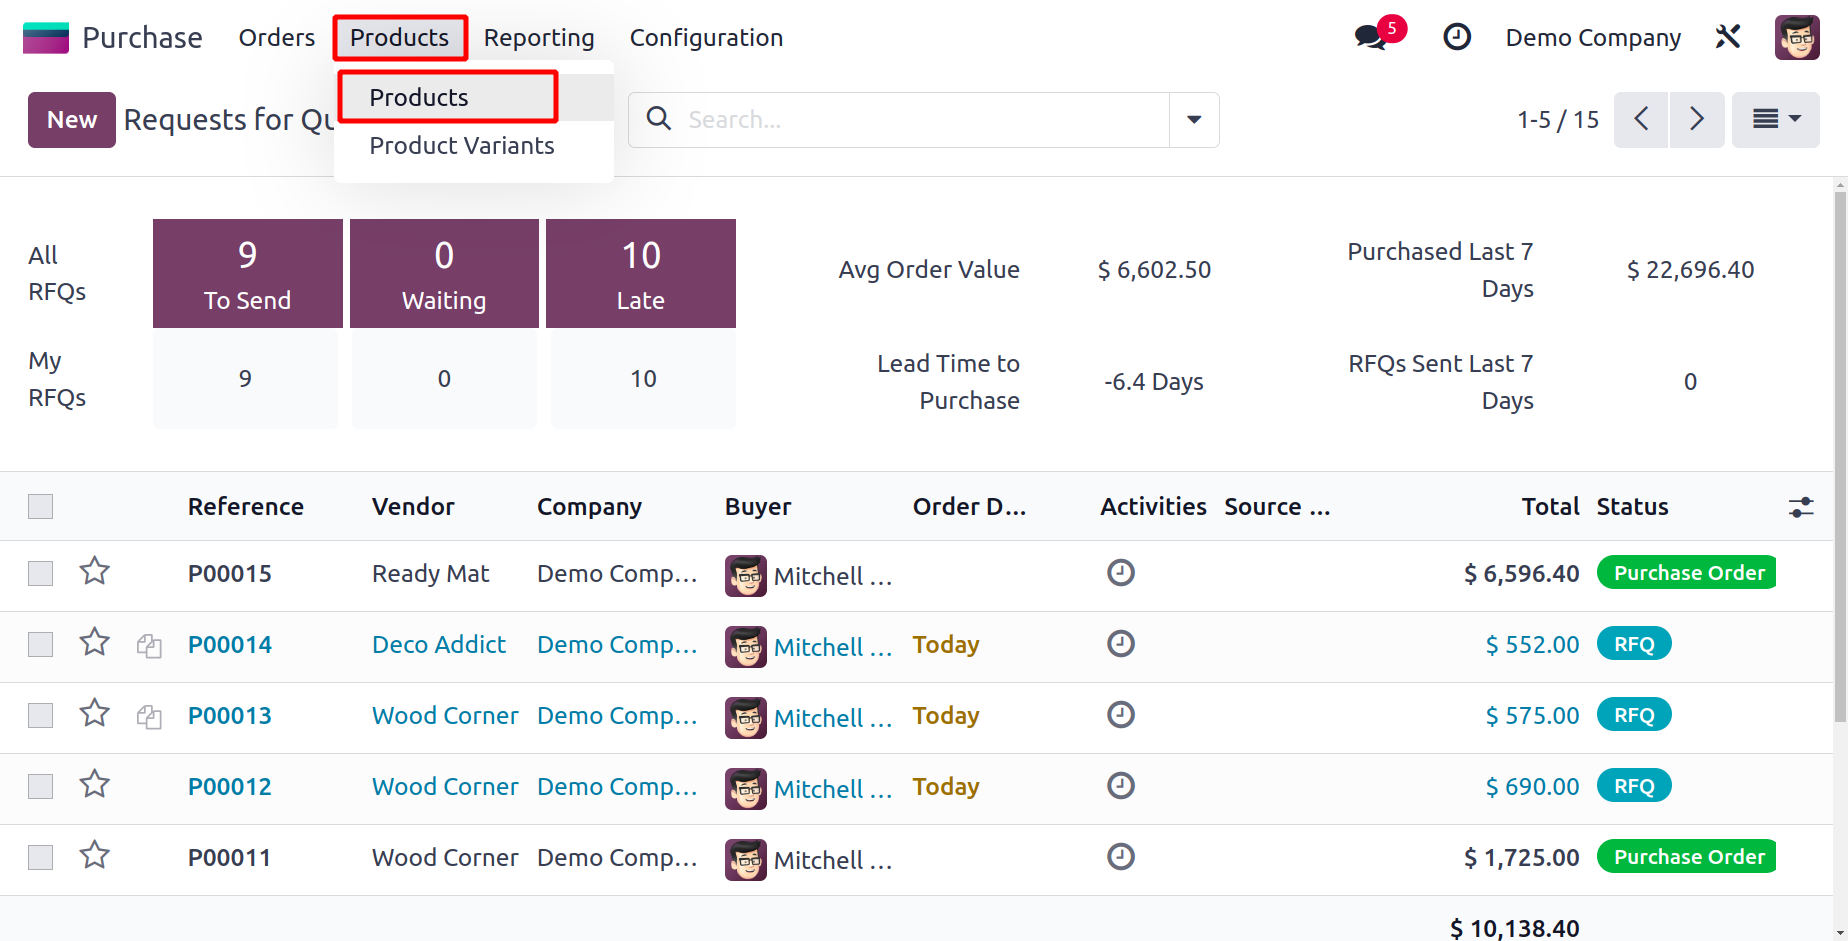
You can configure purchaseable products and their variants using the Products and Product Variants options found under the Products menu. You may get a list of the products that can be purchased using the Purchase module by using the filter "Can be Purchased".
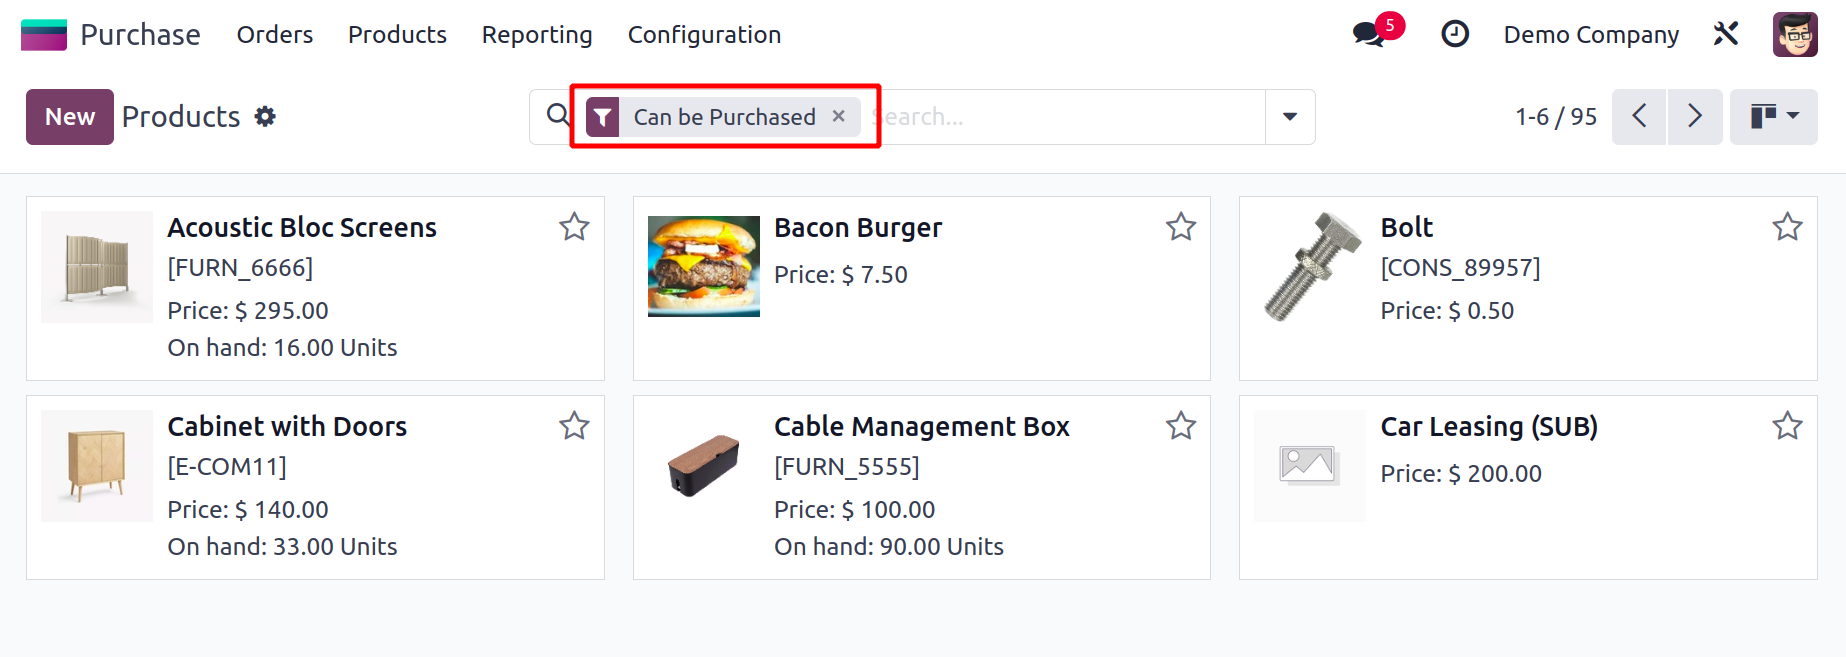
You can arrange a product to be a purchaseable product by activating the "Can be Purchased" option while configuring the product in the Purchase module.
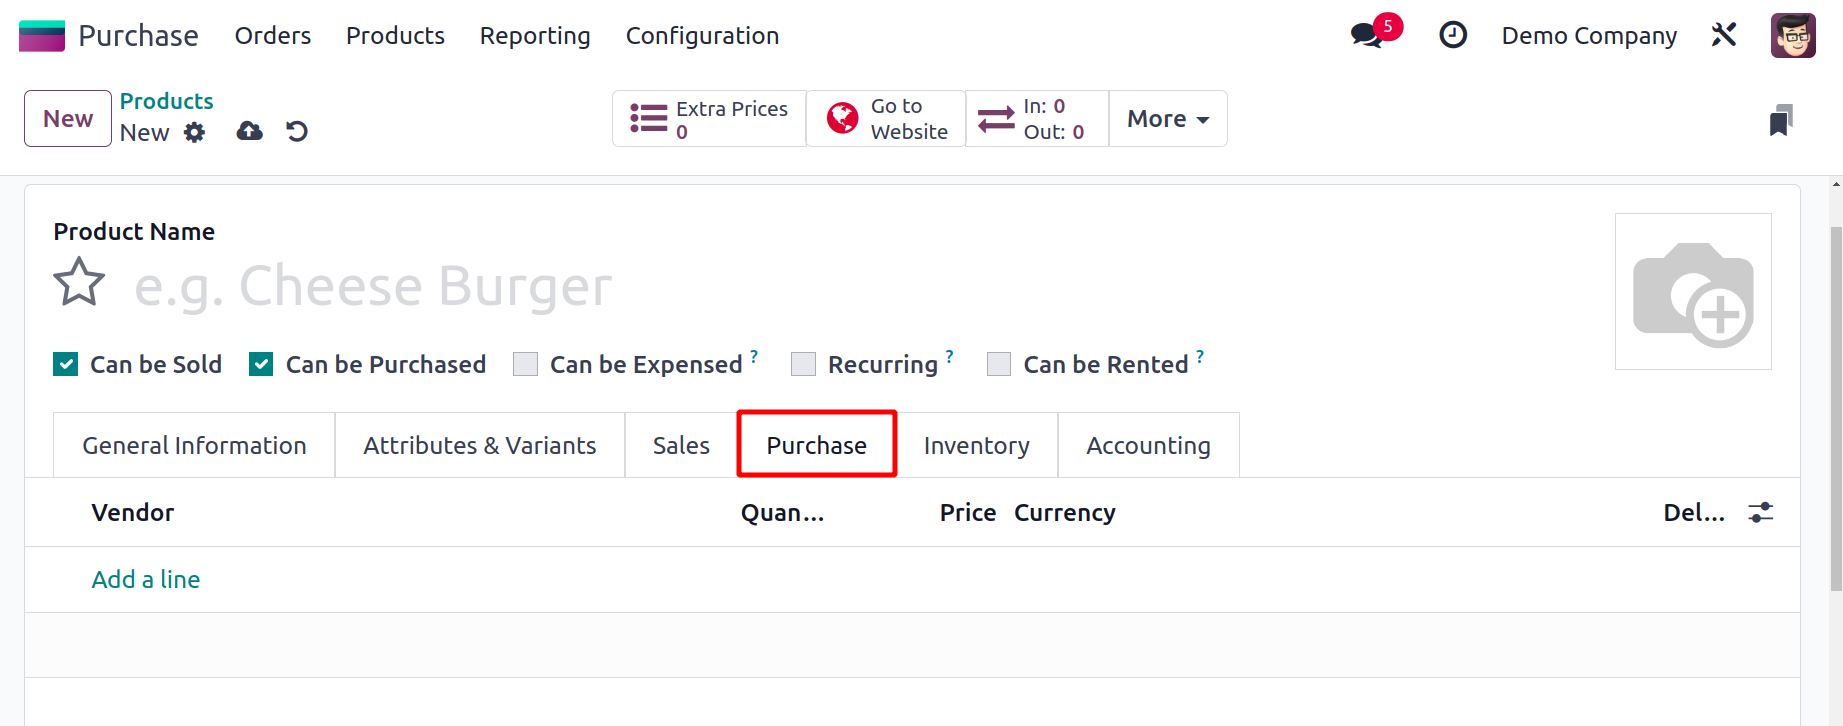
You can include the list of vendors from which you plan to acquire this product under the Purchase tab in the product settings window. You can add the vendors one at a time by using the Add a Line button. A product can have numerous sellers added to it here. You can choose the vendor's name from the provided list or add the new merchant to your contact list. You can turn on the Subcontractor field if the chosen vendor is a subcontractor. You can subcontract for products in Odoo17, which we'll cover while describing the Manufacturing module.
In the Currency area, indicate the appropriate currency for the seller. You can enter a quantity in the Quantity area for the product you want to buy from this vendor. The Unit of Measures box allows you to specify the default UoM that will be applied to purchase orders for this product. Enter the cost to buy this item in the Price section. The Delivery Lead time shows how many days there are from the moment the purchase order is confirmed and the product is delivered to your warehouse.
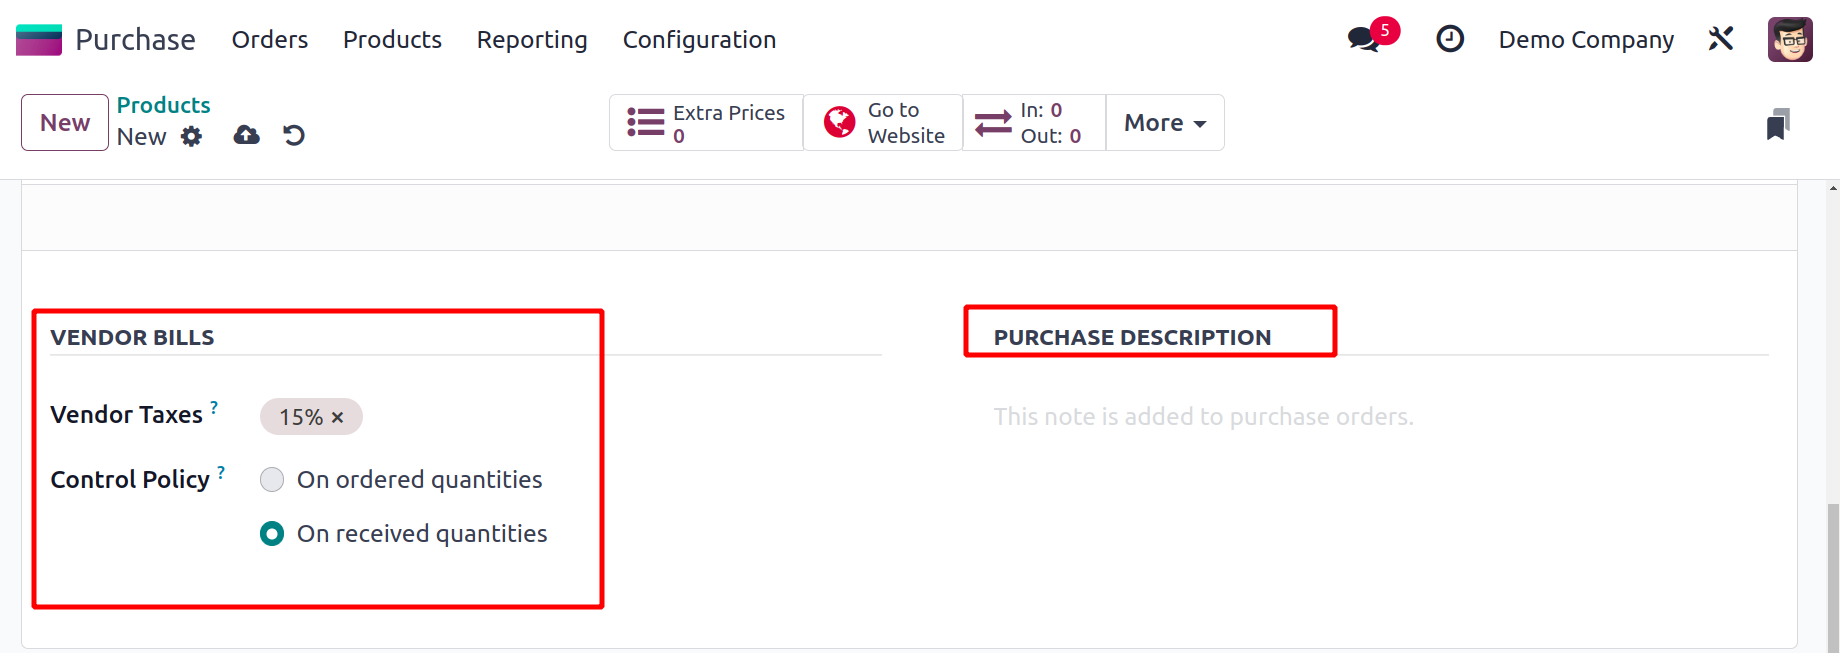
The default taxes applied when buying this product are listed in the Vendor Taxes column. The Control Policy can be configured for both received and ordered quantities. Control invoices are created based on ordered quantities. Control invoices based on quantities that have been received.
The default taxes applied when buying this product are listed in the Vendor Taxes column. The Control Policy can be configured for both received and ordered quantities. Control invoices are created based on ordered quantities. Control invoices based on quantities that have been received.
From the Settings menu of the Purchase module, you can define an appropriate Control Policy as the default for all goods.
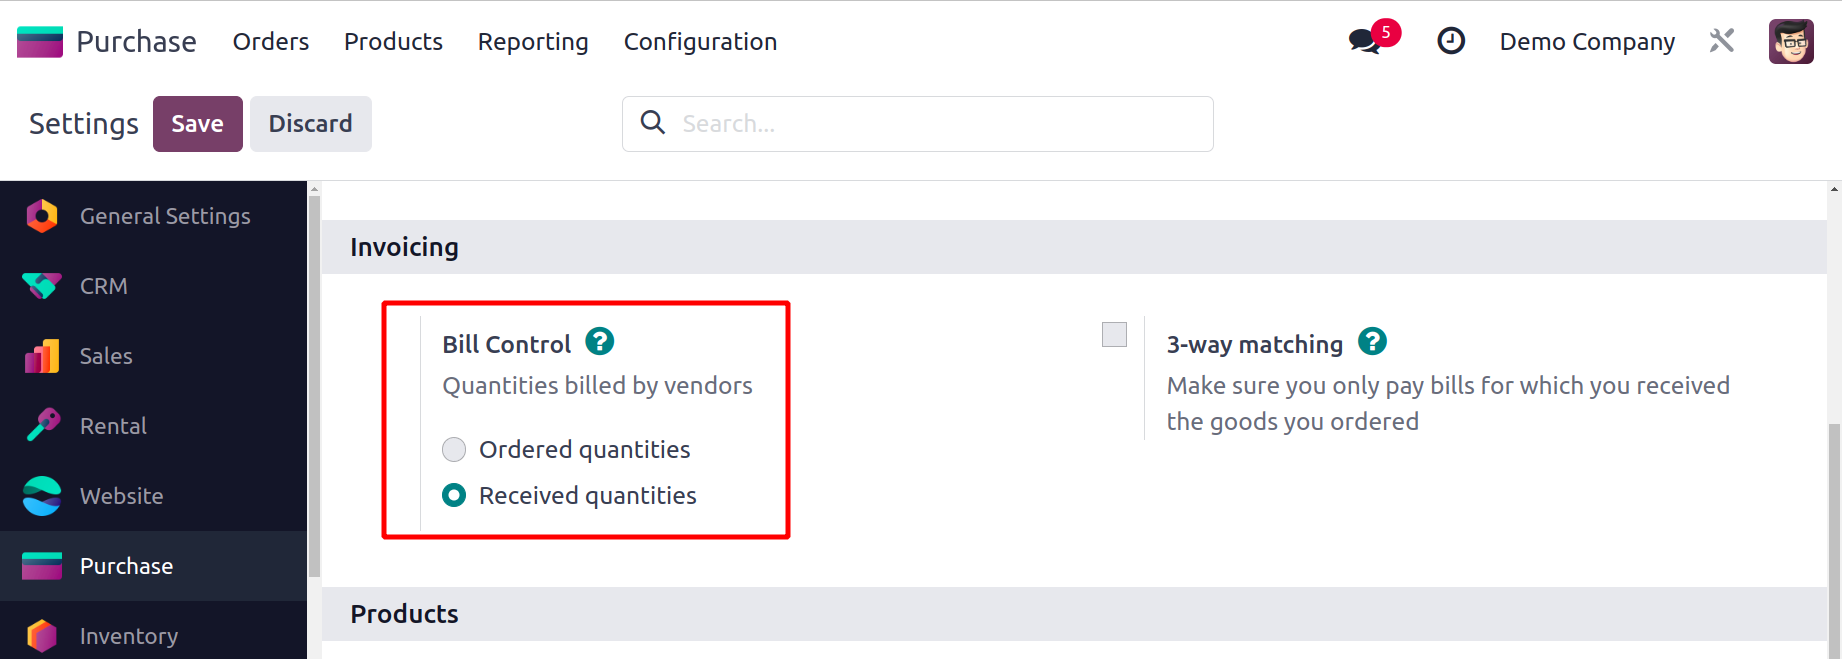
You can configure the Bill Control for all goods under the Invoicing section. All new goods will use this default setting. From the relevant product detail form, you can modify the bill control policy as needed.
You can enter product-related notes under the Purchase Description section that will eventually be included in purchase orders. When purchasing this product, you have the option to set warnings in particular situations. From the module's Settings menu, this feature can be turned on.
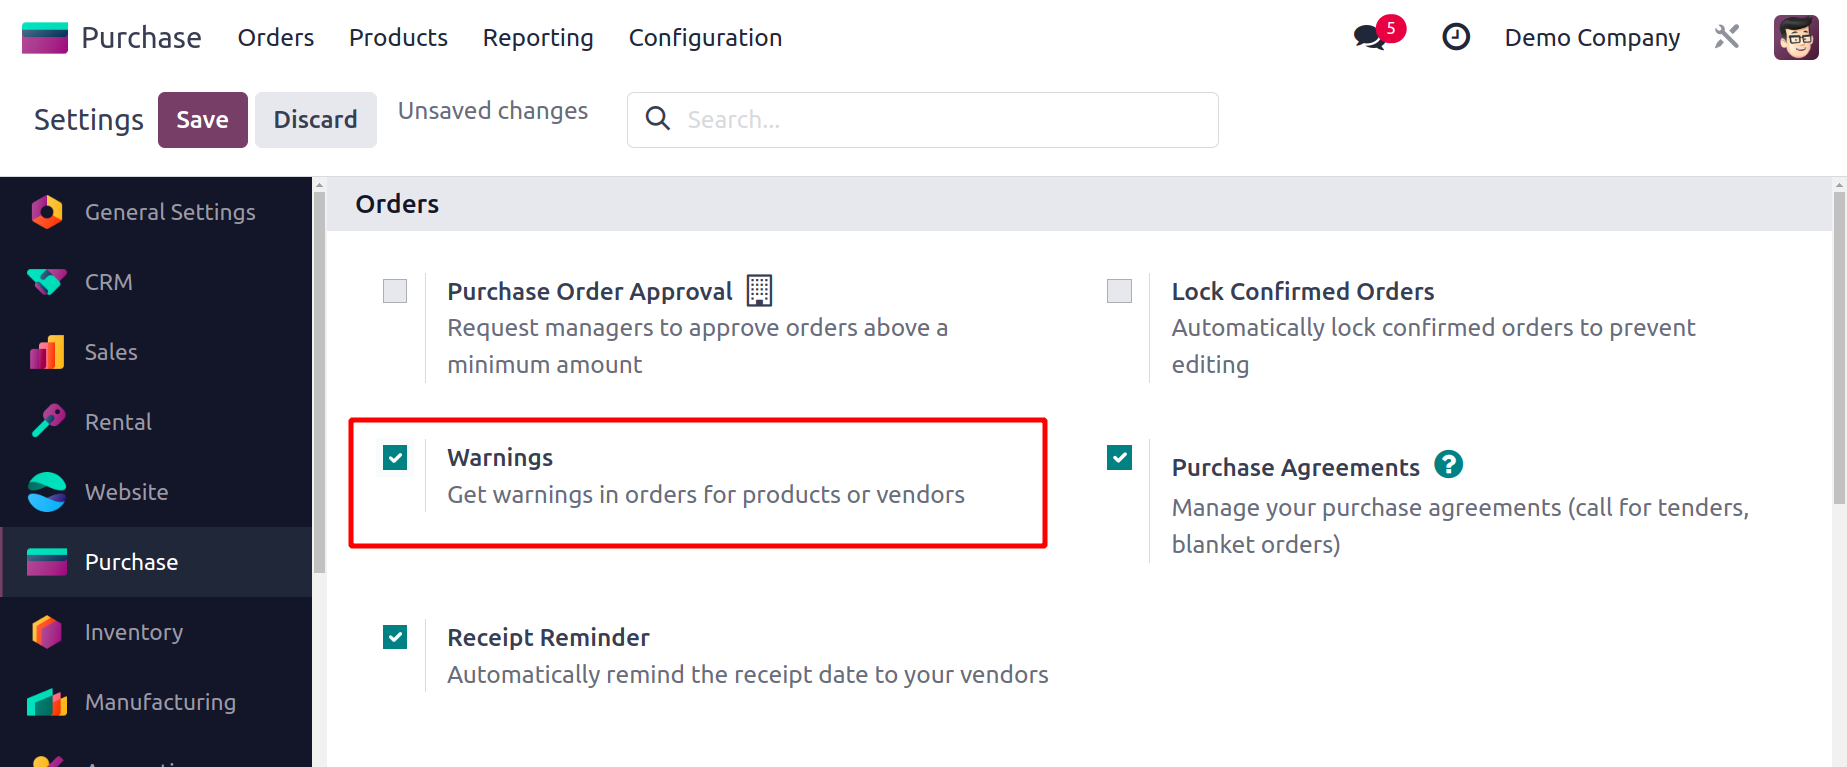
You may activate the Warnings option under the Orders tab. As soon as you turn on this option, the product information form will add a new field to the Purchase tab, as seen below.
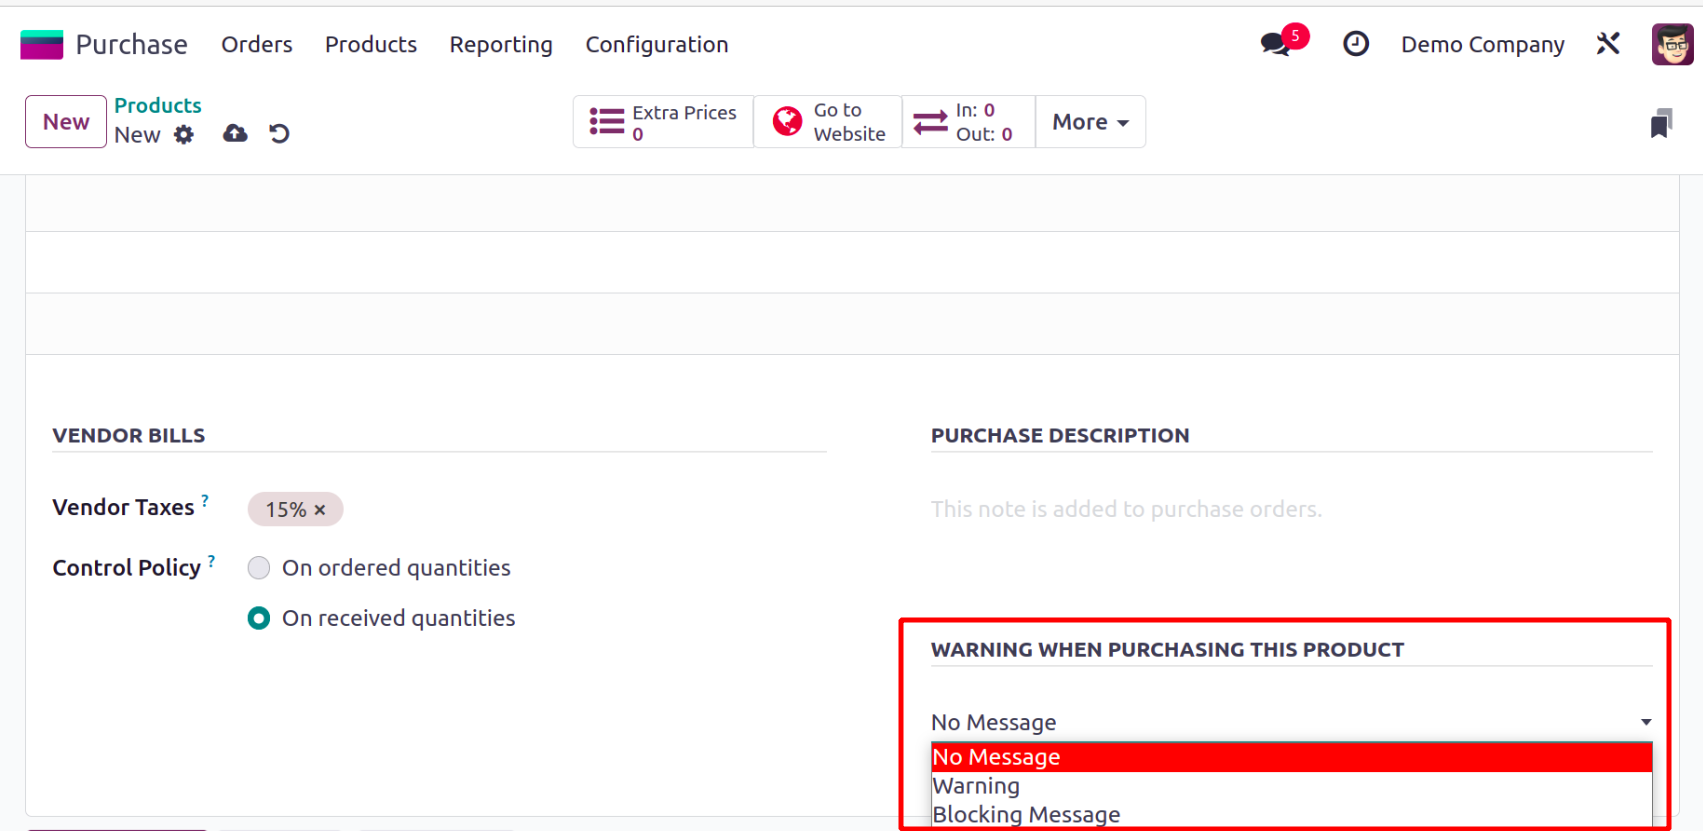
While buying this product, you can set Warnings for orders here. The chapter of the Inventory module will go into great detail about how to configure Products, Product Variants, Product Attributes, and Product Categories.
Let's get into more detail about the Purchase module's management of vendors in Odoo17
Vendor Management
Upholding a positive relationship with the suppliers of the goods you wish to buy is crucial when it comes to the management of purchasing operations in an organization. You may effectively create and maintain vendor contacts in your database with the help of the Odoo17 Purchase module. This will guarantee that you always have rapid access to the suppliers' information. Users of the Odoo17 ERP system may easily configure and maintain vendor lists, enabling them to manage vendors and activities linked to them in a single location.
The Purchase module's Orders menu provides access to the vendor management window for the user.
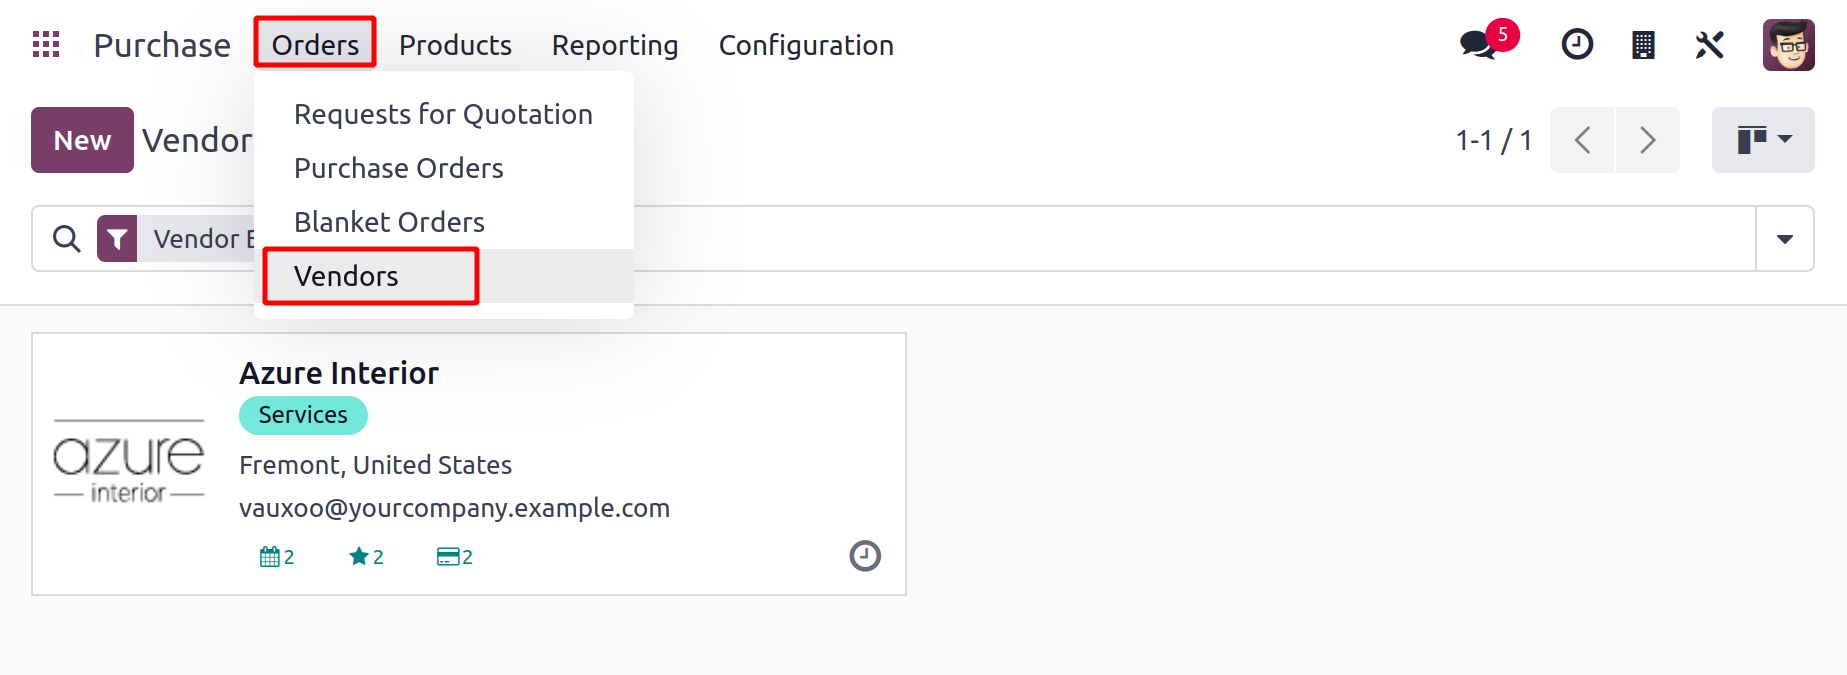
Click the Vendors option under the Orders menu to open a new window with information about all configured vendors, as seen in the screenshot above. On this platform, users have access to both Kanban and List views, and they may choose the one they need from the icons in the top right corner of the screen. You can examine a preview of the vendor profile in the Kanban view, which also includes the vendor's name, address, email address, tags, the number of meetings that are currently scheduled, opportunities, purchases, sales, and many other facts.
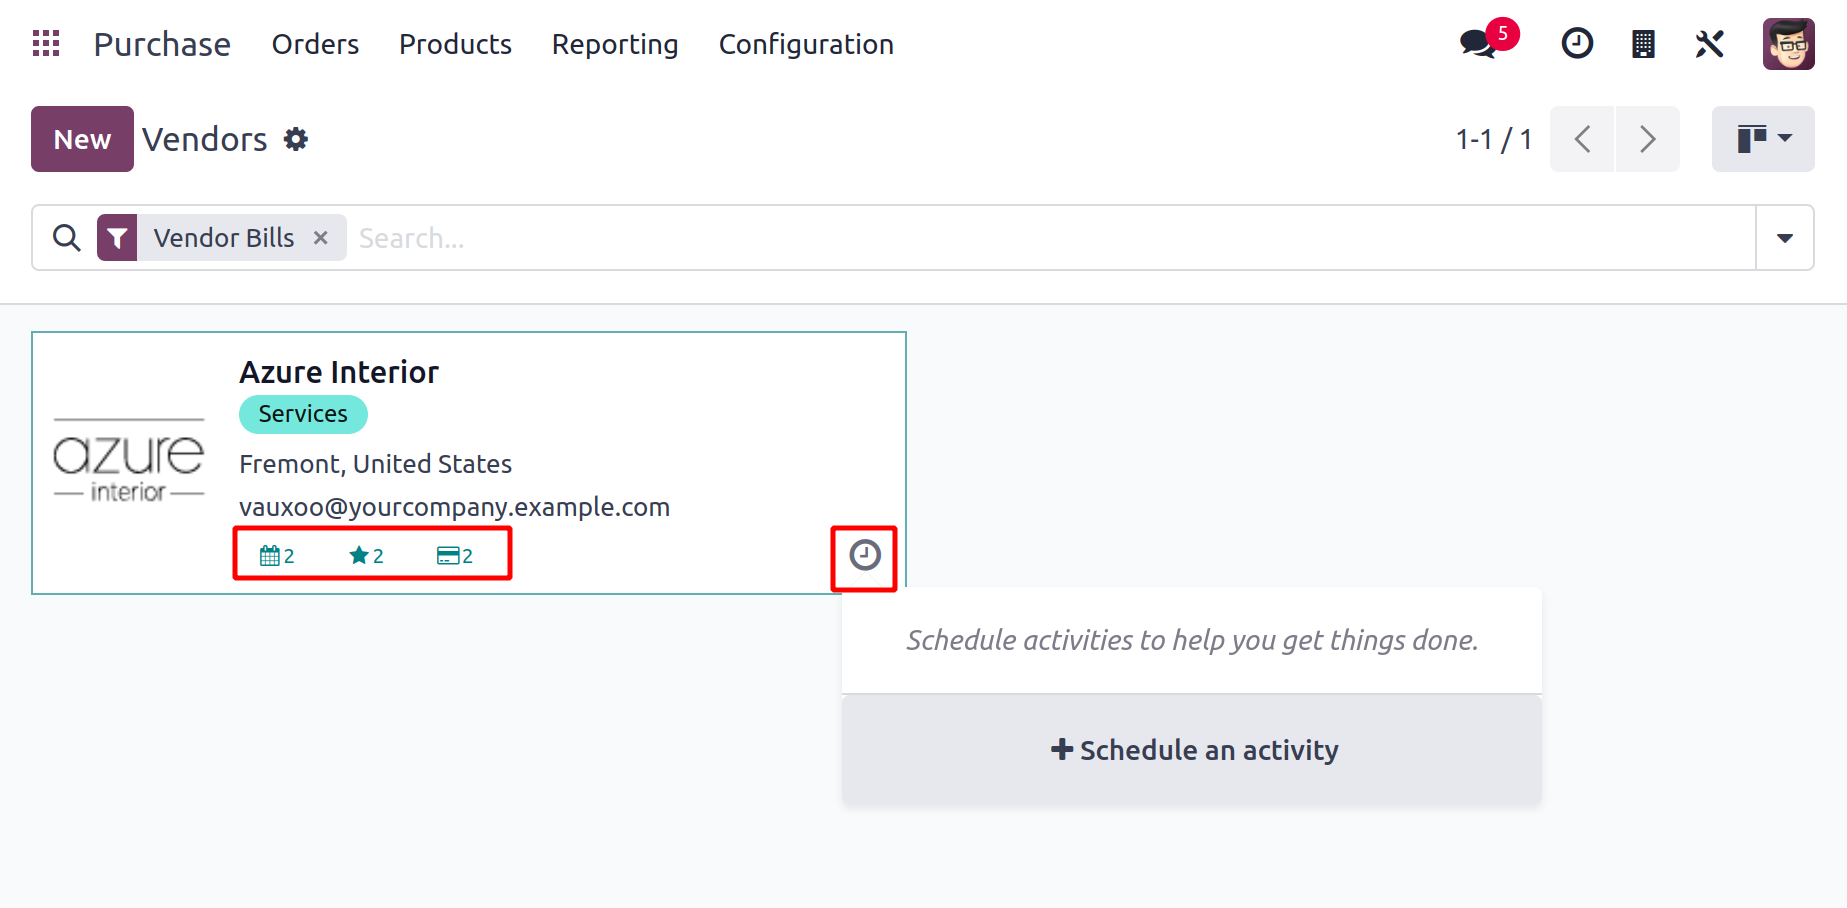
You can plan an activity with the specific seller by clicking on the tiny clock icon on their profile page.
This platform's list view displays the vendor's Name, Phone, Email, Salesperson, Activities, City, Country, and Company.
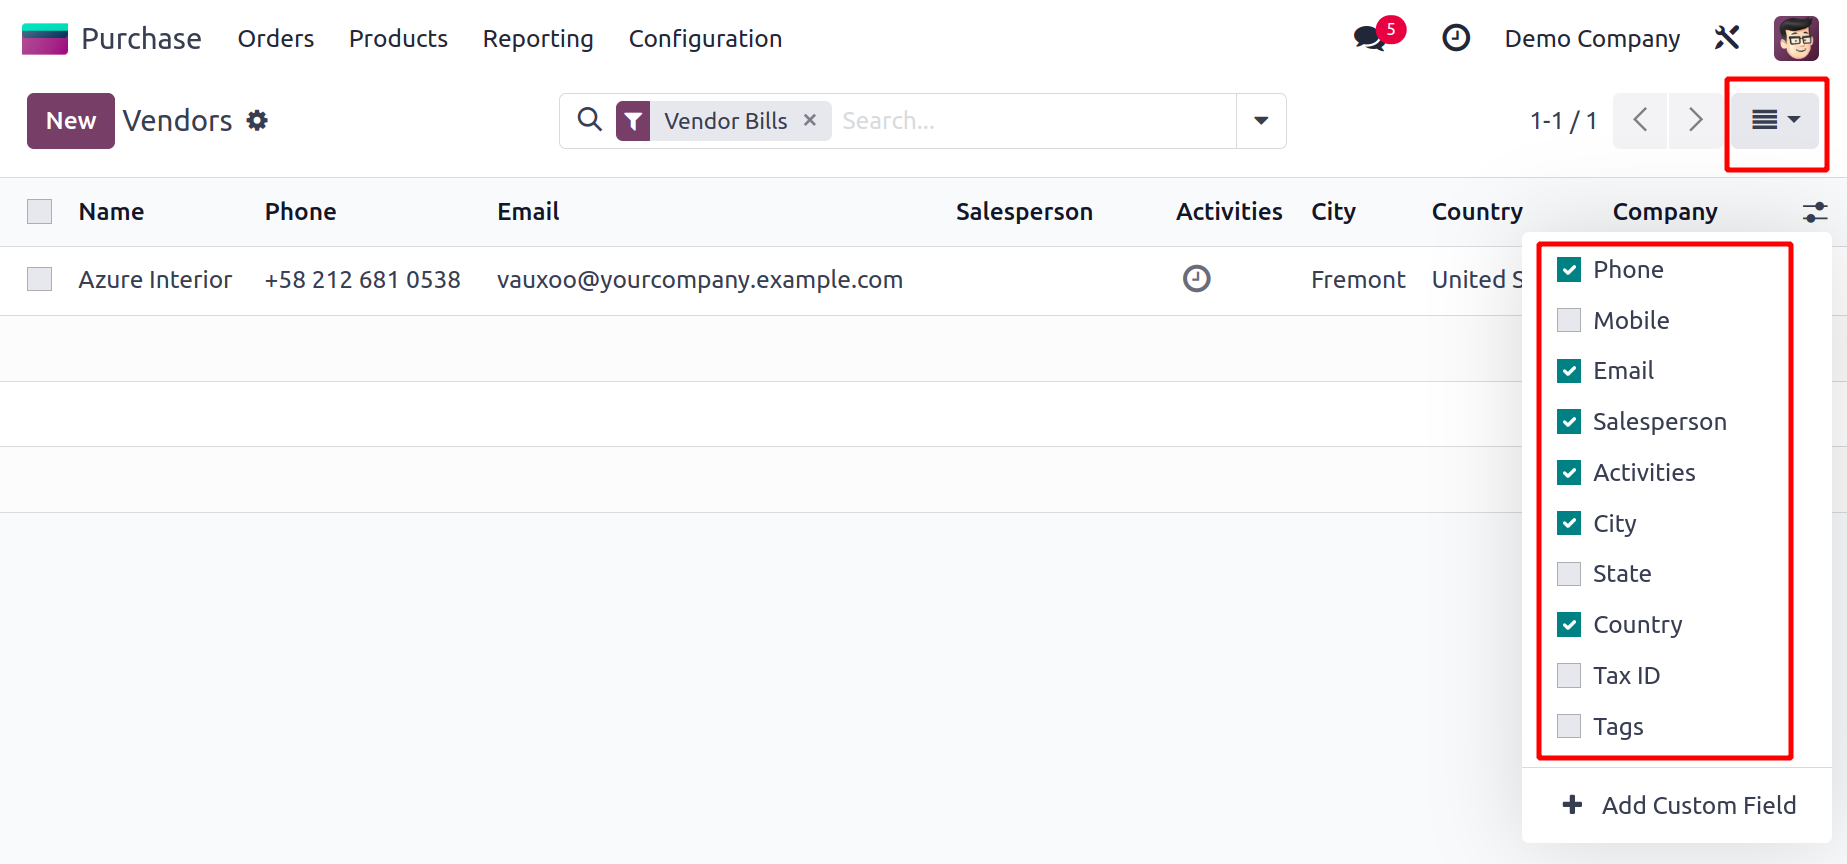
By adding more fields from the list displayed in the above example, you can enlarge the list view preview.
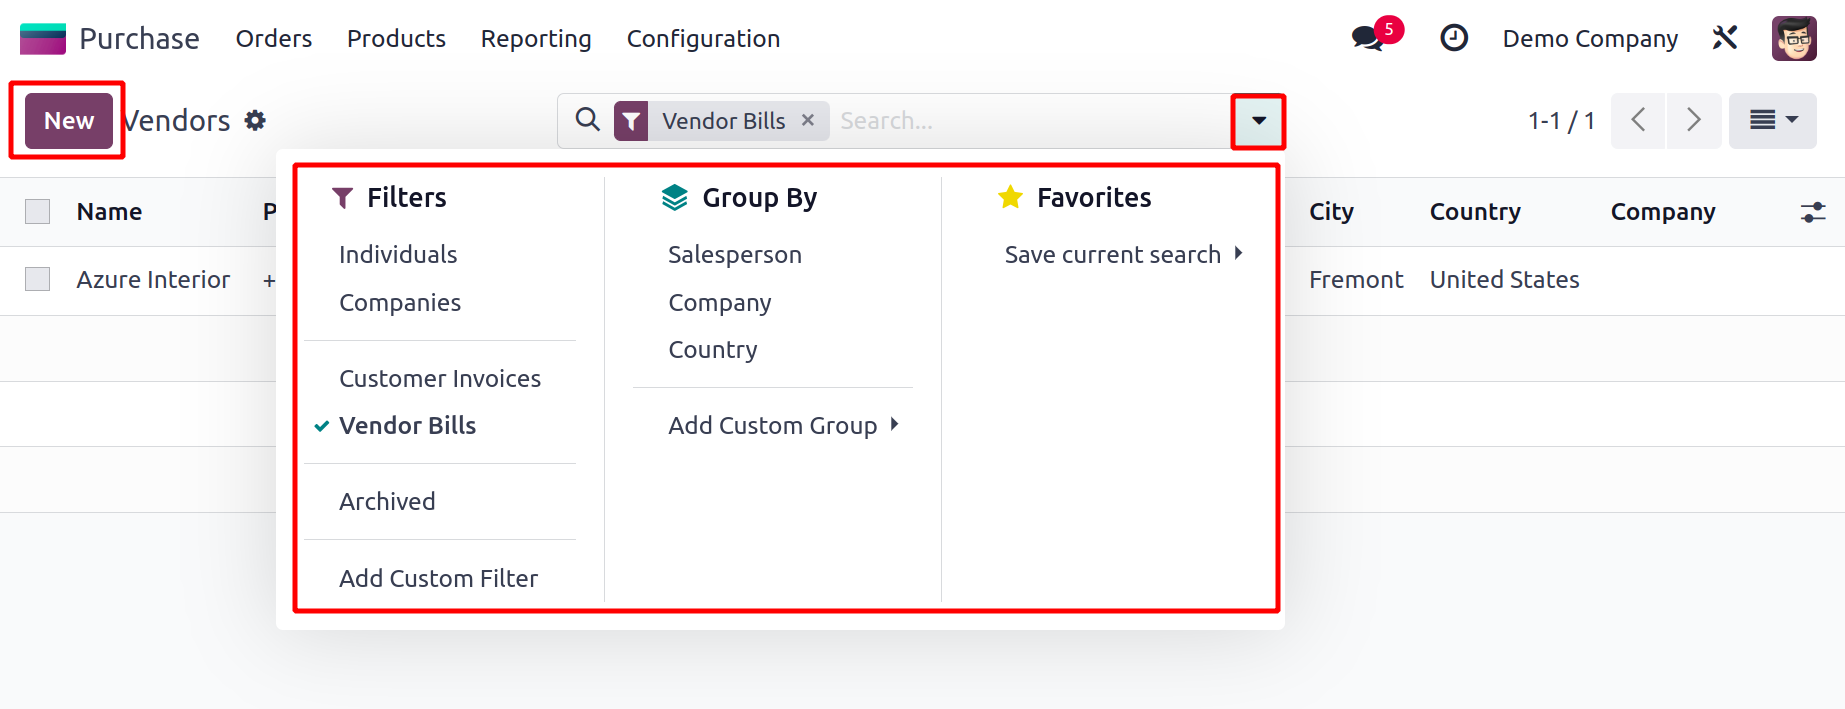
The accessible list of suppliers can be sorted according to your needs using the default and custom features of the Filters, Group By, and Favorites options. Use the New button to add a new vendor's configuration to your database.
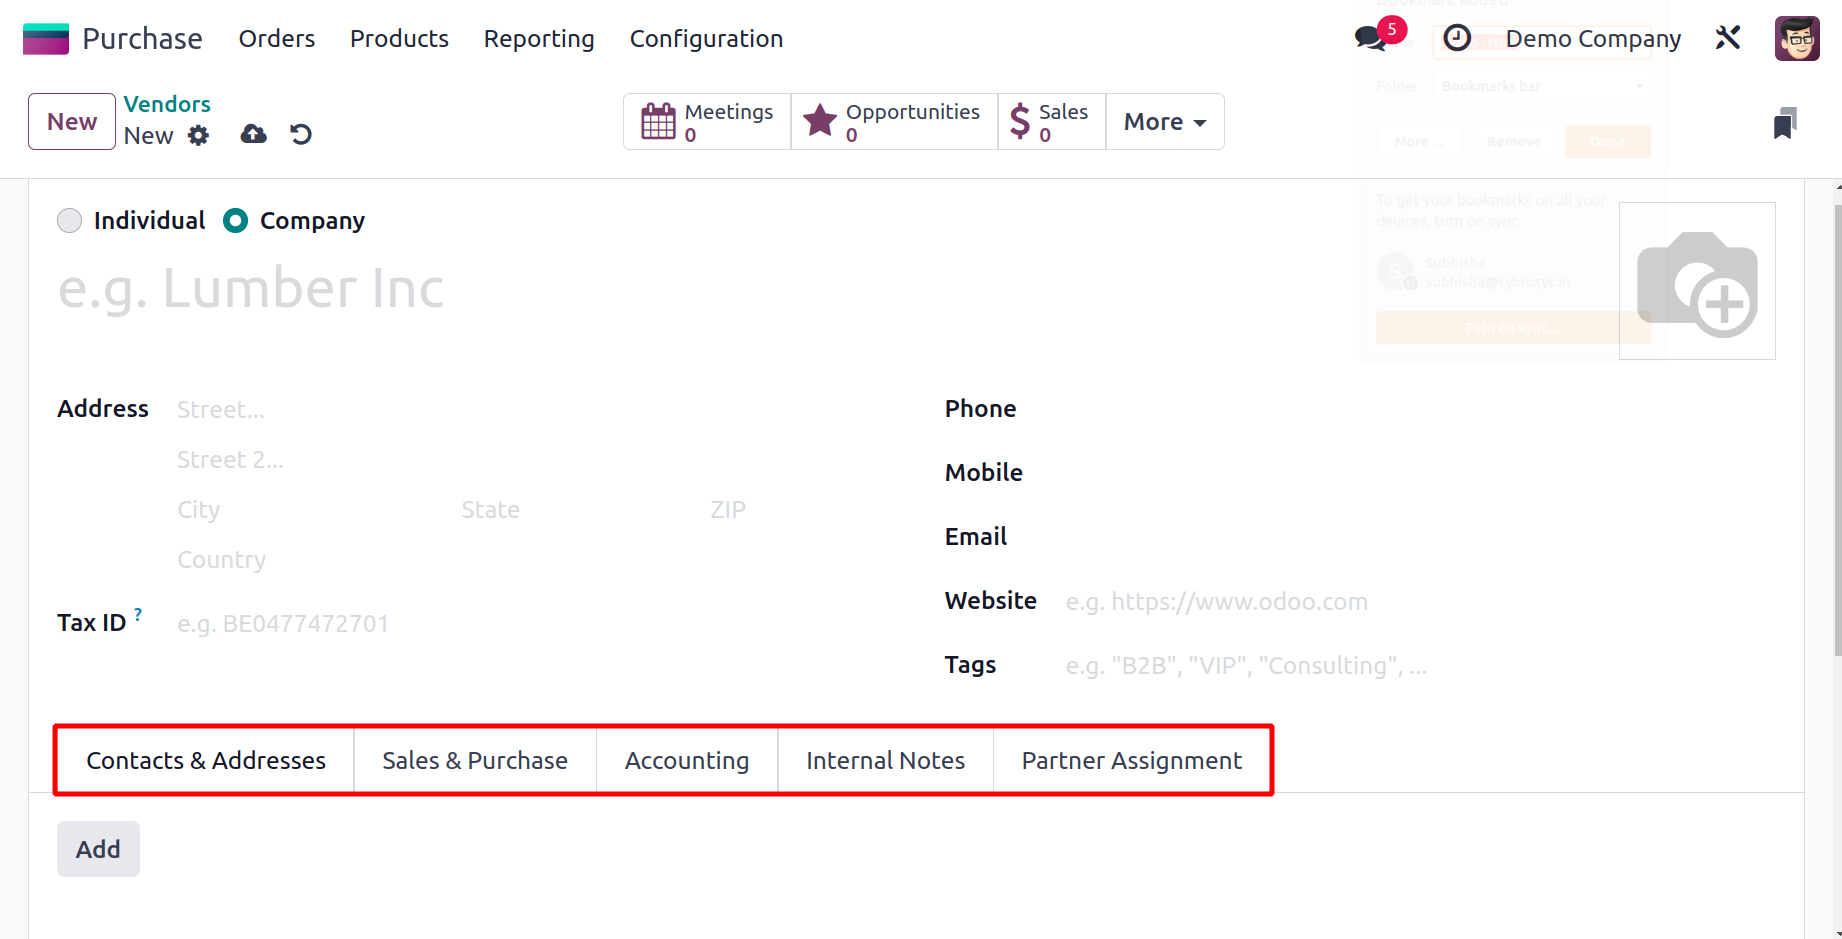
The process for setting up a new vendor in the Purchase module is the same as the process for setting up customers in the Sales module. By using the procedures we covered in the Sales chapter, you can fill out the Contacts & Addresses, Sales & Purchases, Accounting, Internal Notes, Partner Assignment, and Membership tabs.
After completing the configuration procedure, you will receive some more smart buttons on the vendor profile, as seen in the figure below.
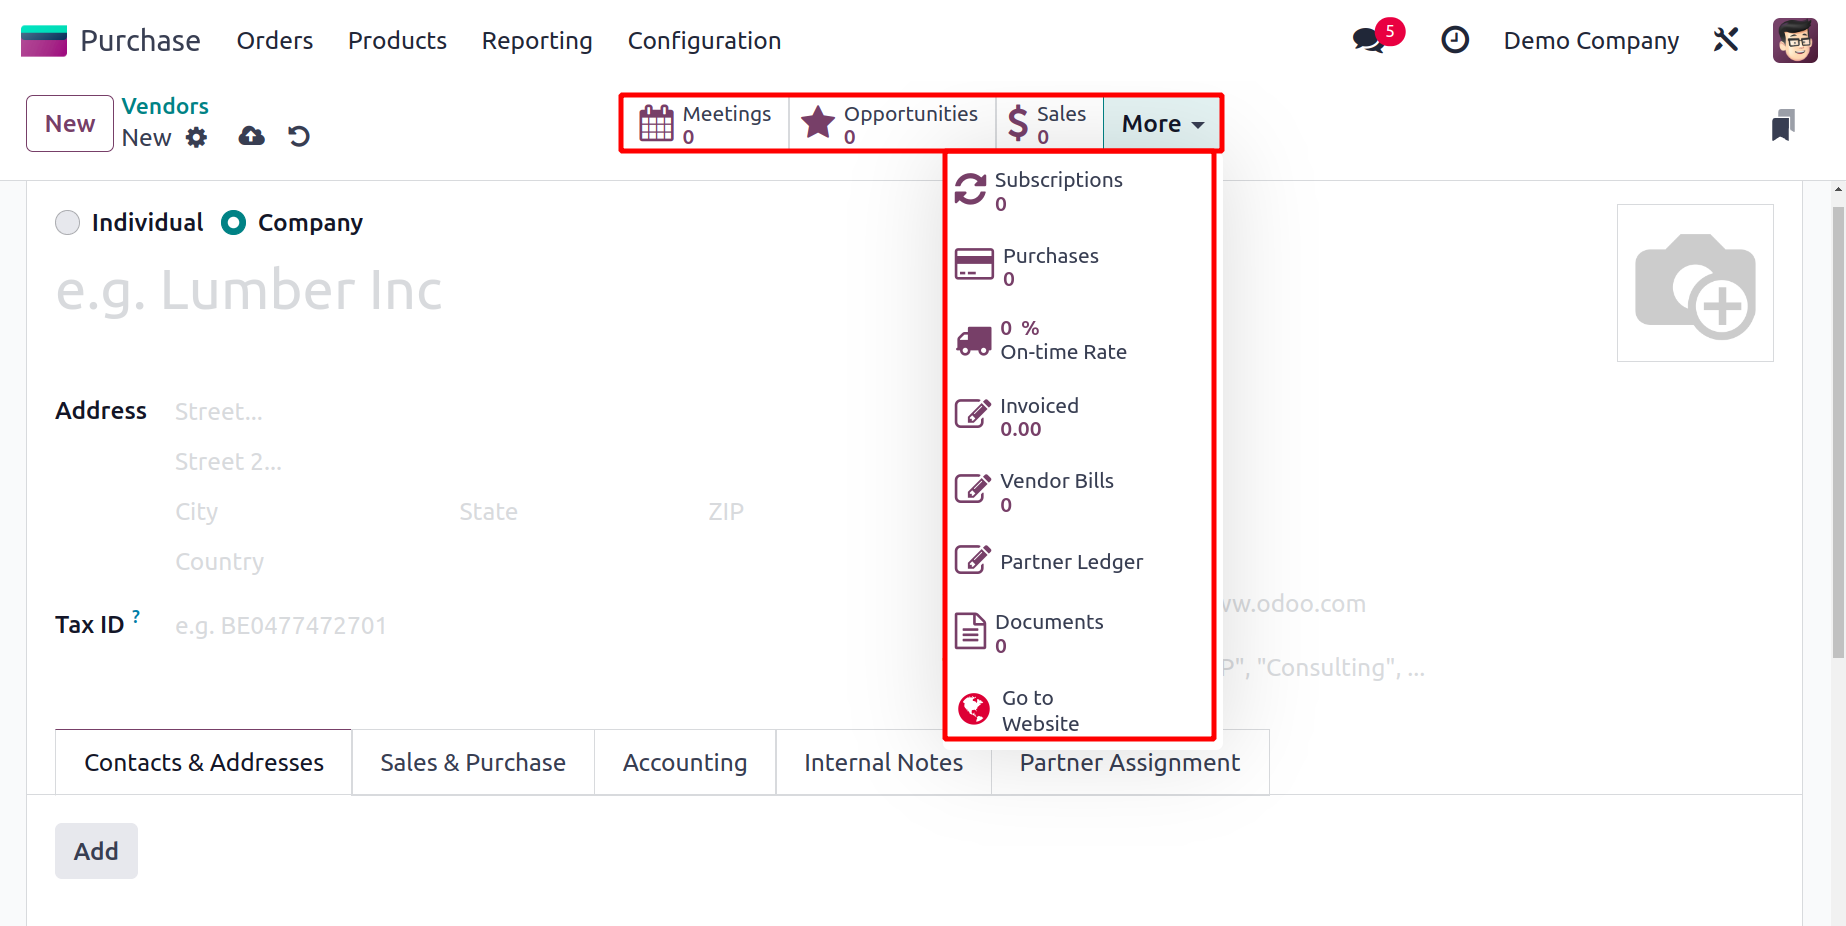
All appointments with this vendor will be listed under the Meetings button. The relevant smart buttons can be used to view the total number of opportunities, sales, subscriptions, events, tasks, and tickets generated by this vendor. Additional smart buttons, such as Purchases, On-time Delivery, Due, Invoiced amount, Vendor Bills, Ledger, Certificates, Documents, and Direct Debit Mandates, are displayed when you select the More option.
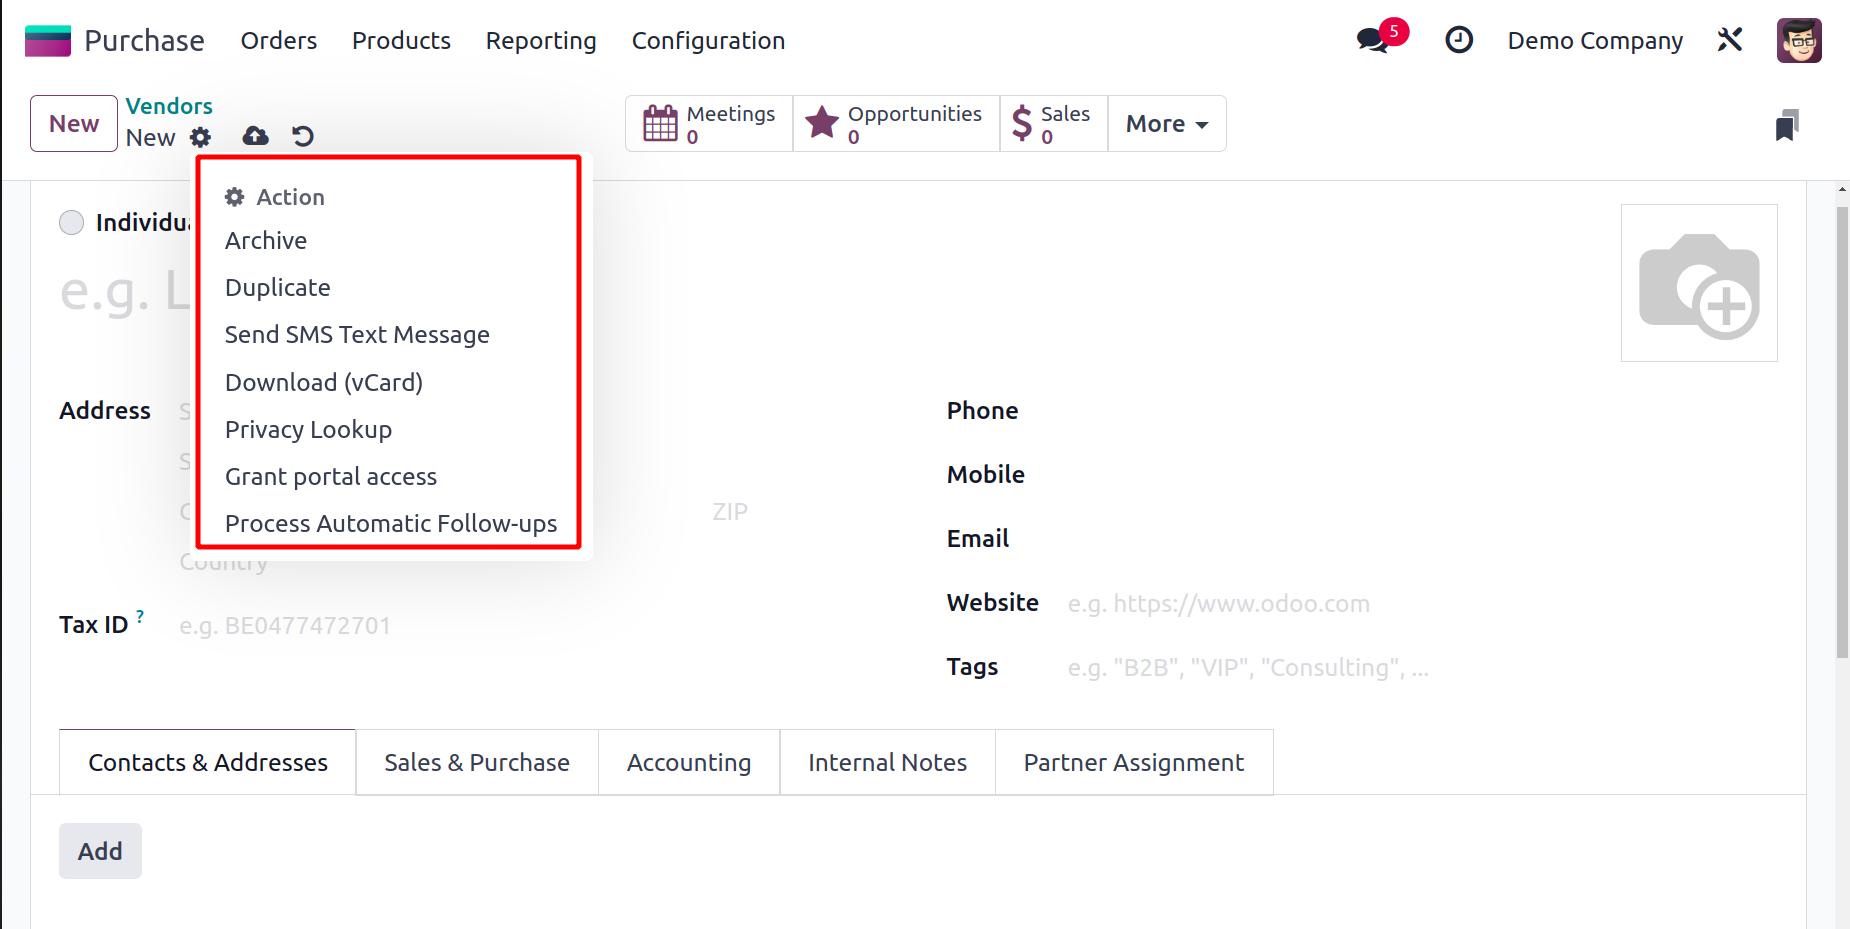
Under the Action button, you can find a selection of unique operation tools. You can use this button to access the following features: Process Follow-ups, Duplicate, Delete, Send SMS Text Messages, Payslip lines, Download (vCard), Privacy Lookup, and Archive.
In the Purchase module, we handle vendors in a similar manner. Let's now discuss how to handle the vendor price list in Odoo 17.
Vendor Price List
One of the essential elements in running a company's sales activities properly and profitably is the price list. You can define a set of prices for particular vendors for a particular length of time on particular products with the aid of vendor price lists. Specific vendor price lists are applied when purchasing products from a vendor. By using the Configuration menu in the Purchase module, you can easily build these vendor price lists.
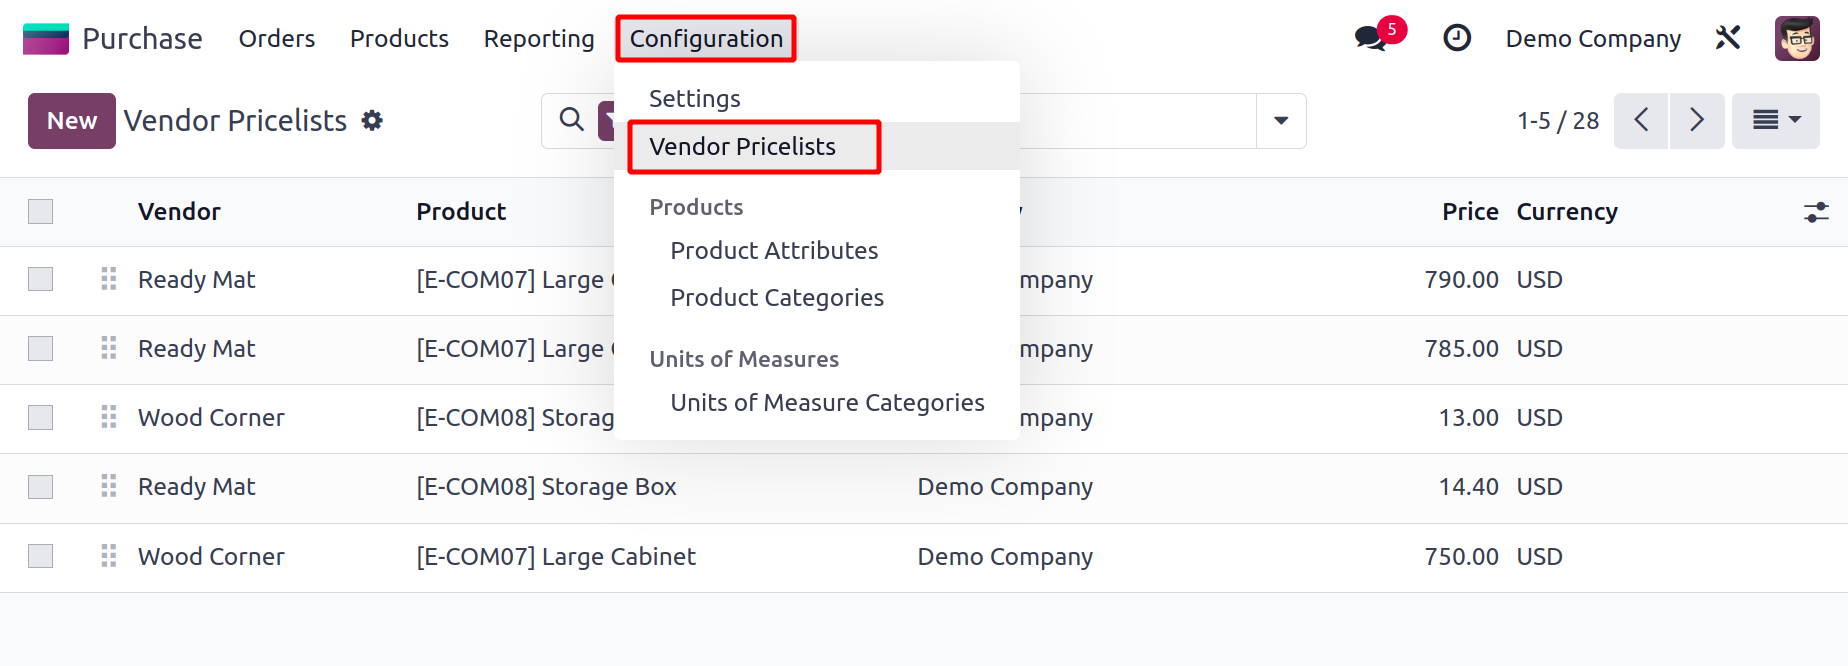
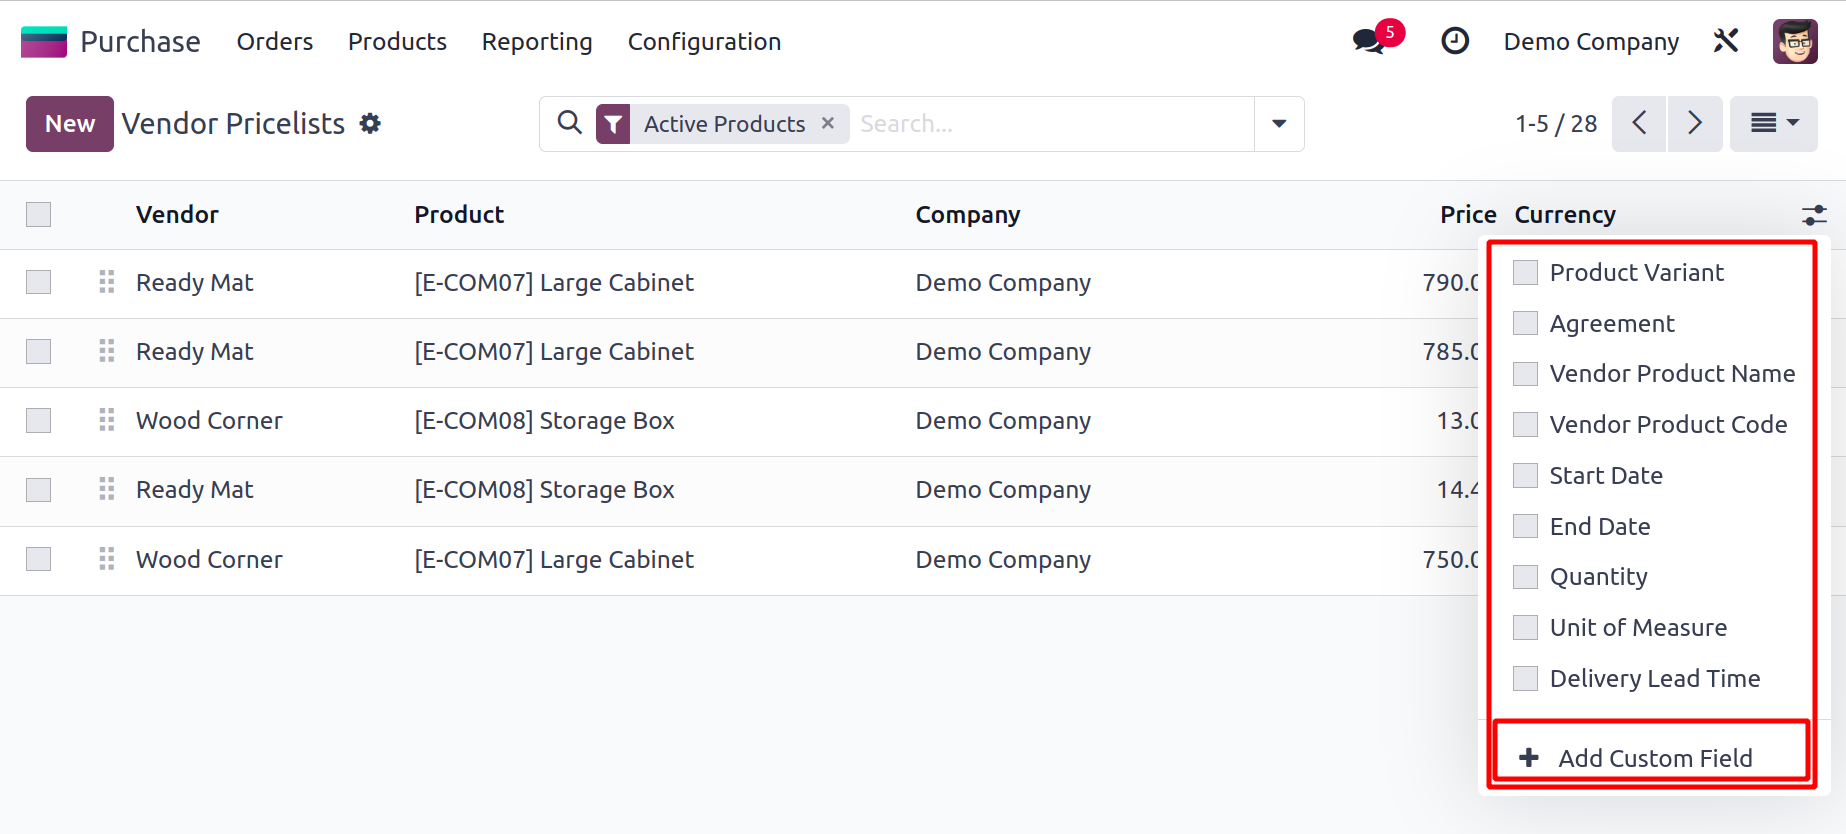
The Configuration menu will have a Vendor Price Lists option as shown in the image above. When you select this option, Odoo17 will show you the vendor price lists window, where you can see a list view of the vendor, subcontractor, product, currency, company, quantity, units of measure, and price details.
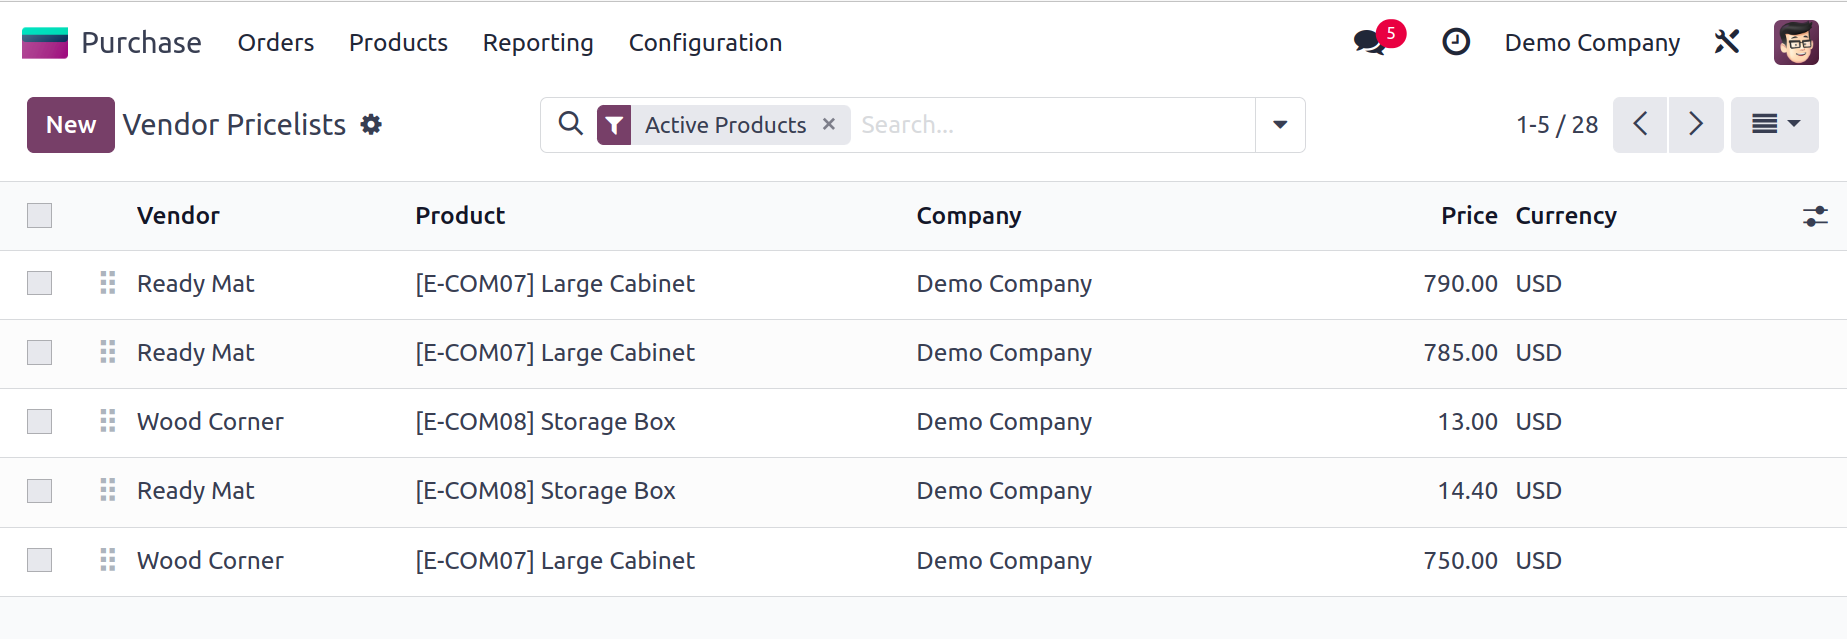
Using the Add Custom Field button shown in the above image, Odoo17 enables you to add custom fields to your list view. You can either activate the options from the options displayed in the screenshot above or build a new custom field if you want to add more fields to the list view. You can use the standard and configurable filters and group by options in this platform just like you do on any other platform in Odoo 17.
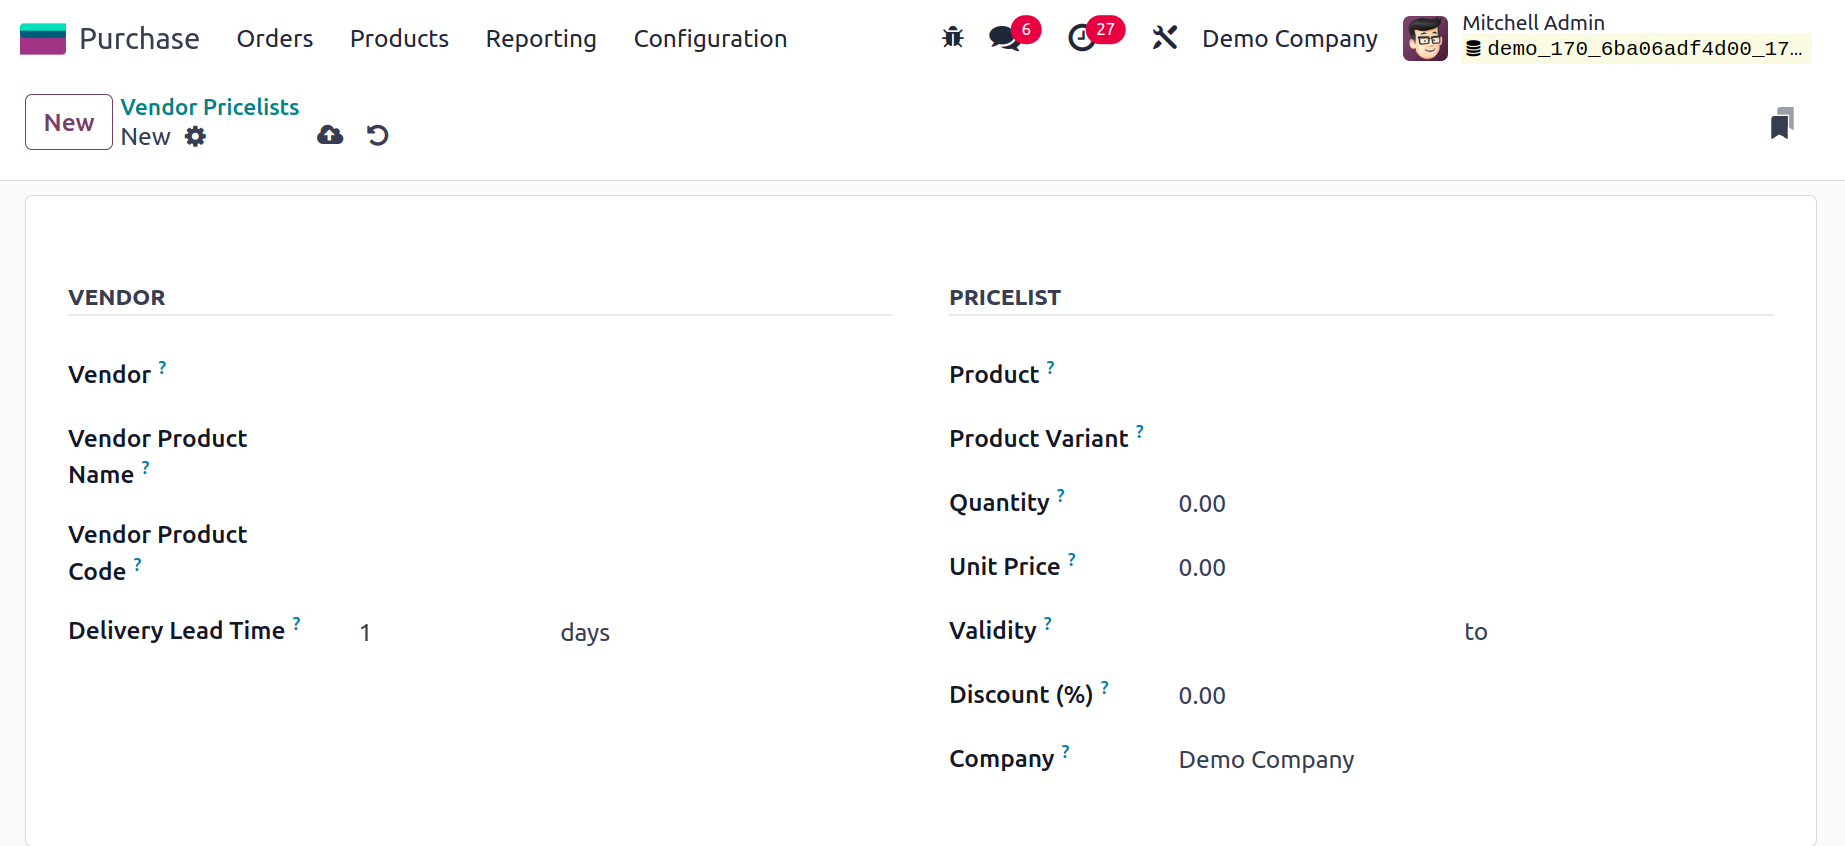
Then, using this vendor price list, you may include the Vendor Product Name that will be utilized when printing a request for quotation. If you want to use the internal one, you can leave it empty. The Vendor Product Code may also be mentioned in the relevant area. In the space provided, enter the delivery lead time in days. It is the average number of days between the creation of the delivery order and the confirmation of the purchase order.
You can list the Product and its Variants that you want to include in this vendor's price list under the Pricelist tab. Additionally, you can specify in the Quantity area how much of the product you plan to buy from this merchant. Include the Unit Price, Pricelist Validity, Discount, and Company in the relevant columns. You can save the updated vendor price list with the aid of the Save button.
Check out the Purchase module's request for the quotation creation process now.
Request for Quotation
To have a good understanding of the items and their service, you may send a Request for quotation to a specific supplier if you want to buy any product from them. The Odoo 17 Purchase module is wholly reliable for generating these requests for bids. You can use Odoo17 to ask various vendors for quotes, which will help you choose the best service provider for your purchase.
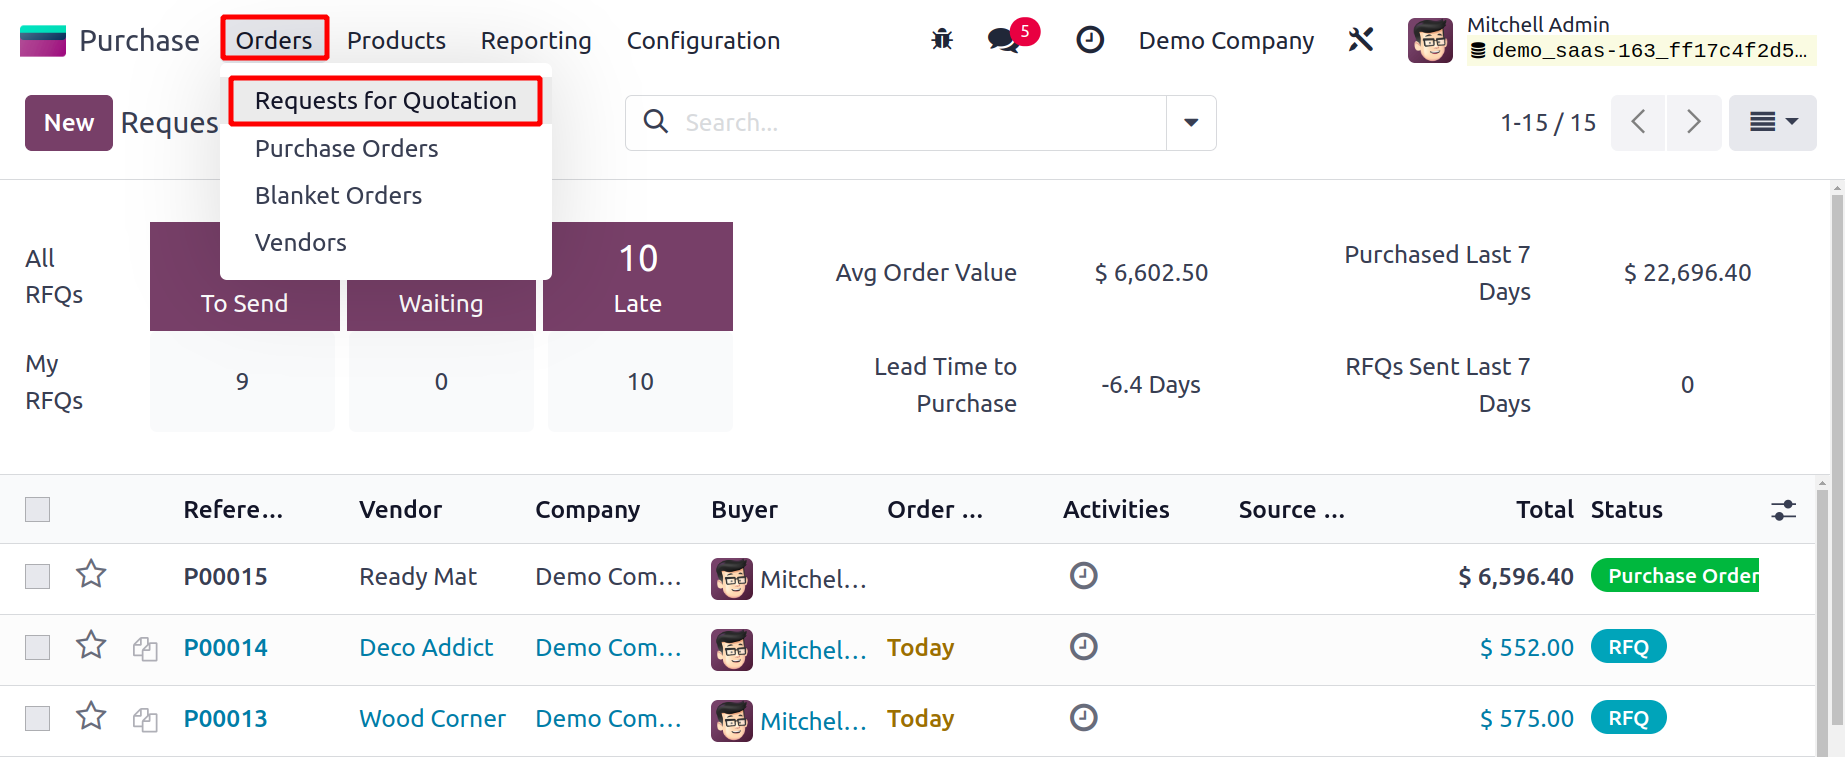
You will have a dedicated platform for the management of each RQF built in the Odoo17 Purchase module. The Orders menu will give you access to this platform. The graphic below demonstrates how Odoo17 will arrange all of your RFQs so that you can quickly and orderly monitor all operations.
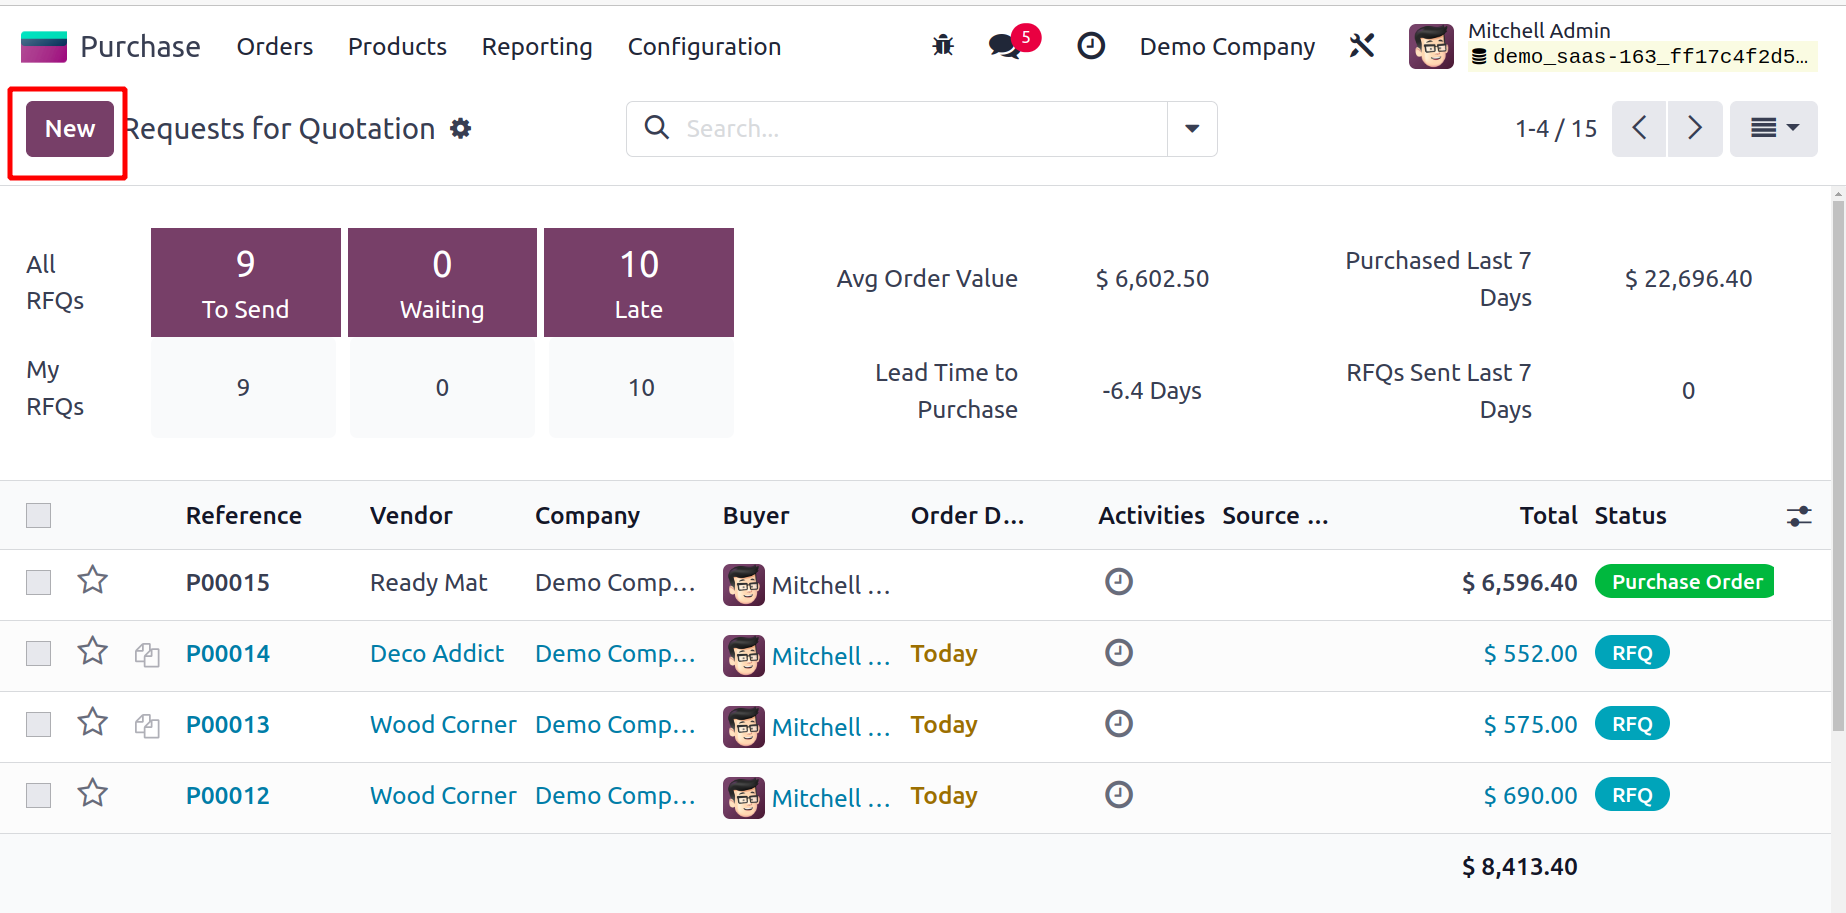
You can see a list view of the Request for Quotation in the image above along with details about each RFQ's Reference, Vendor, Company, Buyer, Order Deadline, Activities, Source Document, Total, and Status. The user can switch the platform's view into the Kanban, Pivot, Graph, Calendar, and Activity views in addition to the List view, depending on demand.
You will benefit from the Filters and Group By option's default and custom capabilities, which will help you streamline the search process. Using these sorting options, you may quickly find the necessary data from the accessible RFQs.
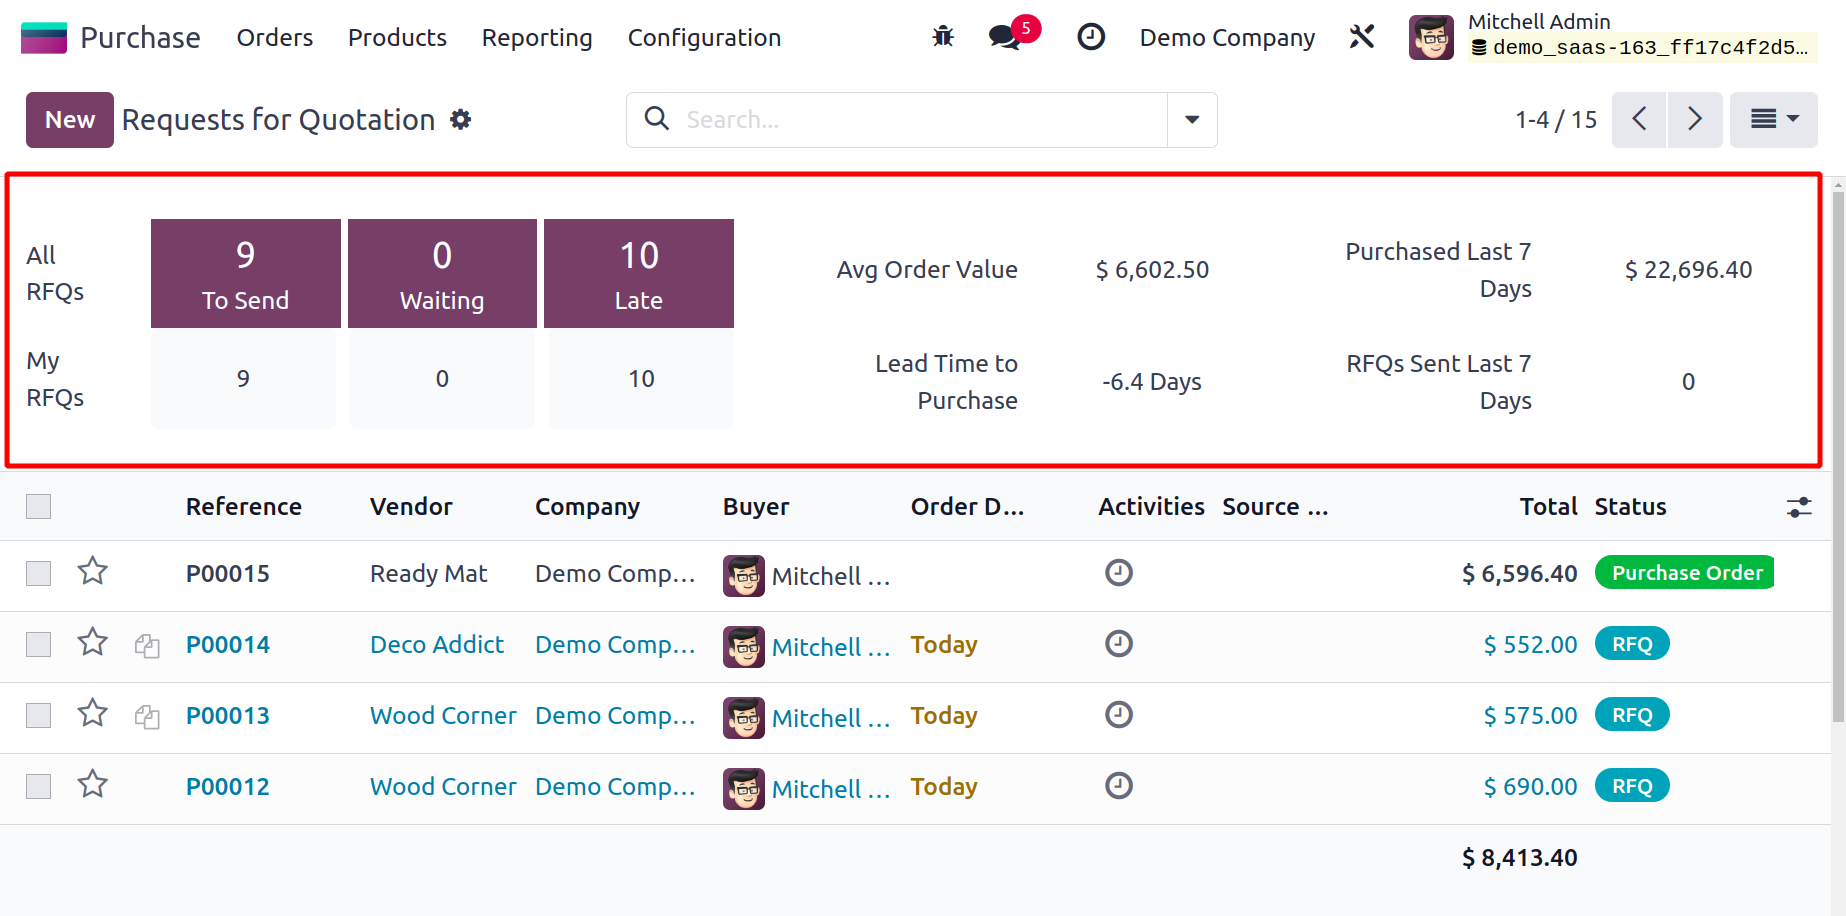
You can find the total number of All RFQs as well as My RFQs (the RFQs that you have either produced or been assigned) in the RFQ window, as indicated in the image above. These fields will separately display the total number of RFQs to be sent to the appropriate vendors, RFQs awaiting vendor confirmation, and late RFQs. You will also receive information on the Average Order Value, Products Purchased in the Past 7 Days, Lead Time to Purchase, Total RFQs Sent in the Past 7 Days, and the Avg. Lead Time in Days from Order Confirmation to Purchase.
You can prioritize your RFQs by using the star icon on the list view's left side.
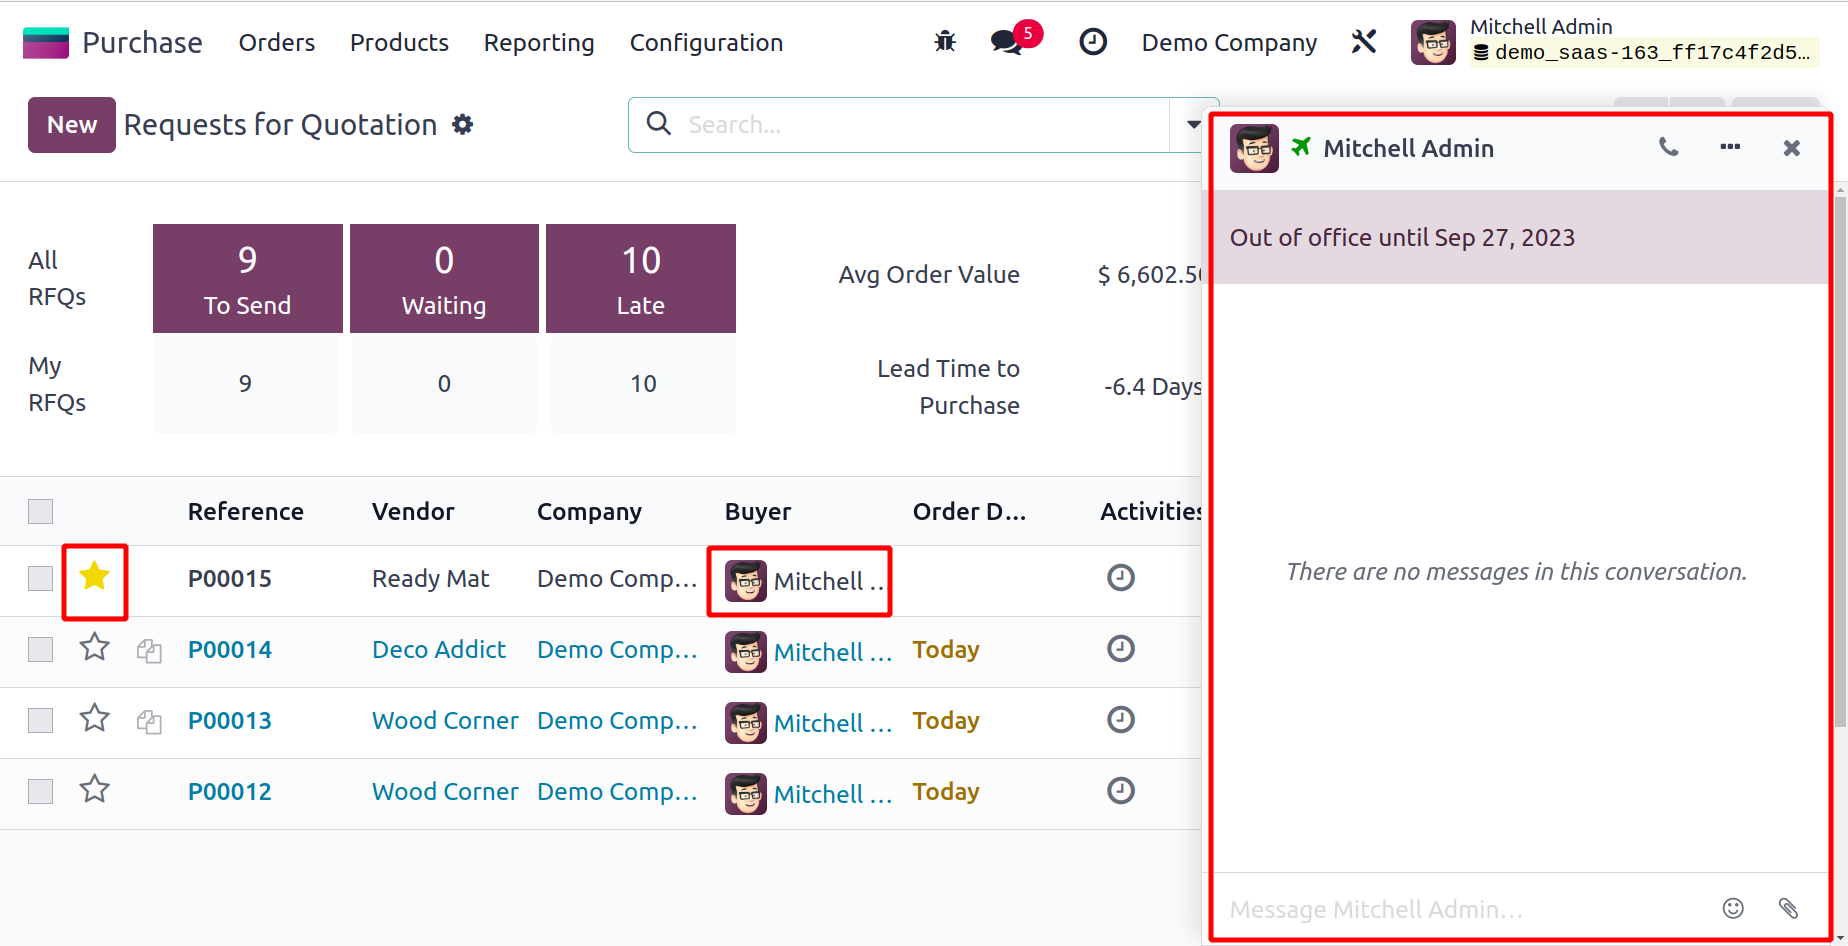
Odoo17 provides a simple method for getting in touch with the buyer right from the RFQ preview. When you click on the buyer's name, a chat window similar to the one in the image above will open, allowing you to communicate with the buyer.
Let's now talk about issuing a fresh request for quotes. You can choose the necessary RFQ from the provided list and use the Edit button to make modifications to the ones that have already been produced. In this section, we'll talk about setting up a fresh request for quotes. You must click the New button to achieve that, and Odoo17 will then direct you to a new creation window as seen below.
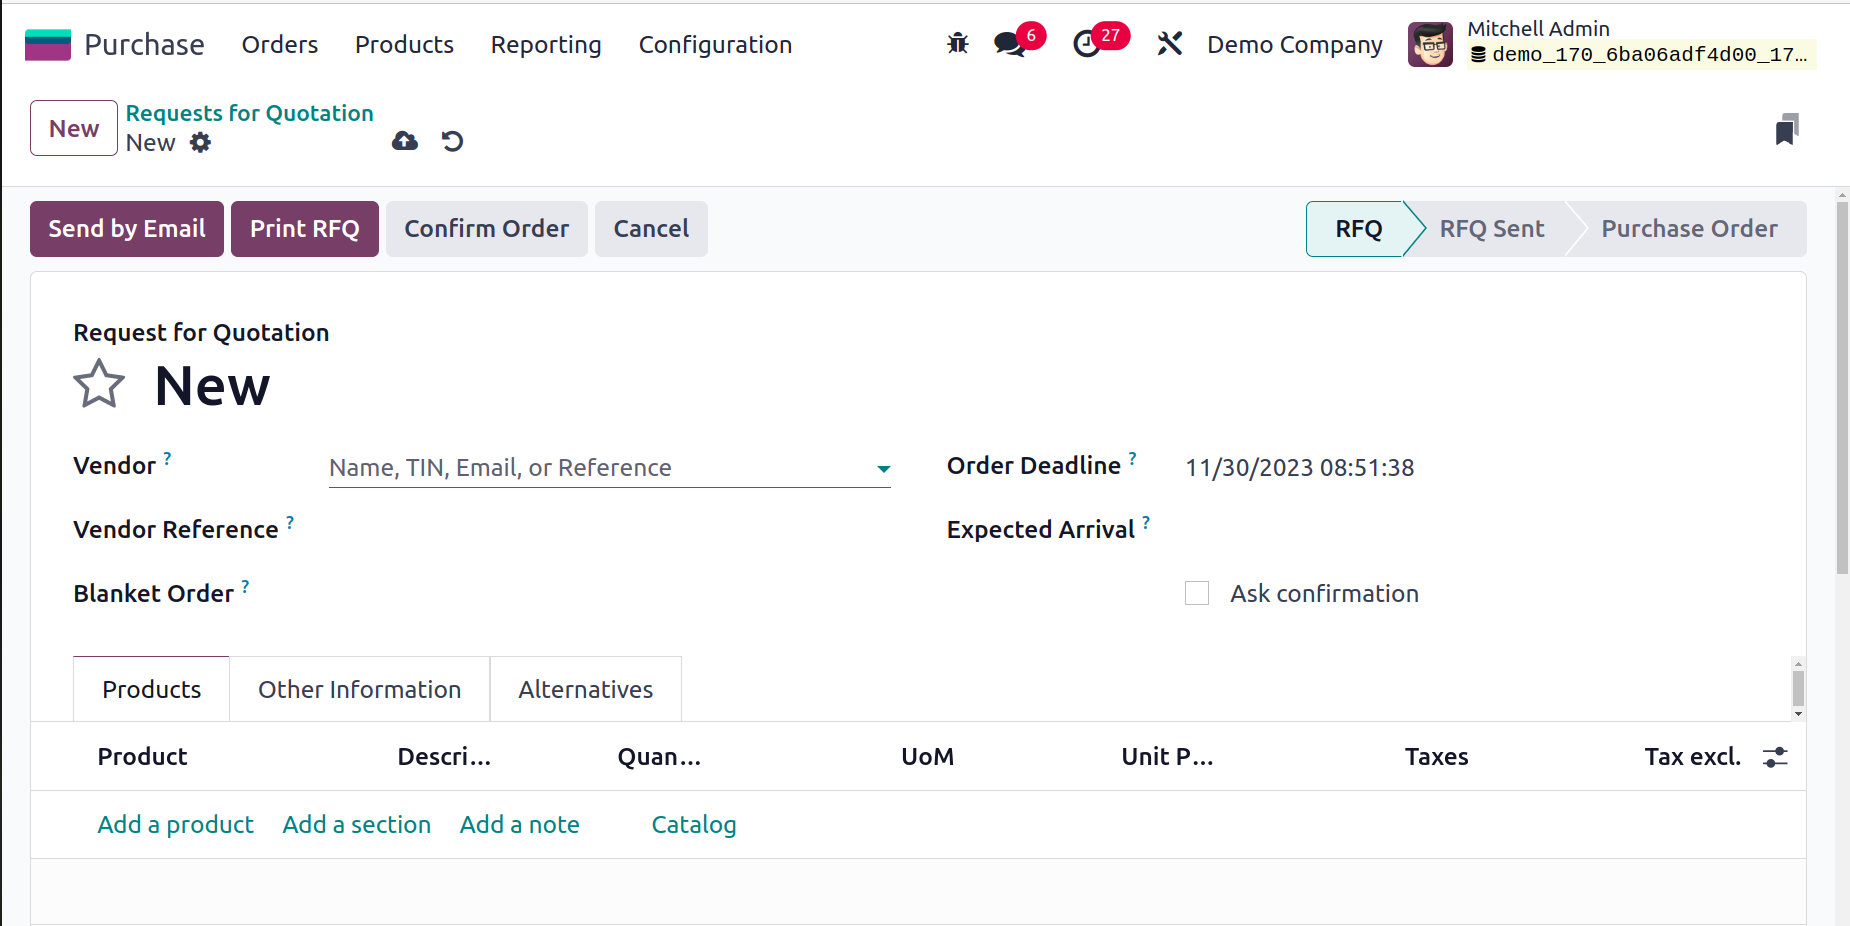
In the previous section, we previously covered vendor configuration. You can choose an appropriate vendor here by choosing from the list of vendors set in the Vendor field of the Purchase module. You can provide a reference to the sales order or bid that the vendor sent in the vendor reference section. As this reference is typically placed on the delivery order sent by your vendor, it is used to match the products when you receive them. You can choose a draft agreement that has been approved by both parties in the Purchase Agreement section. You can manage and set up purchase agreements on an additional platform in Odoo17, which we'll cover later.
The matching field allows you to define the Currency that is appropriate for your buying procedures. The Order Deadline column shows how long the quotation has to be approved before it can be turned into a purchase order. The delivery date provided by the provider is shown under Expected Arrival. Using the Ask Confirmation option, you can request that the seller confirm the date by automatically sending a confirmation email. The operation type of the incoming shipment will be determined by the stock-picking type specified in the Delivery To field.
Using the Add a Product button under the Products tab, you may specify the products you want to buy from the specific vendor. The catalog allows the users to easily select products, which is the same as mentioned in the Sales module.
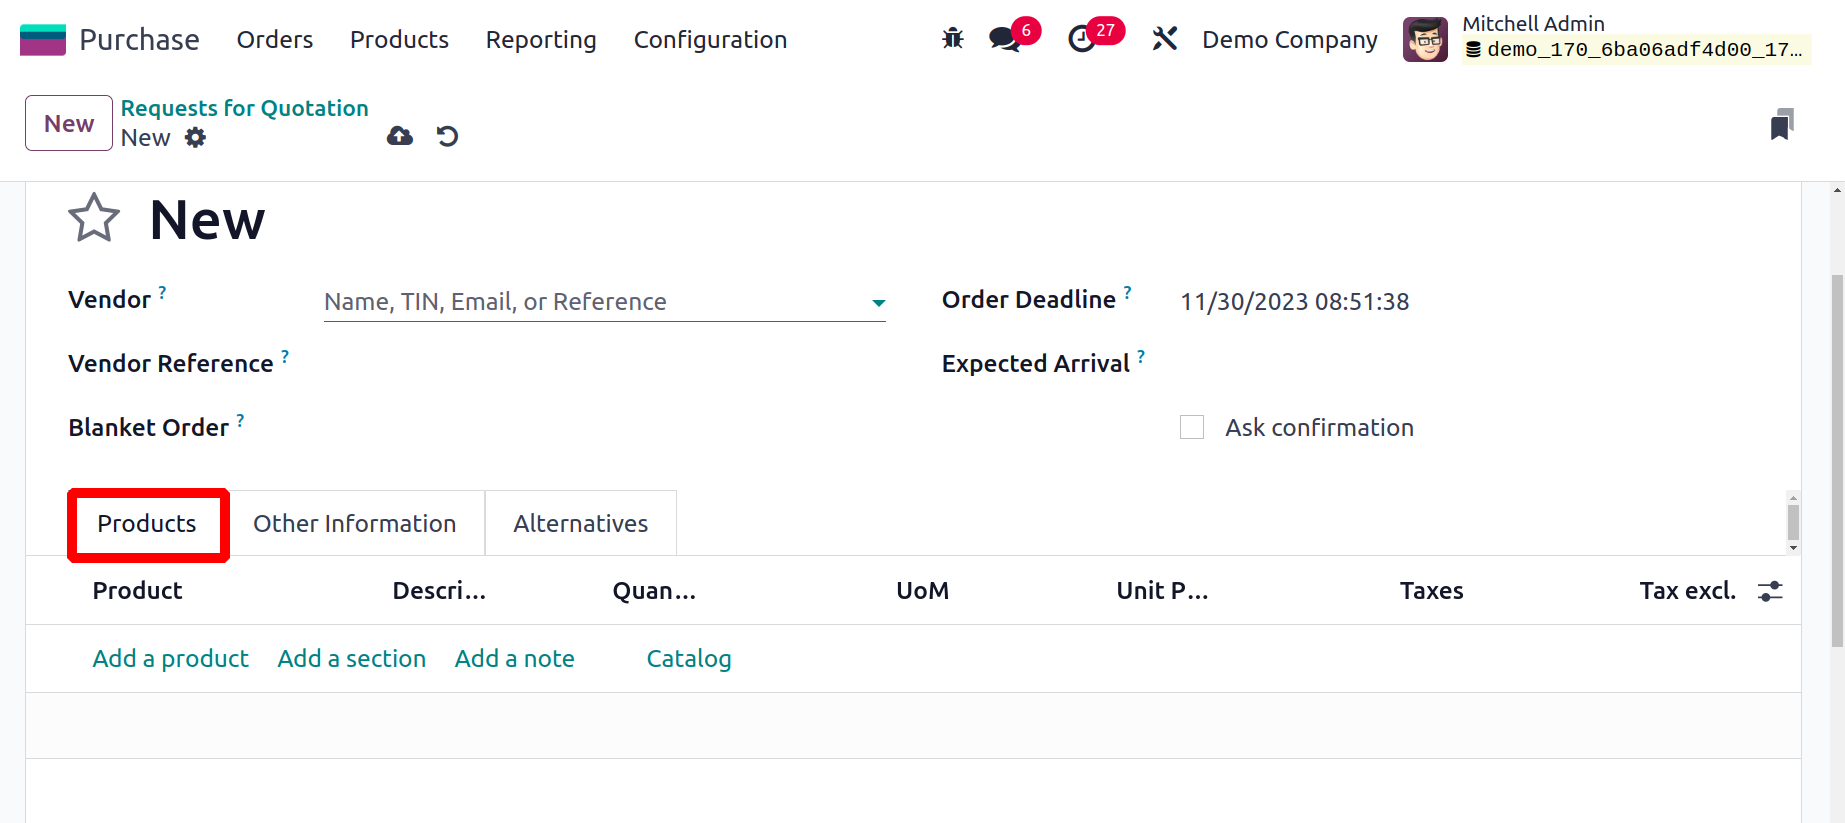
Details about the Product, Description, Quantity, UoM, Unit Price, Taxes, and Subtotal will be included in the Product Line. The total cost of the purchase will be displayed under the Products tab on the right side of the screen after all items have been added. Under the Products tab, sections and notes can be added using the Add a Section and Add a Note buttons, respectively. The terms and conditions for this purchase will be specified in a separate area on this tab.
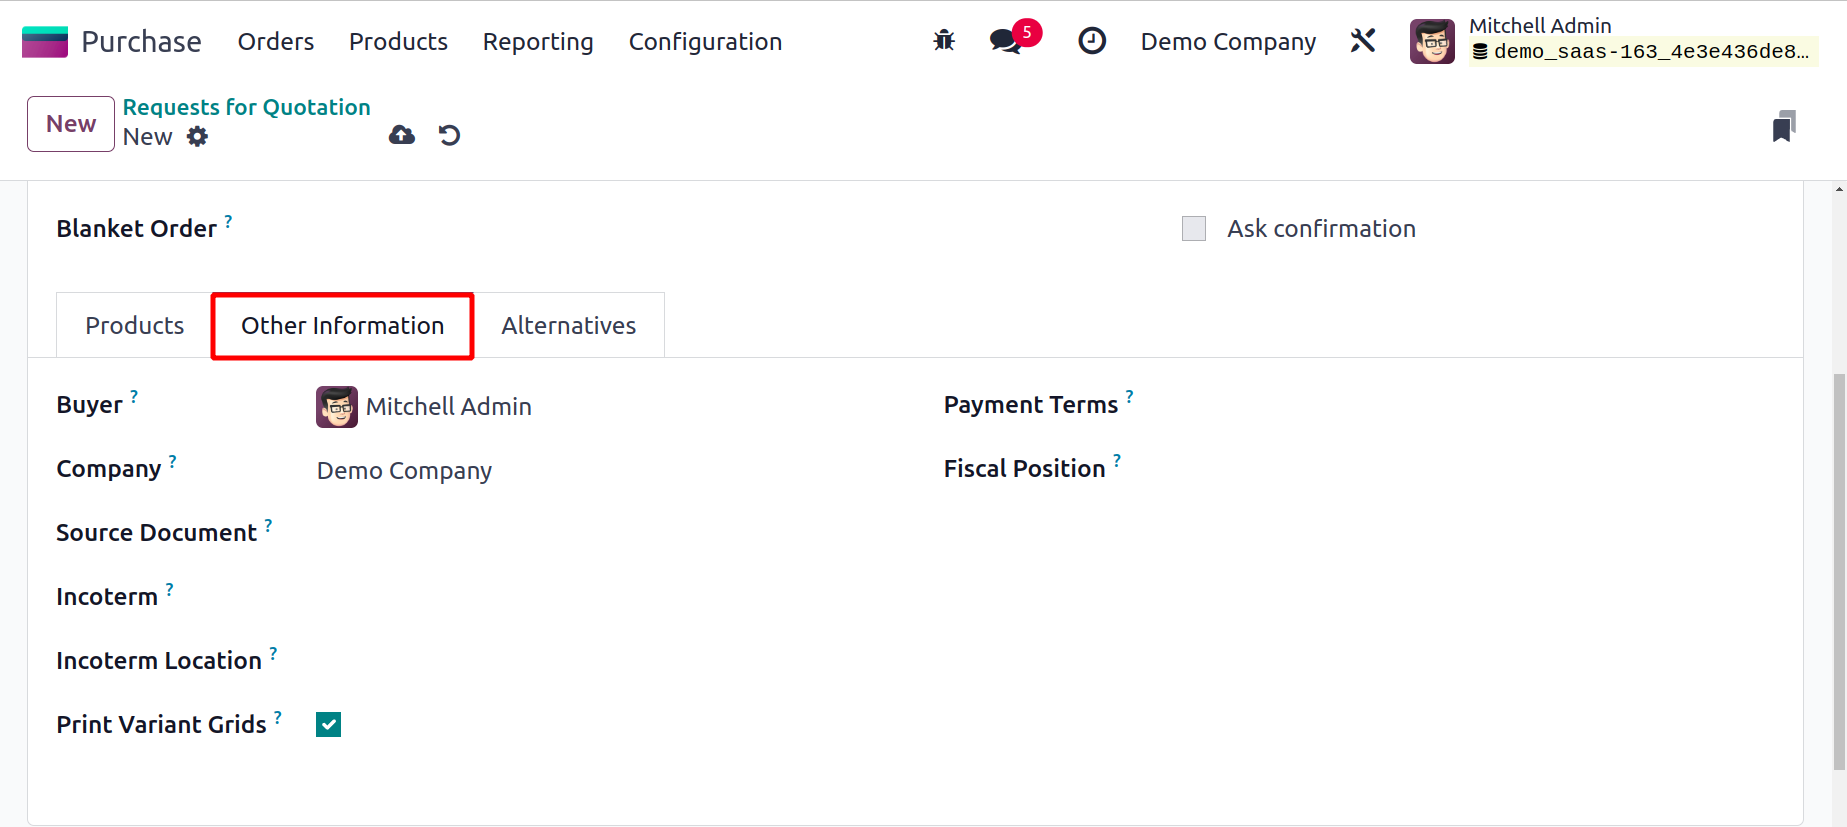
Under the Other Information tab, you may provide more information about the quotation. Here, you can fill in the appropriate fields with the names of the Buyer, Company, and Source Document. The adjustable product matrix will appear on the order report if the Print Variant Grids field is selected. You can enter both the international commercial term and the Incoterm Location in the Incoterm field, which is a list of predefined commercial terms used in international transactions. According to the agreement, the Purchase form section allows you to choose either Commission or Procurement as the form of purchase. The related variables allow you to specify the payment terms and fiscal positions utilized for this purchase procedure.
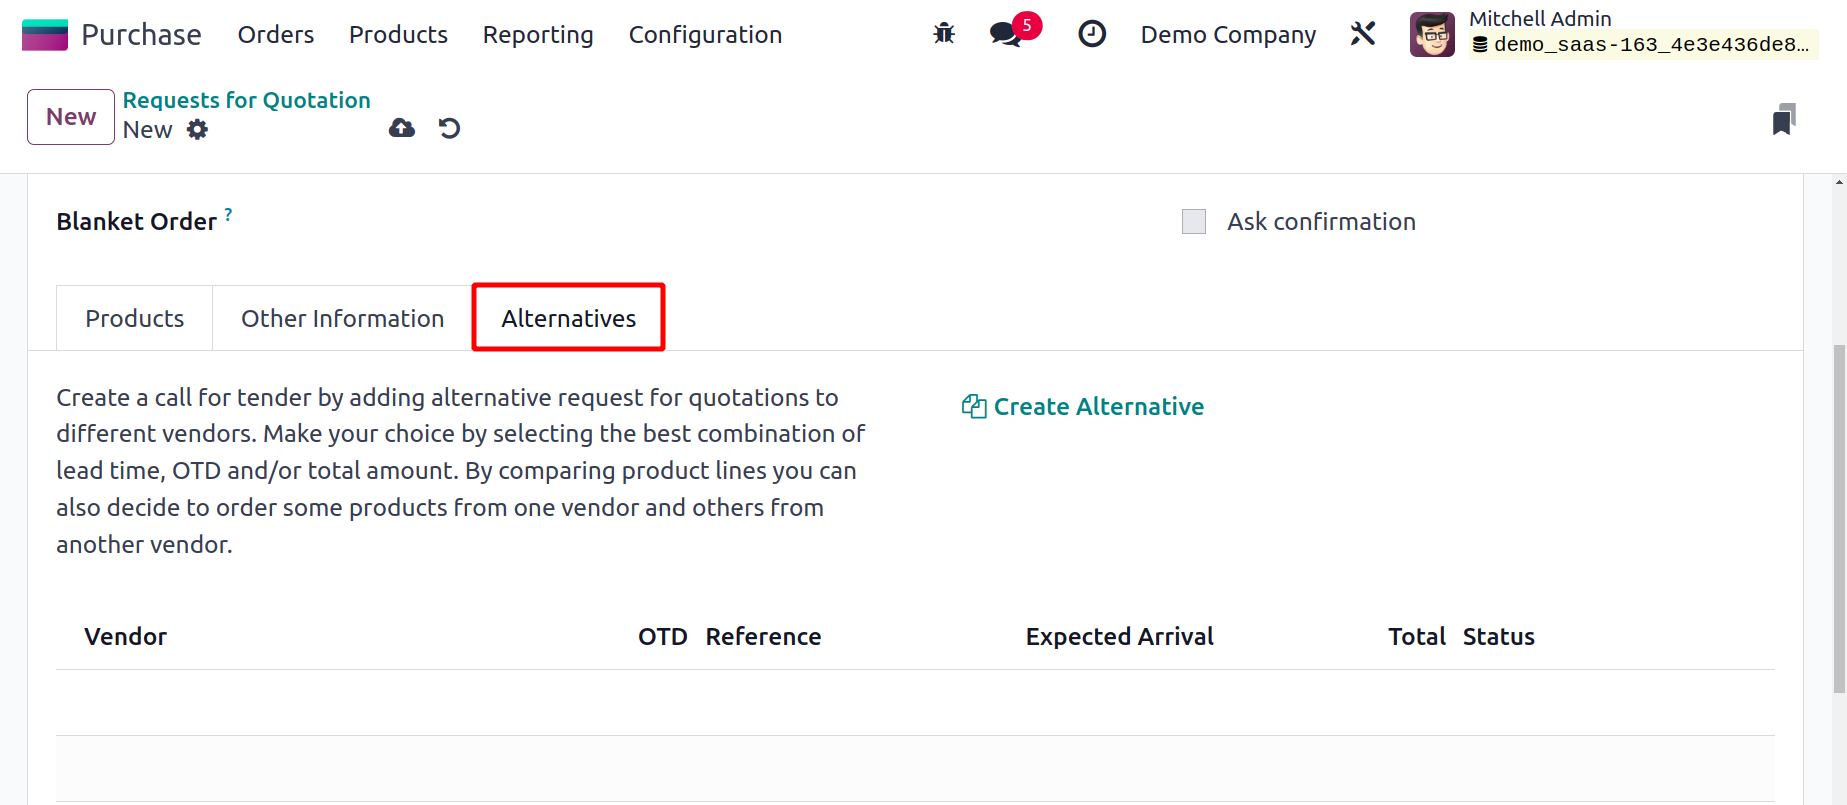
The Odoo 17 Purchase module now has a new feature called the Alternatives tab. Here, you can add more purchase orders for the exact same goods from various sellers. This page will assist you in creating a request for proposals by allowing you to add alternative requests for quotes from other vendors. The best lead time, OTD reference, and total amount combinations can be used to make your options.
You can quickly select to order some products from one vendor and others from another vendor by comparing the product lines of other providers. You can open a wizard-like shown below by clicking the Create Alternative button to generate alternatives.
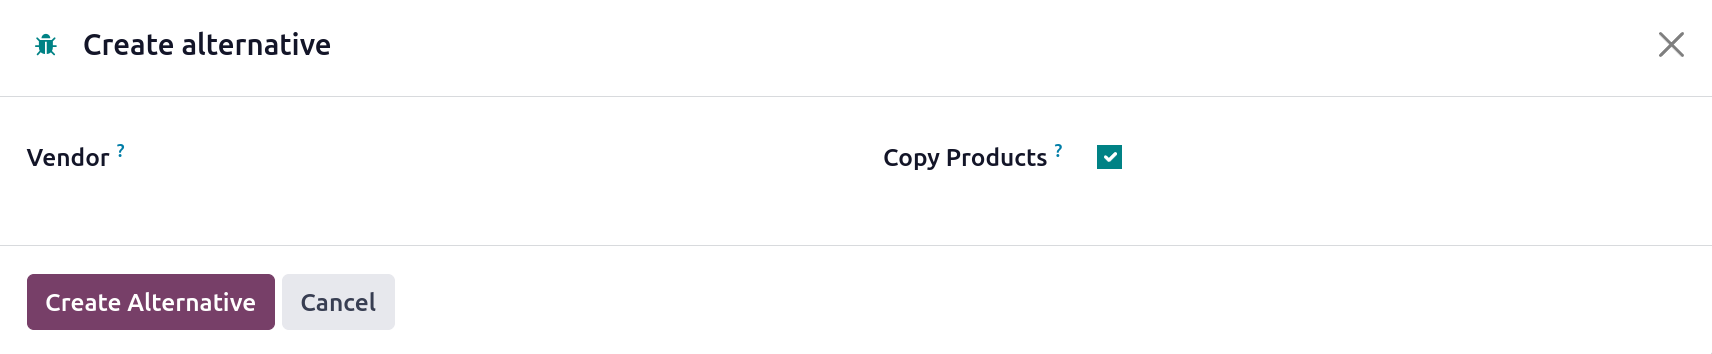
In this section, you can pick a vendor for the different purchase orders. To duplicate the product quantities from the original purchase orders, select the Copy Products option. Click the Create Alternative button to continue. The alternative purchase orders will be shown under the Alternatives tab as shown below, once you've finished creating them.
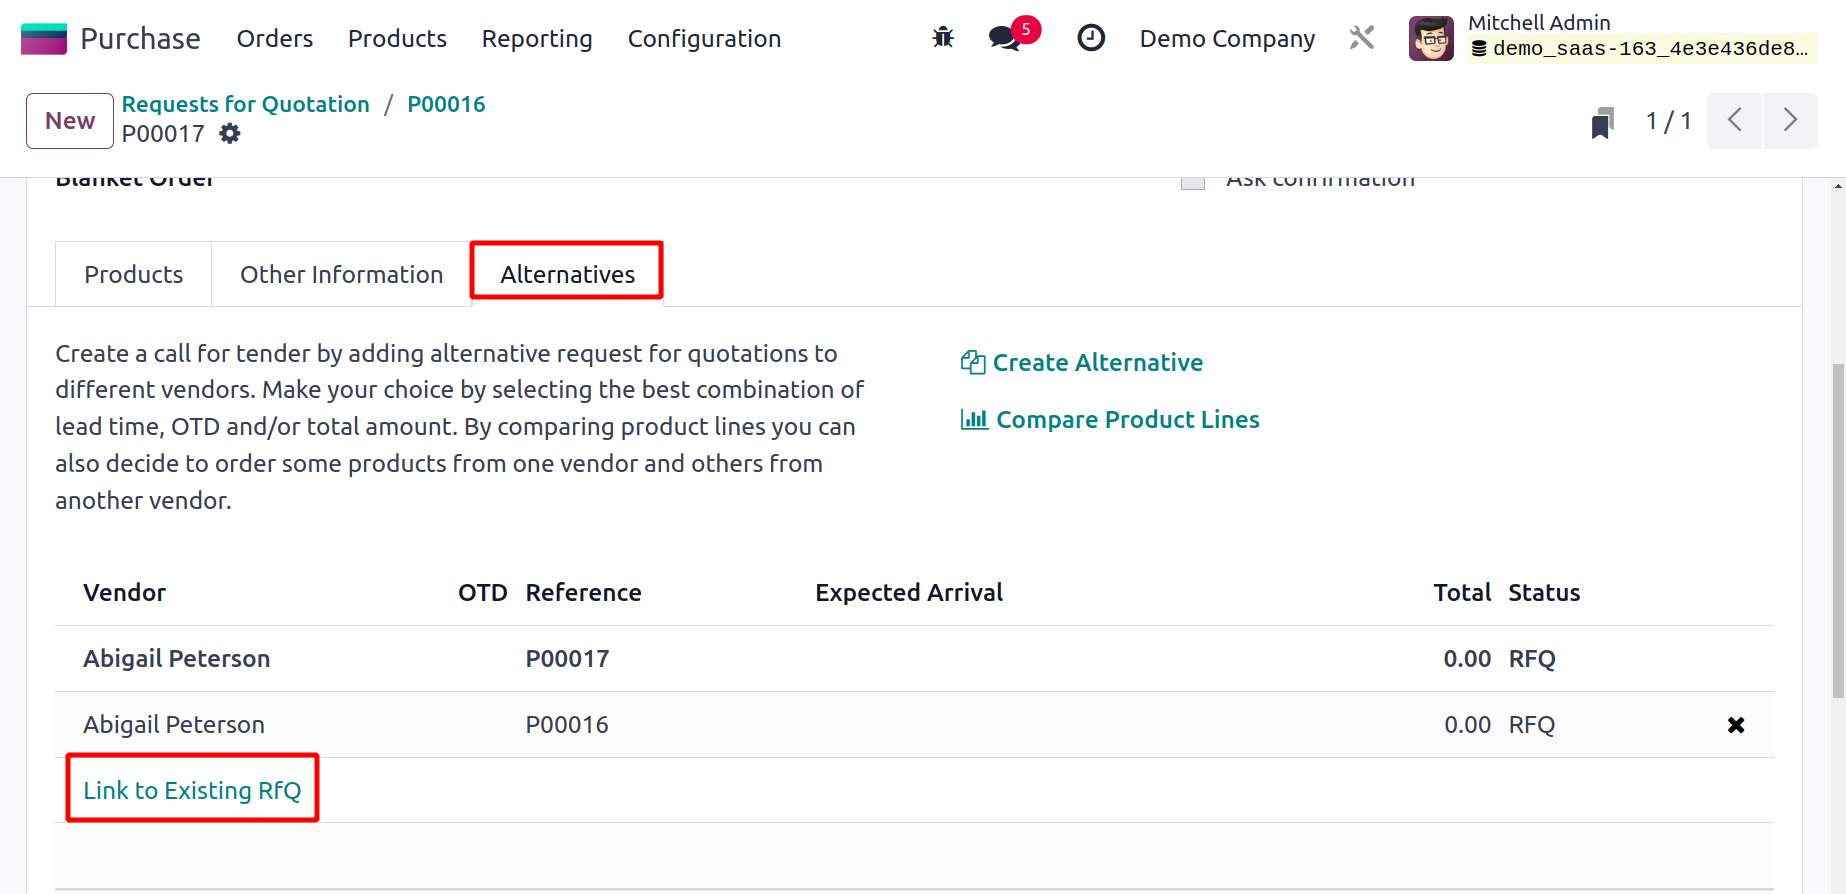
Purchase orders can be linked to alternative POs by using the Link to Existing RFQ button. An option selection pop-up will show when you click on this button. From this pop-up, you can choose appropriate substitutions to add to the Alternatives tab.
The Compare Product Lines button in Odoo17 enables you to compare the product line. By clicking this button, you will be taken to a page that compares two purchase orders and displays a list view of them together with information on the product, vendor, OTD reference, description, anticipated arrival, quantity, unit of measurement, unit price, total, and currency.
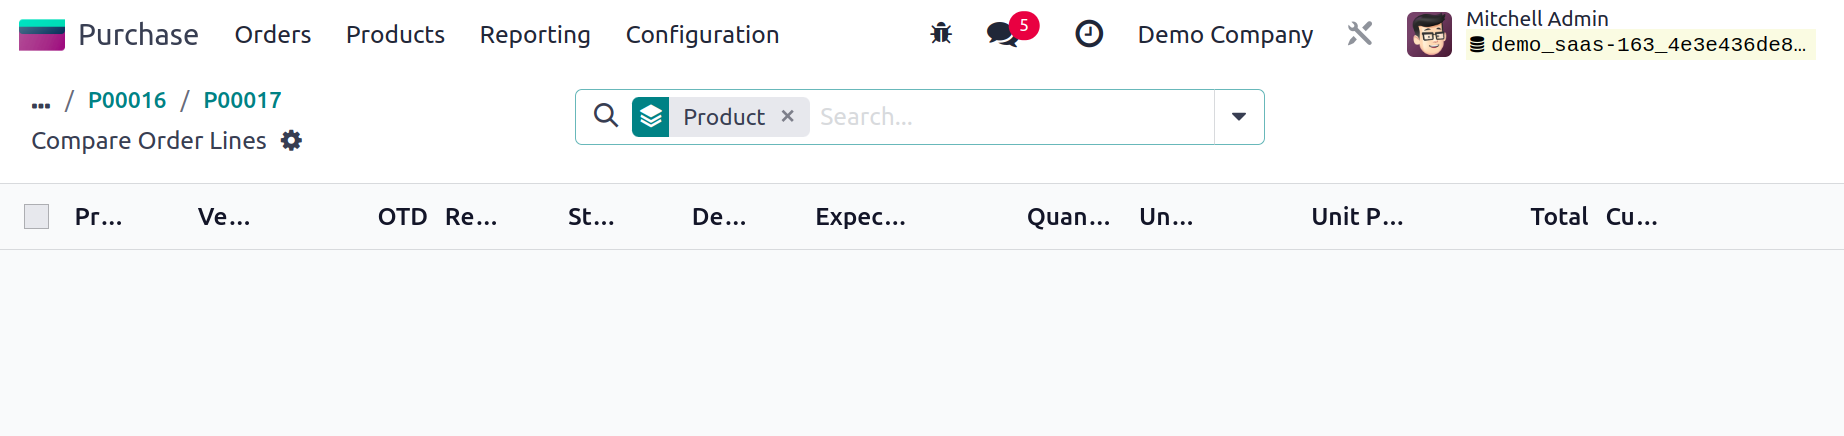
By selecting the Choose button, you can choose from the available options instead of using the original purchase order. You can remove the options by using the Clear button.
When you have finished filling out all of the fields on the Request for Quotation form, click the Save button.
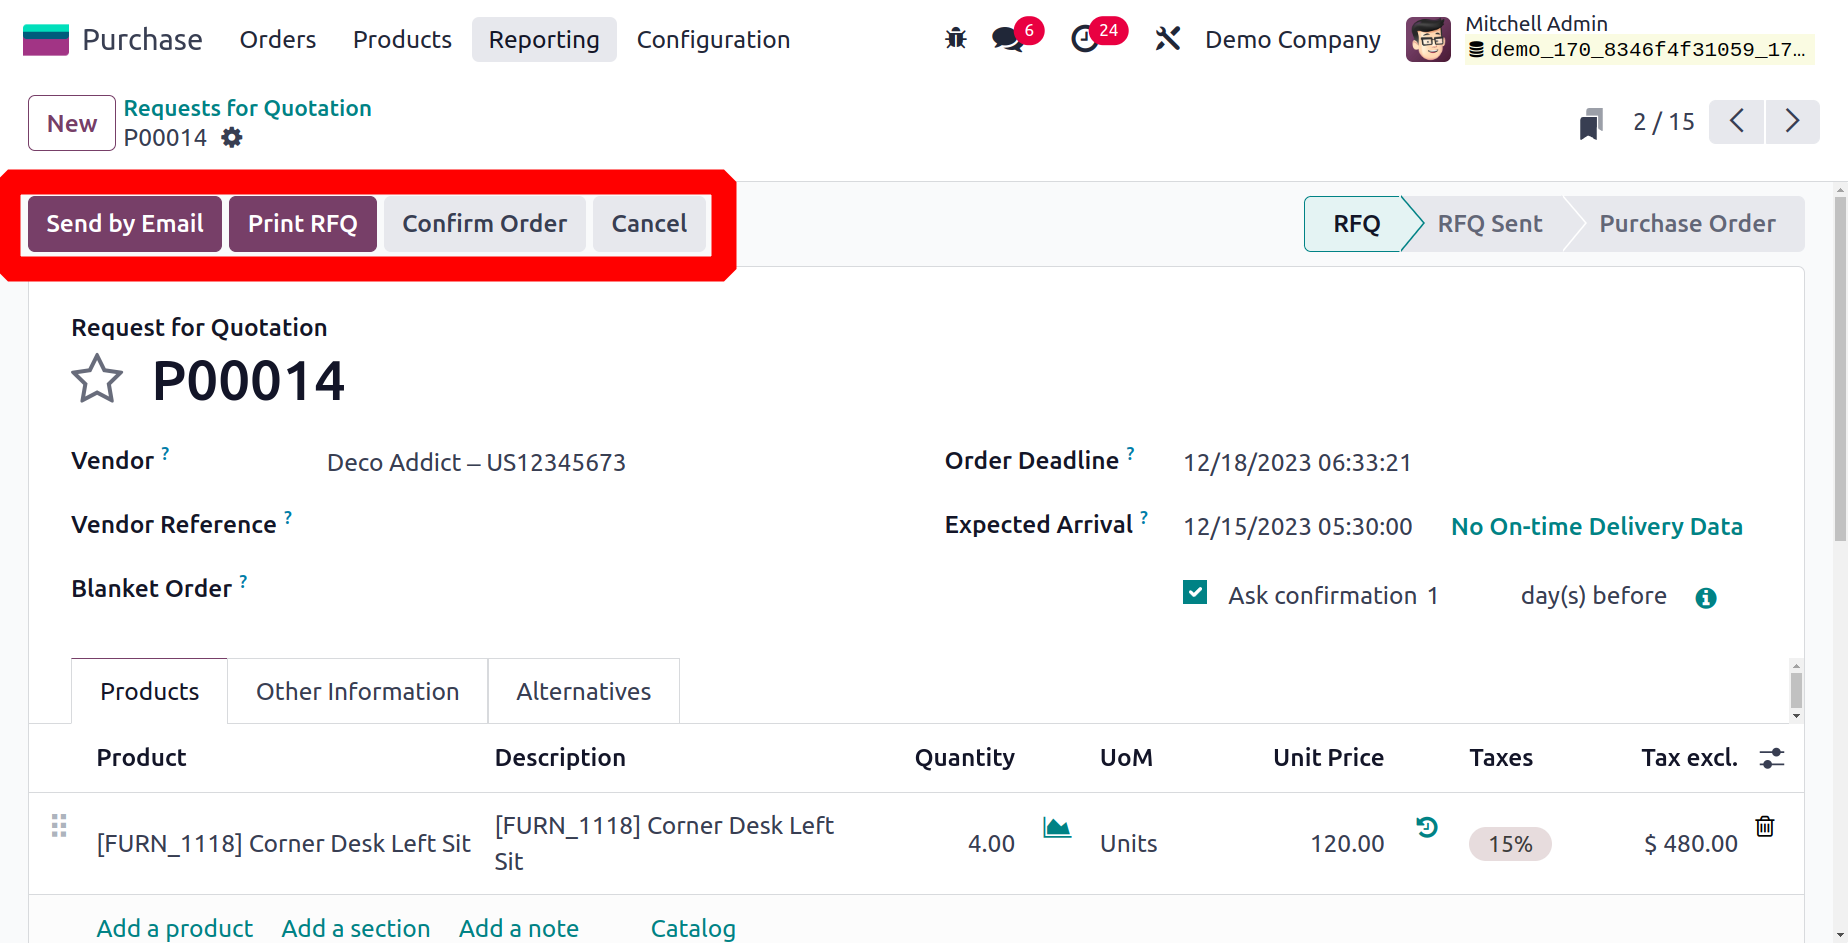
To transmit this request for a quotation to the appropriate vendor, use the Send By Email option. As soon as you select this option, Odoo17 will create the automated email template that is displayed below. In the Recipients section, you can enter the recipients' names. Using the Attachments button, you can add other attachments to the email.
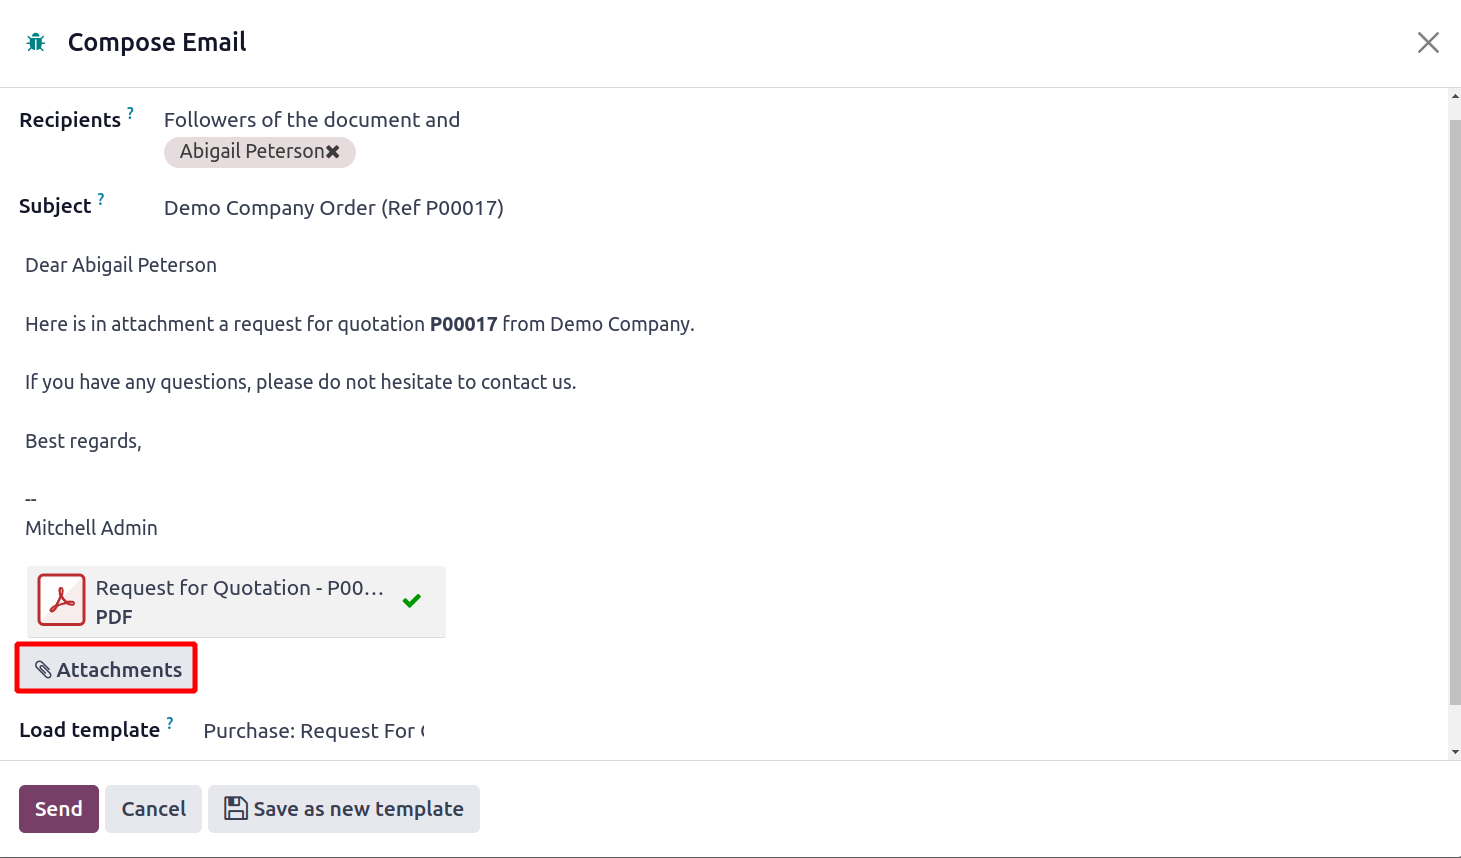
To send the email to the designated recipients, click the Send button.
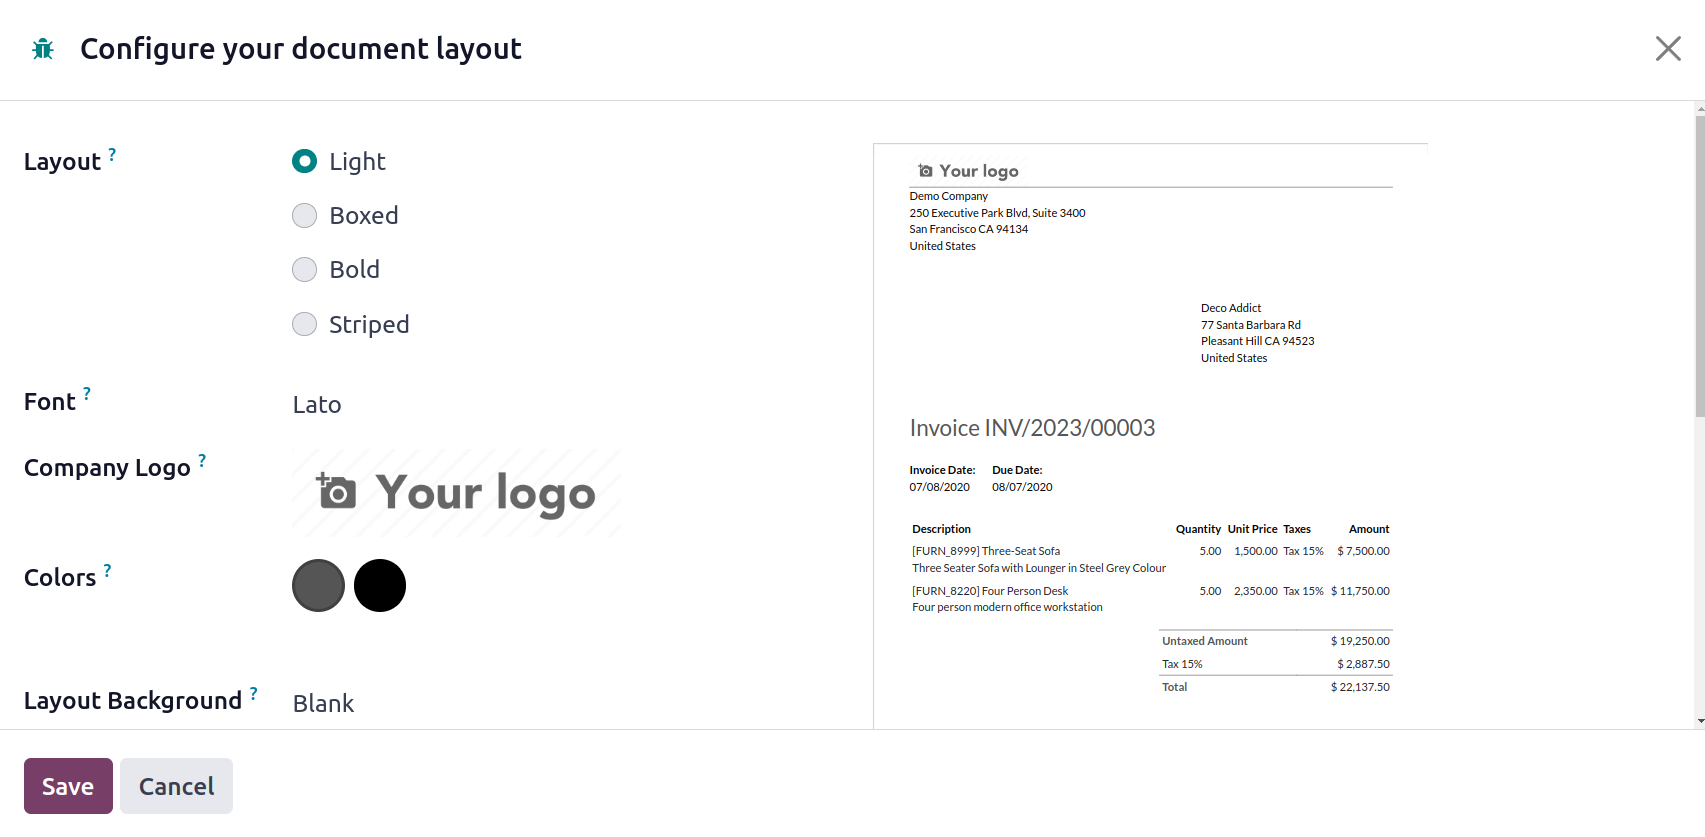
You can see the status of the RFQ and "RFQ SEND" once you've sent it to the appropriate vendors. You are able to use the Cancel button to withdraw your request. You can print the RFQ using Odoo17 by using the Print RFQ function. A pop-up will appear for you to customize the document's layout.
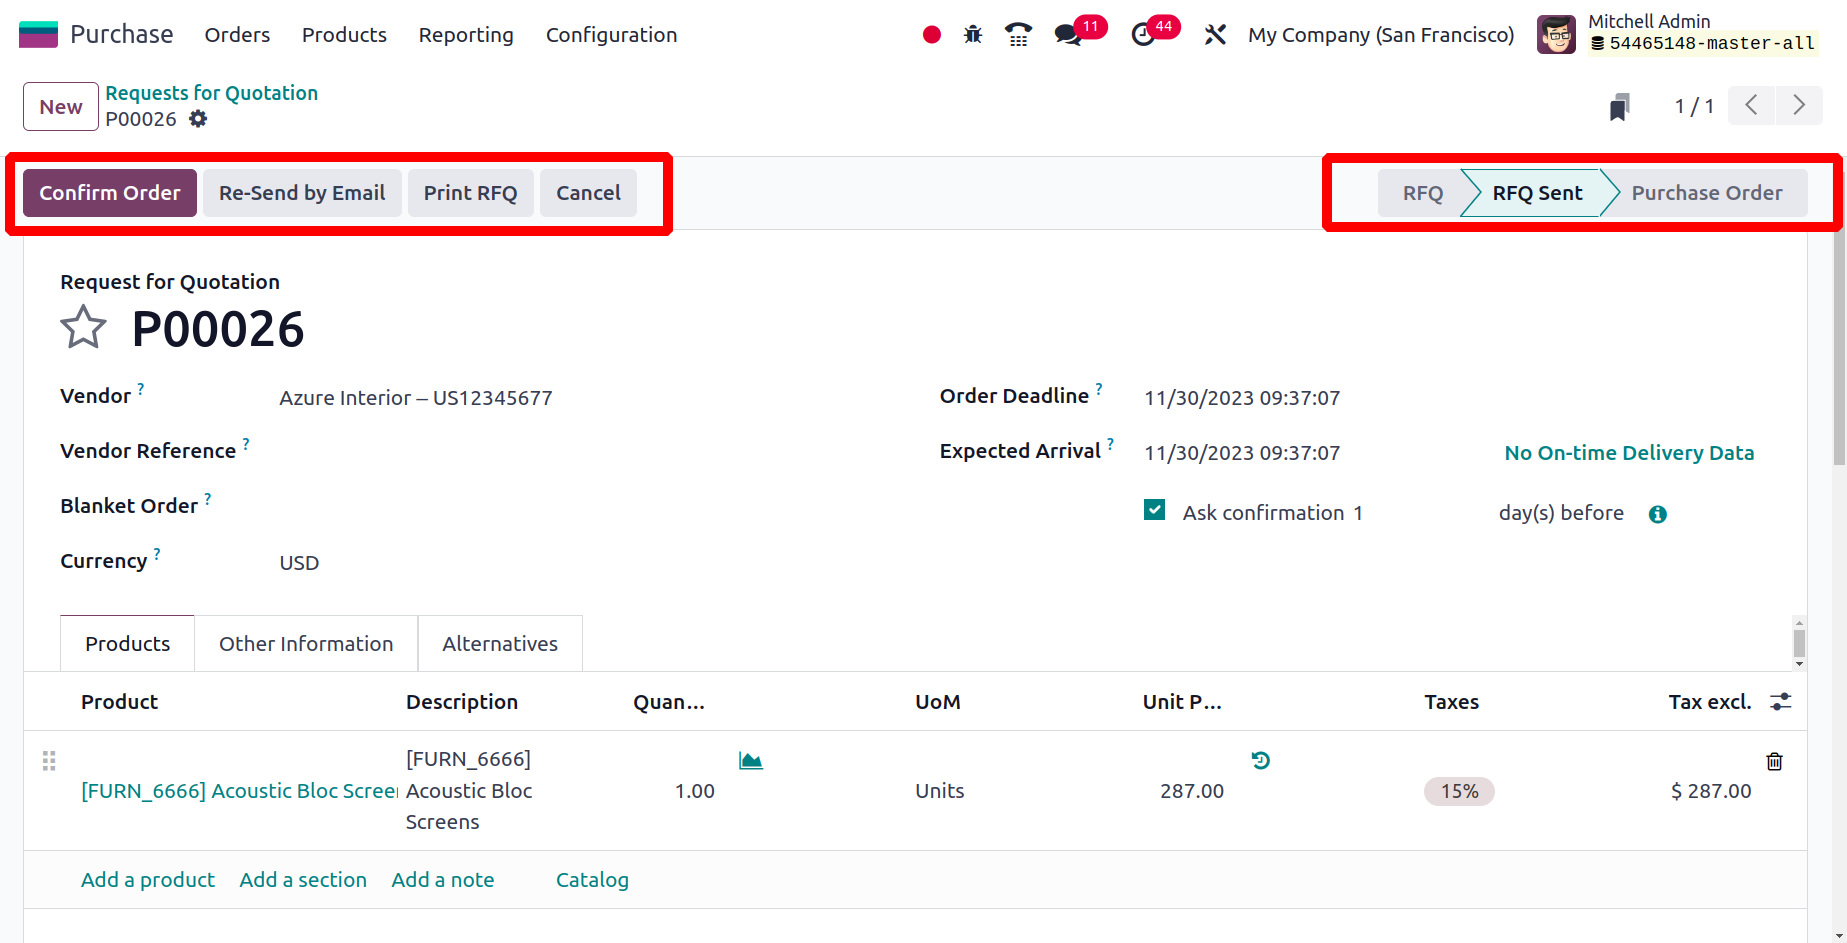
The Layout, Font, Company Logo, Colors, Layout Background, Company Tagline, Company Details, Footer, and Paper Format options are available here. On the right side of the wizard, you'll see a preview of the document based on the choice you made. The moment you press the Save button, your document will print immediately.
We described how to create an RFQ in the Purchase module, and now we'll look at how to manage a purchase order in Odoo17.
Purchase Order
Once the request for quotation has been created, you can send it to the appropriate vendor for their approval. The confirmation of the purchase order comes after giving the vendor the RFQ. For the handling of Purchase Orders, Odoo17 provides a separate platform under the Orders menu of the Purchase module.
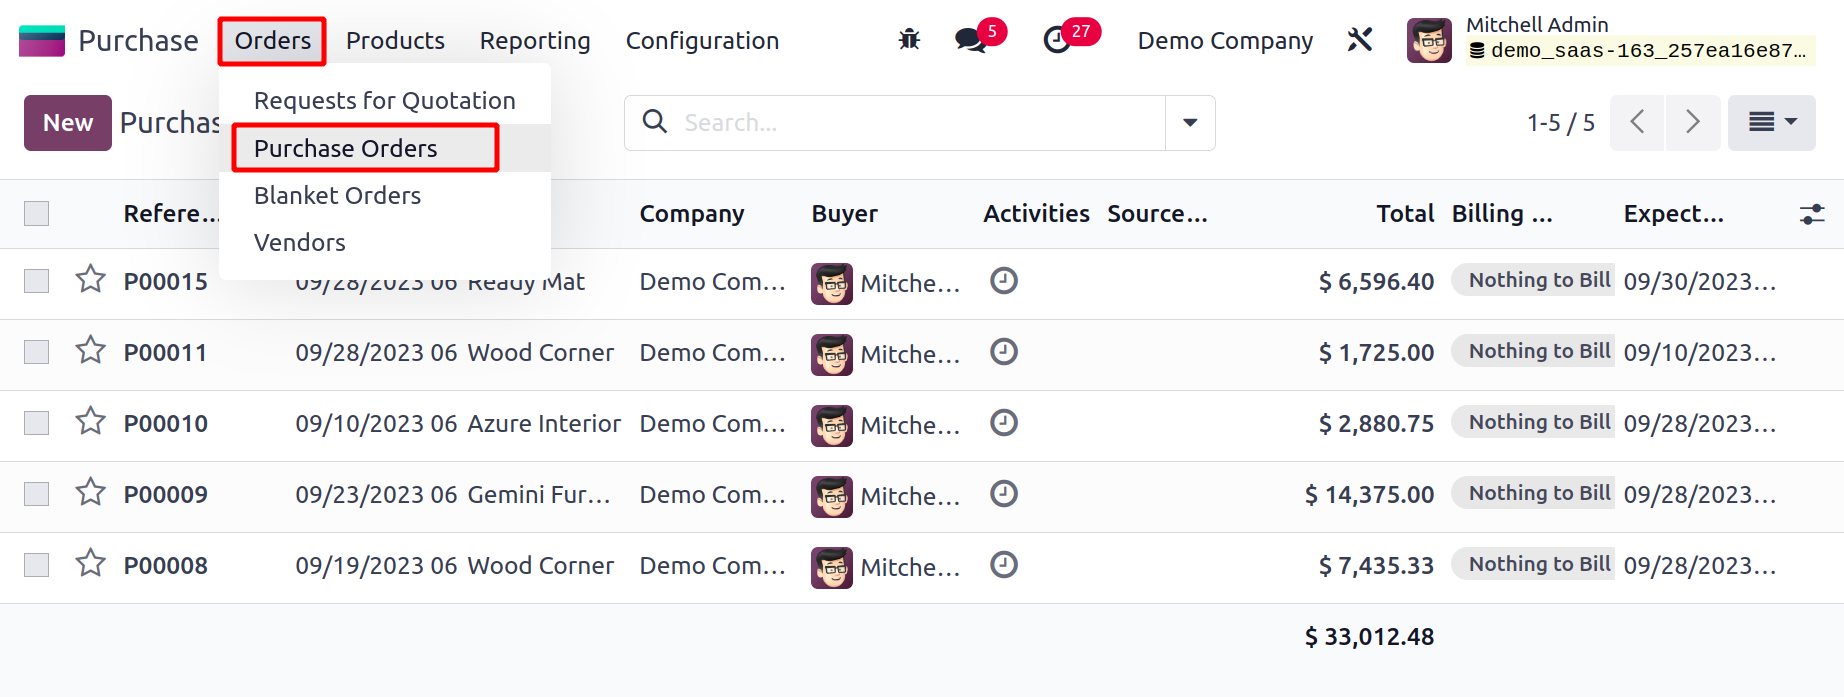
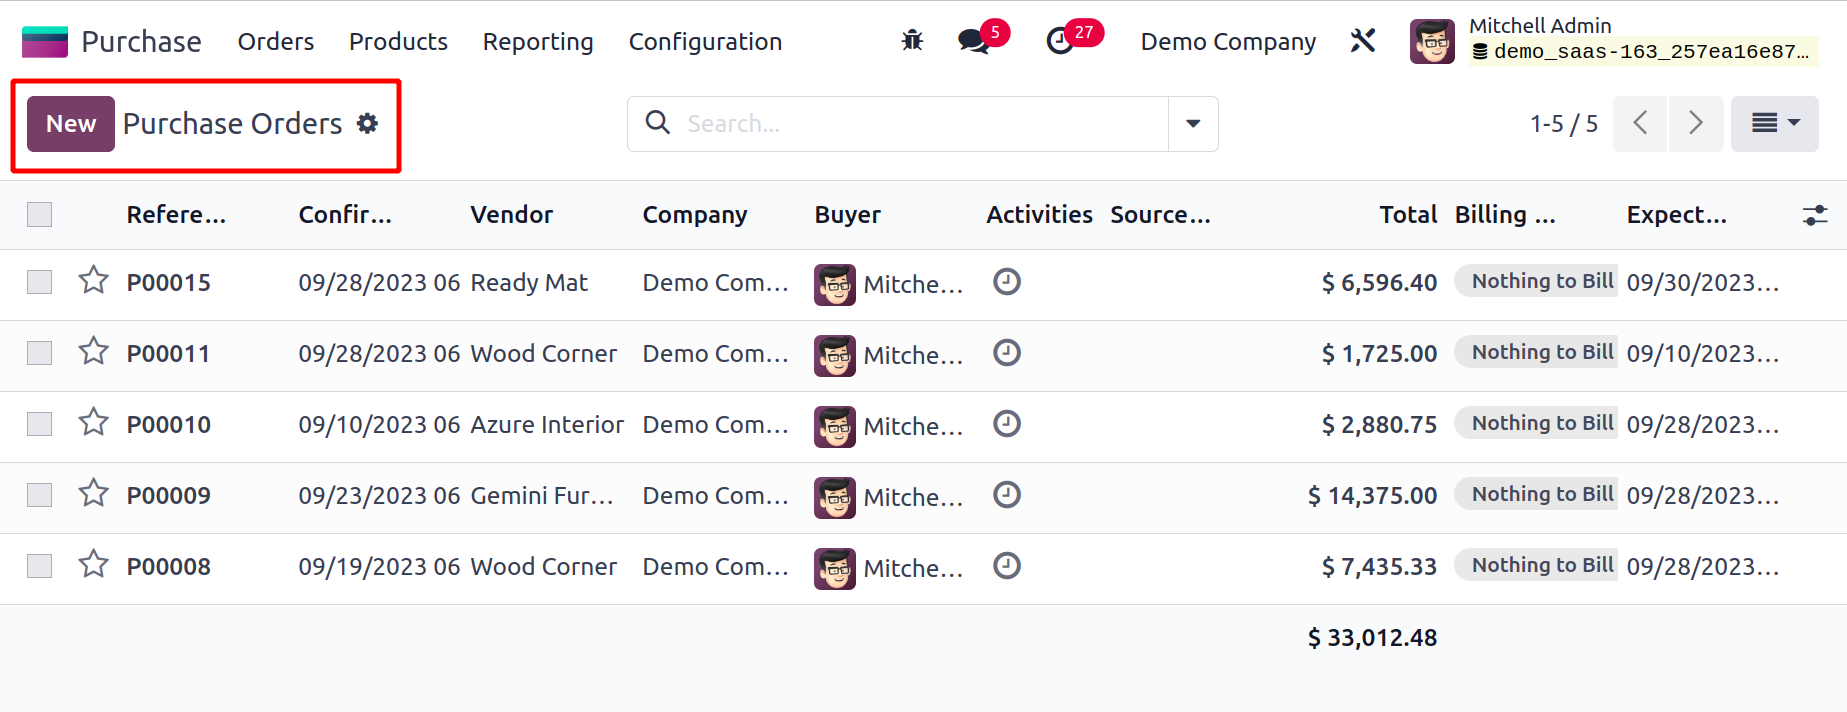
This window resembles the management window for requests for quotes. The Reference, Confirmation Date, Vendor, Company, Buyer, Activities, Source Document, Total, Billing Status, and Expected Arrival Date will all be sent to you. You can make a new purchase order using the New button's assistance.
Using the Confirm button, the request for quotation (RFQ) can be changed into a purchase order if all parties are content with the terms and conditions stated therein.
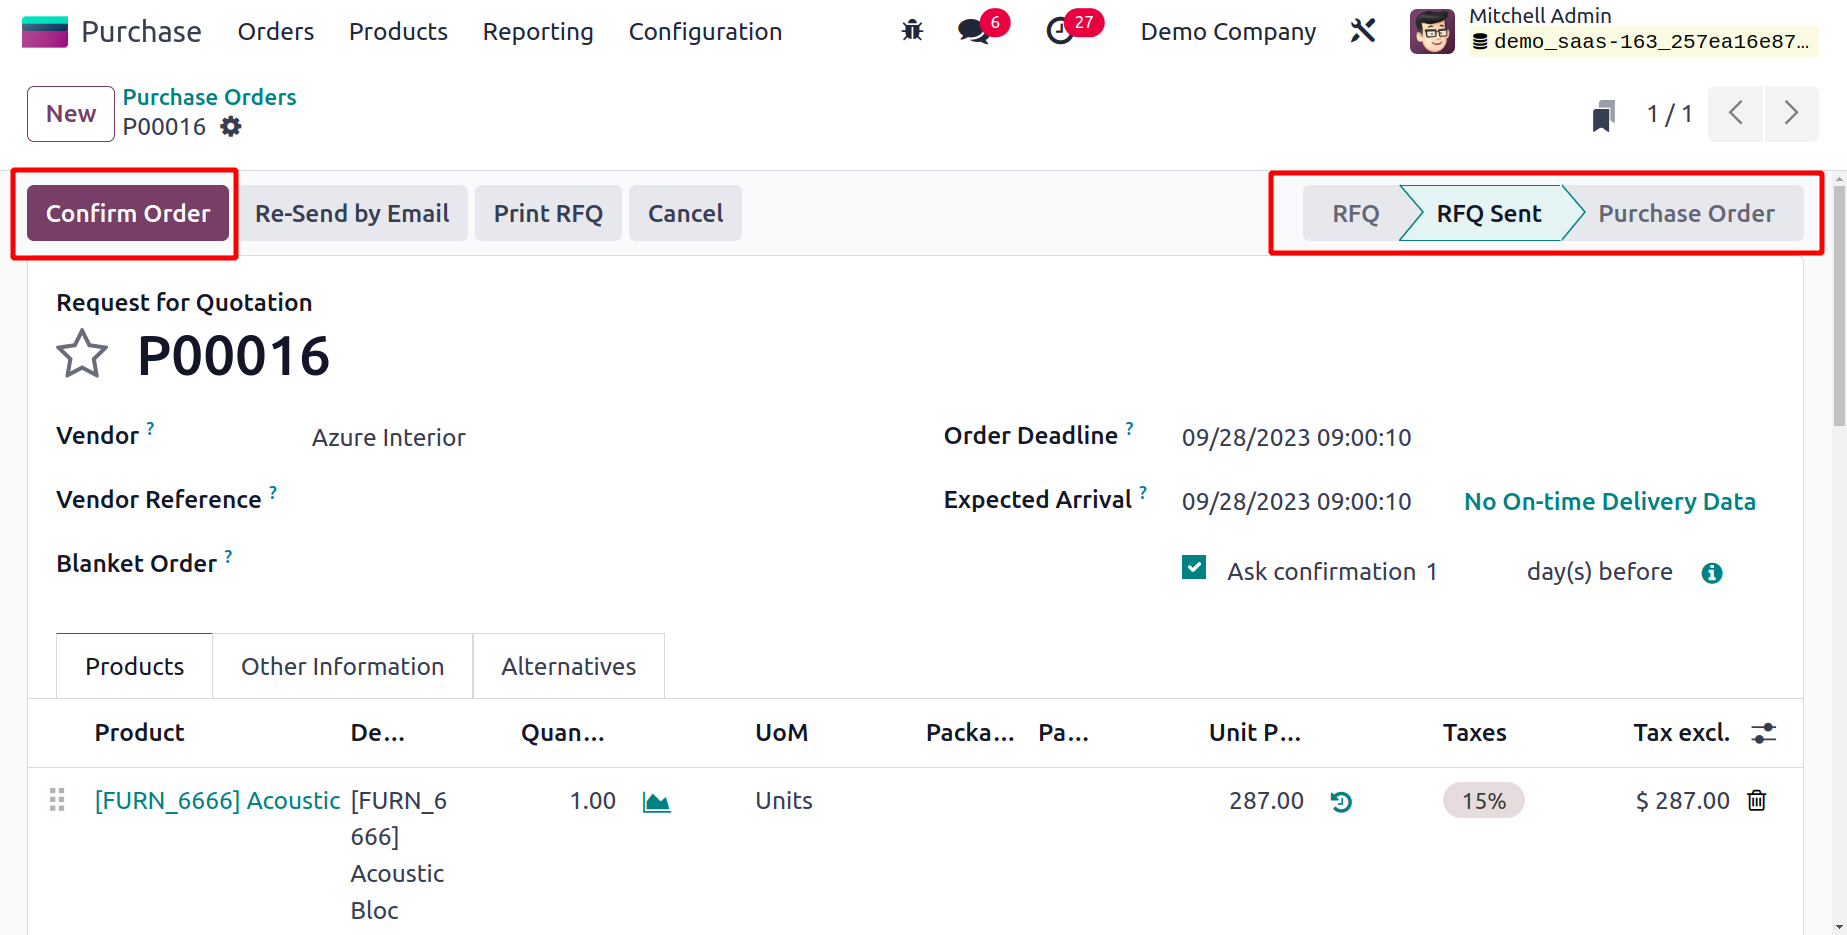
Once you click the Confirm button, the RFQ will show as a Purchase Order in your browser.
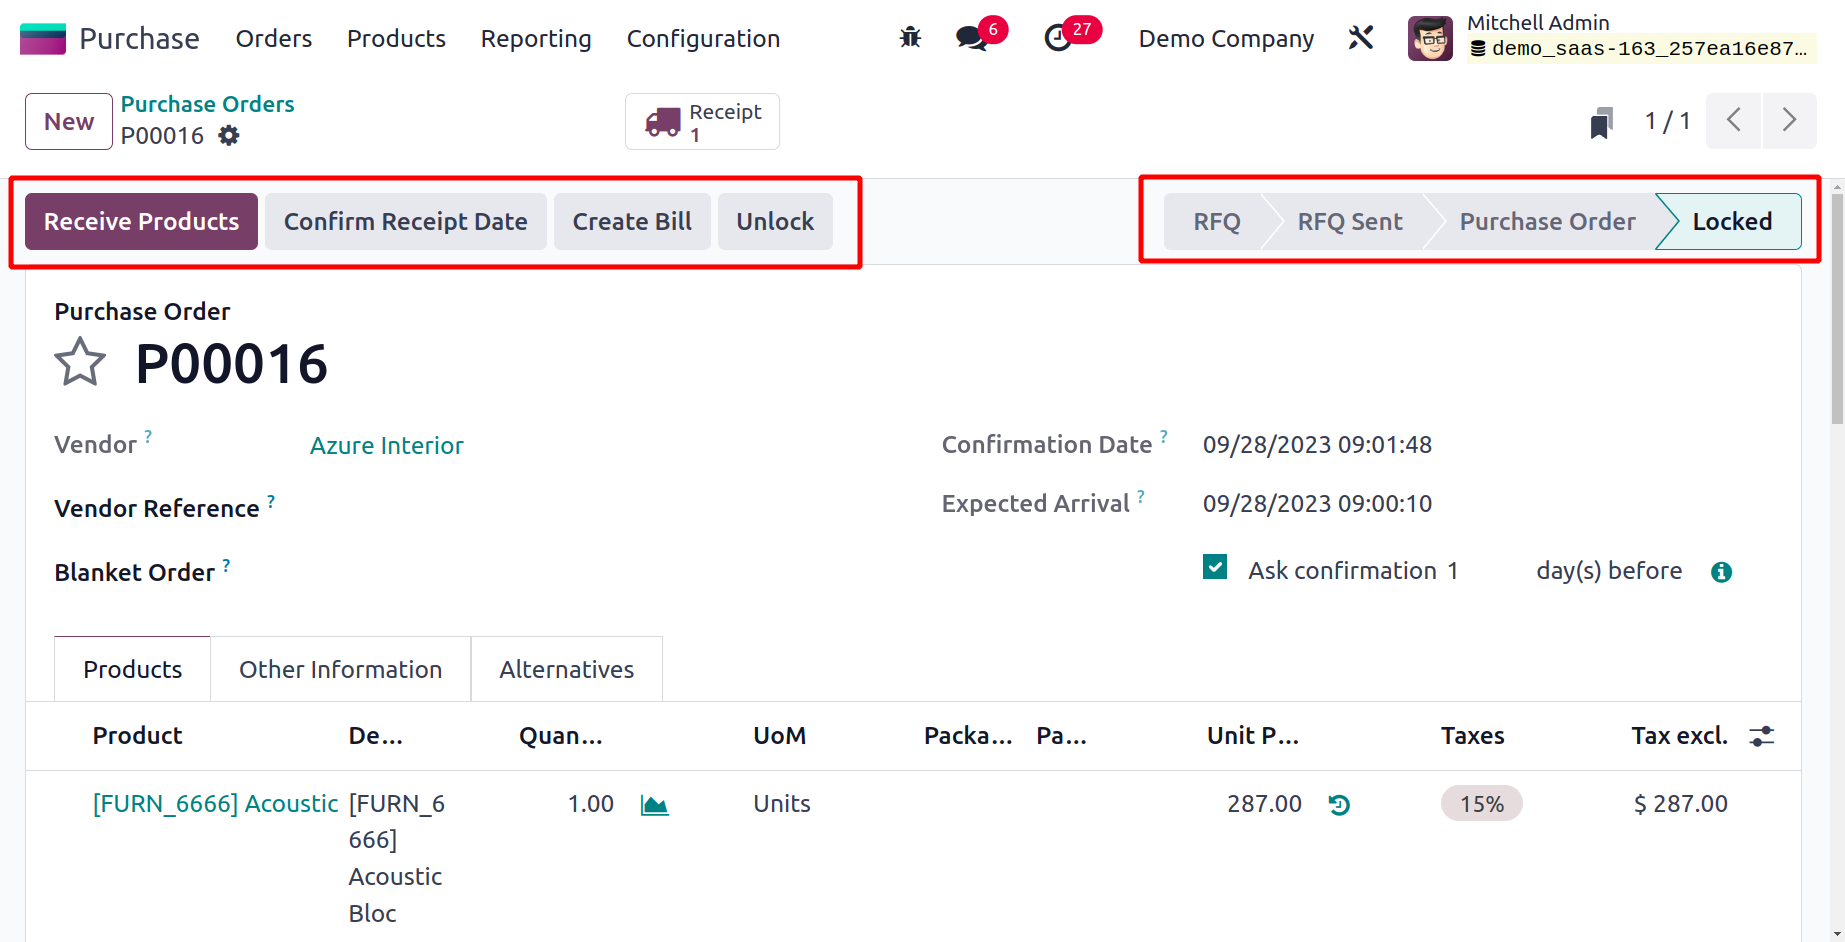
You may manage received products using choices like Receive Products, Confirm Receipt Date, and Verify Receipt Date in the Purchase Order box. To create a vendor bill, select Create Bill; to cancel a purchase order, select Cancel.
Purchase orders can be automatically locked in Odoo17 to prevent modification. This can be accomplished by turning on the Lock Confirmed Orders option in the module's Settings menu.
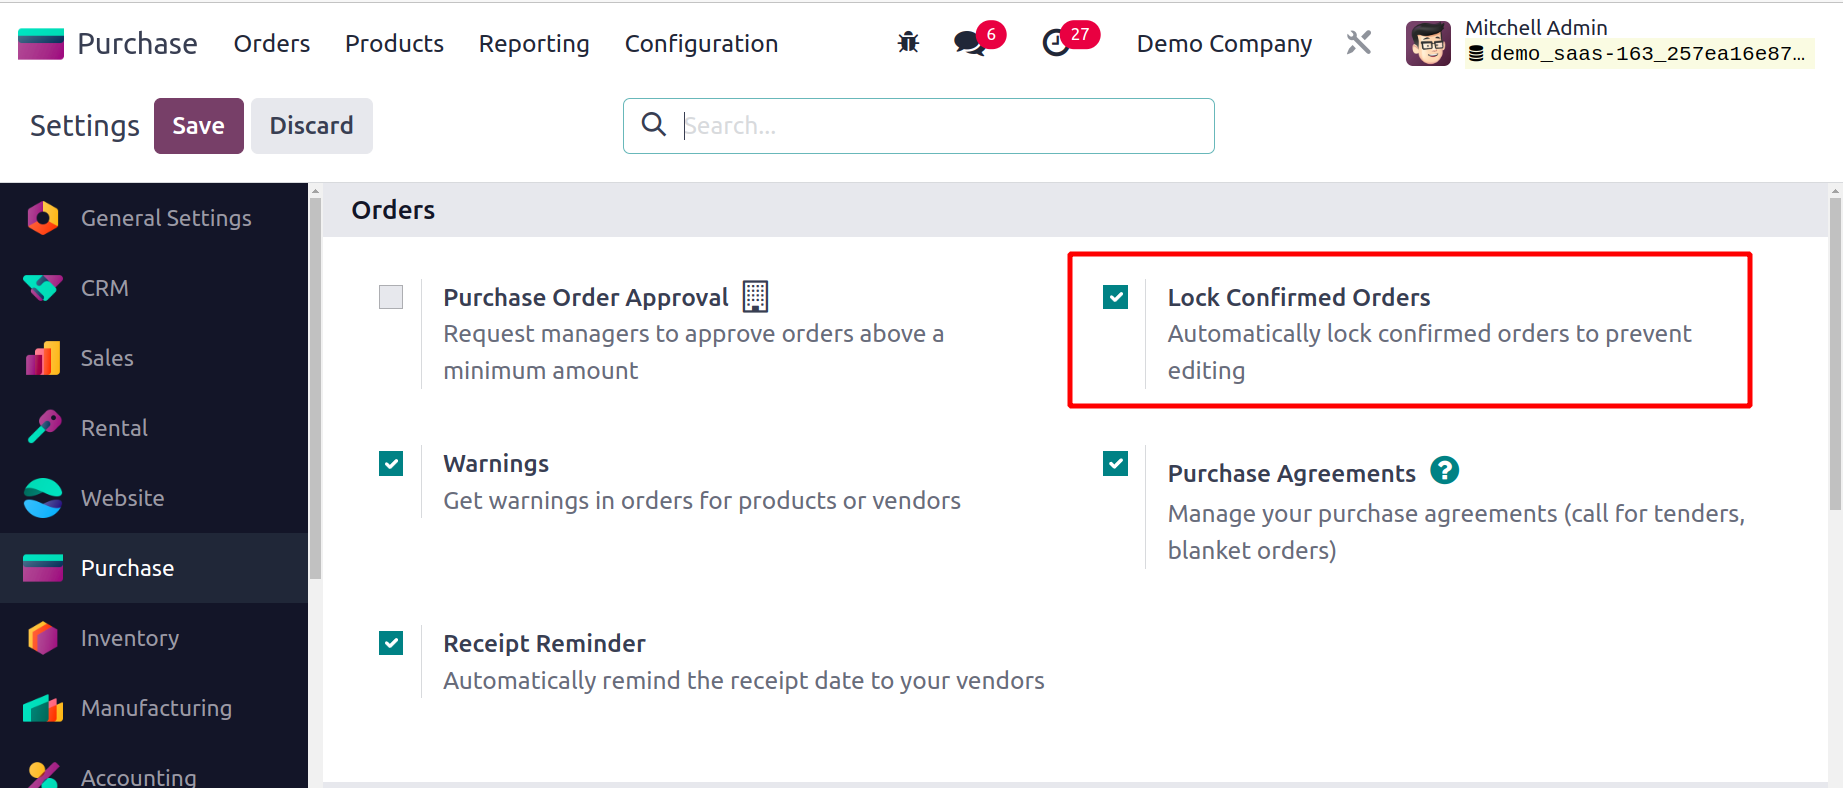
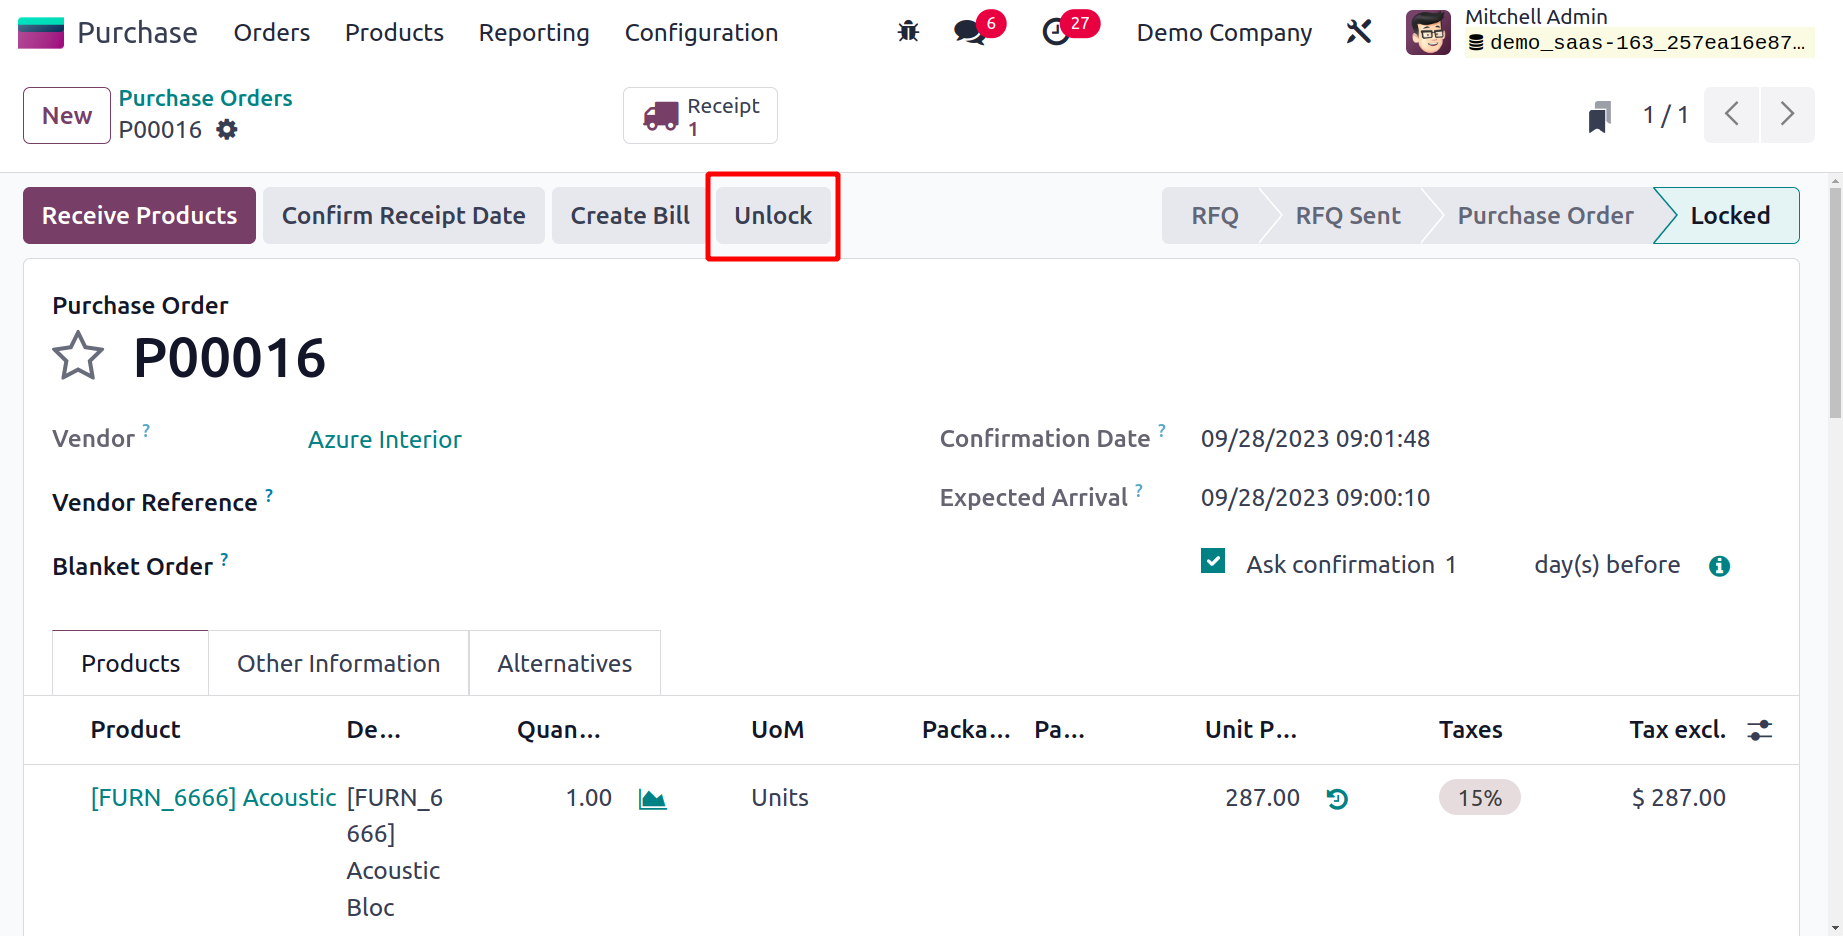
Orders that have been confirmed will automatically lock once you turn on this option. You can use the Unlock button to make any necessary adjustments to a purchase order.
Receive Products
Following order confirmation, the merchant will ship goods to the address you specified in the purchase order. Odoo17 will help you with the product delivery methods as well. You can click the Receive Products button to start receiving the products as soon as the seller sends them to your business.
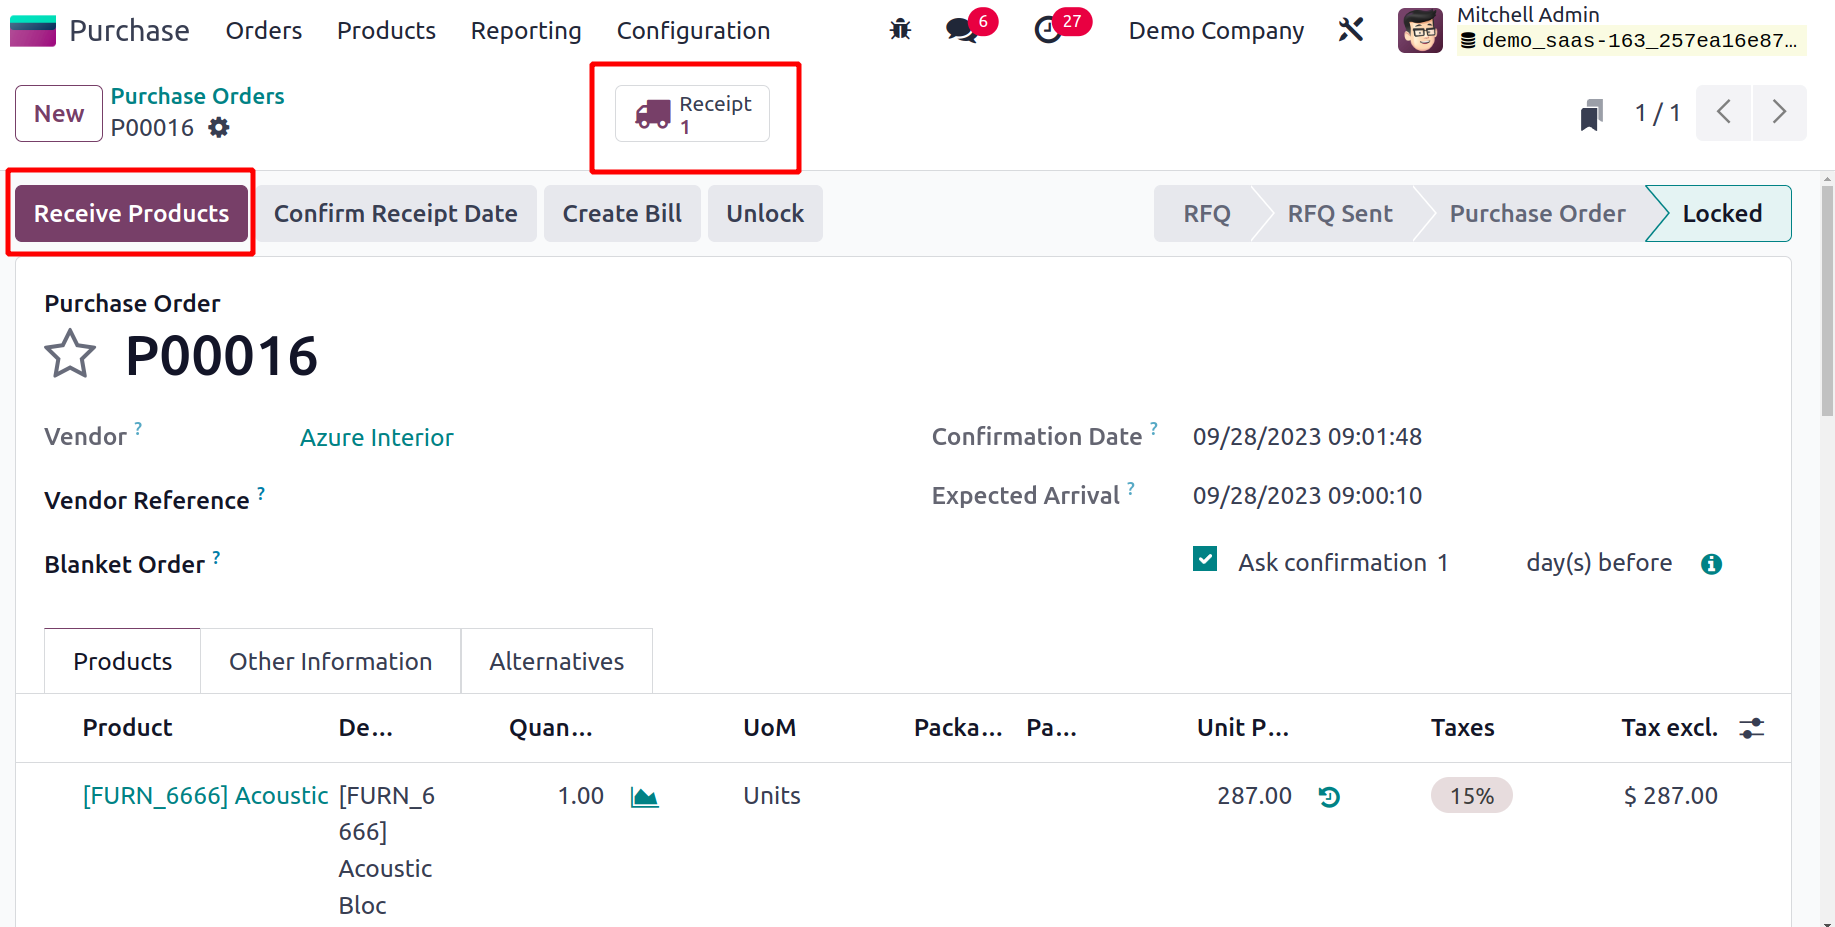
You will then be taken to a new window that has information on the arriving shipments. Utilizing the smart button Receipt found on the relevant purchase order window, you may visit this window.
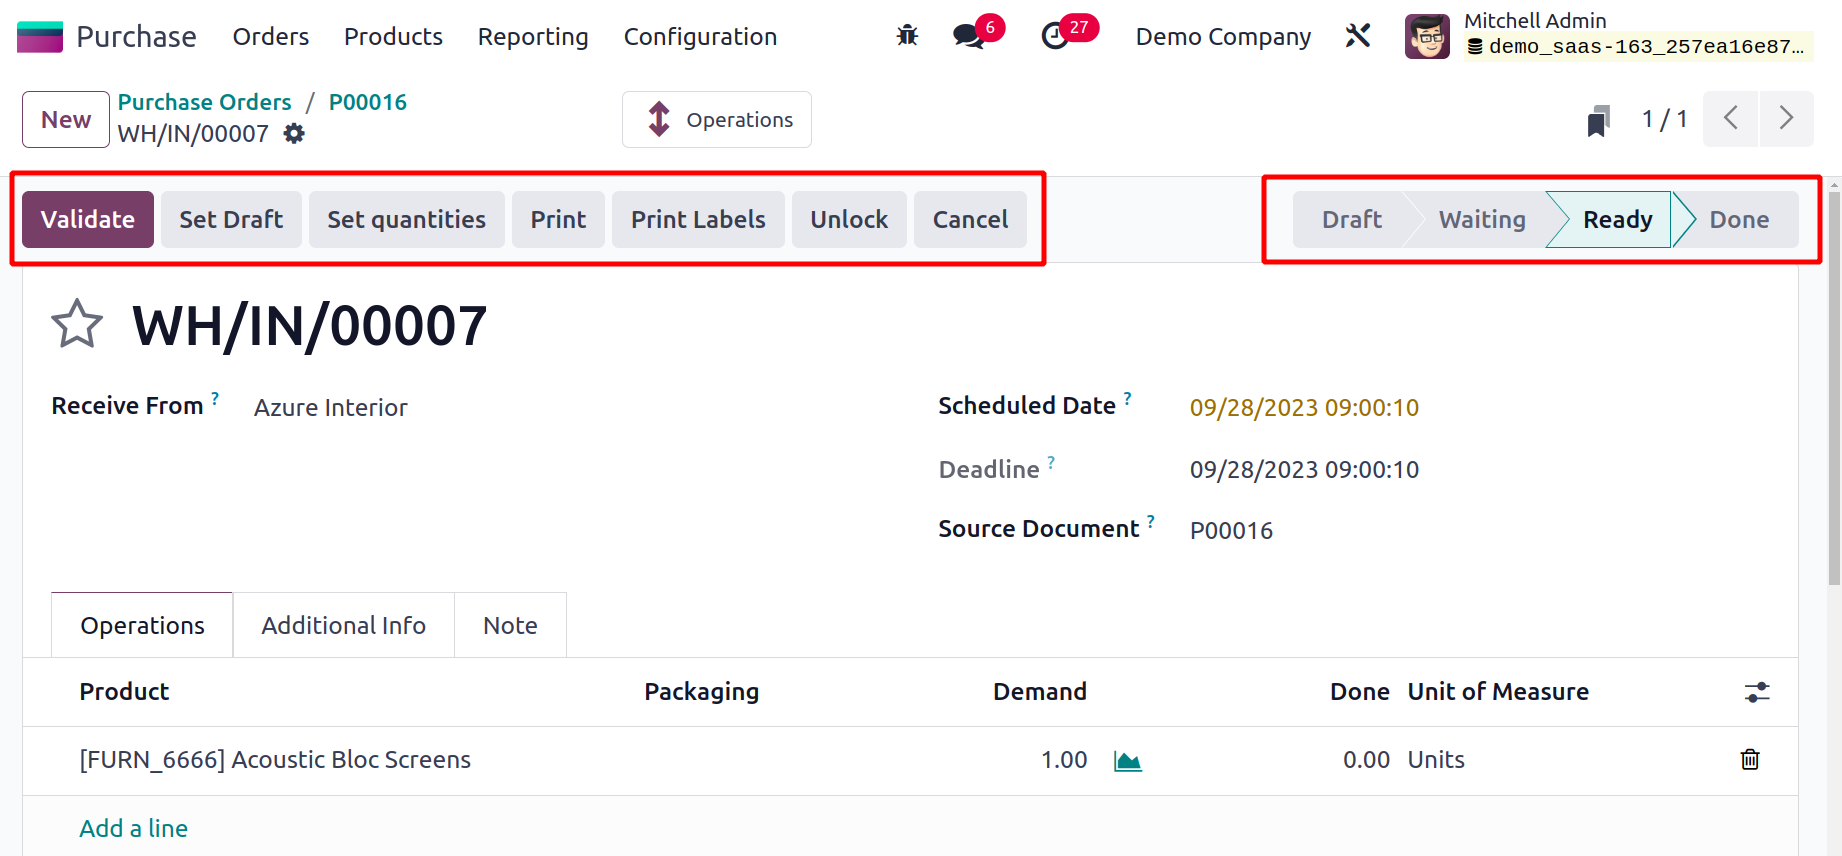
After reviewing the details, click the Validate button to verify the delivery receipt. The name of the product's supplier will be displayed in the Receive From box. The delivery address you specified when you created the purchase order will appear as the destination location. You will find the Scheduled Date, Deadline, and Source Document of the delivery receipt in the corresponding fields.
Under the Operations tab, specifics like Product, Demand, Done, and Unit of Measure can be seen.
The number of the products as they appear in the inventory will be displayed in the demand field. You will see a button to view the product's forecast report close to this field.
You may find shipping details and other information pertaining to the product's delivery under the Additional Information page.
You may find information about the Carrier, Tracking Reference, Weight, and Shipping Weight in the Shipping Information section. The names of the Responsible Employee, Procurement Group, and Company will appear in the appropriate fields of the Other Information section. The relevant notes for the incoming cargo will be displayed on the Note tab.
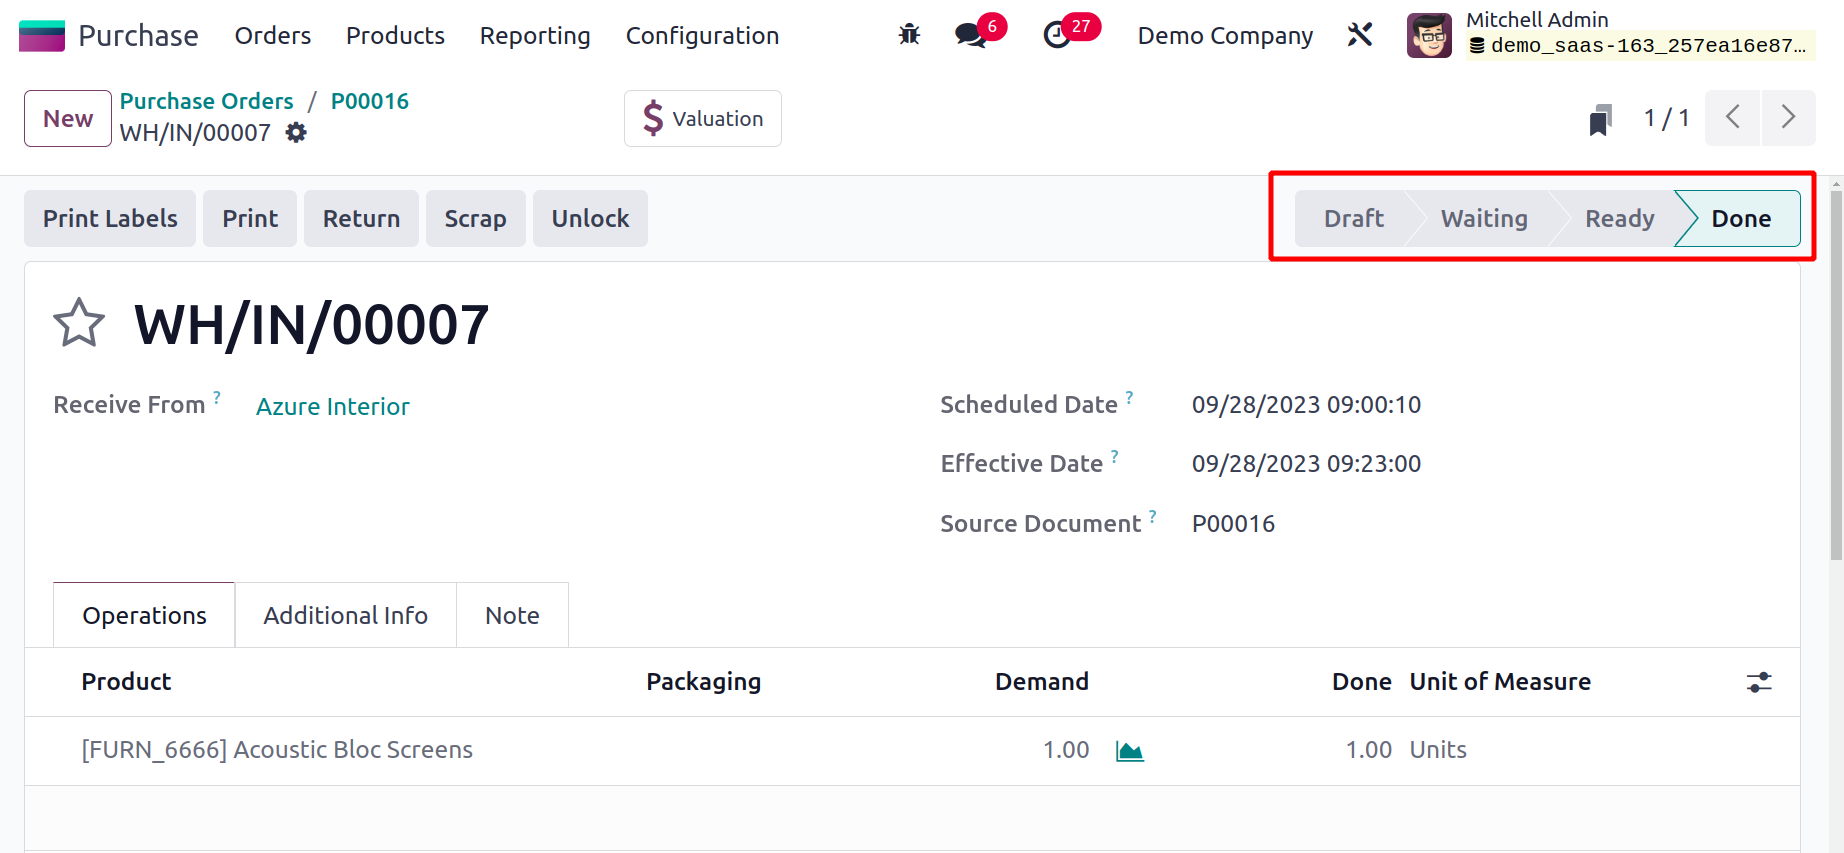
You can validate the receipt by selecting the Validate option after you have reviewed all the details.
The receipt's status has changed to Done, indicating that the transfer has been completed.
Vendor Bills
One of the critical stages in the buying process that demands the highest care and precision is creating vendor bills. With the aid of Odoo17, the payment to the vendor will be easily registered in the form of a vendor bill. These automatically generated vendor bills will be connected to the configured vendors in Odoo 17. Depending on your company's regulations, vendor bills may be produced using the quantities that were ordered or those that were delivered. This billing policy can be set in the Purchase module's Settings menu.
Below is a screenshot of the Purchase module's Settings menu.
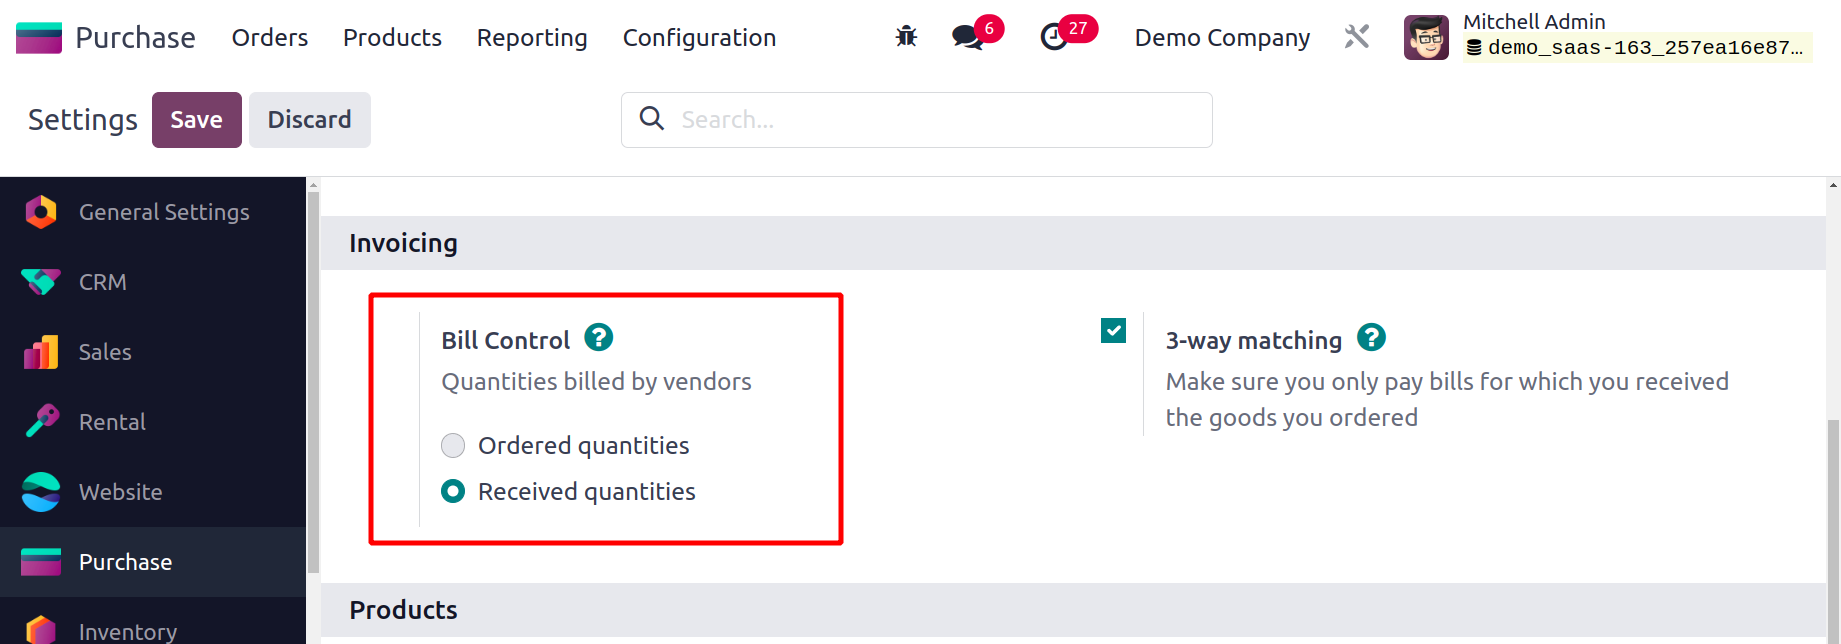
Here, you can specify the policy for creating vendor bills by using the Bill Control option found under the Invoicing tab. With the aid of this option, you may choose how to manage vendor invoices. When the vendor bill must be paid following the confirmation of a purchase order will depend on the control policy you choose here. You have the option of paying your vendors either before or after receiving their goods. You can use the bought quantities bill control option to pay your vendor bill for the items you bought as soon as your purchase order is confirmed. Here, a draft vendor bill will be produced by taking into account the amounts specified in the relevant purchase order. After receiving the ordered goods, you can create vendor bills using the Received Quantities option. Using this option, you can pay the vendor's bill according to the quantities you've received.
Odoo17 will set this control policy as the default on all newly generated goods as soon as you select a suitable Bill Control option from the Settings menu. A specific product's product detail form is where you can make changes to the default control policy for that product.
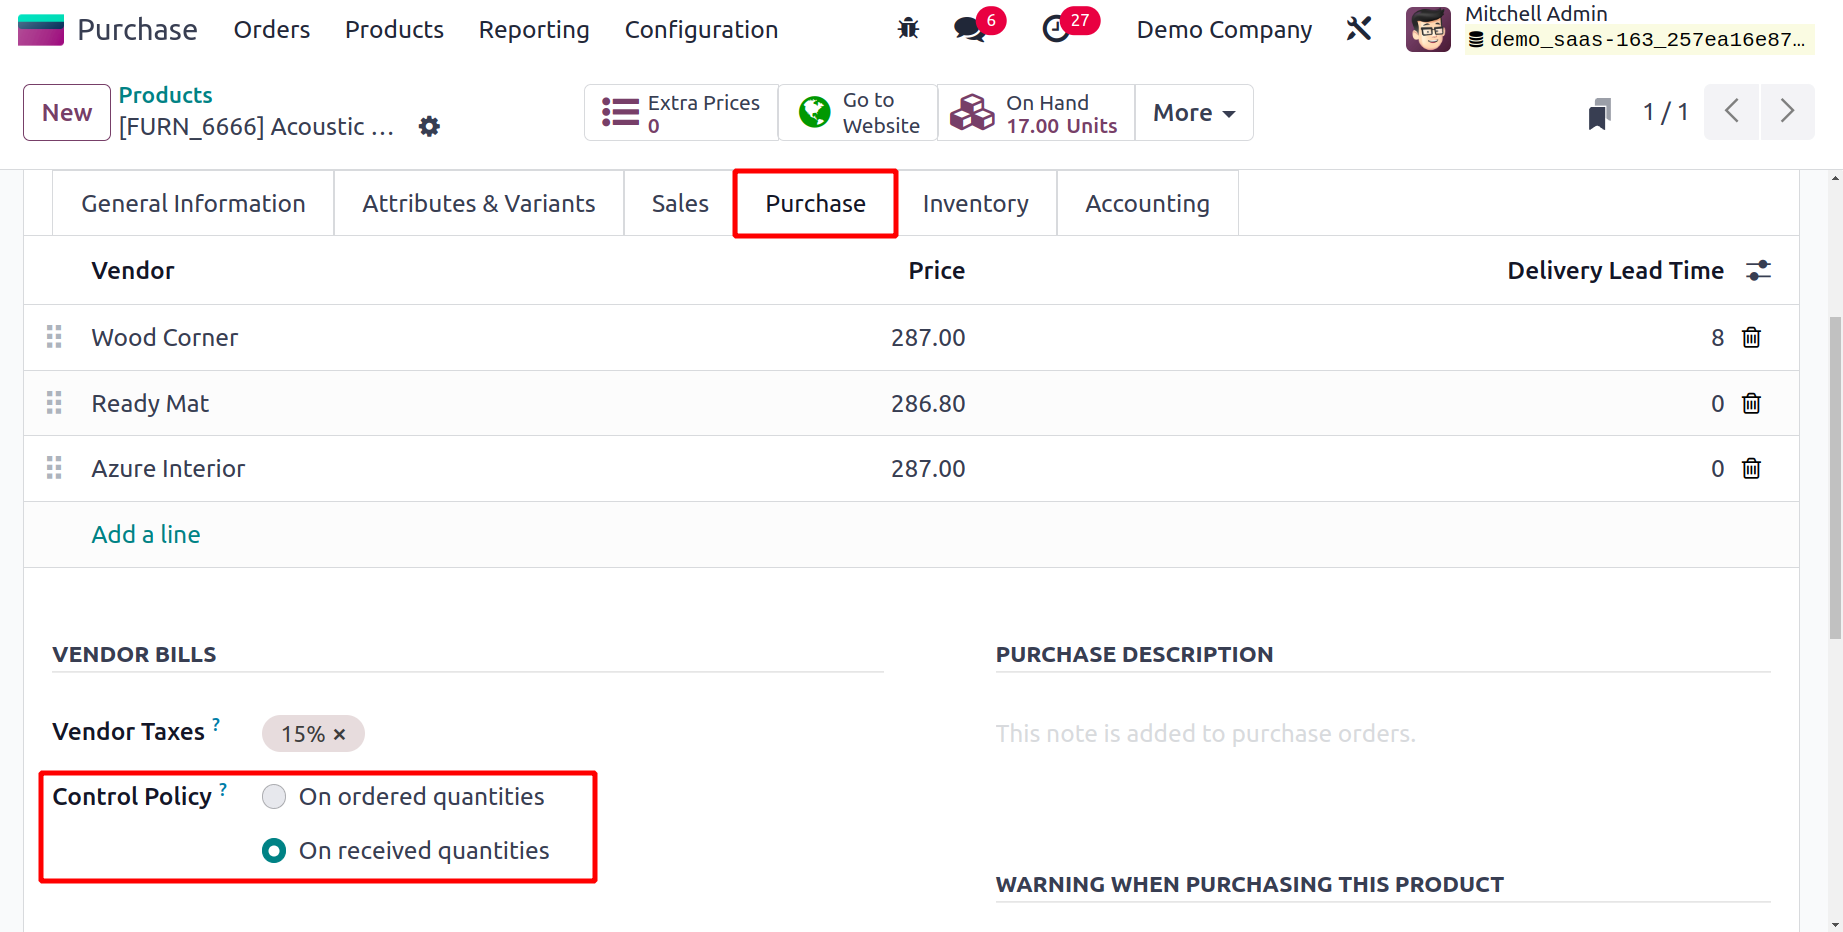
You may manage the Control Policy under the product's Purchase tab, as is noted in the image above. All goods come with this option. This functionality enables you to directly manage the essential products' billing procedures.
Let's now examine the processes used to create the vendor bill and make payments on it.
In order to generate the vendor bill, you will receive the option to ‘Create Bill’ after completing a purchase order, as shown in the screenshot below.
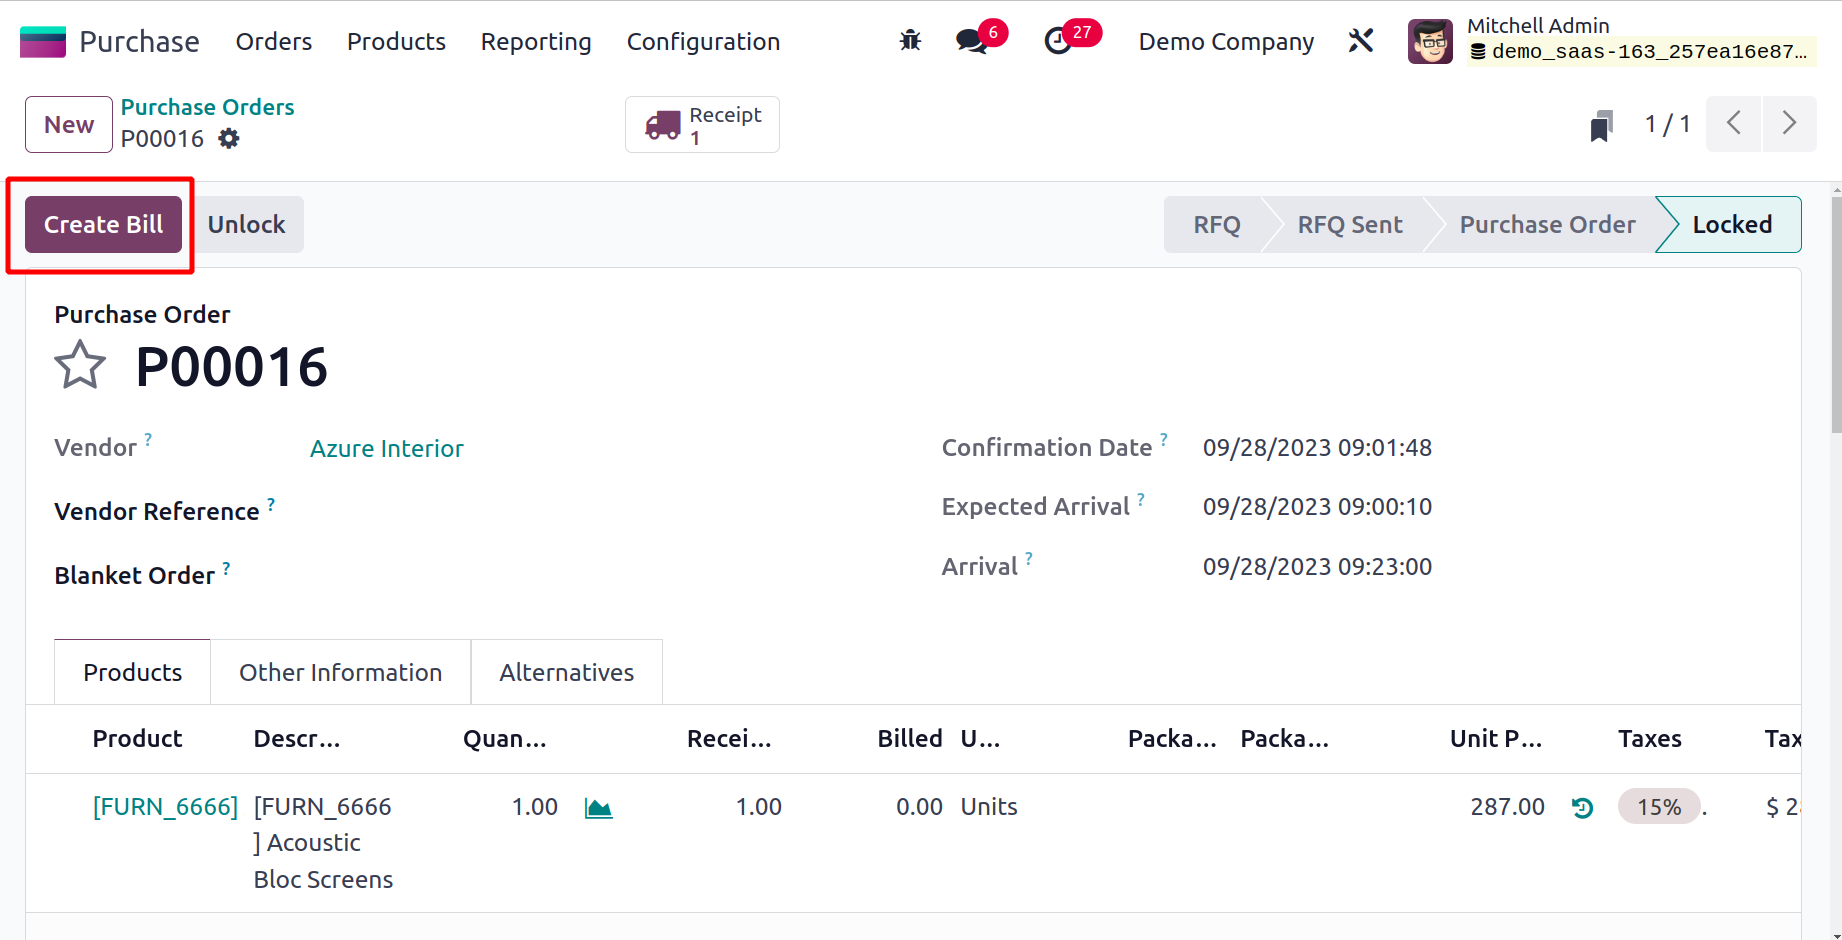
When you click on this button, Odoo17 will take you to a new screen where you can view the vendor bill in draft form.
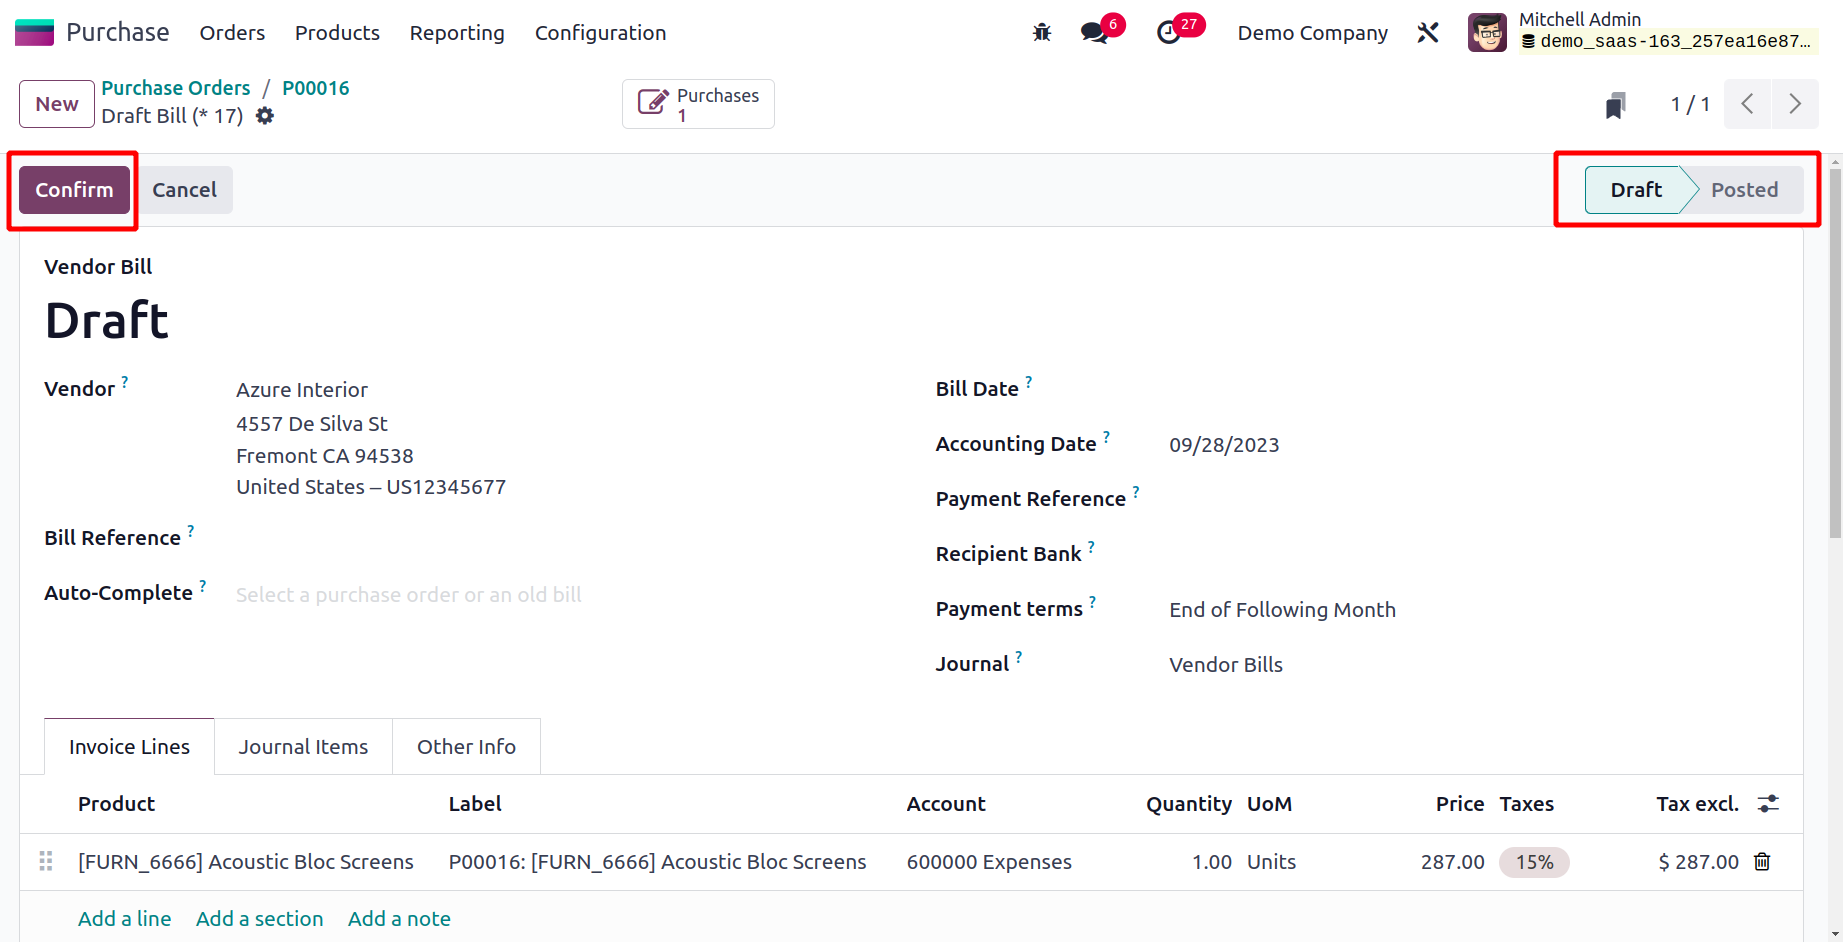
Before approving it, you can double-check the information provided in the draft vendor bill. The Vendor, Bill Reference, Bill Date, Accounting Date, Payment Reference, Recipient Bank, Journal, and Due Date information is included. To automatically fill out the form, you can upload a previous bill or purchase order.
You can view a list of the things you ordered in the Invoice Lines. The associated fields allow you to see the journal entries and other details related to the vendor bill. To confirm the vendor bill, click the Confirm button.
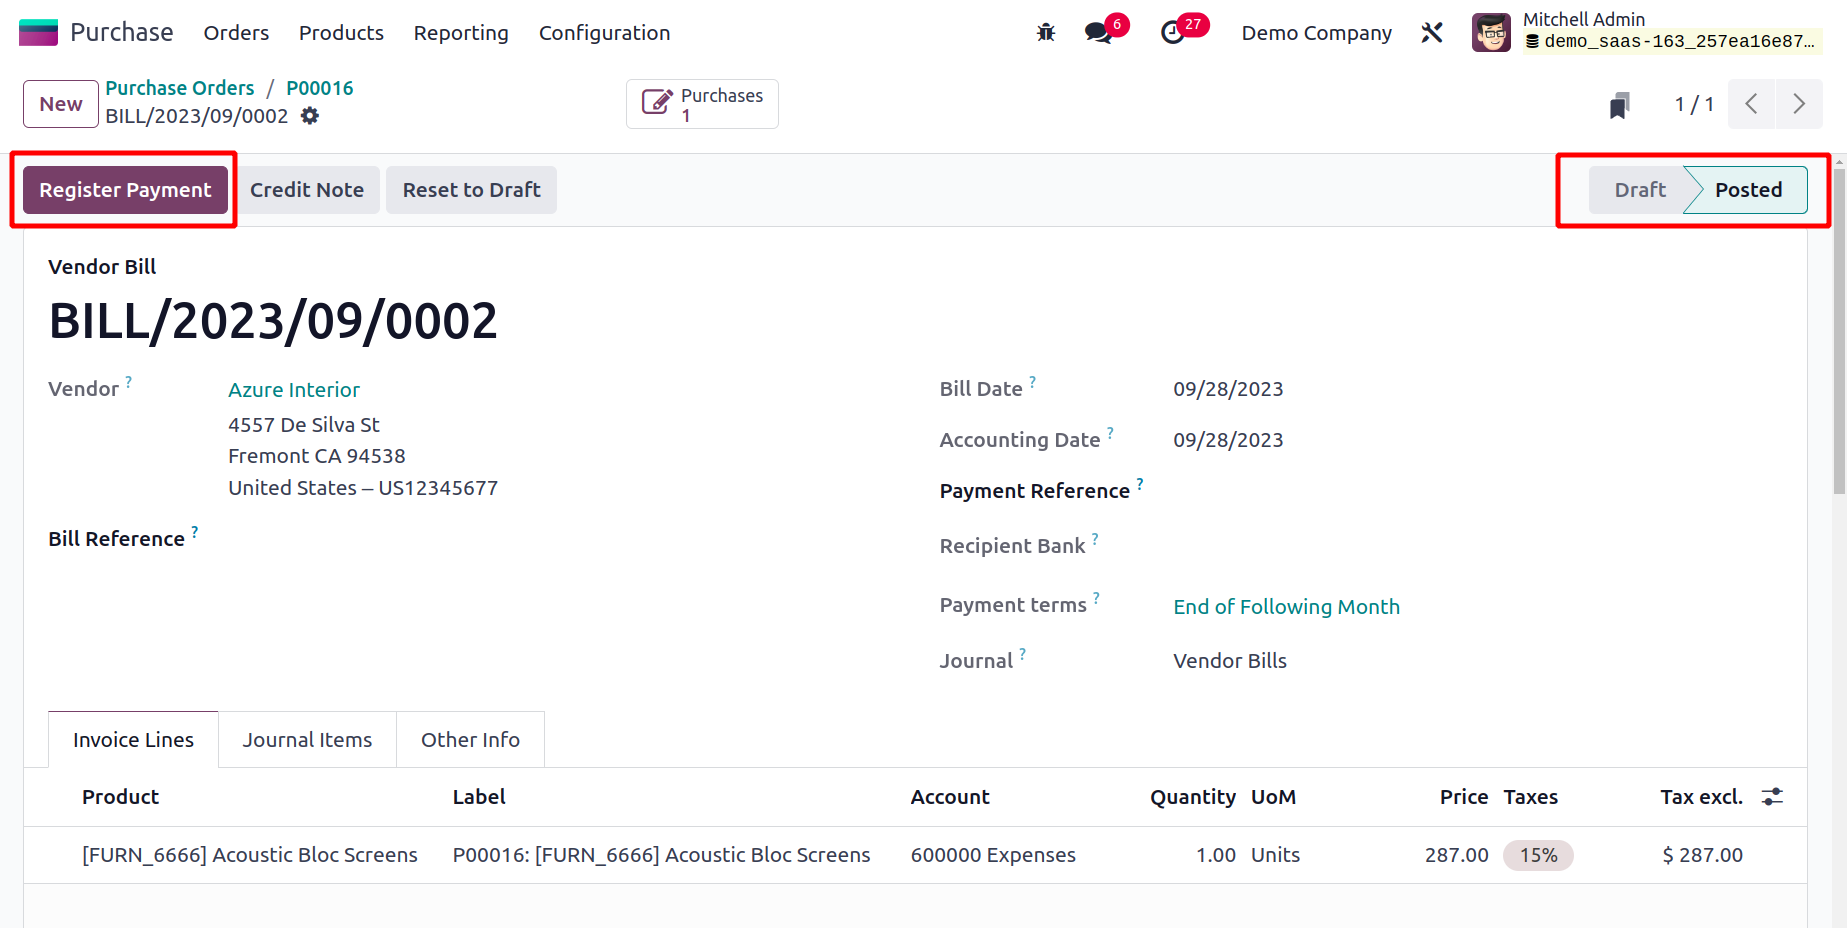
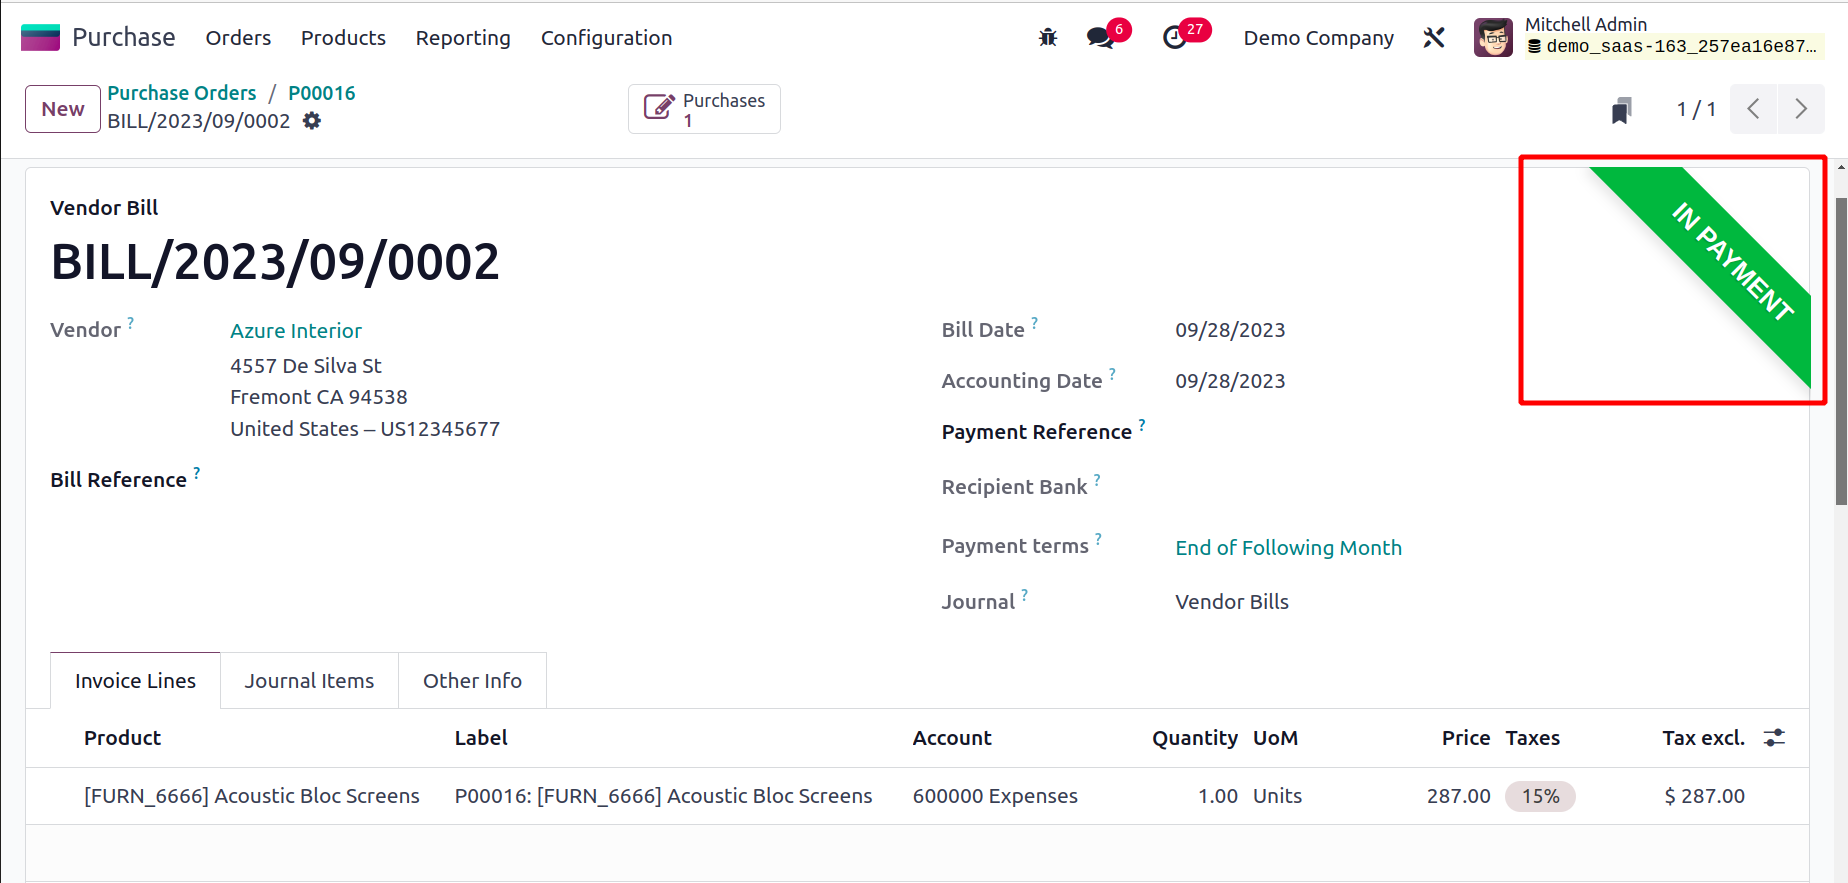
The status of the vendor bill can be shown as Paid as seen in the image above after completing all payment steps. This is how we create vendor invoices for the things we've received.
Now that we have a clear understanding of how Odoo17 generates vendor invoices, let's talk about how the Purchase module creates purchase agreements.
Purchase Agreements
A purchase agreement is, as its name suggests, a type of contract or agreement formed between a seller and a customer describing the terms and circumstances of the purchase. The purchase agreement created between the seller and the customer must be approved by both parties before the purchase order can be confirmed. In the Purchase module of Odoo17, a separate platform is provided for drafting and managing purchase agreements. You are permitted to use this platform to establish multiple contracts with the same or various vendors for a variety of products. In Odoo17, these agreements can be used when making purchase orders.
You must enable the Purchase Agreement option from the module's Settings menu in order to receive this feature in your Odoo17 Purchase module.
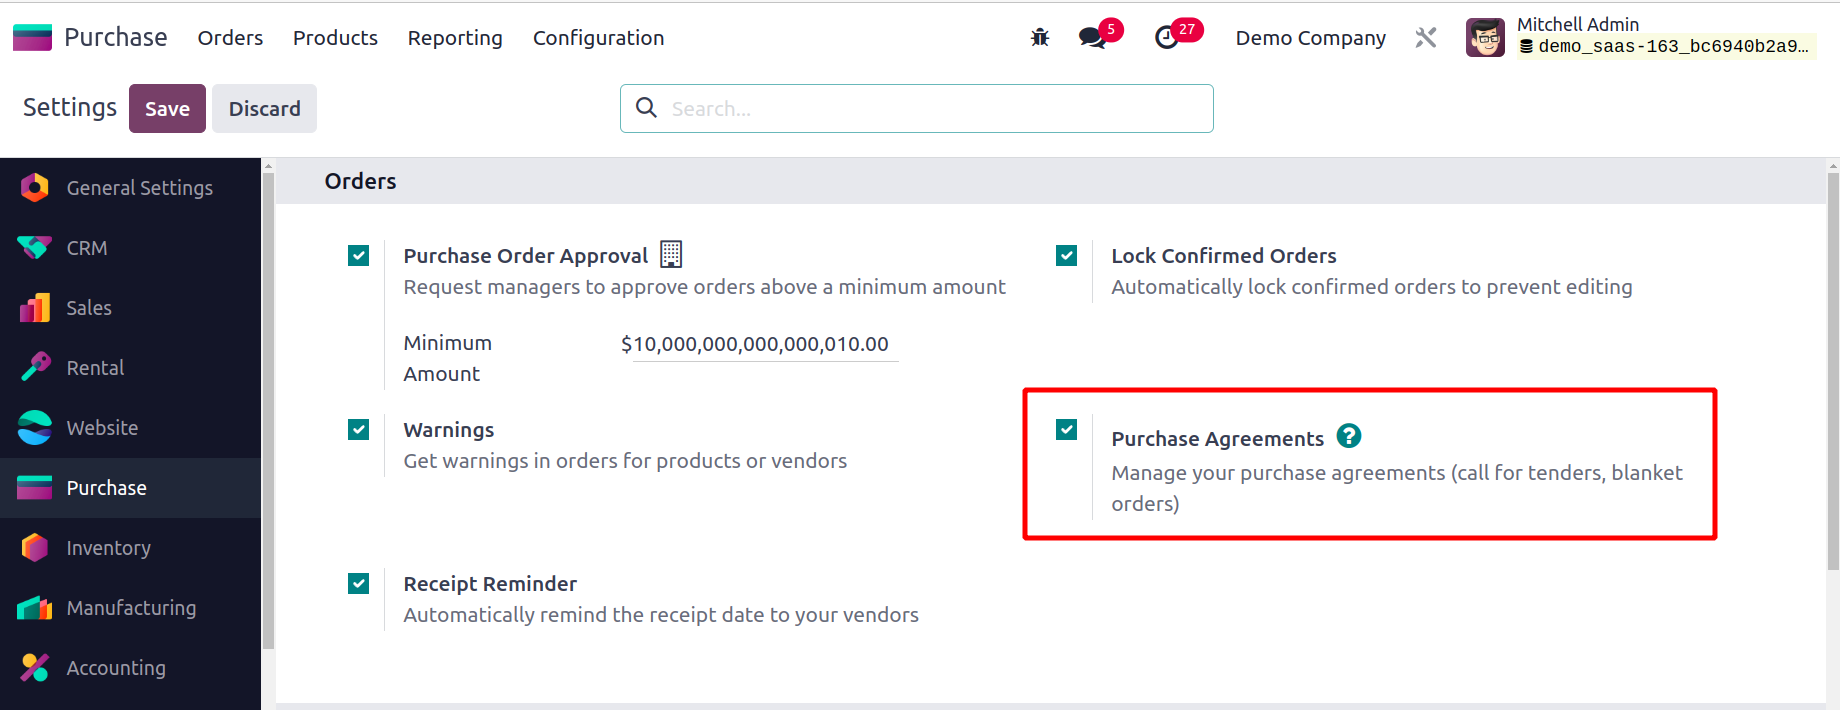
From the Orders page, select the Purchase Agreement option. The two primary types of purchasing agreements in Odoo 17 are Blanket orders and Calls for tenders.
Use the Call for Tender to compare the offers made by several suppliers when you wish to generate requests for quotations from multiple vendors for a specific set of products. When creating a new RFQ, you will receive this feature. As seen in the image below, the RFQ creation window has an Alternatives tab where you may include alternative requests for quotations from various vendors to construct a call for tender.
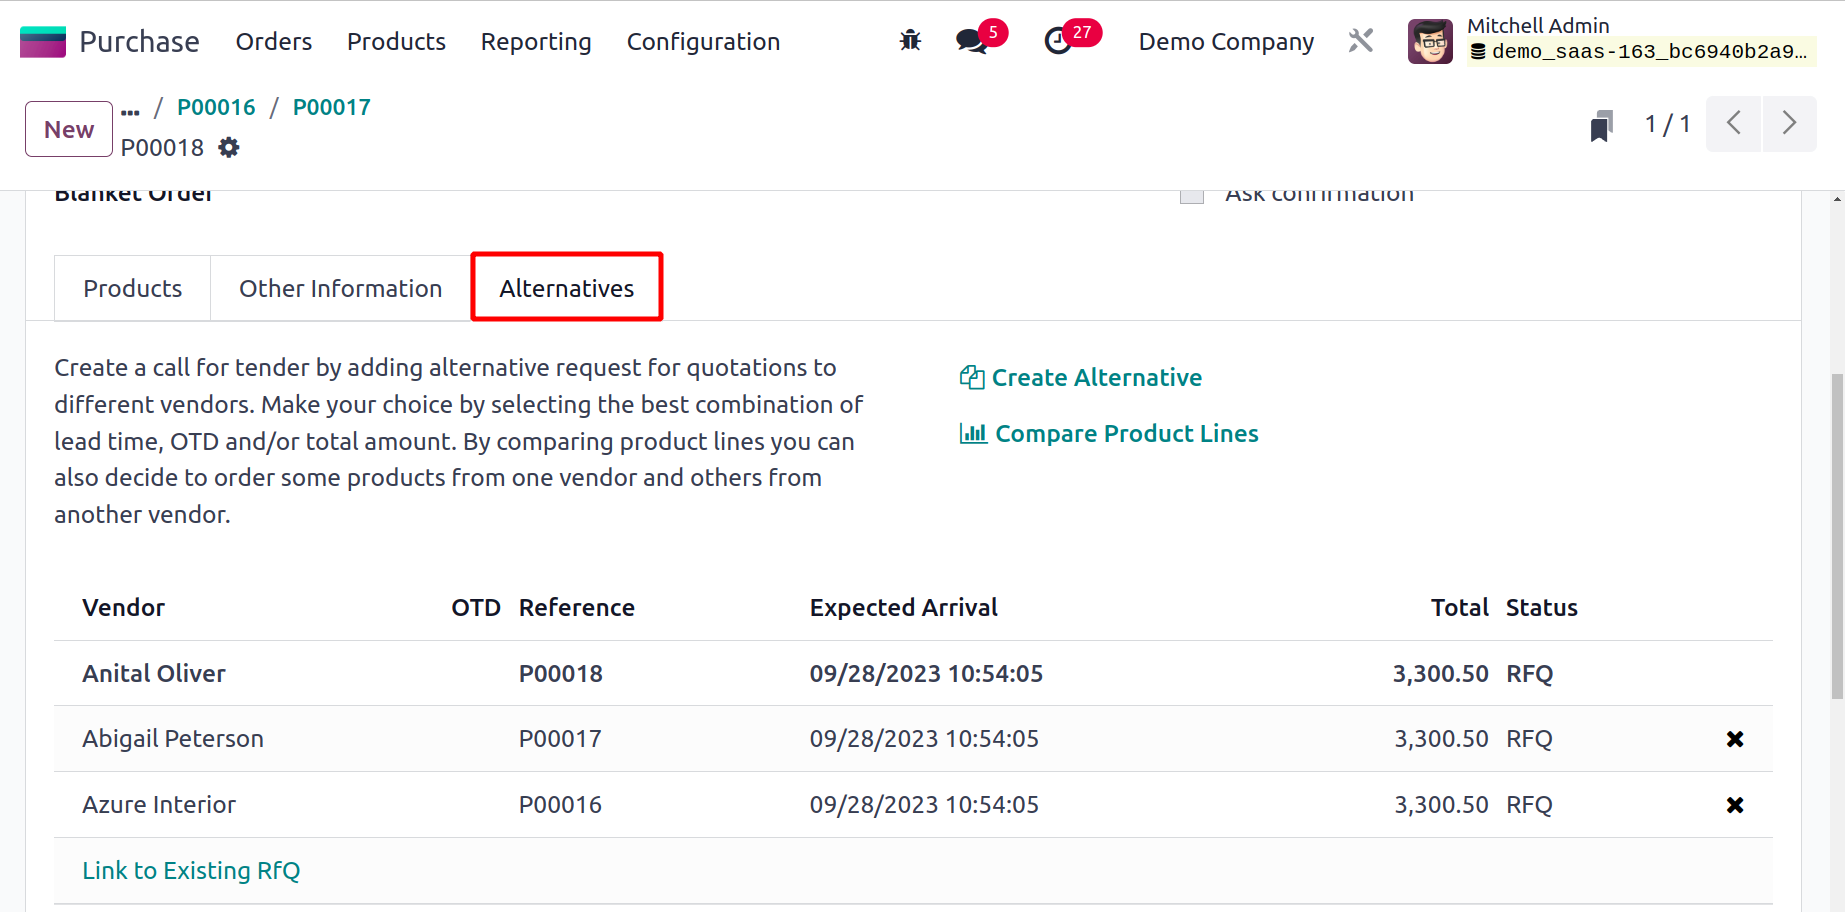
This will enable you to select the most practical quote based on your needs. You can easily choose the appropriate quotation from the provided options after comparing the product lines and rejecting the other quotes.
Create a purchasing agreement with your regular clients with the use of Odoo17's blanket order tool. Customizing products and price lists for specific consumers will be made easier with the help of this feature. This kind of purchase agreement can be used if you want to make repeated purchases from the same vendor, acquire the same product from several suppliers, or receive different products in consecutive deliveries from the same vendor within a specific time frame.
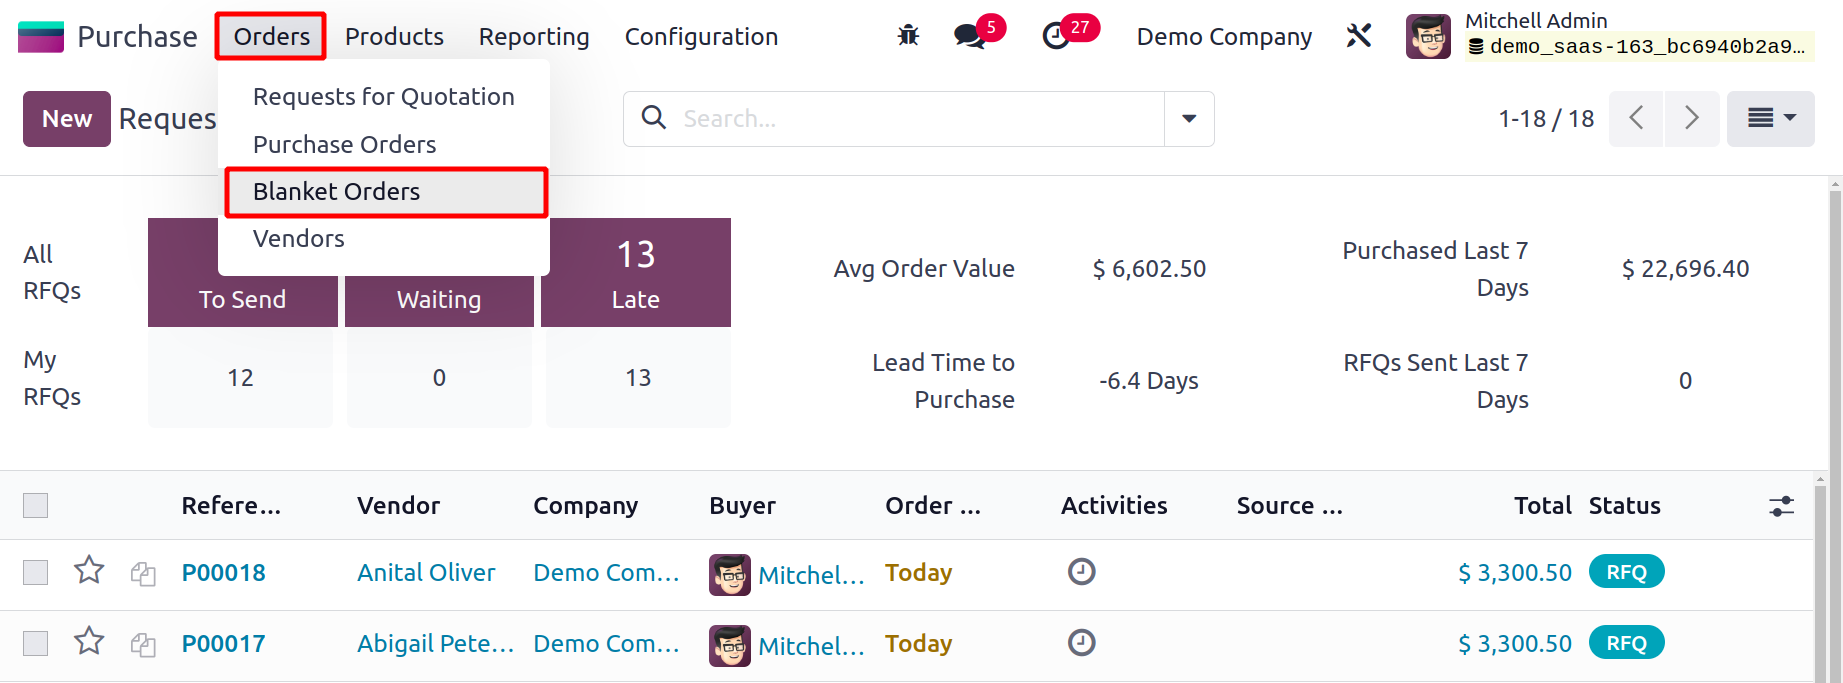
By choosing the correct option from the Orders menu, you may configure and manage Blanket Orders in the Odoo17 Purchase module.
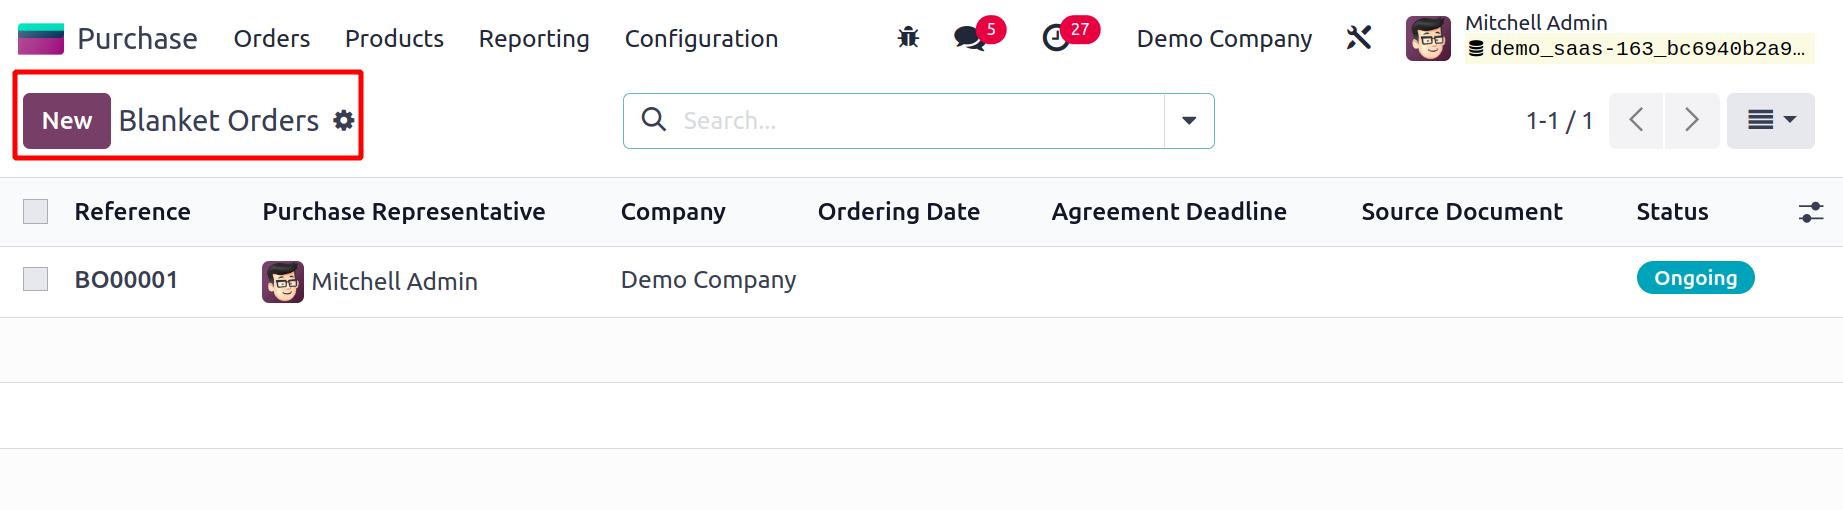
The Reference, Purchase Representative, Company, Ordering Date, Agreement Deadline, Source Document, and Status will all be displayed in the list's preview. The option to view a Kanban is also available in this window. Since we have Odoo17, creating a new blanket order is not a tough procedure.
When you click the New button, a new window will open up where you can enter the details for a fresh blanket order.
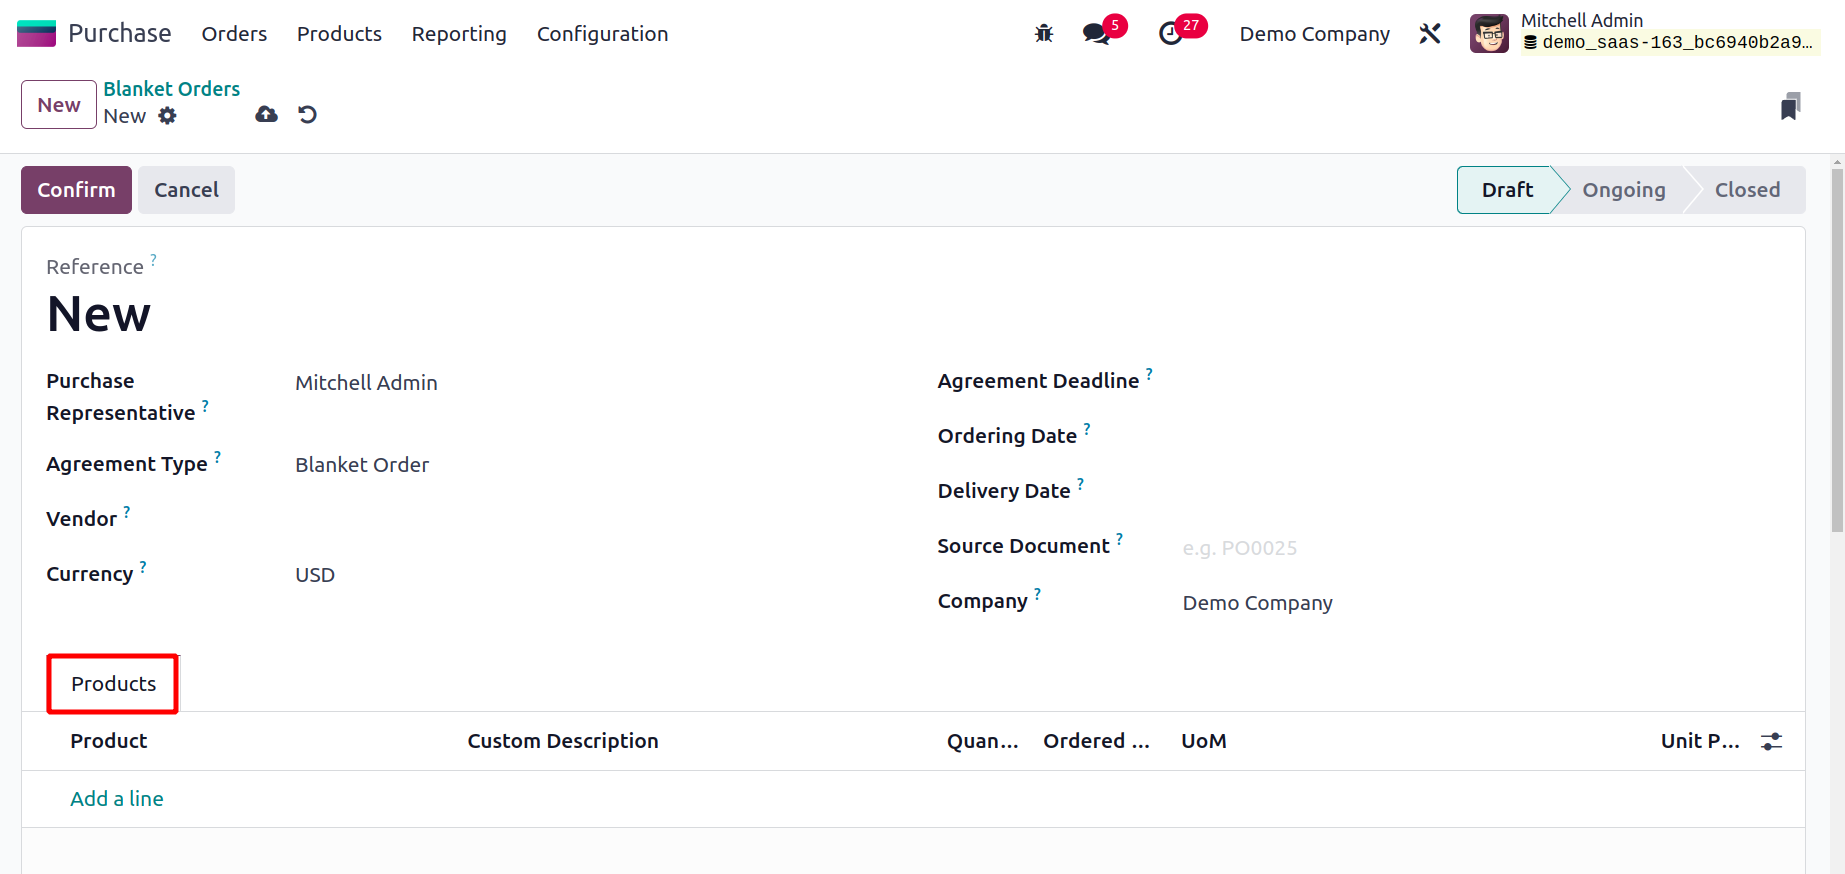
You put the name of your purchasing representative in the area labeled "Purchase Representative." In the relevant field, the Agreement Type will be displayed as Blanket Order. In the Vendor section, you can choose the vendor's name from your contact list.
In the provided field, mention the currency that was utilized for the transaction. You can provide a deadline for the blanket order using the Agreement Deadline box. In the corresponding fields, provide the ordering date and delivery date. The Delivery Date in this context is understood to be the anticipated and planned delivery date for all the products. You can enter the Source Document, Operation Type, and Company information in the corresponding fields.
The products you want to include in the purchase agreement can be added one by one under the Products tab by using the Add a Line button. Remember to provide the Unit Price for the items you added to the contract.
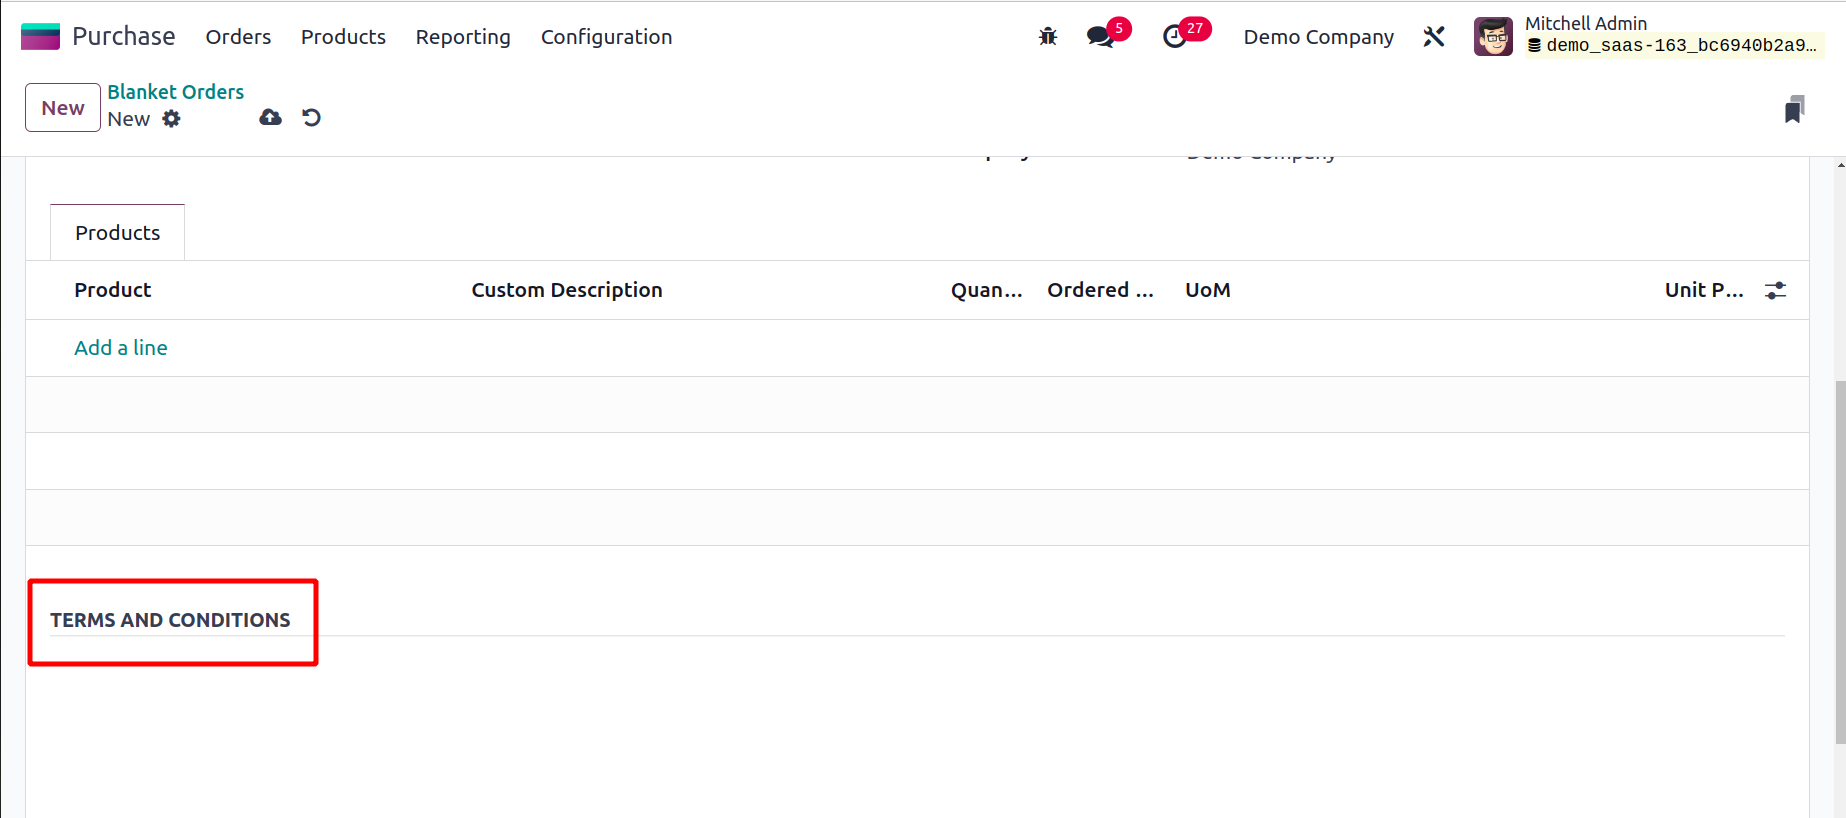
There will be an additional field accessible for mentioning the agreement's Terms and Conditions. Here is a sample purchase agreement that we have put together.
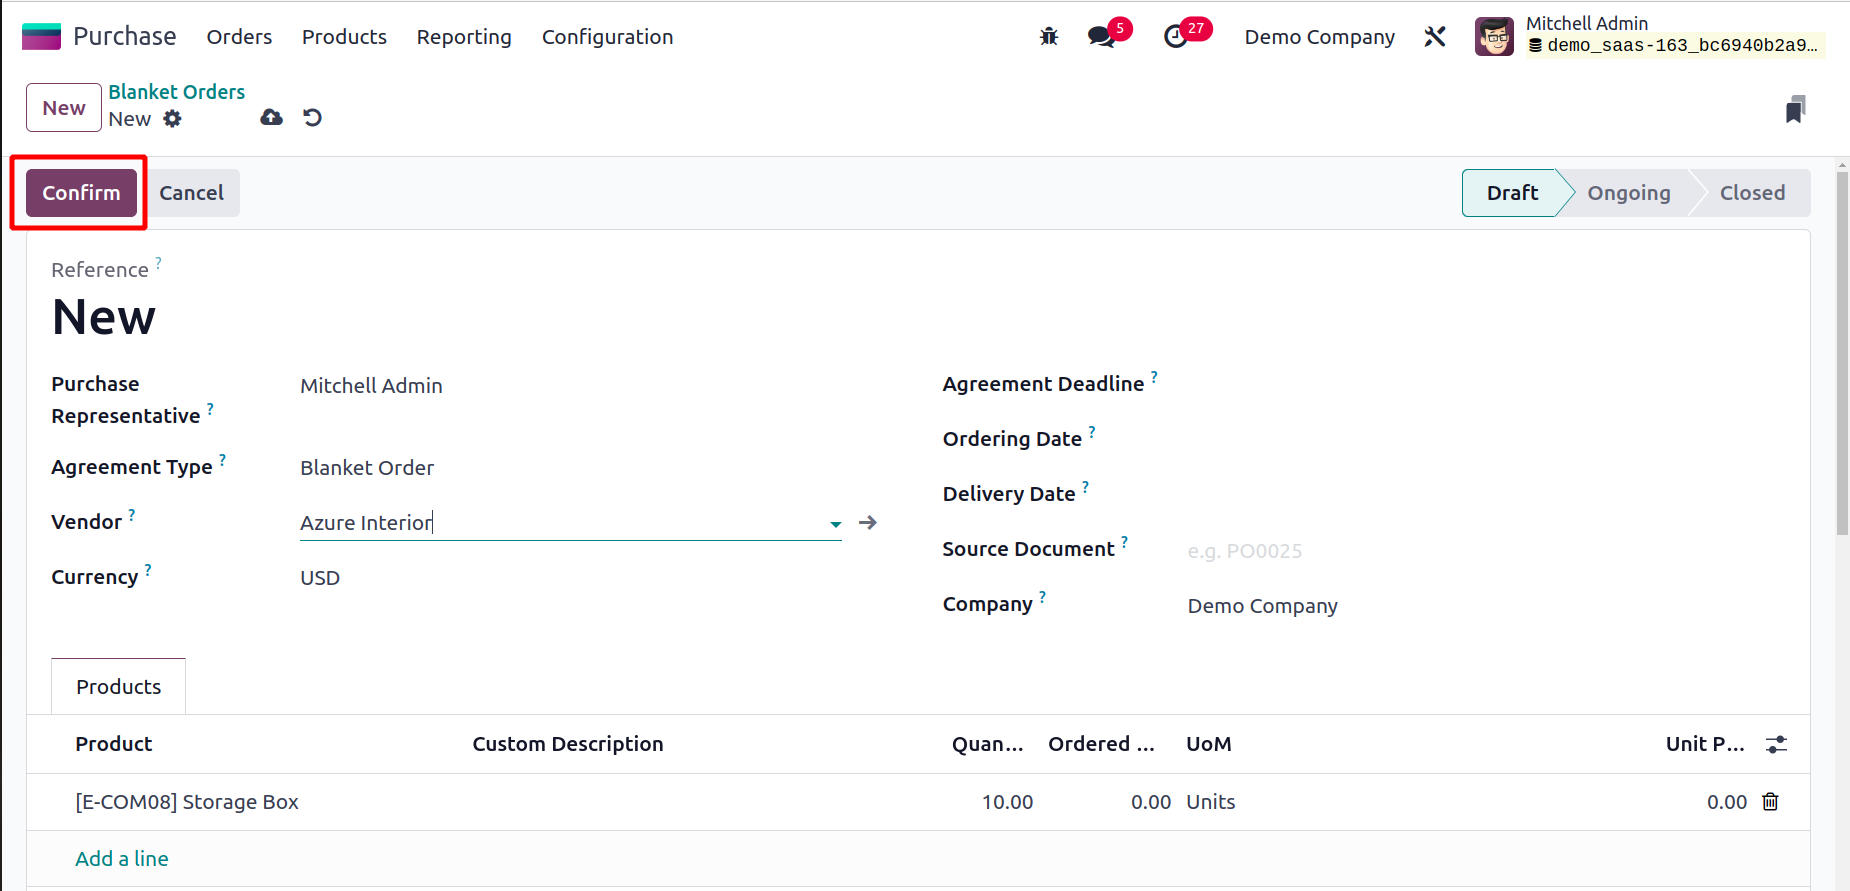
Using the Confirm option, you can now confirm the blanket order. Odoo17's status will change from Draft to Ongoing as soon as you approve the broad order. Once the deadline has passed, the agreement will be automatically changed to the Closed state.
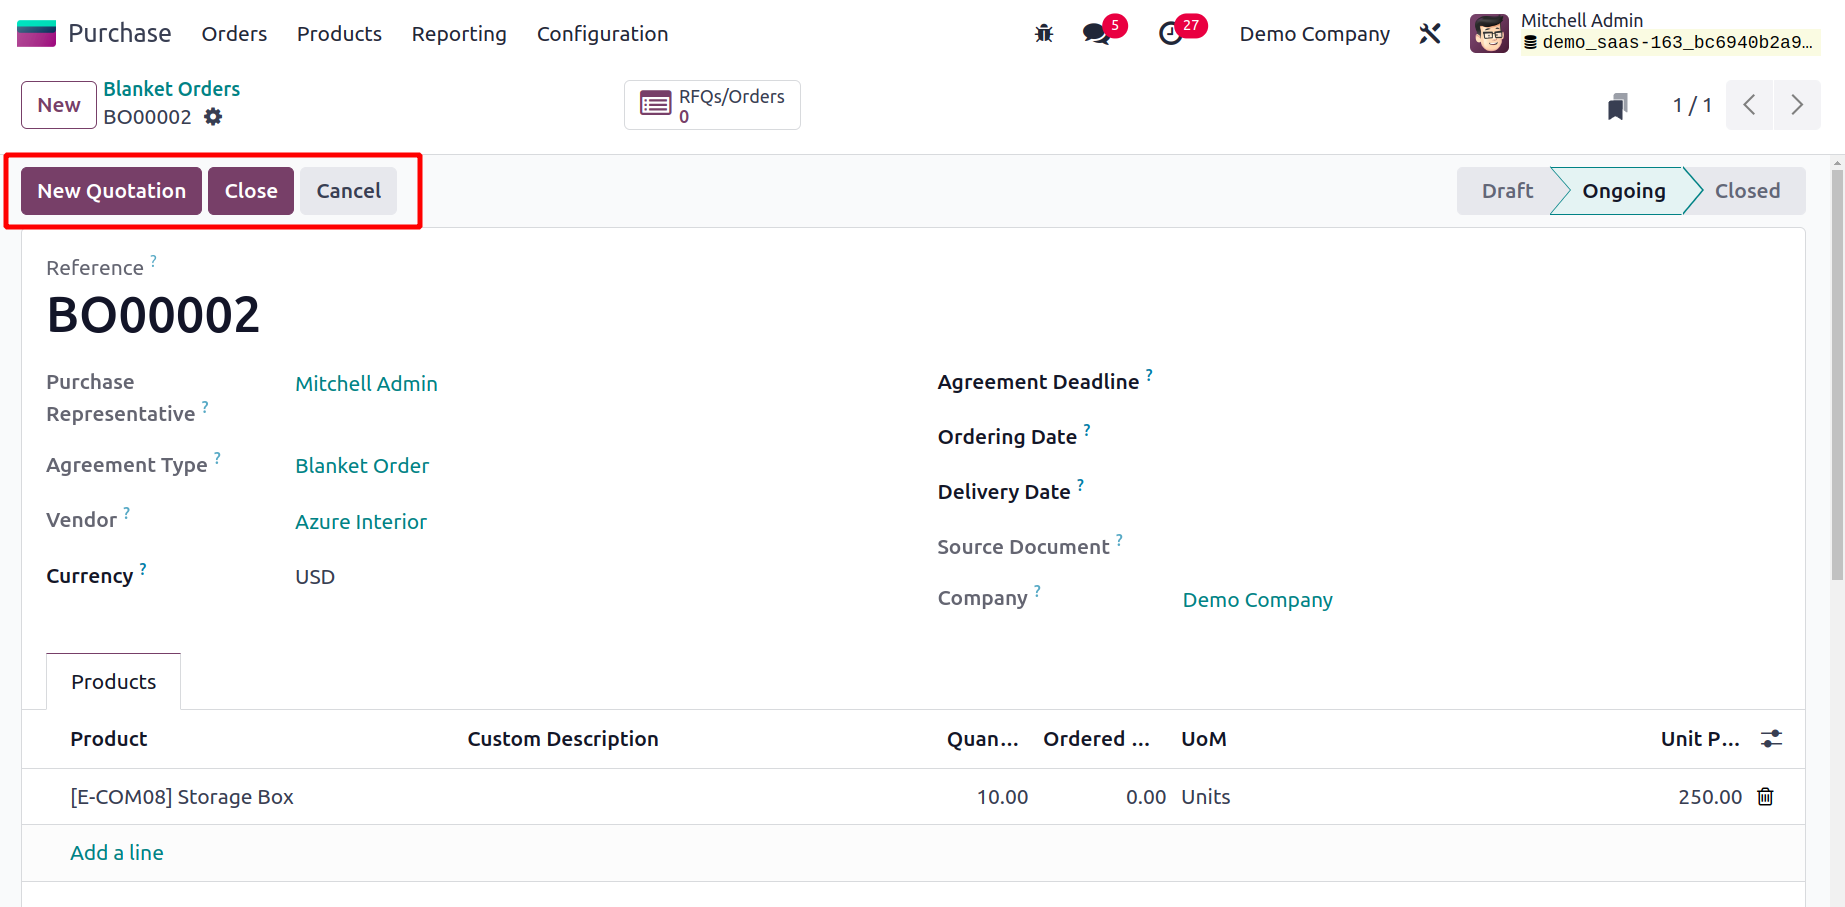
You can build new RFQs and Purchase Orders in Odoo17 using this blanket order. Odoo17 has enabled the New Quotation button on the blanket order page itself to make this procedure simpler and will take you right to the quotation creation window.
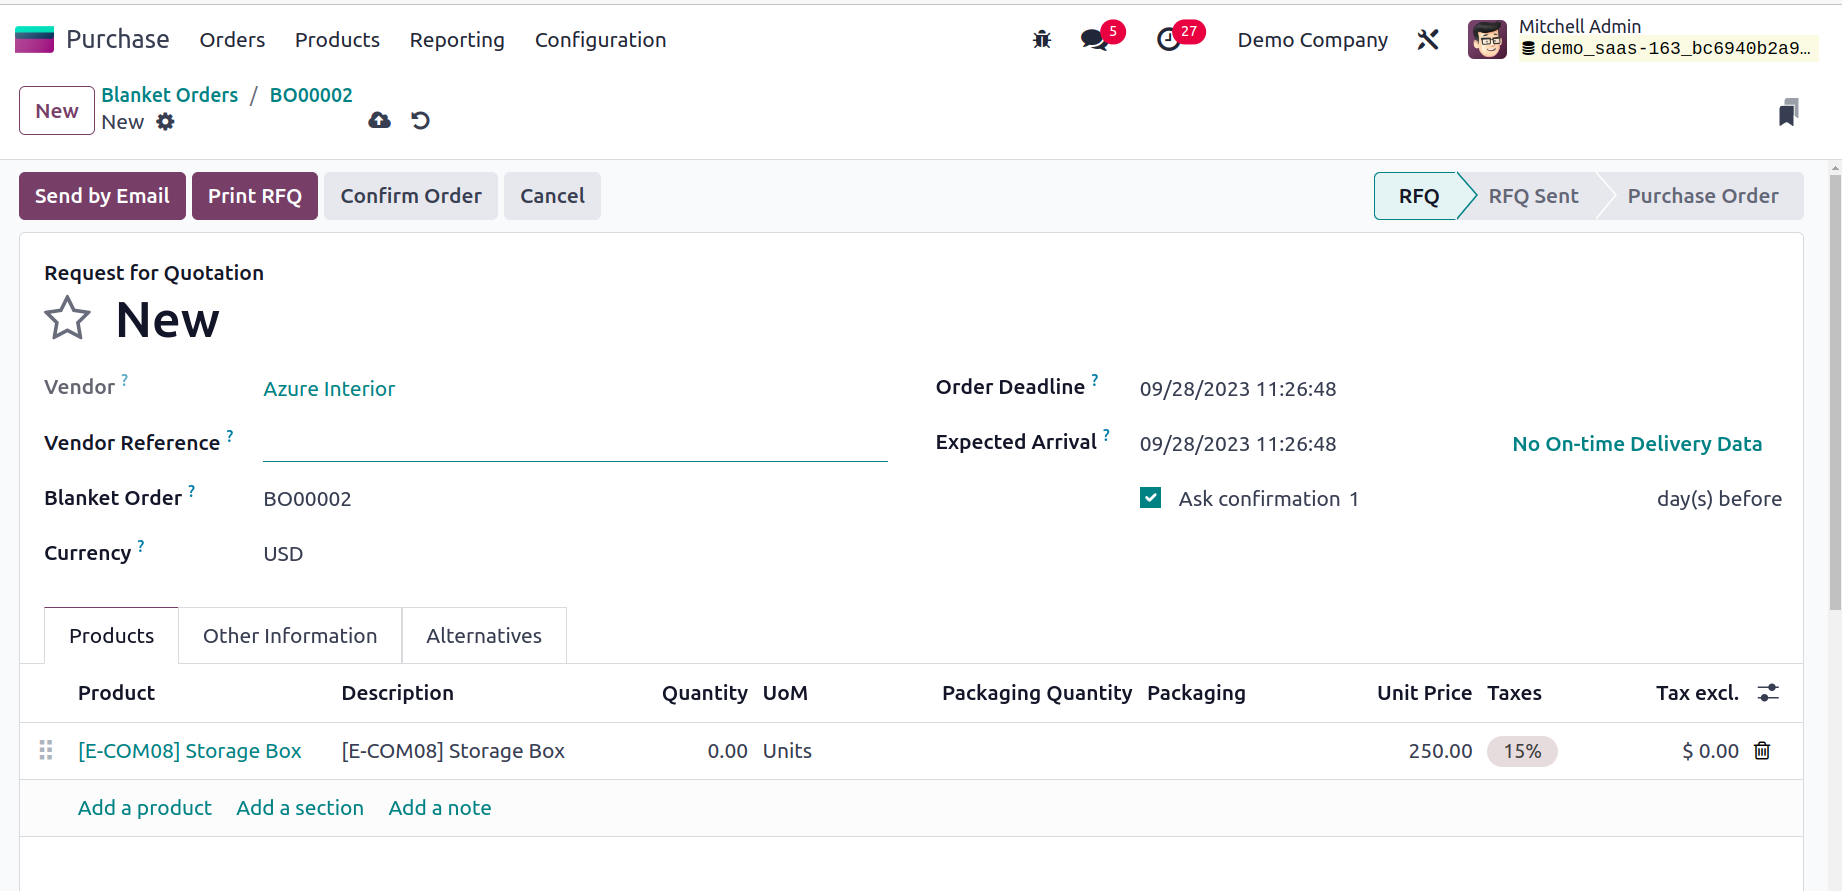
In the appropriate fields of the RFQ, as indicated in the figure above, the information mentioned in the purchase agreement will immediately display. Just as we covered earlier in the section Request for Quotation, you can confirm the information and manage the RFQ. This blanket order may be used more than once to buy the same item from the same seller during the defined time frame.
Warning Messages
When an enterprise manages its buying activities, Odoo17 always ensures protection. You can produce warnings or block messages on purchase orders based on the vendors or items contained in the purchase order by using the warning messages feature offered by Odoo 17. You can take advantage of this function whenever you run into issues with certain sellers or products. Let's examine how this function operates in the Purchase module.
You can turn on the Warnings option found under the Orders tab from the module's Settings menu.
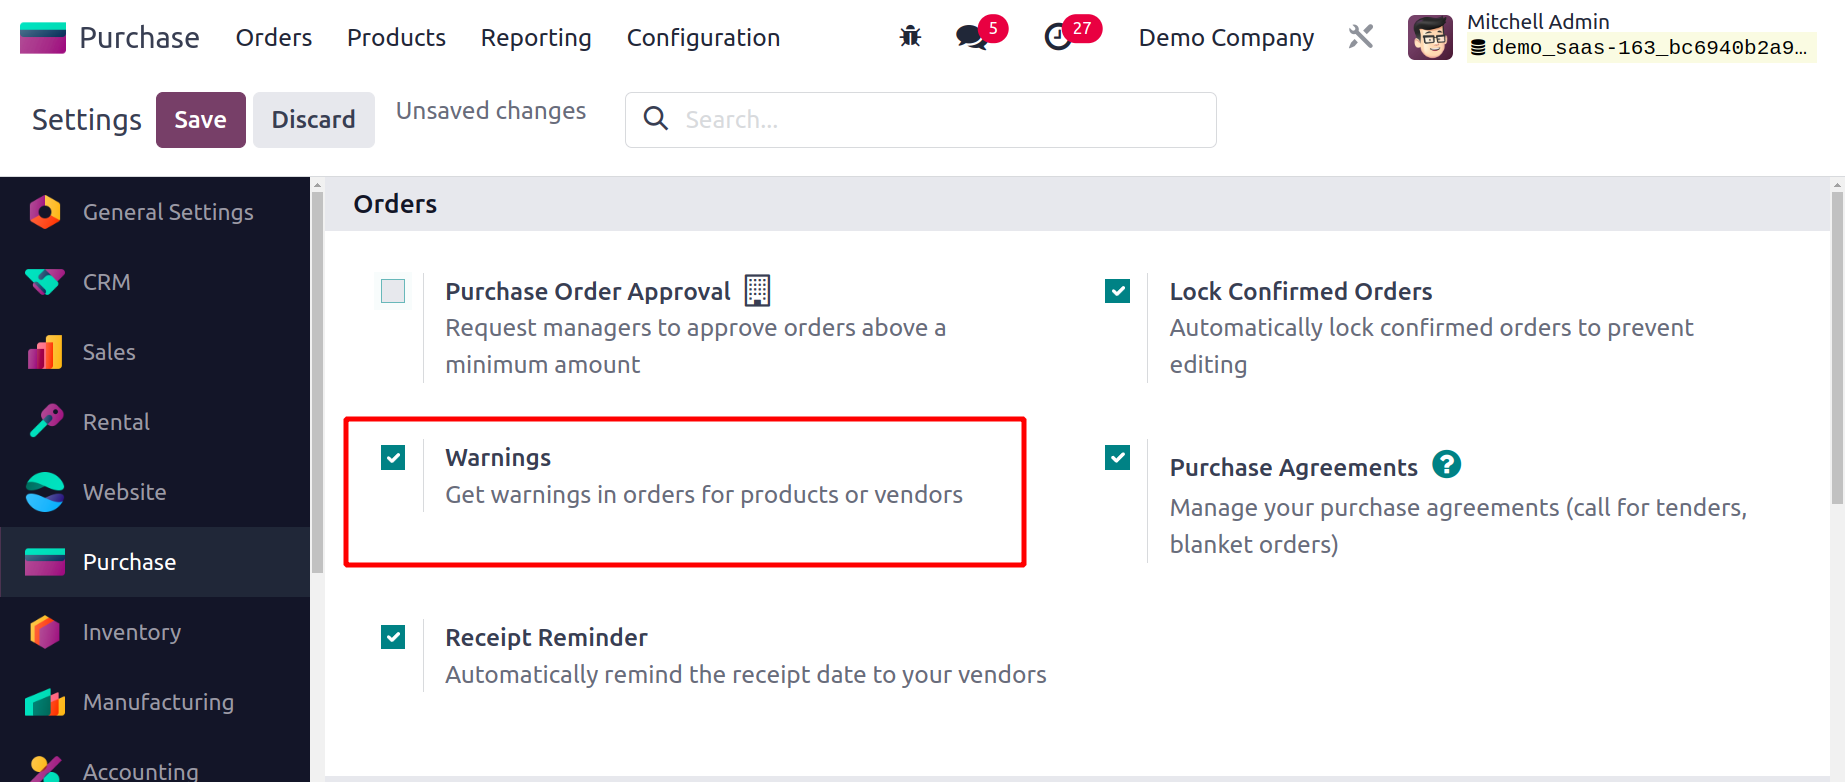
To save the new modifications after activating this function, be sure to click the Save button. In your Purchase module, you can now specify warning messages for products and sellers.
You will also have the opportunity to customize the vendor's warning messages in the vendor management box, as illustrated in the screenshot below.
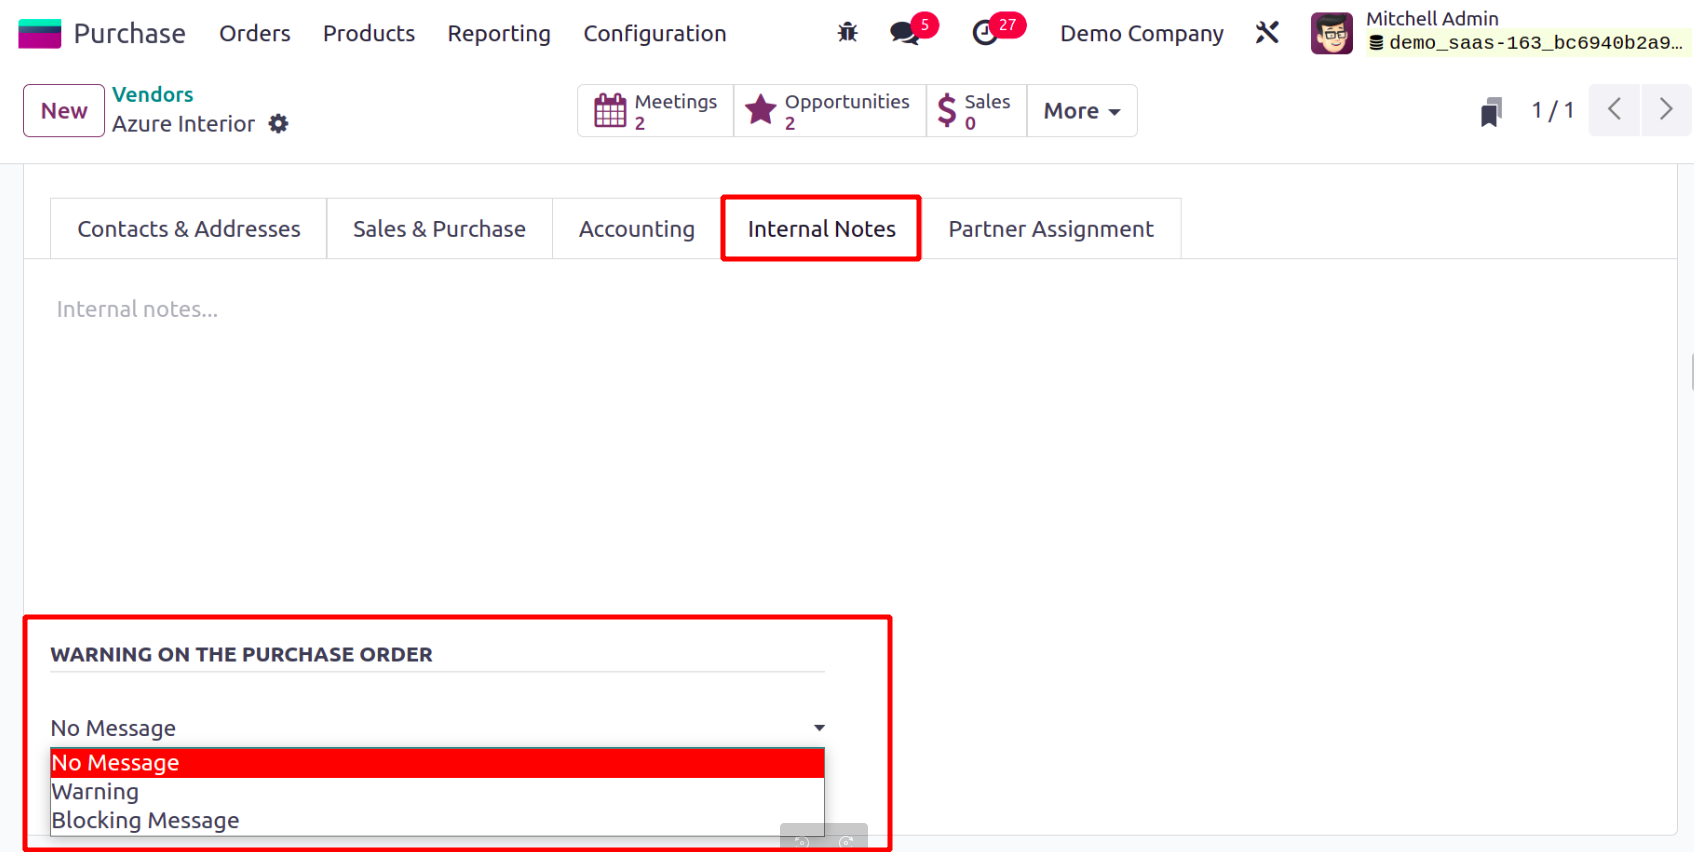
You can choose a suitable operation from the available options for the buy order with this vendor under the Warning on the buy Order option under the Internal Notes tab. You can choose No Message if you don't want to generate any sort of warning message. You can issue warnings using the Warning option and block communications using the Blocking Message option, respectively, if you encounter any problems with this vendor.
The products will also have access to this capability. You can find the Warning function under the Purchase tab in the product details window, as seen below.
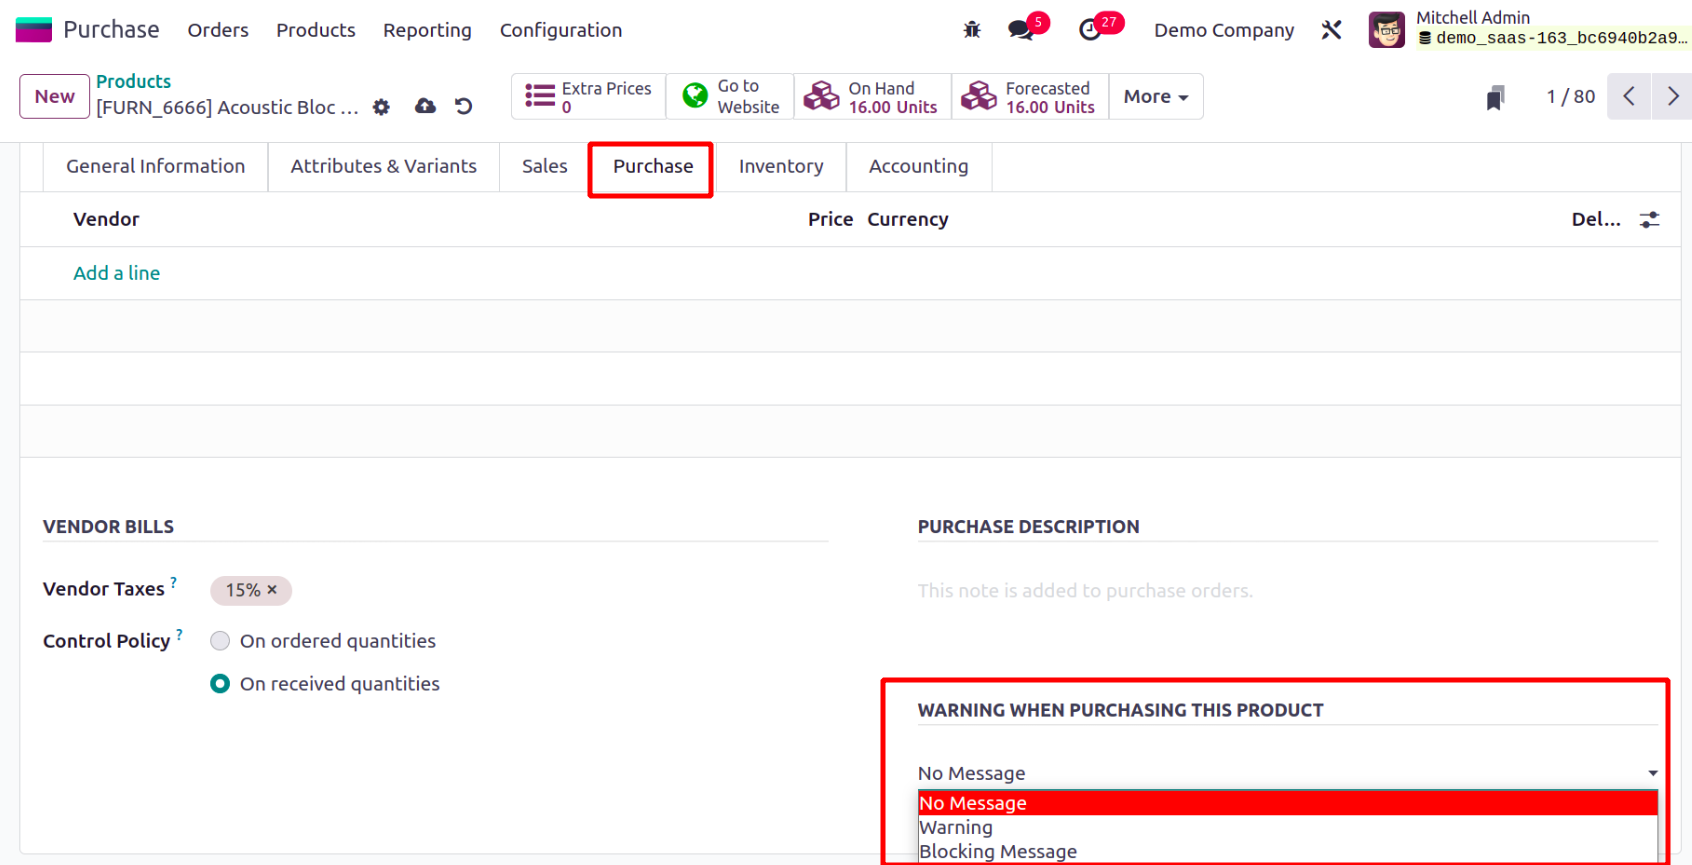
Odoo17 will automatically send you a warning message when you confirm a purchase order with a vendor or product that has a warning so that you are aware of the problem with the chosen vendor or product.
We will now talk about the invoices and celebrations for 3-way matching purchases
3-Way Matching
You may make sure that you only pay the vendor bill for the goods that are delivered to your address by using the Odoo 17 Purchase module's 3-Way Matching Purchase Receptions and Bills feature. Before receiving the things purchased in the purchase order, vendors may send you vendor bills. You might want to wait to make the payment until the things are received, though. In these situations, you can utilize Odoo's 3-Way Matching Purchase Receptions and Bills tool to determine whether or not the vendor bill needs to be paid. This will compare the data on the vendor bill, receipt, and purchase order. This function will prevent you from paying erroneous or fraudulent vendor bills.
The 3-Way Matching Purchase Receptions and Bills feature must first be enabled from the Settings menu of the Purchase module.
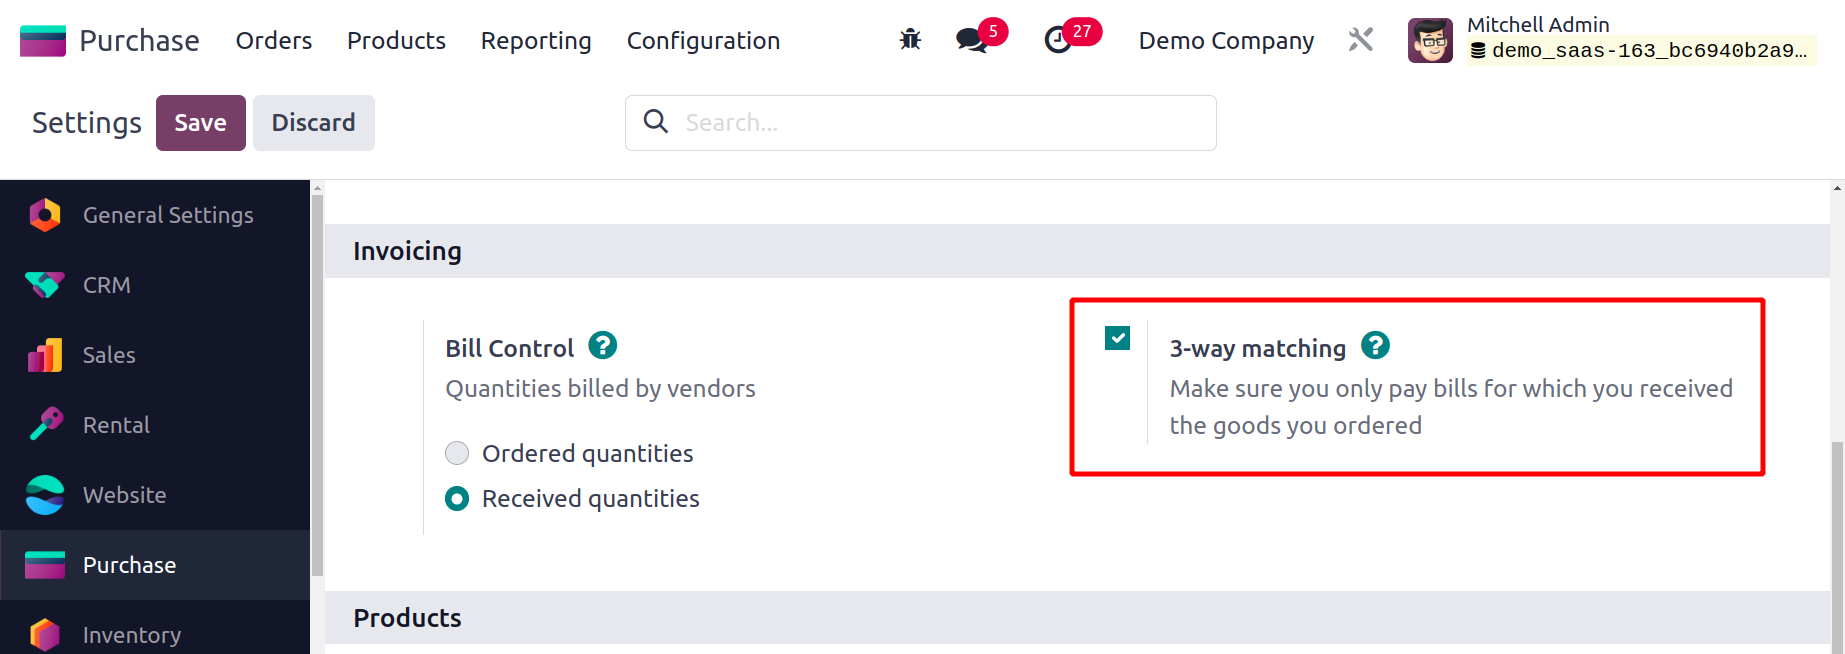
As seen in the above image, you can find this feature under the Invoicing tab. Keep in mind that the Received Quantities must be established for the bill control policy. From the Settings menu or the product details window of the item you want to order, you may change the control policy.
You can establish a new purchase order with the items for which the control policy on received quantities has been defined after activating the 3-way matching purchase receptions and bills feature. If you should pay the bill or not will be indicated on the vendor bill for this purchase order. On the vendor bill, Odoo17 will show one of the three potential default values shown below.
-
Yes means that the things have been delivered and that the bill is due.
-
No means that you shouldn't pay the bill because the goods you ordered haven't been delivered yet.
-
The word "Exception" denotes a discrepancy between the quantities you purchased, were paid for, and were actually given.
the vendor bill, Odoo17 will automatically set this value. Let's see how it functions in Odoo 17.
By selecting the Receive Products button after completing the purchase order, you can get the items you requested.
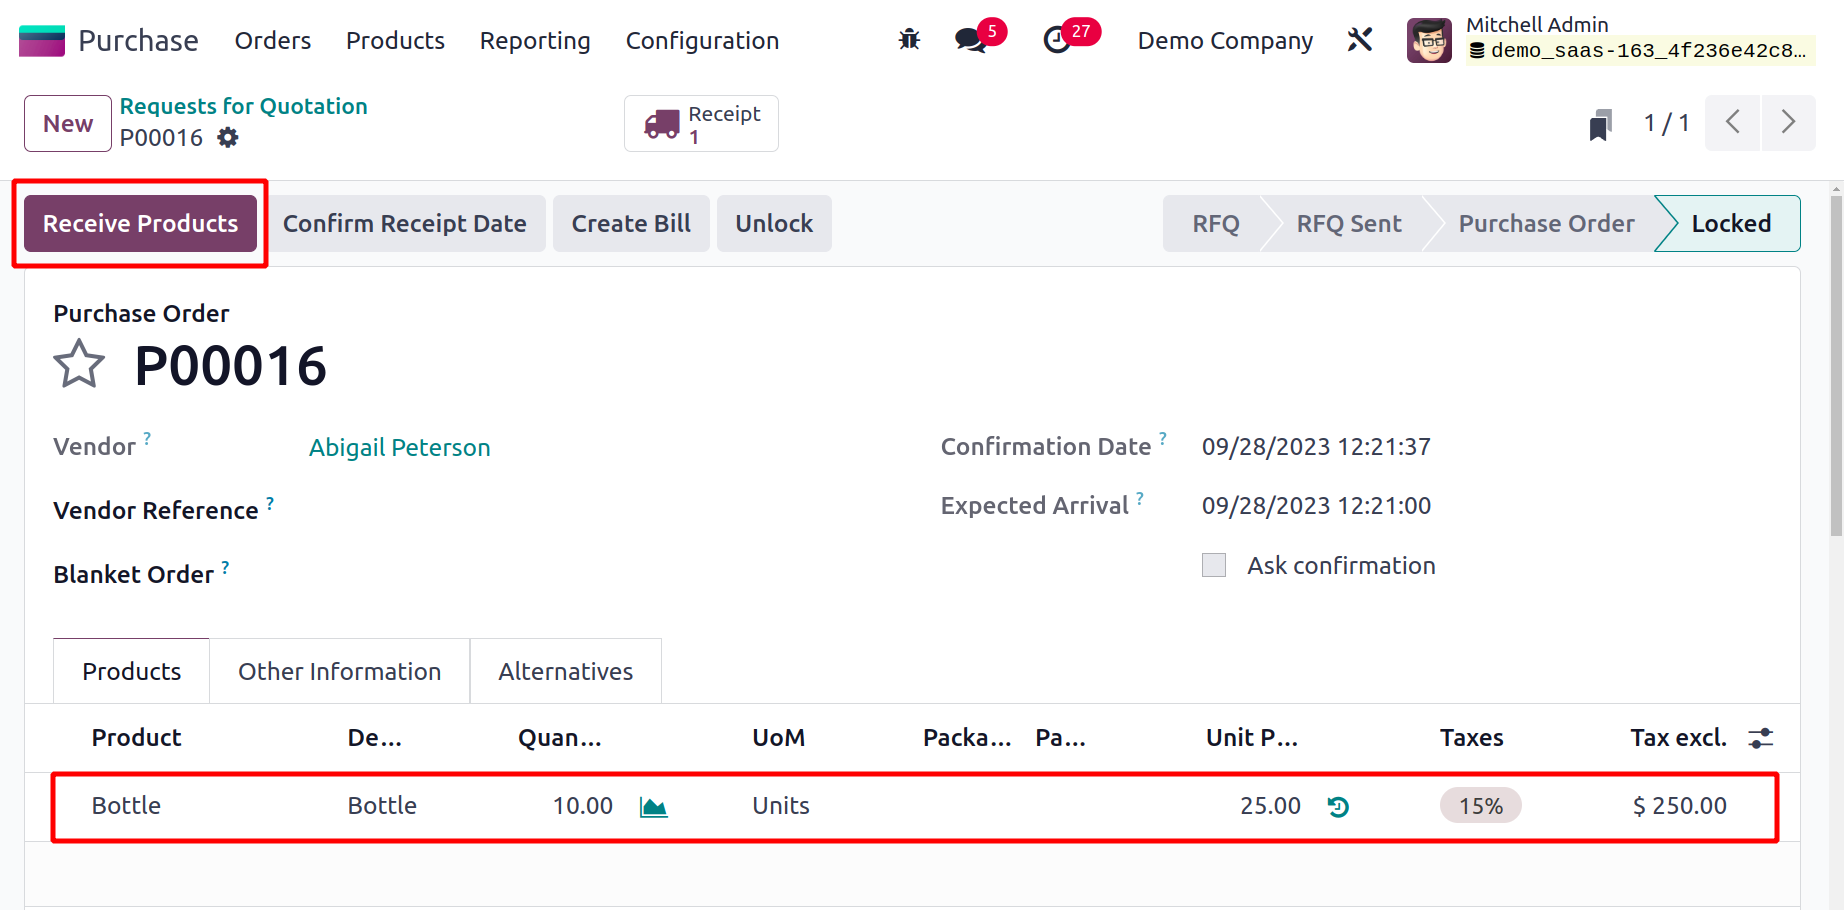
For this purchase, you can verify the receipt and create a vendor bill.
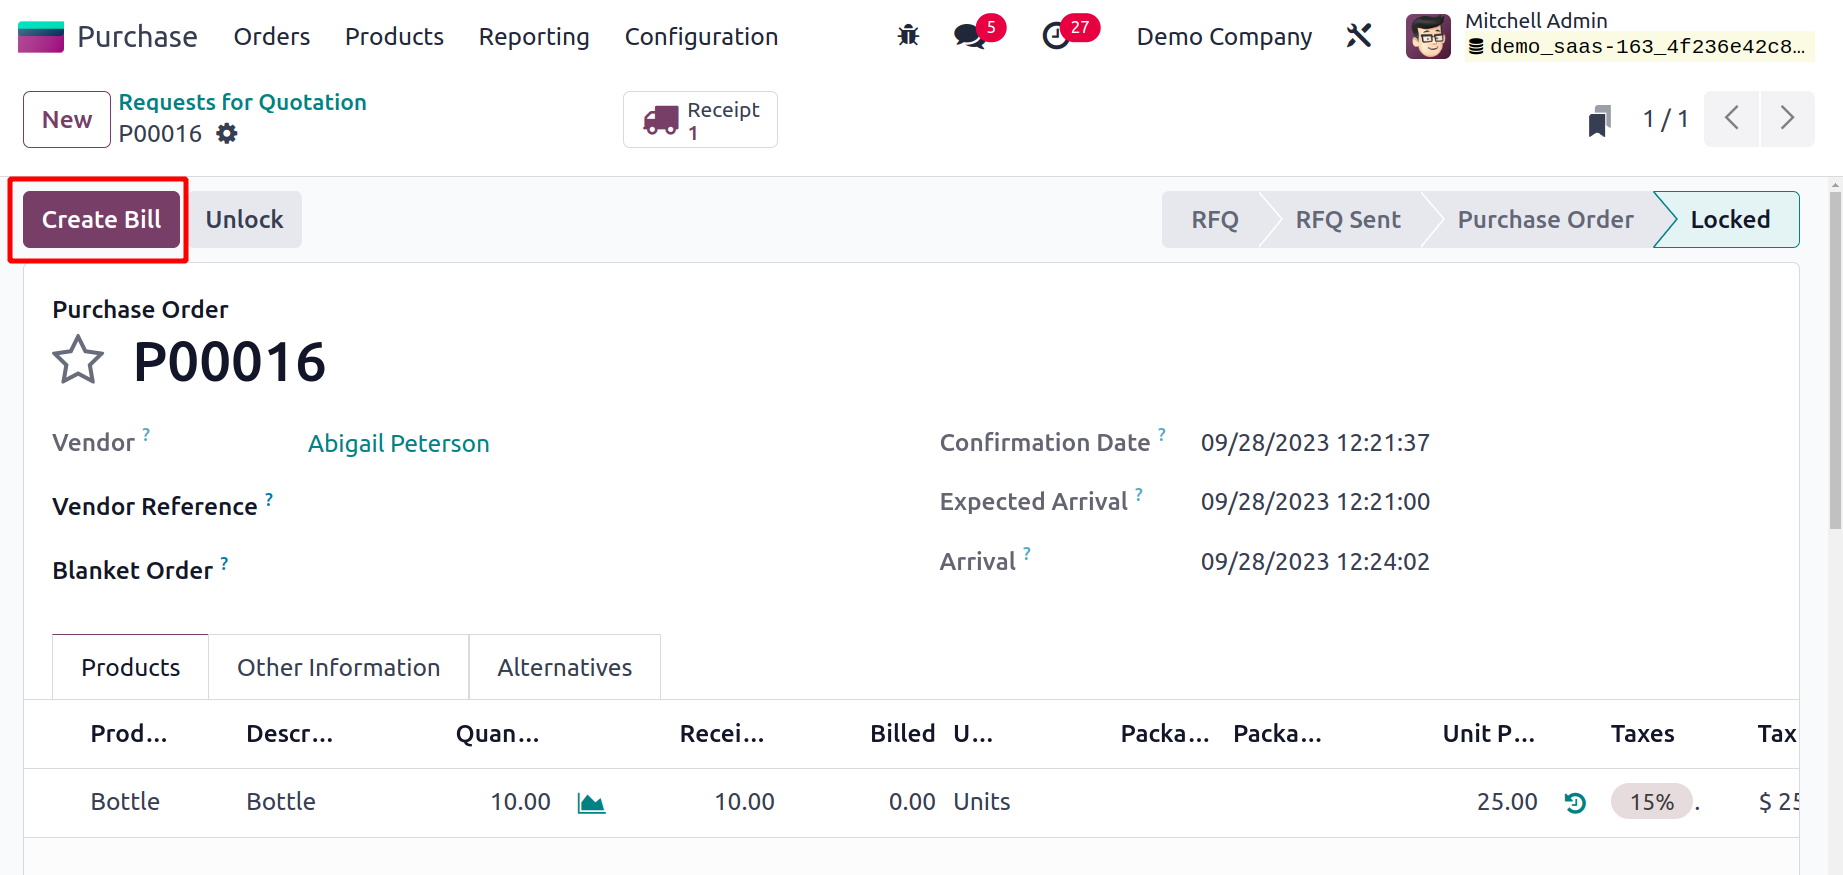
You can create a new vendor bill with the help of the Create Bill button. Odoo17 will automatically indicate whether you need to pay the amount under the Other Information tab of the vendor bill.
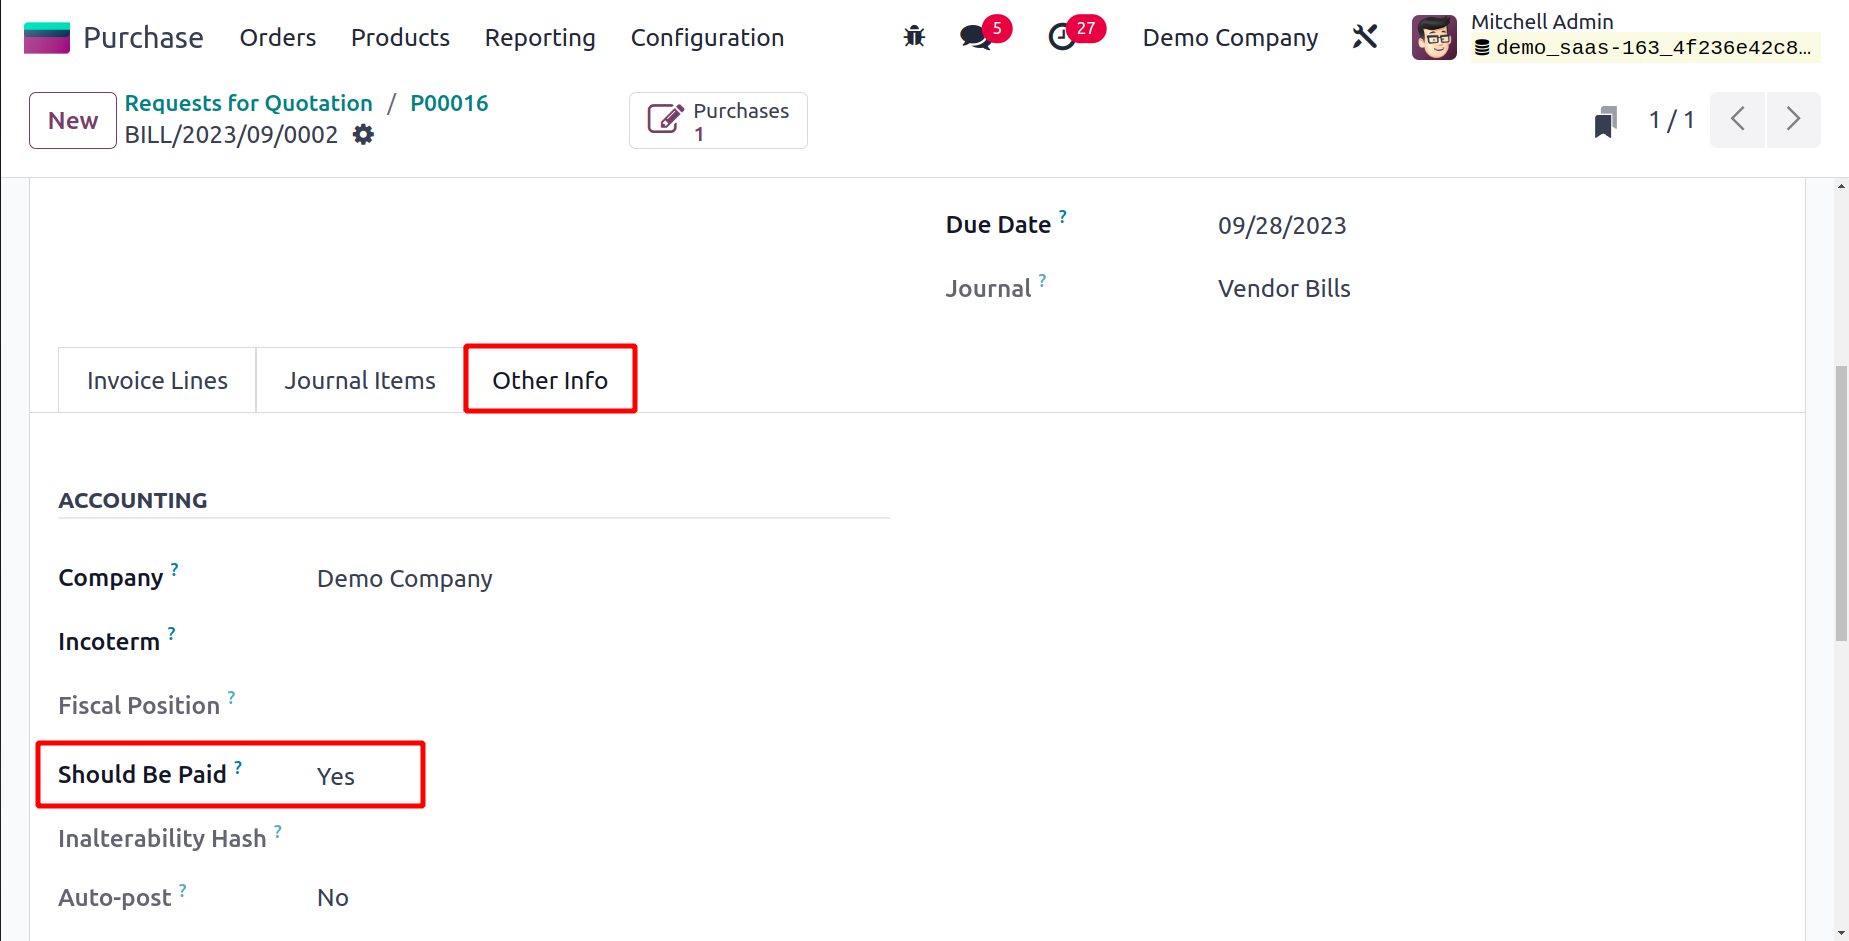
As you can see in the image above, it says Yes, indicating that since you received the items you bought, you should pay this vendor's charge.
Let's now talk about the Dropshipping function offered by the Purchase module.
Dropshipping
For sellers who don't want to hold an inventory, dropshipping is one of the practical shipping options available. You can ship goods straight from the vendor to the buyer using this technique. Since there is no need to maintain warehouses because deliveries are made directly from suppliers to customers, it will be more advantageous to the merchants. The dropshipping approach will assist you in sending the products to the consumer directly from the supplier or manufacturer rather than maintaining an inventory.
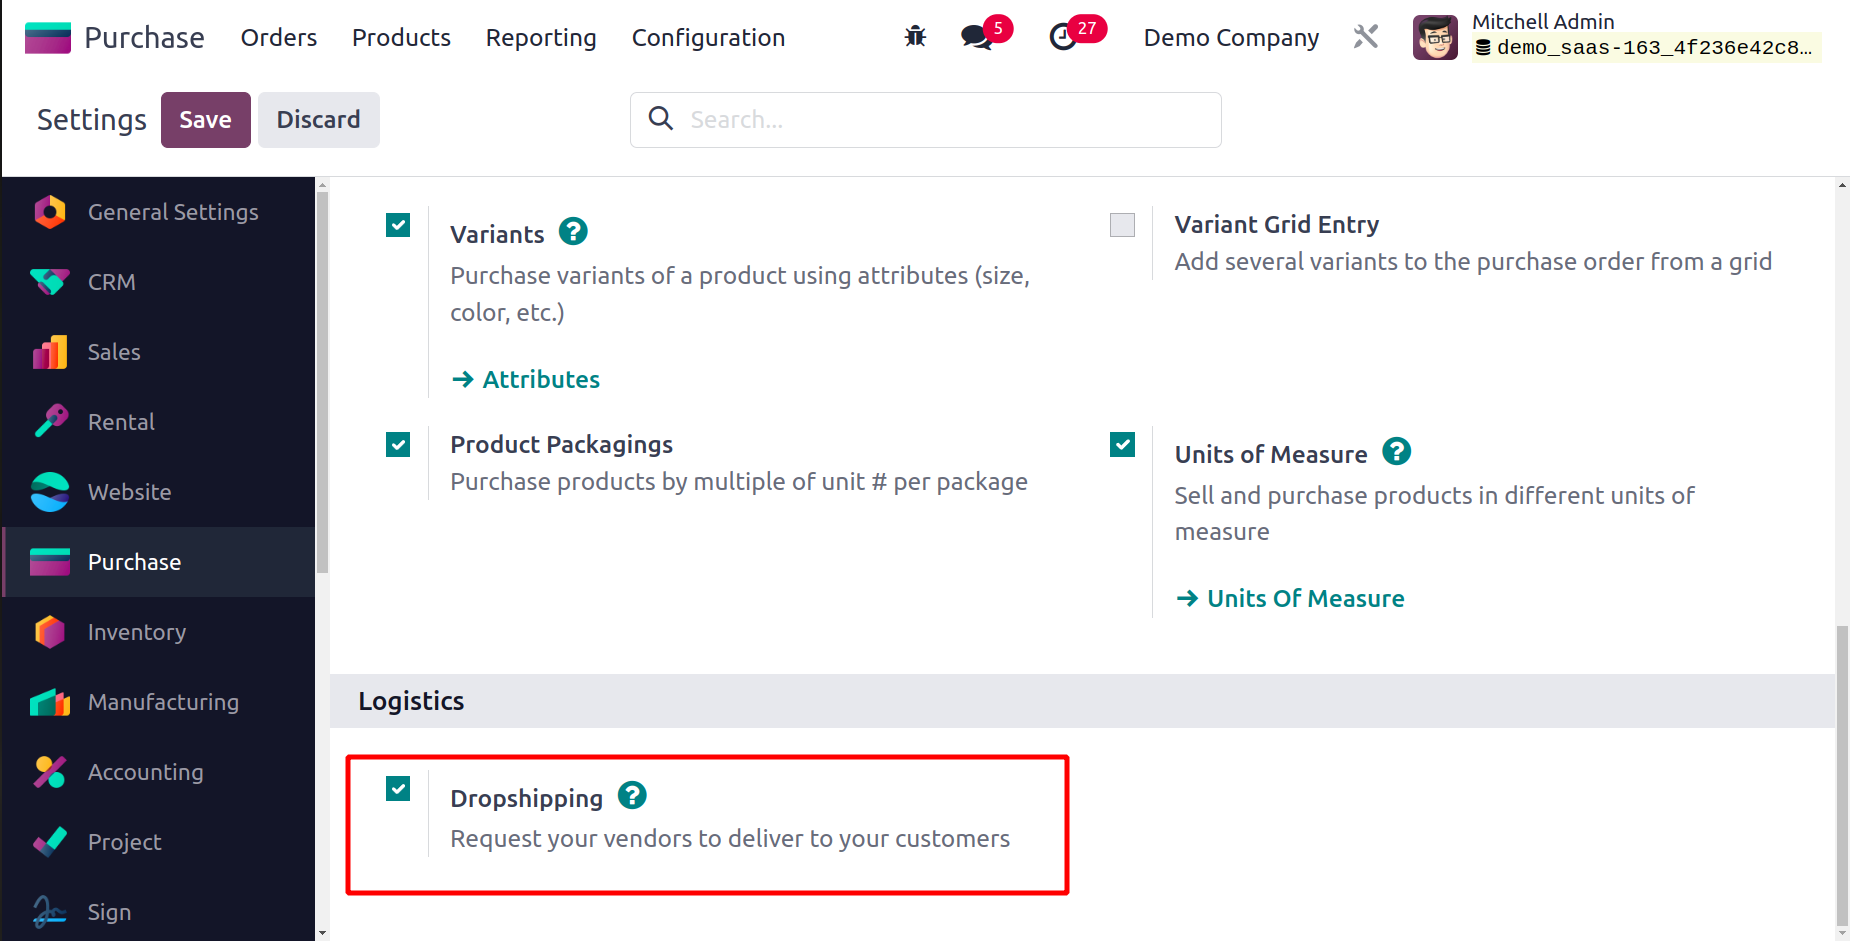
In Odoo17, you may activate the Drop-shipping method from the Settings menu of the Purchase module. The option will be accessible under the Logistics tab, as shown in the image below.
 As indicated in the image below, you can now specify the product that you wish to dropship and set the routes of operation to Dropship. On the product detail form's Inventory tab, the choice is available.
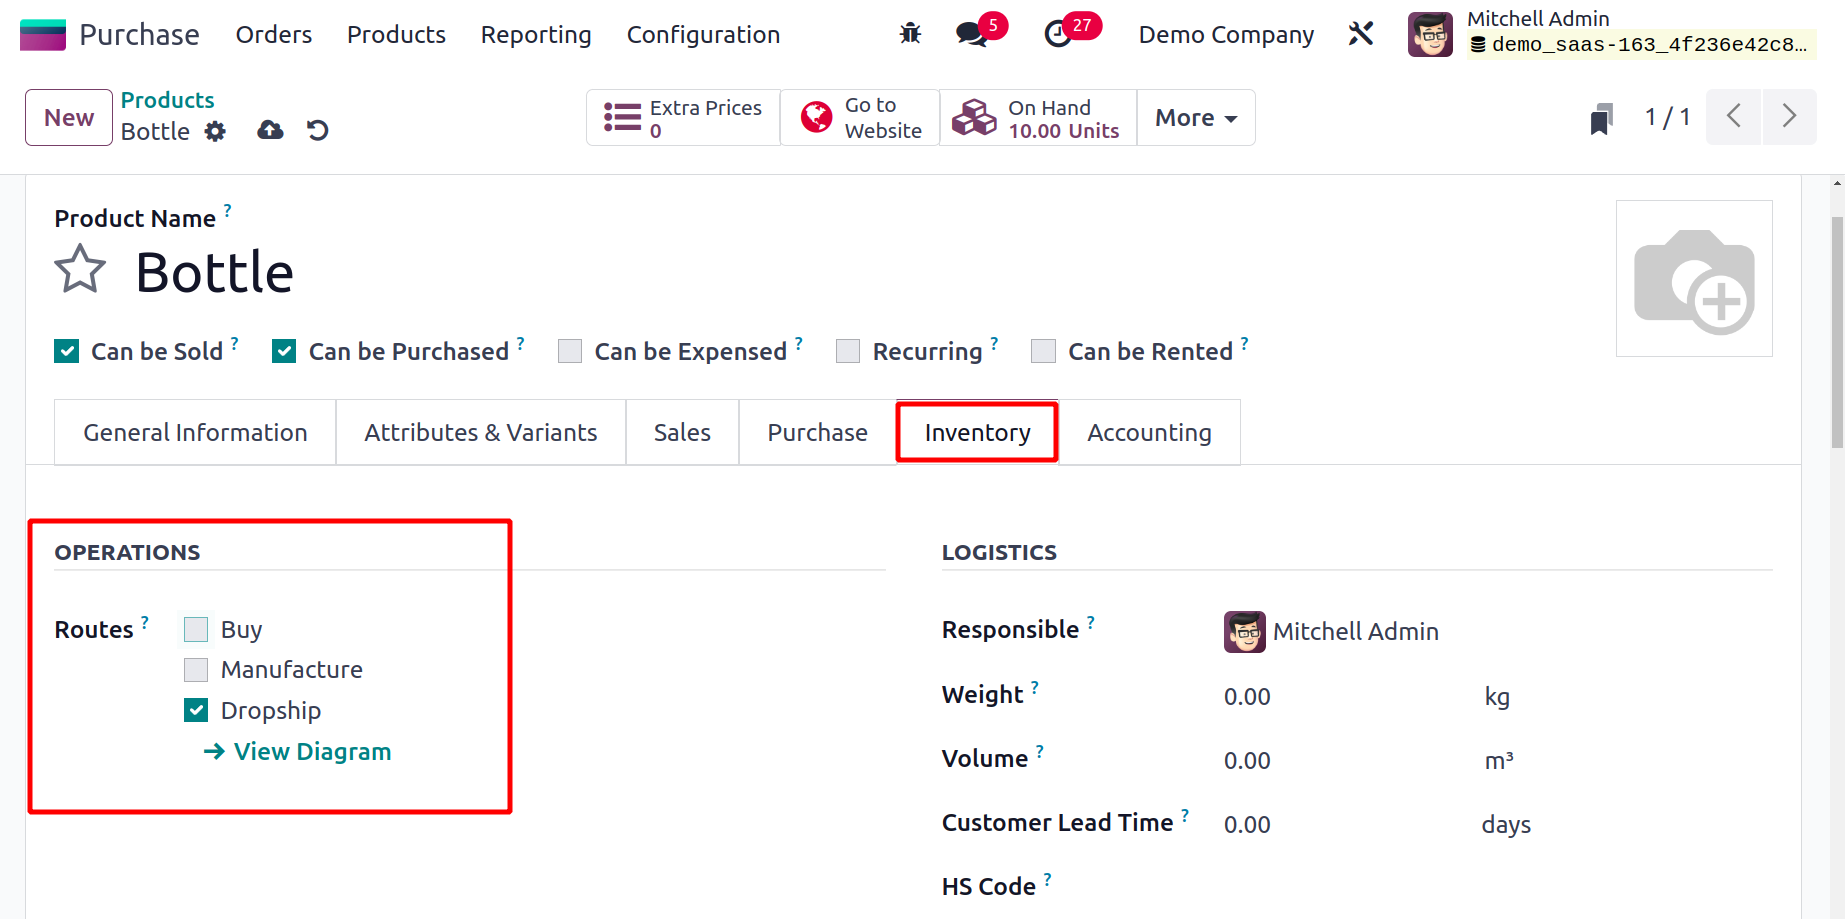 With the aid of the Inventory module, you may control a product's operational pathways.
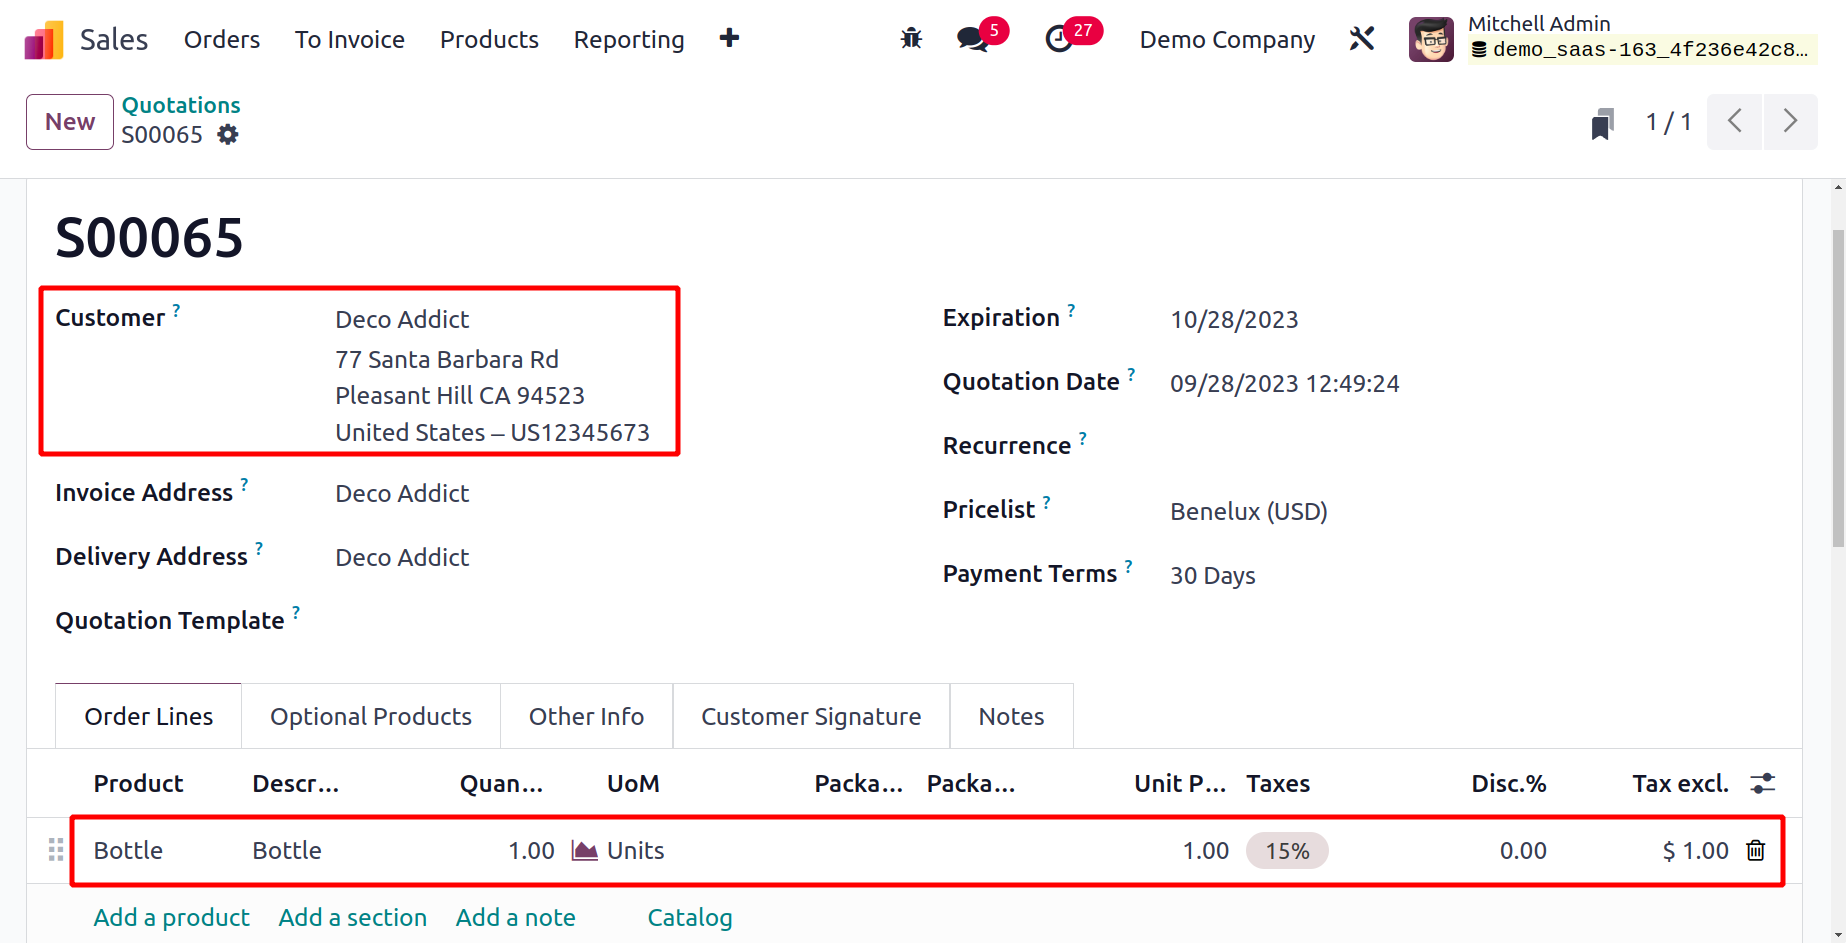 From the Sales module, you can now generate a sales order for this product. The relevant field can be used to include the customer's information.A purchase order for this item from the relevant vendor will be automatically generated as soon as you confirm the sales order by clicking the Confirm button.
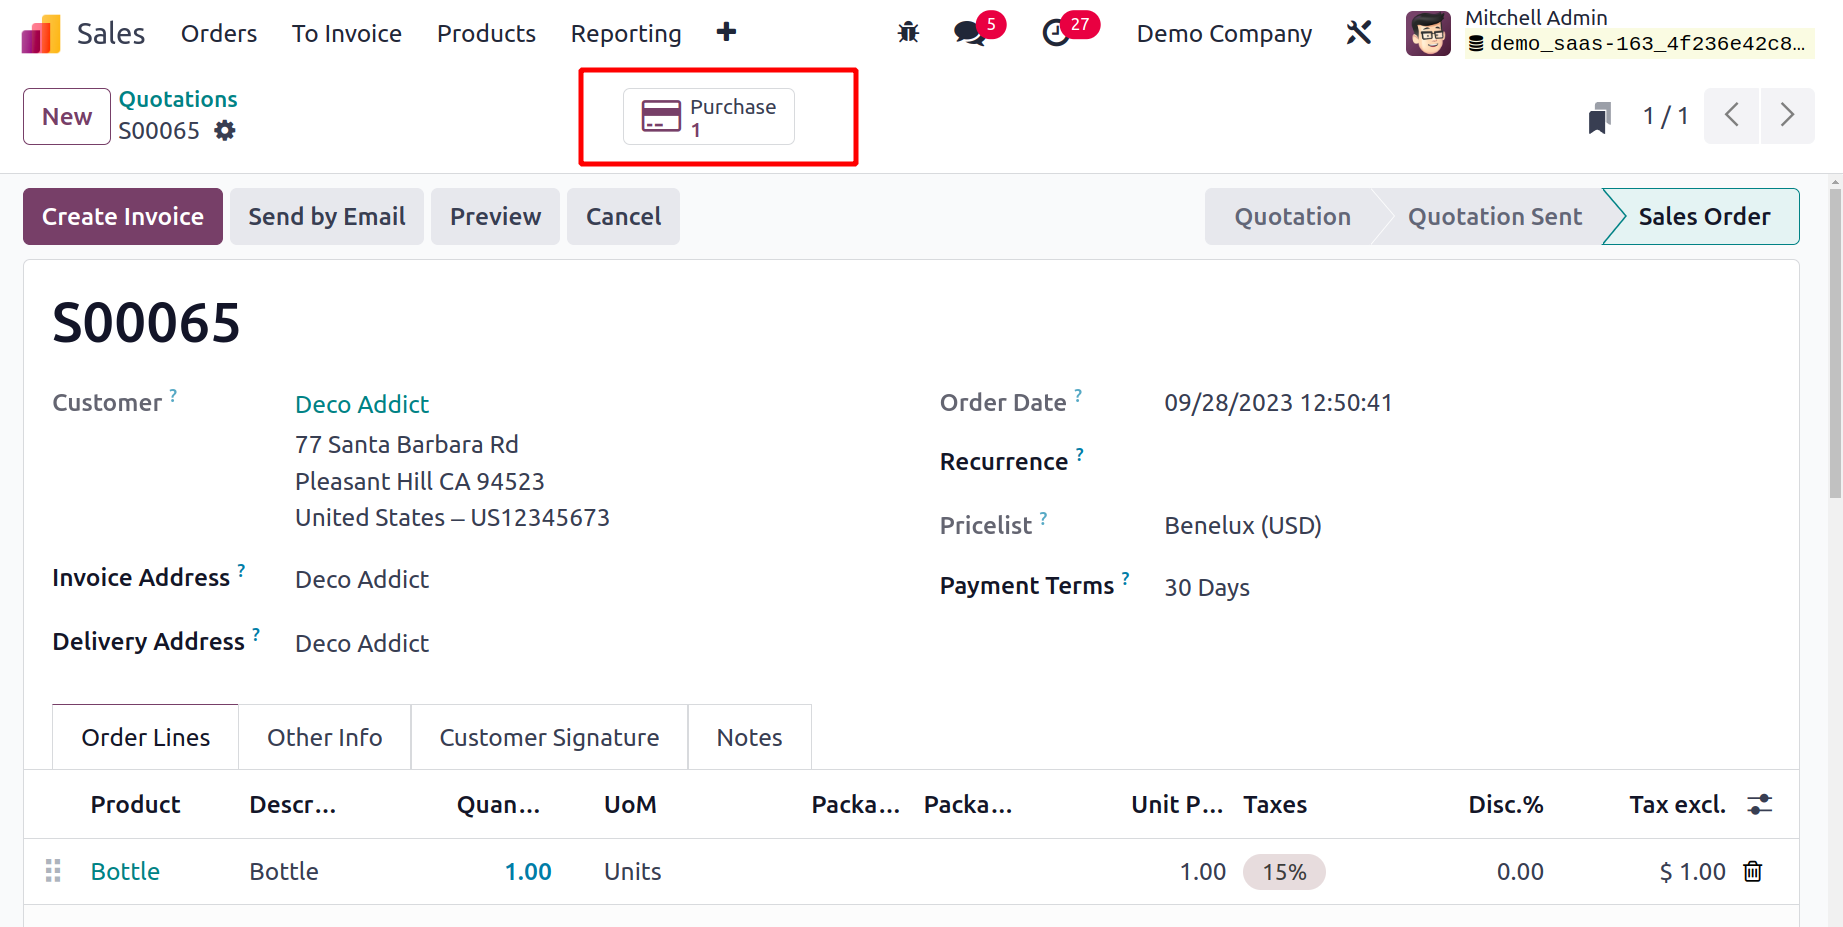 Using the window's smart button, you can view the recently generated purchase order.
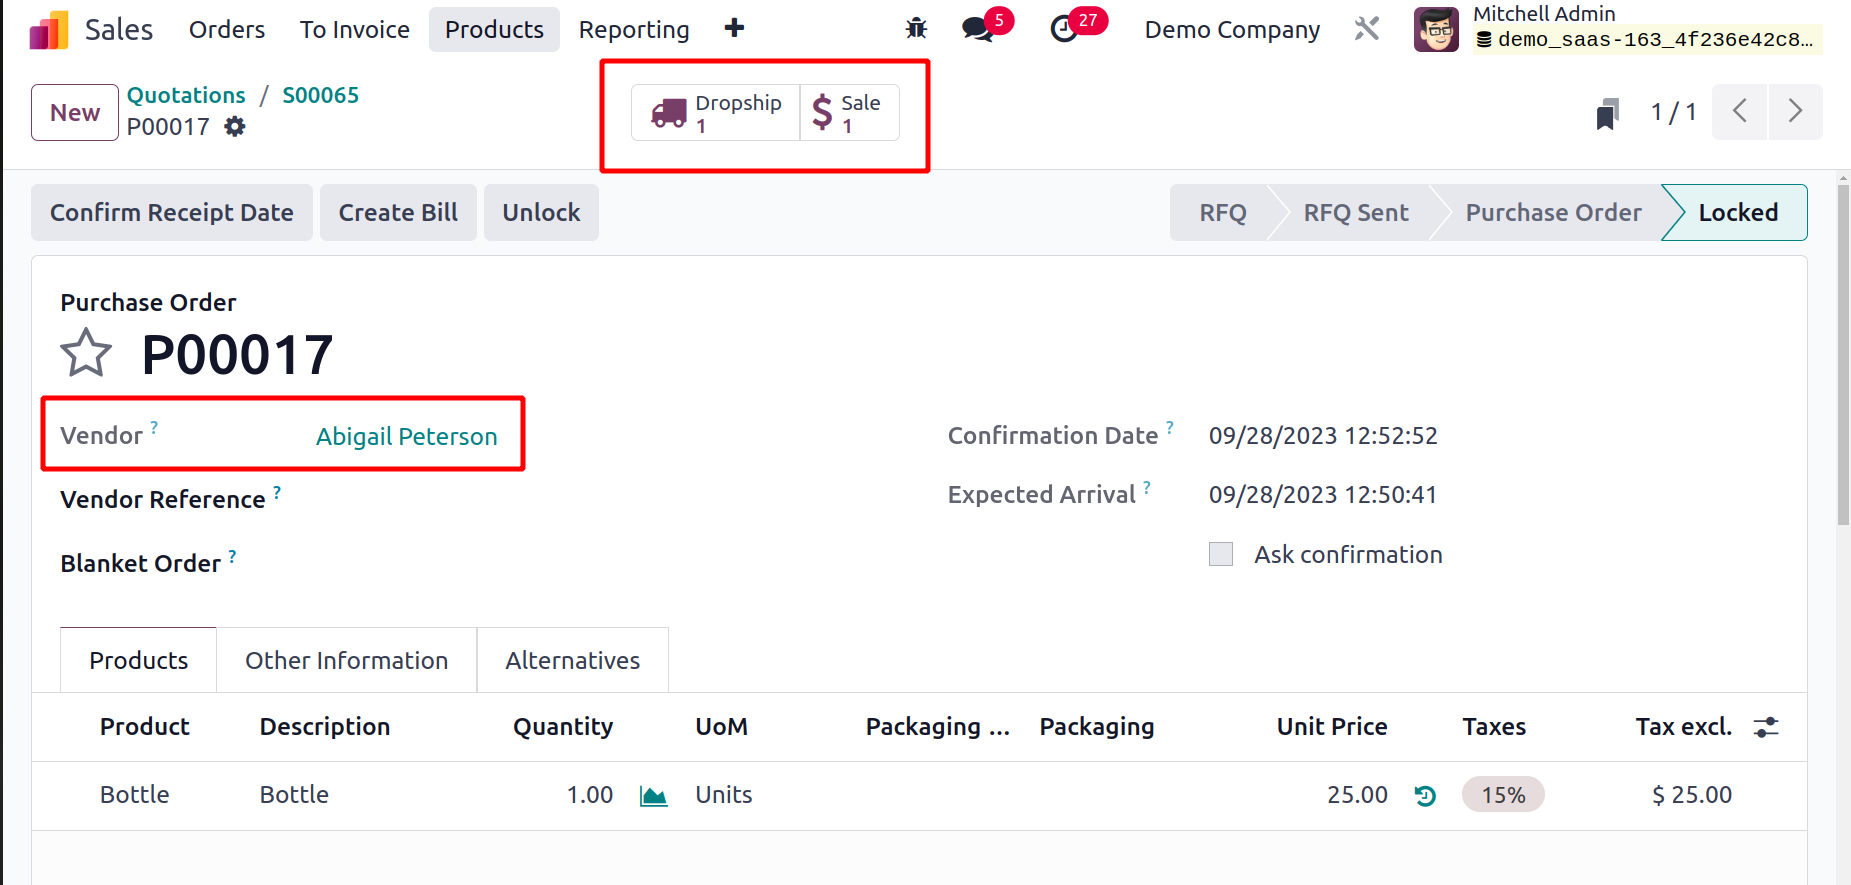 You can Validate the Dropship in a new window by clicking the Dropship smart button.
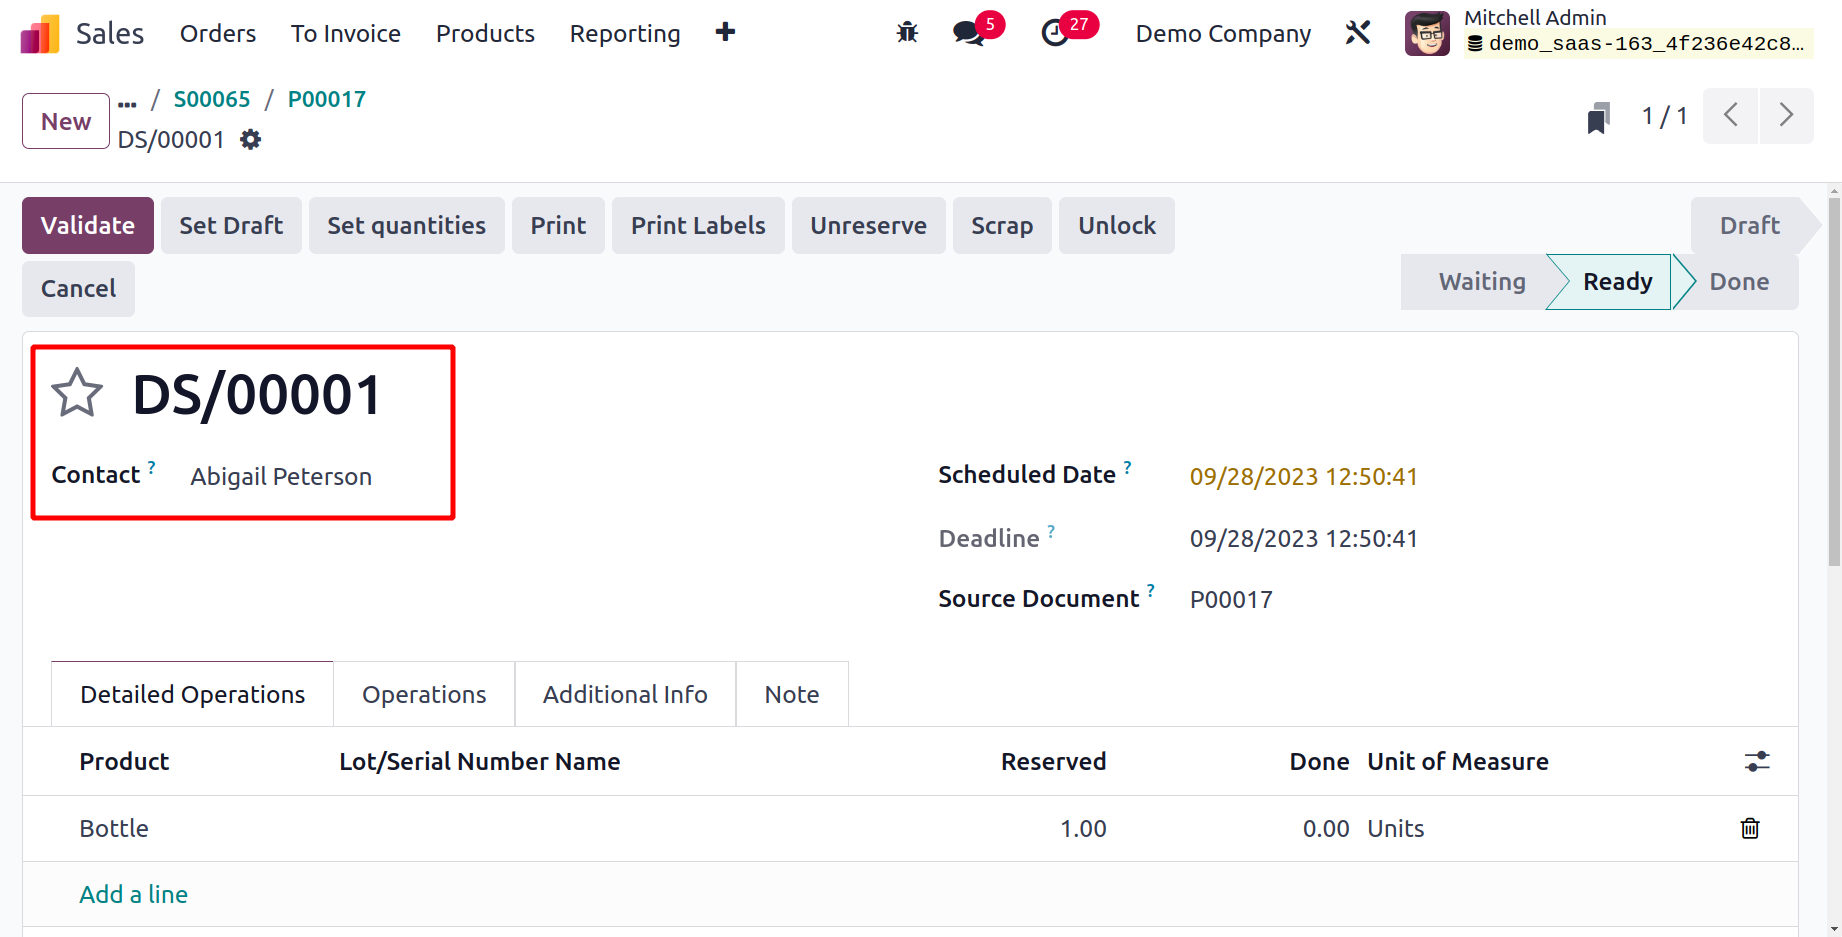 How Odoo17 manages dropships is as follows.
Purchase Order Approval
You can ask your manager to approve orders over a minimum amount in the Odoo17 Purchase module. This can be accomplished by turning on the Settings menu's Purchase Order Approval option, as illustrated below.
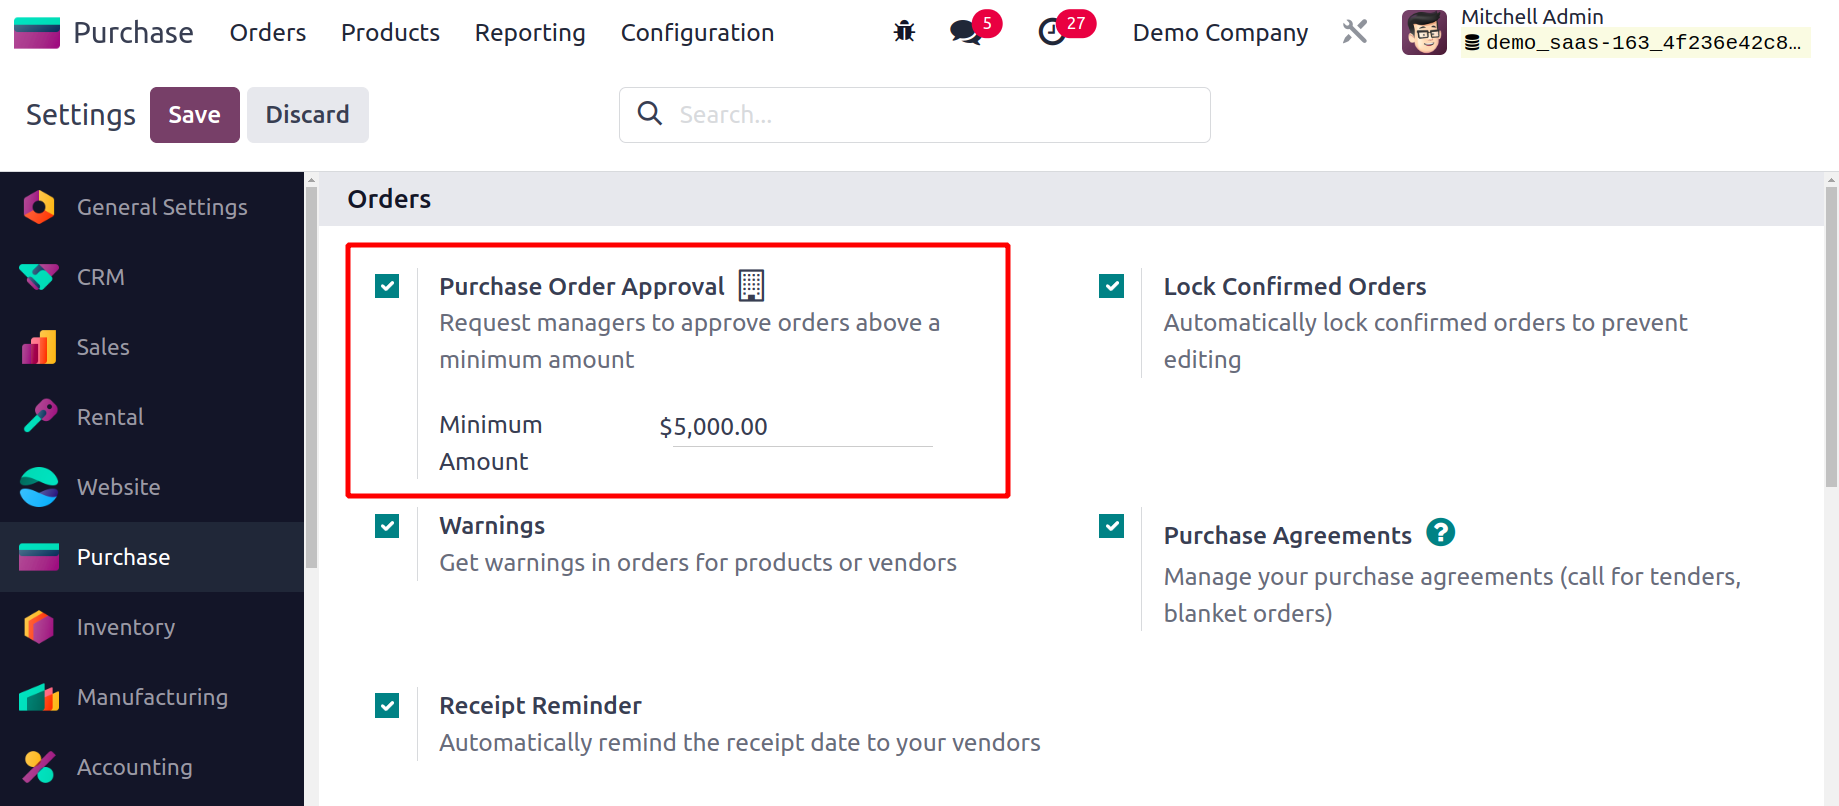 Once you turn on this feature, you will have access to an extra field where you may choose the Minimum Amount.
Reporting
The Odoo 17 Purchase module's enhanced Reporting feature, which is available, will provide insightful reports on the purchases made by your business. You can use reports you produce on a daily, monthly, or annual basis to evaluate your purchasing activity. The dynamic purchase reporting platform will assist you in performing pivot tables and graphical analyses of data.
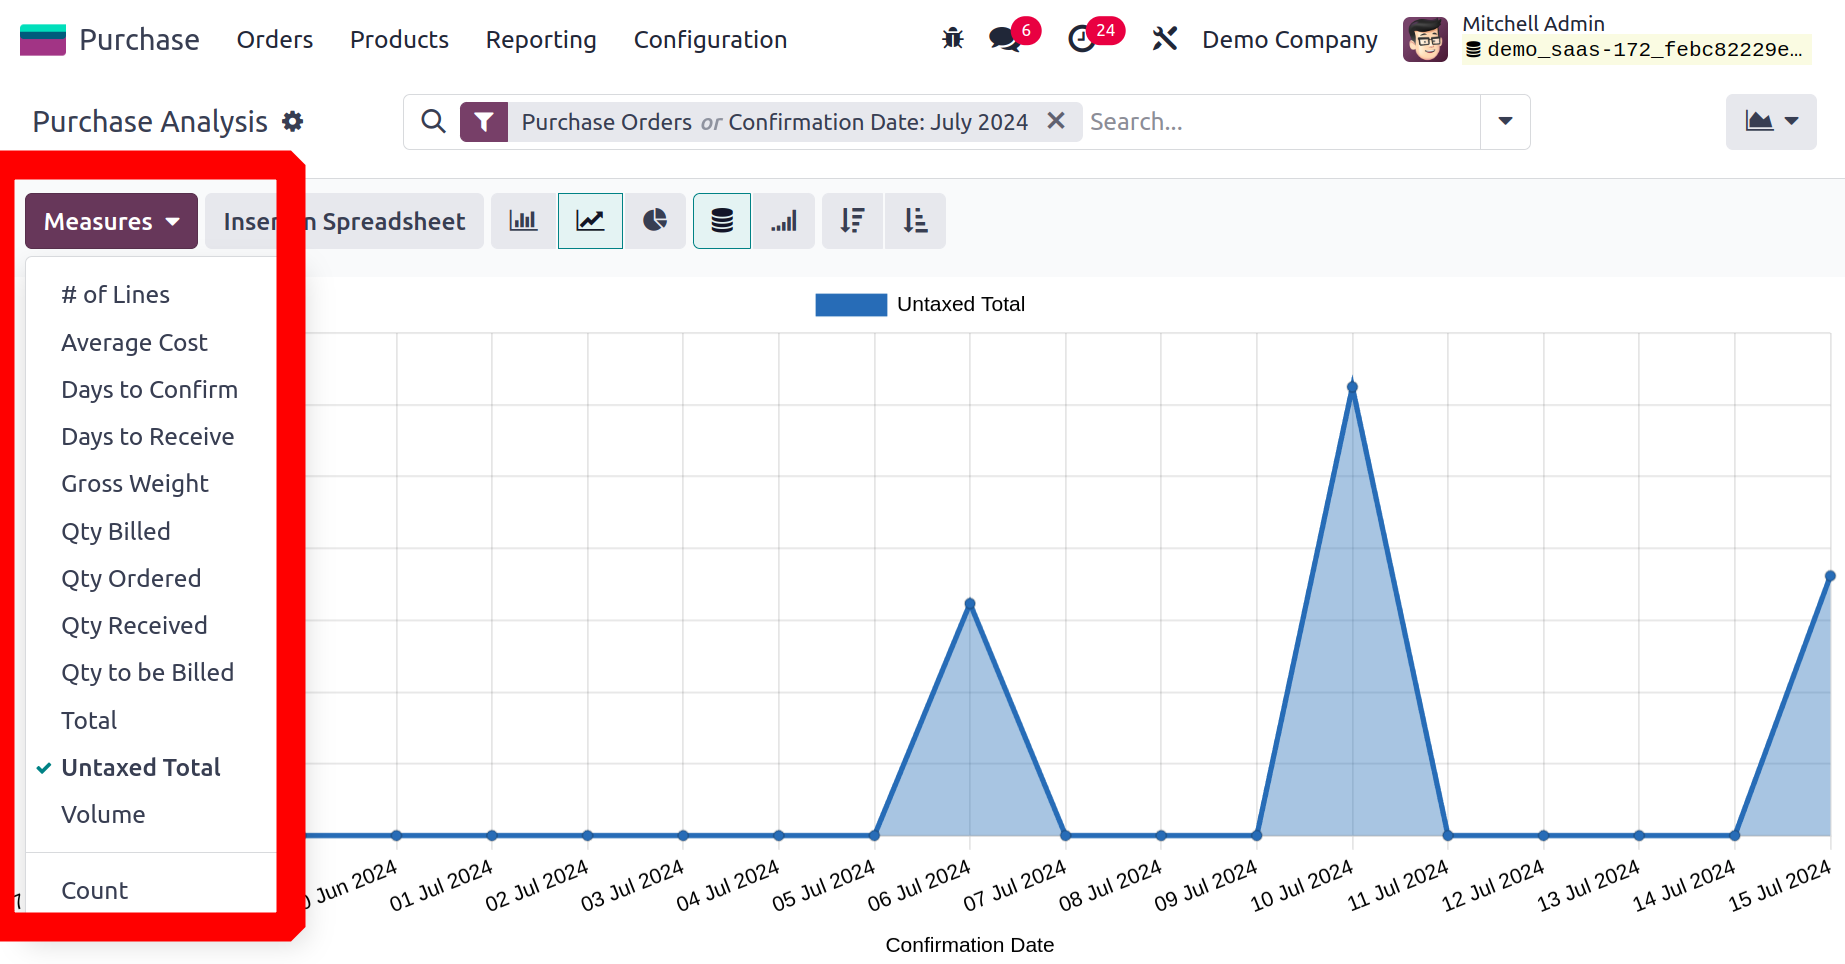
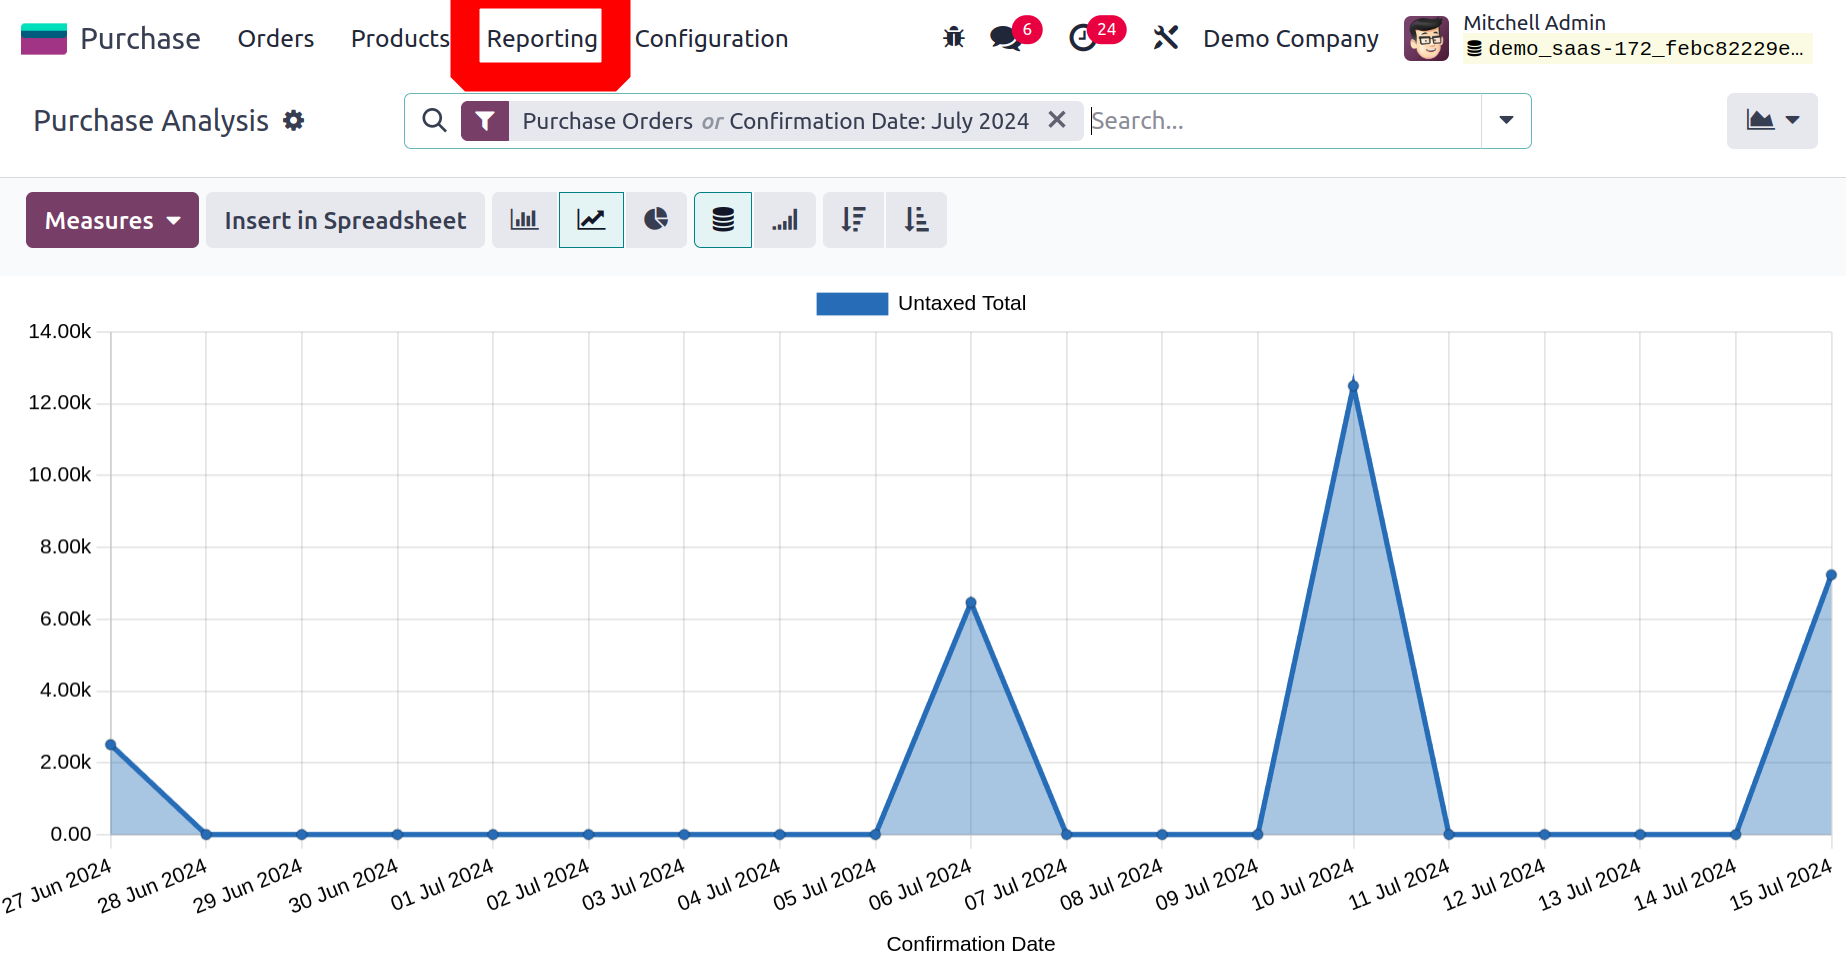 The line chart showing the untaxed total of the purchases depending on their confirmation date is displayed in the screenshot up top. Depending on your preference, you can view the graphic reports as line, bar, or pie charts. You can arrange the Line and Bar charts either in ascending or descending order.Average Cost, Days to Confirm, Days to Receive, Gross Weight, Quantity Billed, Quantity Ordered, Quantity Received, Quantity to be Billed, Total, Untaxed Total, Volume, and Count are some of the options for the Measures.
 The Request for Quotations, Purchase Orders, Confirmation Date Last Year, Order Date, and Confirmation Date can all be used to filter the report. You can add new custom filters to your reports using the Add Custom Filter option. In a similar vein, the platform for purchase reporting will also provide you with default Group By options.
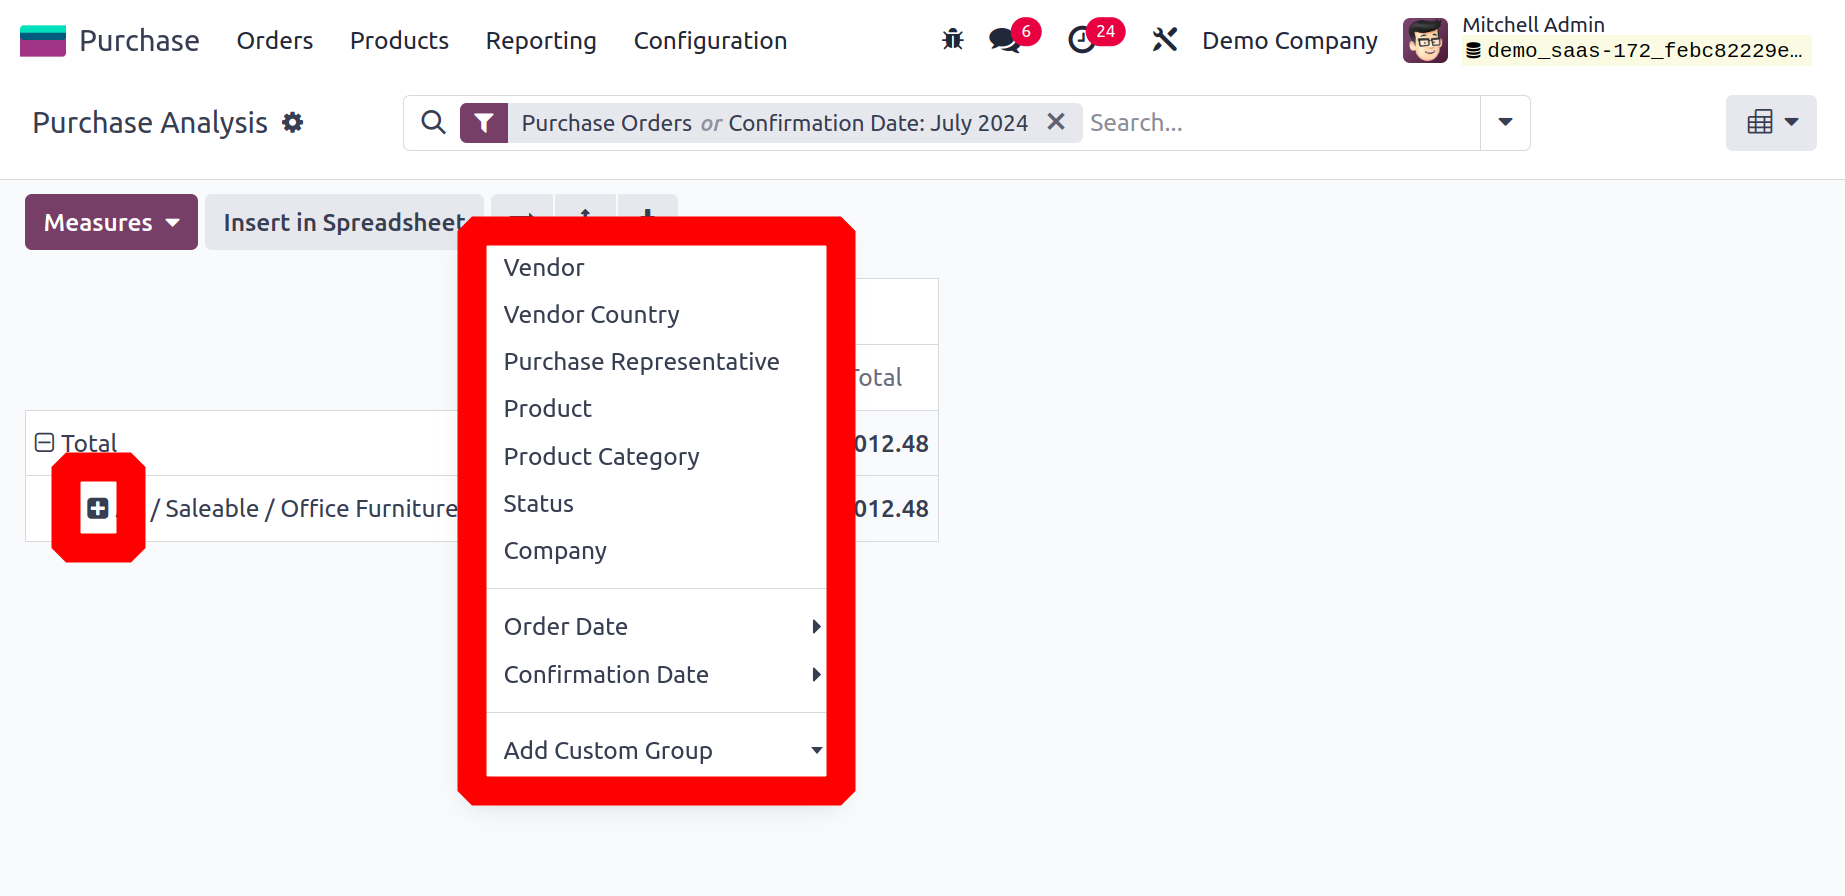
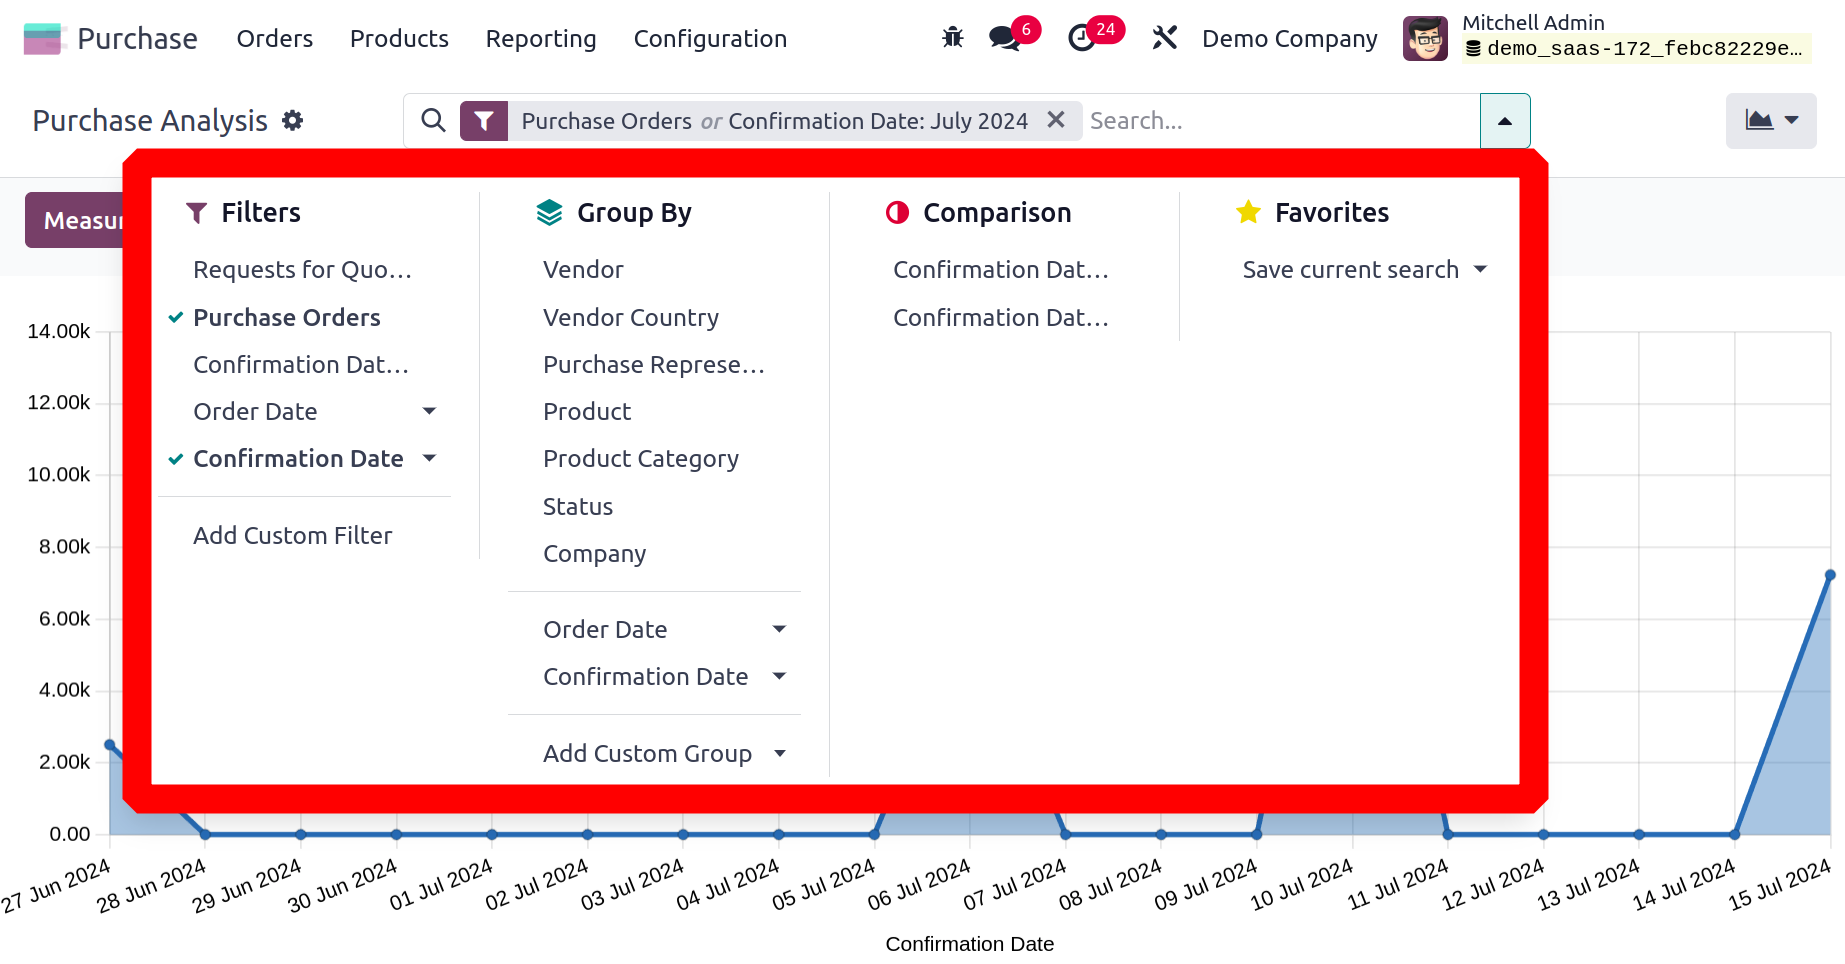 Vendor, Vendor Country, Purchase Representative, Product, Product Category, Status, Company, Order Date, and Confirmation Date are among the criteria you can use to group the reports. To build a custom group by options, click the Add Custom Group button.Let's now examine the Purchase report's pivot view.
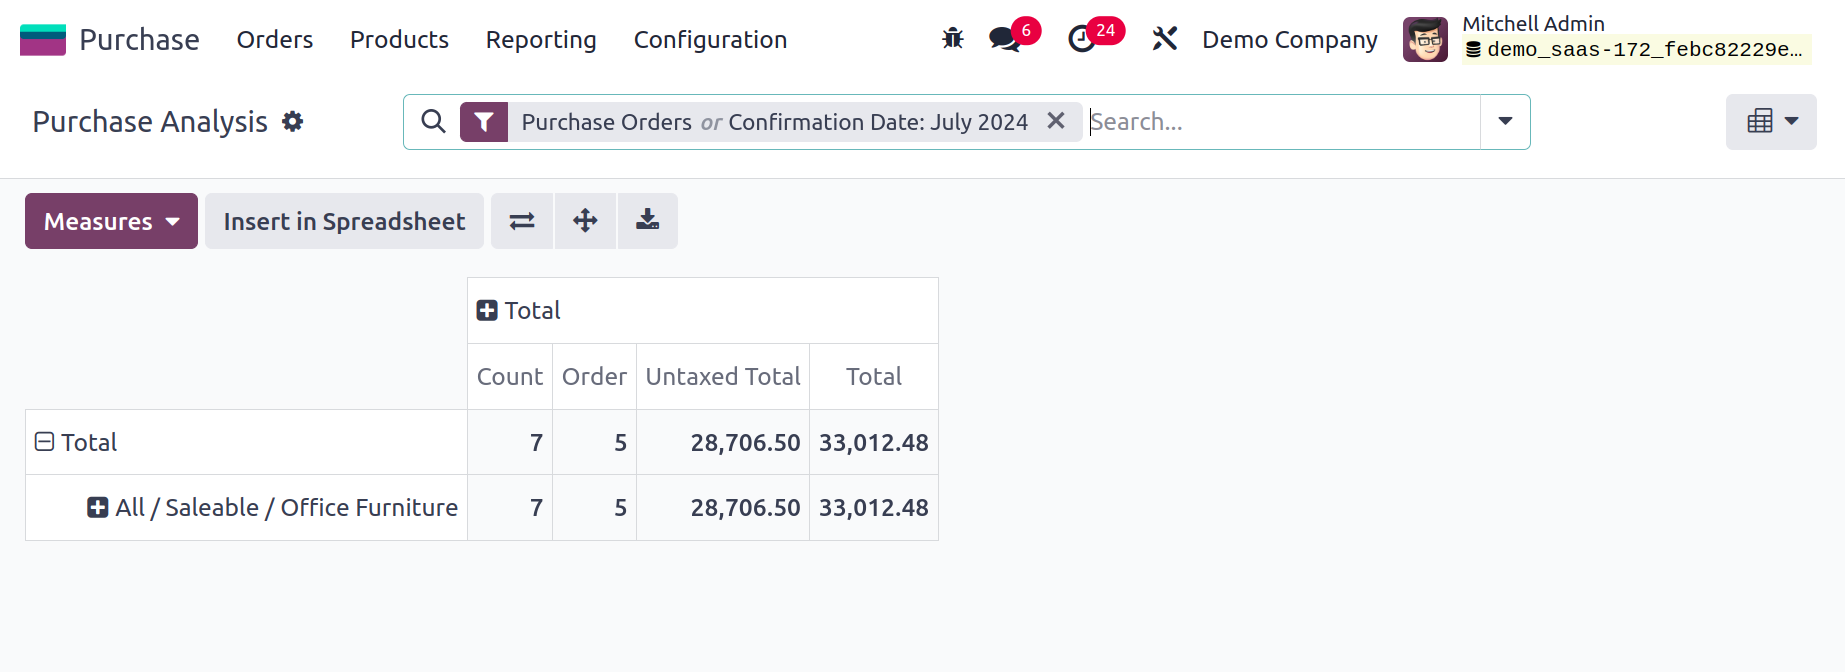 You may add more data to the table by clicking the tiny plus icon. Using the Insert Spreadsheet button, you may turn the report into a spreadsheet. The purchase reports can be modified to your specifications so you can easily analyze them.
 You can easily manage all your purchase-related operations with the help of the specialized purchase management system included in the new Odoo 17.


